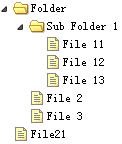
1. EasyUI uses tags to create a tree menu
A tree can be created from markers. The easyui tree menu (Tree) can also be defined in the

Create a tree menu (Tree)
 <ul class="easyui-tree">
  <li>
   <span>Folder</span>
   <ul>
    <li>
     <span>Sub Folder 1</span>
     <ul>
      <li><span>File 11</span></li>
      <li><span>File 12</span></li>
      <li><span>File 13</span></li>
     </ul>
    </li>
    <li><span>File 2</span></li>
    <li><span>File 3</span></li>
   </ul>
  </li>
  <li><span>File21</span></li>
</ul>2. Create asynchronous tree menu with EasyUI
In order to create an asynchronous tree menu (Tree), each tree node must have an 'id' attribute, which will be submitted back to the server to retrieve child node data.

Create a tree menu (Tree)
 <ul id="tt" class="easyui-tree"
 url="tree2_getdata.php">
 </ul>
Server side code
 $id = isset($_POST['id']) ? intval($_POST['id']) : 0;

 include 'conn.php';

 $result = array();
 $rs = mysql_query("select * from nodes where parentId=$id");
 while($row = mysql_fetch_array($rs)){
 $node = array();
 $node['id'] = $row['id'];
 $node['text'] = $row['name'];
 $node['state'] = has_child($row['id']) ? 'closed' : 'open';
 array_push($result,$node);
 }

 echo json_encode($result);

 function has_child($id){
 $rs = mysql_query("select count(*) from nodes where parentId=$id");
 $row = mysql_fetch_array($rs);
 return $row[0] > 0 ? true : false;
 }
3. Add nodes to EasyUI tree menu
This section shows you how to attach nodes to the tree menu (Tree). We will create a food tree containing fruit and vegetable nodes, and then add some other fruits to the existing fruit nodes.

Create a food tree
First, we create the food tree, the code looks like this:
 <div style="width:200px;height:auto;border:1px solid #ccc;">
 <ul id="tt" class="easyui-tree" url="tree_data.json"></ul>
 </div>
Please note that the tree component is defined in the
Then we select the fruit node by clicking on the node and we will add some other fruit data. Execute the getSelected method to get the processing node:
var node = $('#tt').tree('getSelected');
The return result of the getSelected method is a javascript object, which has an id, text, and target attributes. The target attribute is a DOM object that refers to the selected node, and its append method will be used to append child nodes.
Additional Node
var node = $('#tt').tree('getSelected');
 if (node){
 var nodes = [{
 "id":13,
 "text":"Raspberry"
 },{
 "id":14,
 "text":"Cantaloupe"
 }];
 $('#tt').tree('append', {
 parent:node.target,
 data:nodes
 });
 }
When adding some fruits, you will see:

As you can see, it is not that difficult to attach nodes using easyui’s Tree plug-in.
4. EasyUI creates a tree menu with check boxes
easyui’s Tree plugin allows you to create a checkbox tree. If you click a node's checkbox, the clicked node information will be inherited up and down. For example: click on the checkbox of the 'tomato' node and you will see that the 'Vegetables' node is now only partially selected.

Create checkbox tree
<ul id="tt" class="easyui-tree"
 url="data/tree_data.json"
 checkbox="true">
</ul>
5. EasyUI tree menu drag and drop control
When using the Tree plug-in in an application, the drag and drop functions are required to allow the user to change the position of nodes. To enable drag and drop operations, all you need to do is set the 'dnd' property of the Tree plugin to true.

Create a tree menu (Tree)
$('#tt').tree({
 dnd: true,
 url: 'tree_data.json'
});
When a drop operation occurs on a tree node, the 'onDrop' event will be triggered, and you should do some or more operations, such as saving the node state to the remote server, etc.
onDrop: function(targetNode, source, point){
 var targetId = $(target).tree('getNode', targetNode).id;
 $.ajax({
 url: '...',
 type: 'post',
 dataType: 'json',
 data: {
 id: source.id,
 targetId: targetId,
 point: point
 }
 });
}
六、EasyUI树形菜单加载父/子节点
通常表示一个树节点的方式就是在每一个节点存储一个 parentid。 这个也被称为邻接列表模型。 直接加载这些数据到树形菜单(Tree)是不允许的。 但是我们可以在加载树形菜单之前,把它转换为标准标准的树形菜单(Tree)数据格式。 树(Tree)插件提供一个 'loadFilter' 选项函数,它可以实现这个功能。 它提供一个机会来改变任何一个进入数据。 本教程向您展示如何使用 'loadFilter' 函数加载父/子节点到树形菜单(Tree)。

父/子节点数据
[
{"id":1,"parendId":0,"name":"Foods"},
{"id":2,"parentId":1,"name":"Fruits"},
{"id":3,"parentId":1,"name":"Vegetables"},
{"id":4,"parentId":2,"name":"apple"},
{"id":5,"parentId":2,"name":"orange"},
{"id":6,"parentId":3,"name":"tomato"},
{"id":7,"parentId":3,"name":"carrot"},
{"id":8,"parentId":3,"name":"cabbage"},
{"id":9,"parentId":3,"name":"potato"},
{"id":10,"parentId":3,"name":"lettuce"}
]
使用 'loadFilter' 创建树形菜单(Tree)
$('#tt').tree({
 url: 'data/tree6_data.json',
 loadFilter: function(rows){
 return convert(rows);
 }
});
转换的实现
function convert(rows){
 function exists(rows, parentId){
 for(var i=0; i<rows.length; i++){
 if (rows[i].id == parentId) return true;
 }
 return false;
 }

 var nodes = [];
 // get the top level nodes
 for(var i=0; i<rows.length; i++){
 var row = rows[i];
 if (!exists(rows, row.parentId)){
 nodes.push({
 id:row.id,
 text:row.name
 });
 }
 }

 var toDo = [];
 for(var i=0; i<nodes.length; i++){
 toDo.push(nodes[i]);
 }
 while(toDo.length){
 var node = toDo.shift(); // the parent node
 // get the children nodes
 for(var i=0; i<rows.length; i++){
 var row = rows[i];
 if (row.parentId == node.id){
 var child = {id:row.id,text:row.name};
 if (node.children){
  node.children.push(child);
 } else {
  node.children = [child];
 }
 toDo.push(child);
 }
 }
 }
 return nodes;
}以上就是关于EasyUI创建树形菜单的基本操作方法,希望大家可以学以致用,真正的掌握其中的技巧。


