
 Web Front-end
JS Tutorial
Detailed explanation of the steps to implement pull-down refresh on Vue mobile terminal
Web Front-end
JS Tutorial
Detailed explanation of the steps to implement pull-down refresh on Vue mobile terminal
Detailed explanation of the steps to implement pull-down refresh on Vue mobile terminal
This time I will bring you a detailed explanation of the steps to implement pull-down refresh on the vue mobile terminal. What are the precautions for implementing pull-down refresh on the vue mobile terminal. The following is a practical case, let's take a look.
After reading this article, I believe everyone can also make a refresh and load component of their own
Before talking about this function, everyone must first understand how to trigger the scroll bar event.
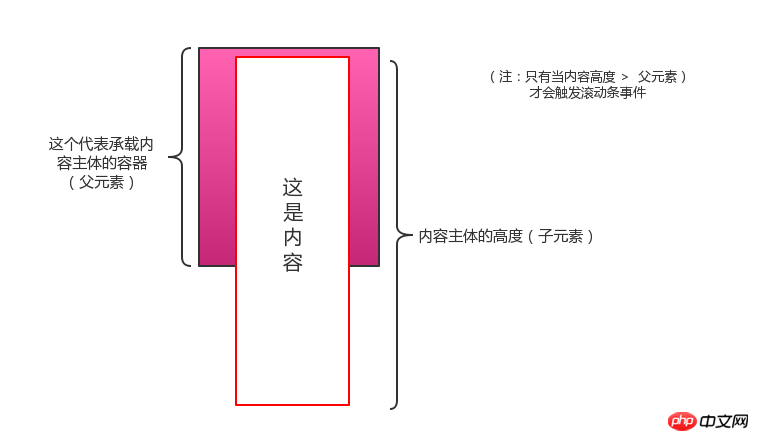
Be sure to note that all scroll events must meet this condition, and the same is true for horizontal scroll bars.
As long as the width of the child element is greater than the width of the parent element That's it. (The next article will talk about how to implement a horizontal scroll bar)
Get to the point! ! !
Let’s first look at how to analyze this pull-down refresh.
Three events on the mobile side to be used: touchstart (finger pressed), touchmove (finger moved), touchend (finger left)
Pull-down refresh is (touchstart => touchmove (Move down) =>touchend) a process
General idea:
Drop-down is mainly related to the finger touching the y-axis point
1. Record the coordinate point where the finger presses the y-axis
2. Record the distance the finger moves when it moves (note: to judge whether the finger moves up or down, up Shifting means scrolling)
3. Start the pull-down refresh event
Look at the code:
In vue, you need to register the event in methods, in Bind to the parent element. Everyone here should be building projects using vue-cli!
If not, I will give you a link later, which contains the already built project structure. Contains the source code and demo of this plug-in. 1
<template>
  <p class="parent">
    <p class="child"></p>
  </p>
</template>
<script>
export default {
  data(){
    return {
      top: 0,
      startY: 0,     // 保存 y轴点的位置
      touching: false,  // 代表当前是否处于 下拉刷新行为的开关,也就是当属于滚动行为时,就要退出该事件机制
    }
  },
  methods: {
    touchStart(e) {
      // e代表该事件对象,e.targetTouches[0].pageY可以拿到手指按下的 y轴点
      this.startY = e.targetTouches[0].pageY
      // 开启下拉刷新状态
      this.touching = true
    },
    touchMove(e) {
      //这个 touchMove,只要页面在动都会发生的,所以 touching就起作用了
      // 如果 touching为false,说明这个正在移动的页面不是我们想要的下拉刷新,有可能是用户随意拉了一下页面而已,或者其他
      if(!this.touching) return
      // 获取移动的距离
      let diff = e.targetToc=uches[0].pageY - this.startY
      //判断是向上拉还是向下拉
      if(diff >0) {
        e.preventDefault()
      } else {
        return
      }
      //这个this.top要对应绑定到该元素的transform: translateY(+top+ 'px')上,不然是无法拉动的
      // 因此这里还要对偏移高度做一下处理,直接设置diff +(this.state === 2 ? 40 : 0) 太快了,因为拉取幅度太大
      // 让diff*0.25这样子就差不多了
       this.top = Math.floor(diff*0.25) + (this.state === 2 ? 40 : 0)
      if(this.top >= 40){
        this.state = 1  //代表正在拉取
      } else {
        this.state = 0 // 代表初始转态
      }
    },
    touchEnd(e) {
      this.touching = false
      if(this.state === 2) {
        this.top = 40
        return
      }
      // 判断抬起时的高度,是大于40 就开启刷新
      if(this.top >= 40) {
        this.refresh()
      } else {
        this.state = 0
        this.top = 0
      }
    },
    refresh() {
      this.state = 2
      this.top = 40
      const self = this
      // 这里可以调用父组件的方法去请求刷新接口
      this.$emit('getRefresh', function(self){
        //传个回调过去,请求完数据就复原
        self.state = 0
        self.top = 0
      })
    }
  }
}
</script>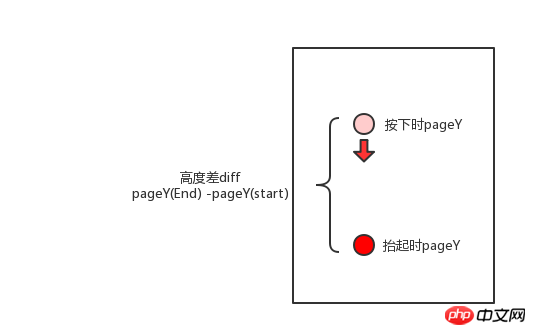
I believe you have mastered the method after reading the case in this article. For more exciting information, please pay attention to other related articles on the PHP Chinese website!
Recommended reading:
Node.js application settings sandbox environment usage method
vue2.0 mobile terminal Pull-down refresh and pull-up loading functions
The above is the detailed content of Detailed explanation of the steps to implement pull-down refresh on Vue mobile terminal. For more information, please follow other related articles on the PHP Chinese website!

Hot AI Tools

Undresser.AI Undress
AI-powered app for creating realistic nude photos

AI Clothes Remover
Online AI tool for removing clothes from photos.

Undress AI Tool
Undress images for free

Clothoff.io
AI clothes remover

AI Hentai Generator
Generate AI Hentai for free.

Hot Article
Hot Tools

Notepad++7.3.1
Easy-to-use and free code editor

SublimeText3 Chinese version
Chinese version, very easy to use

Zend Studio 13.0.1
Powerful PHP integrated development environment

Dreamweaver CS6
Visual web development tools

SublimeText3 Mac version
God-level code editing software (SublimeText3)
Hot Topics


 How to make Google Maps the default map in iPhone
Apr 17, 2024 pm 07:34 PM
How to make Google Maps the default map in iPhone
Apr 17, 2024 pm 07:34 PM
The default map on the iPhone is Maps, Apple's proprietary geolocation provider. Although the map is getting better, it doesn't work well outside the United States. It has nothing to offer compared to Google Maps. In this article, we discuss the feasible steps to use Google Maps to become the default map on your iPhone. How to Make Google Maps the Default Map in iPhone Setting Google Maps as the default map app on your phone is easier than you think. Follow the steps below – Prerequisite steps – You must have Gmail installed on your phone. Step 1 – Open the AppStore. Step 2 – Search for “Gmail”. Step 3 – Click next to Gmail app
 6 Ways to Refresh Web Pages on iPhone
Feb 05, 2024 pm 02:00 PM
6 Ways to Refresh Web Pages on iPhone
Feb 05, 2024 pm 02:00 PM
When you browse the web on your iPhone, the loaded content is temporarily stored as long as the browser app remains open. However, the website updates content regularly, so refreshing the page is an effective way to clear out old data and see the latest published content. This way, you always have the latest information and experiences. If you want to refresh the page on iPhone, the following post will explain you all the methods. How to Refresh Web Pages on Safari [4 Methods] There are several methods to refresh the pages you are viewing on the Safari App on iPhone. Method 1: Use the Refresh Button The easiest way to refresh a page you have open on Safari is to use the Refresh option on your browser's tab bar. If Safa
 This Apple ID is not yet in use in the iTunes Store: Fix
Jun 10, 2024 pm 05:42 PM
This Apple ID is not yet in use in the iTunes Store: Fix
Jun 10, 2024 pm 05:42 PM
When logging into iTunesStore using AppleID, this error saying "This AppleID has not been used in iTunesStore" may be thrown on the screen. There are no error messages to worry about, you can fix them by following these solution sets. Fix 1 – Change Shipping Address The main reason why this prompt appears in iTunes Store is that you don’t have the correct address in your AppleID profile. Step 1 – First, open iPhone Settings on your iPhone. Step 2 – AppleID should be on top of all other settings. So, open it. Step 3 – Once there, open the “Payment & Shipping” option. Step 4 – Verify your access using Face ID. step
 F5 refresh key not working in Windows 11
Mar 14, 2024 pm 01:01 PM
F5 refresh key not working in Windows 11
Mar 14, 2024 pm 01:01 PM
Is the F5 key not working properly on your Windows 11/10 PC? The F5 key is typically used to refresh the desktop or explorer or reload a web page. However, some of our readers have reported that the F5 key is refreshing their computers and not working properly. How to enable F5 refresh in Windows 11? To refresh your Windows PC, just press the F5 key. On some laptops or desktops, you may need to press the Fn+F5 key combination to complete the refresh operation. Why doesn't F5 refresh work? If pressing the F5 key fails to refresh your computer or you are experiencing issues on Windows 11/10, it may be due to the function keys being locked. Other potential causes include the keyboard or F5 key
 Steps to upgrade to the latest version of WeChat (Easily master the upgrade method to the latest version of WeChat)
Jun 01, 2024 pm 10:24 PM
Steps to upgrade to the latest version of WeChat (Easily master the upgrade method to the latest version of WeChat)
Jun 01, 2024 pm 10:24 PM
WeChat is one of the social media platforms in China that continuously launches new versions to provide a better user experience. Upgrading WeChat to the latest version is very important to keep in touch with family and colleagues, to stay in touch with friends, and to keep abreast of the latest developments. 1. Understand the features and improvements of the latest version. It is very important to understand the features and improvements of the latest version before upgrading WeChat. For performance improvements and bug fixes, you can learn about the various new features brought by the new version by checking the update notes on the WeChat official website or app store. 2. Check the current WeChat version We need to check the WeChat version currently installed on the mobile phone before upgrading WeChat. Click to open the WeChat application "Me" and then select the menu "About" where you can see the current WeChat version number. 3. Open the app
 Detailed explanation of the steps to obtain Win11 system administrator permissions
Mar 08, 2024 pm 09:09 PM
Detailed explanation of the steps to obtain Win11 system administrator permissions
Mar 08, 2024 pm 09:09 PM
Windows 11, as the latest operating system launched by Microsoft, is deeply loved by users. In the process of using Windows 11, sometimes we need to obtain system administrator rights in order to perform some operations that require permissions. Next, we will introduce in detail the steps to obtain system administrator rights in Windows 11. The first step is to click "Start Menu". You can see the Windows icon in the lower left corner. Click the icon to open the "Start Menu". In the second step, find and click "
 How to close WeChat video account? Detailed steps for closing WeChat video account
Jan 02, 2024 pm 11:57 PM
How to close WeChat video account? Detailed steps for closing WeChat video account
Jan 02, 2024 pm 11:57 PM
To understand how to close a WeChat video account, you first need to know that WeChat, a chat software, is very rich in functions. For different people, WeChat video accounts have different functions. For ordinary people, the WeChat video account is just a channel for sharing short videos shot by individuals, and they can share some interesting WeChat videos. For others, they use WeChat video accounts to attract traffic. Naturally, they may not be able to accept comments from trolls and trolls, so they may want to close the WeChat video account. Next, the editor of this website will introduce to you how to close the WeChat video account. Friends who are interested, come and take a look. The steps to close the WeChat video account are as follows: We first open WeChat, enter the main page, and click " I" button, which will take us to a
 Safari zoom issue on iPhone: Here's the fix
Apr 20, 2024 am 08:08 AM
Safari zoom issue on iPhone: Here's the fix
Apr 20, 2024 am 08:08 AM
If you don't have control over the zoom level in Safari, getting things done can be tricky. So if Safari looks zoomed out, that might be a problem for you. Here are a few ways you can fix this minor zoom issue in Safari. 1. Cursor magnification: Select "Display" > "Cursor magnification" in the Safari menu bar. This will make the cursor more visible on the screen, making it easier to control. 2. Move the mouse: This may sound simple, but sometimes just moving the mouse to another location on the screen may automatically return it to normal size. 3. Use Keyboard Shortcuts Fix 1 – Reset Zoom Level You can control the zoom level directly from the Safari browser. Step 1 – When you are in Safari
