
 Backend Development
Python Tutorial
Detailed explanation of PyTorch batch training and optimizer comparison
Backend Development
Python Tutorial
Detailed explanation of PyTorch batch training and optimizer comparison
Detailed explanation of PyTorch batch training and optimizer comparison

This article mainly introduces the detailed explanation of PyTorch batch training and optimizer comparison. It introduces in detail what PyTorch batch training and PyTorch's Optimizer optimizer are. It is of great practical value. Friends in need can refer to it
1. PyTorch batch training
1. Overview
PyTorch provides a way to package data for batch training Training tool - DataLoader. When using it, we only need to first convert our data into the tensor form of torch, then convert it into a Dataset format that torch can recognize, and then put the Dataset into the DataLoader.
import torch
import torch.utils.data as Data

torch.manual_seed(1) # 设定随机数种子

BATCH_SIZE = 5

x = torch.linspace(1, 10, 10)
y = torch.linspace(0.5, 5, 10)

# 将数据转换为torch的dataset格式
torch_dataset = Data.TensorDataset(data_tensor=x, target_tensor=y)

# 将torch_dataset置入Dataloader中
loader = Data.DataLoader(
  dataset=torch_dataset,
  batch_size=BATCH_SIZE, # 批大小
  # 若dataset中的样本数不能被batch_size整除的话,最后剩余多少就使用多少
  shuffle=True, # 是否随机打乱顺序
  num_workers=2, # 多线程读取数据的线程数
  )

for epoch in range(3):
  for step, (batch_x, batch_y) in enumerate(loader):
    print('Epoch:', epoch, '|Step:', step, '|batch_x:',
       batch_x.numpy(), '|batch_y', batch_y.numpy())
'''''
shuffle=True
Epoch: 0 |Step: 0 |batch_x: [ 6. 7. 2. 3. 1.] |batch_y [ 3.  3.5 1.  1.5 0.5]
Epoch: 0 |Step: 1 |batch_x: [ 9. 10.  4.  8.  5.] |batch_y [ 4.5 5.  2.  4.  2.5]
Epoch: 1 |Step: 0 |batch_x: [ 3.  4.  2.  9. 10.] |batch_y [ 1.5 2.  1.  4.5 5. ]
Epoch: 1 |Step: 1 |batch_x: [ 1. 7. 8. 5. 6.] |batch_y [ 0.5 3.5 4.  2.5 3. ]
Epoch: 2 |Step: 0 |batch_x: [ 3. 9. 2. 6. 7.] |batch_y [ 1.5 4.5 1.  3.  3.5]
Epoch: 2 |Step: 1 |batch_x: [ 10.  4.  8.  1.  5.] |batch_y [ 5.  2.  4.  0.5 2.5]

shuffle=False
Epoch: 0 |Step: 0 |batch_x: [ 1. 2. 3. 4. 5.] |batch_y [ 0.5 1.  1.5 2.  2.5]
Epoch: 0 |Step: 1 |batch_x: [ 6.  7.  8.  9. 10.] |batch_y [ 3.  3.5 4.  4.5 5. ]
Epoch: 1 |Step: 0 |batch_x: [ 1. 2. 3. 4. 5.] |batch_y [ 0.5 1.  1.5 2.  2.5]
Epoch: 1 |Step: 1 |batch_x: [ 6.  7.  8.  9. 10.] |batch_y [ 3.  3.5 4.  4.5 5. ]
Epoch: 2 |Step: 0 |batch_x: [ 1. 2. 3. 4. 5.] |batch_y [ 0.5 1.  1.5 2.  2.5]
Epoch: 2 |Step: 1 |batch_x: [ 6.  7.  8.  9. 10.] |batch_y [ 3.  3.5 4.  4.5 5. ]
'''2. TensorDataset
classtorch.utils.data.TensorDataset(data_tensor, target_tensor)
TensorDataset class To package the samples and their labels into a torch Dataset, data_tensor, and target_tensor are both tensors.
3. DataLoader
##Copy code The code is as follows:
classtorch.utils .data.DataLoader(dataset, batch_size=1, shuffle=False, sampler=None,num_workers=0, collate_fn=2. PyTorch's Optimizer
In this experiment, first construct a set of data sets, convert the format and place it in the DataLoader. spare. Define a default neural network with a fixed structure, and then build a neural network for each optimizer. The difference between each neural network is only the optimizer. By recording the loss value during the training process, the optimization process of each optimizer is finally presented on the image. Code implementation:import torch
import torch.utils.data as Data
import torch.nn.functional as F
from torch.autograd import Variable
import matplotlib.pyplot as plt
torch.manual_seed(1) # 设定随机数种子
# 定义超参数
LR = 0.01 # 学习率
BATCH_SIZE = 32 # 批大小
EPOCH = 12 # 迭代次数
x = torch.unsqueeze(torch.linspace(-1, 1, 1000), dim=1)
y = x.pow(2) + 0.1*torch.normal(torch.zeros(*x.size()))
#plt.scatter(x.numpy(), y.numpy())
#plt.show()
# 将数据转换为torch的dataset格式
torch_dataset = Data.TensorDataset(data_tensor=x, target_tensor=y)
# 将torch_dataset置入Dataloader中
loader = Data.DataLoader(dataset=torch_dataset, batch_size=BATCH_SIZE,
shuffle=True, num_workers=2)
class Net(torch.nn.Module):
def __init__(self):
super(Net, self).__init__()
self.hidden = torch.nn.Linear(1, 20)
self.predict = torch.nn.Linear(20, 1)
def forward(self, x):
x = F.relu(self.hidden(x))
x = self.predict(x)
return x
# 为每个优化器创建一个Net
net_SGD = Net()
net_Momentum = Net()
net_RMSprop = Net()
net_Adam = Net()
nets = [net_SGD, net_Momentum, net_RMSprop, net_Adam]
# 初始化优化器
opt_SGD = torch.optim.SGD(net_SGD.parameters(), lr=LR)
opt_Momentum = torch.optim.SGD(net_Momentum.parameters(), lr=LR, momentum=0.8)
opt_RMSprop = torch.optim.RMSprop(net_RMSprop.parameters(), lr=LR, alpha=0.9)
opt_Adam = torch.optim.Adam(net_Adam.parameters(), lr=LR, betas=(0.9, 0.99))
optimizers = [opt_SGD, opt_Momentum, opt_RMSprop, opt_Adam]
# 定义损失函数
loss_function = torch.nn.MSELoss()
losses_history = [[], [], [], []] # 记录training时不同神经网络的loss值
for epoch in range(EPOCH):
print('Epoch:', epoch + 1, 'Training...')
for step, (batch_x, batch_y) in enumerate(loader):
b_x = Variable(batch_x)
b_y = Variable(batch_y)
for net, opt, l_his in zip(nets, optimizers, losses_history):
output = net(b_x)
loss = loss_function(output, b_y)
opt.zero_grad()
loss.backward()
opt.step()
l_his.append(loss.data[0])
labels = ['SGD', 'Momentum', 'RMSprop', 'Adam']
for i, l_his in enumerate(losses_history):
plt.plot(l_his, label=labels[i])
plt.legend(loc='best')
plt.xlabel('Steps')
plt.ylabel('Loss')
plt.ylim((0, 0.2))
plt.show()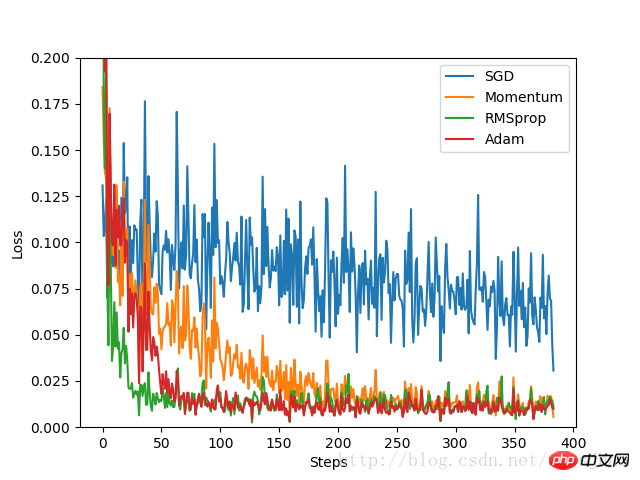
3. Other supplements
1. Python’s zip function
zip function accepts any Multiple (including 0 and 1) sequences are taken as parameters and a tuple list is returned.x = [1, 2, 3] y = [4, 5, 6] z = [7, 8, 9] xyz = zip(x, y, z) print xyz [(1, 4, 7), (2, 5, 8), (3, 6, 9)] x = [1, 2, 3] x = zip(x) print x [(1,), (2,), (3,)] x = [1, 2, 3] y = [4, 5, 6, 7] xy = zip(x, y) print xy [(1, 4), (2, 5), (3, 6)]
Introduction to Pytorch mnist classification example
The above is the detailed content of Detailed explanation of PyTorch batch training and optimizer comparison. For more information, please follow other related articles on the PHP Chinese website!

Hot AI Tools

Undresser.AI Undress
AI-powered app for creating realistic nude photos

AI Clothes Remover
Online AI tool for removing clothes from photos.

Undress AI Tool
Undress images for free

Clothoff.io
AI clothes remover

Video Face Swap
Swap faces in any video effortlessly with our completely free AI face swap tool!

Hot Article
Hot Tools

Notepad++7.3.1
Easy-to-use and free code editor

SublimeText3 Chinese version
Chinese version, very easy to use

Zend Studio 13.0.1
Powerful PHP integrated development environment

Dreamweaver CS6
Visual web development tools

SublimeText3 Mac version
God-level code editing software (SublimeText3)
Hot Topics
 1387
1387
 52
52

 How to enable nfc function on Xiaomi Mi 14 Pro?
Mar 19, 2024 pm 02:28 PM
How to enable nfc function on Xiaomi Mi 14 Pro?
Mar 19, 2024 pm 02:28 PM
Nowadays, the performance and functions of mobile phones are becoming more and more powerful. Almost all mobile phones are equipped with convenient NFC functions to facilitate users for mobile payment and identity authentication. However, some Xiaomi 14Pro users may not know how to enable the NFC function. Next, let me introduce it to you in detail. How to enable nfc function on Xiaomi 14Pro? Step 1: Open the settings menu of your phone. Step 2: Find and click the "Connect and Share" or "Wireless & Networks" option. Step 3: In the Connection & Sharing or Wireless & Networks menu, find and click "NFC & Payments". Step 4: Find and click "NFC Switch". Normally, the default is off. Step 5: On the NFC switch page, click the switch button to switch it to on.
 How to use TikTok on Huawei Pocket2 remotely?
Mar 18, 2024 pm 03:00 PM
How to use TikTok on Huawei Pocket2 remotely?
Mar 18, 2024 pm 03:00 PM
Sliding the screen through the air is a feature of Huawei that is highly praised in the Huawei mate60 series. This feature uses the laser sensor on the phone and the 3D depth camera of the front camera to complete a series of functions that do not require The function of touching the screen is, for example, to use TikTok from a distance. But how should Huawei Pocket 2 use TikTok from a distance? How to take screenshots from the air with Huawei Pocket2? 1. Open the settings of Huawei Pocket2 2. Then select [Accessibility]. 3. Click to open [Smart Perception]. 4. Just turn on the [Air Swipe Screen], [Air Screenshot], and [Air Press] switches. 5. When using it, you need to stand 20~40CM away from the screen, open your palm, and wait until the palm icon appears on the screen.
 How to set line spacing in WPS Word to make the document neater
Mar 20, 2024 pm 04:30 PM
How to set line spacing in WPS Word to make the document neater
Mar 20, 2024 pm 04:30 PM
WPS is our commonly used office software. When editing long articles, the fonts are often too small to be seen clearly, so the fonts and the entire document are adjusted. For example: adjusting the line spacing of the document will make the entire document very clear. I suggest that all friends learn this operation step. I will share it with you today. The specific operation steps are as follows, come and take a look! Open the WPS text file you want to adjust, find the paragraph setting toolbar in the [Start] menu, and you will see the small line spacing setting icon (shown as a red circle in the picture). 2. Click the small inverted triangle in the lower right corner of the line spacing setting, and the corresponding line spacing value will appear. You can choose 1 to 3 times the line spacing (as shown by the arrow in the figure). 3. Or right-click the paragraph and it will appear.
 TrendX Research Institute: Merlin Chain project analysis and ecological inventory
Mar 24, 2024 am 09:01 AM
TrendX Research Institute: Merlin Chain project analysis and ecological inventory
Mar 24, 2024 am 09:01 AM
According to statistics on March 2, the total TVL of Bitcoin’s second-layer network MerlinChain has reached US$3 billion. Among them, Bitcoin ecological assets accounted for 90.83%, including BTC worth US$1.596 billion and BRC-20 assets worth US$404 million. Last month, MerlinChain’s total TVL reached US$1.97 billion within 14 days of launching staking activities, surpassing Blast, which was launched in November last year and is also the most recent and equally eye-catching. On February 26, the total value of NFTs in the MerlinChain ecosystem exceeded US$420 million, becoming the public chain project with the highest NFT market value besides Ethereum. Project Introduction MerlinChain is an OKX support
 The difference and comparative analysis between C language and PHP
Mar 20, 2024 am 08:54 AM
The difference and comparative analysis between C language and PHP
Mar 20, 2024 am 08:54 AM
Differences and comparative analysis between C language and PHP C language and PHP are both common programming languages, but they have obvious differences in many aspects. This article will conduct a comparative analysis of C language and PHP and illustrate the differences between them through specific code examples. 1. Syntax and usage: C language: C language is a process-oriented programming language, mainly used for system-level programming and embedded development. The syntax of C language is relatively simple and low-level, can directly operate memory, and is efficient and flexible. C language emphasizes the programmer's completeness of the program
 Detailed explanation of GQA, the attention mechanism commonly used in large models, and Pytorch code implementation
Apr 03, 2024 pm 05:40 PM
Detailed explanation of GQA, the attention mechanism commonly used in large models, and Pytorch code implementation
Apr 03, 2024 pm 05:40 PM
GroupedQueryAttention is a multi-query attention method in large language models. Its goal is to achieve the quality of MHA while maintaining the speed of MQA. GroupedQueryAttention groups queries, and queries within each group share the same attention weight, which helps reduce computational complexity and increase inference speed. In this article, we will explain the idea of GQA and how to translate it into code. GQA is in the paper GQA:TrainingGeneralizedMulti-QueryTransformerModelsfromMulti-HeadCheckpoint
 C++ program optimization: time complexity reduction techniques
Jun 01, 2024 am 11:19 AM
C++ program optimization: time complexity reduction techniques
Jun 01, 2024 am 11:19 AM
Time complexity measures the execution time of an algorithm relative to the size of the input. Tips for reducing the time complexity of C++ programs include: choosing appropriate containers (such as vector, list) to optimize data storage and management. Utilize efficient algorithms such as quick sort to reduce computation time. Eliminate multiple operations to reduce double counting. Use conditional branches to avoid unnecessary calculations. Optimize linear search by using faster algorithms such as binary search.
 How to use Xiaomi Mi 14 Ultra AI smart image expansion?
Mar 16, 2024 pm 12:37 PM
How to use Xiaomi Mi 14 Ultra AI smart image expansion?
Mar 16, 2024 pm 12:37 PM
The progress of the times has made many people's incomes higher and higher, and the mobile phones they usually use will be changed frequently. The Xiaomi Mi 14 Ultra recently launched by Xiaomi must be familiar to users. It has very high performance configuration and can provide users with more In order to provide a comfortable and smooth experience, new mobile phones will inevitably encounter many functions that are not used. For example, how to use Xiaomi 14UltraAI smart image expansion? Come and take a look at the usage tutorial below! How to use Xiaomi 14UltraAI smart image expansion? First open Xiaomi 14Ultra, enter the photo album, select the picture you want to enlarge, and enter the photo album editing option. Click Crop Rotate, click Crop, and click Smart Expand in the selection that appears. Finally, choose the way to expand the image according to your own needs.
