Django Admin management tool
This article mainly introduces the Django Admin management tool, which has certain reference value. Now I share it with everyone. Friends in need can refer to it
Django Admin management tool
Django The automatic management tool is part of django.contrib. You can see it in INSTALLED_APPS in the project's setting.py:
INSTALLED_APPS = (    'django.contrib.admin',    'django.contrib.auth',    'django.contrib.contenttypes',    'django.contrib.sessions',    'django.contrib.messages',    'django.contrib.staticfiles',
)
django.contrib is a huge feature set , which is an integral part of Django's code base.
Use management tools
Start the development server, and then access http://127.0.0.1:8000/admin/ in the browser to enter the management interface. We can create a super user through the command python manage.py createsuperuser, as shown below:
python manage.py createsuperuser
Username (leave blank to use 'root'): admin
Email address: admin@wqy.com
Password:
Password (again):
Superuser created successfully.
In order to let the admin interface manage a certain data model. We need to register the data model to admin first. For example, we created the model Student in models.py before, modify admin.py:
from django.contrib import adminfrom stu.models import Student# 1. 注册的第一种方式# admin.site.register(Student, StudentAdmin)# 第二种注册方式@admin.register(Student)class StudentAdmin(admin.ModelAdmin):

    def set_sex(self):
        if self.sex:            return '男'
        return '女'

    # 修改性别字段描述
    set_sex.short_description = '性别'
    # 展示字段
    list_display = ['id', 'name', set_sex]    # 过滤
    list_filter = ['name']    # 搜索
    search_fields = ['name']    # 分页
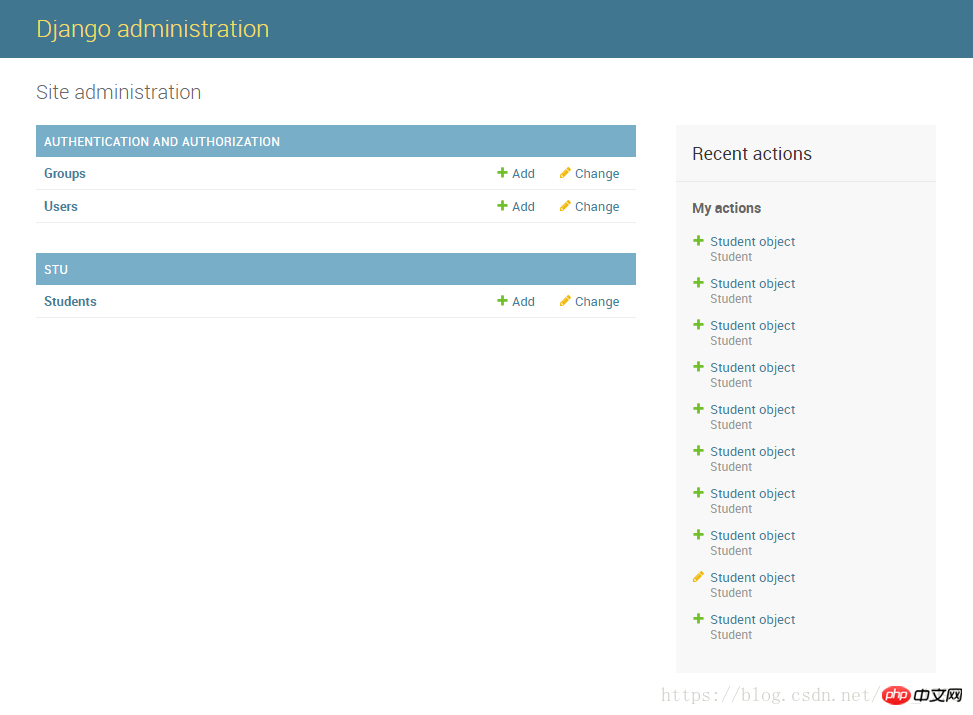
list_per_page = 4Use the command python manage .py runserver Run the program and open the URL http://127.0.0.1:8000/admin/. The interface is as follows: 
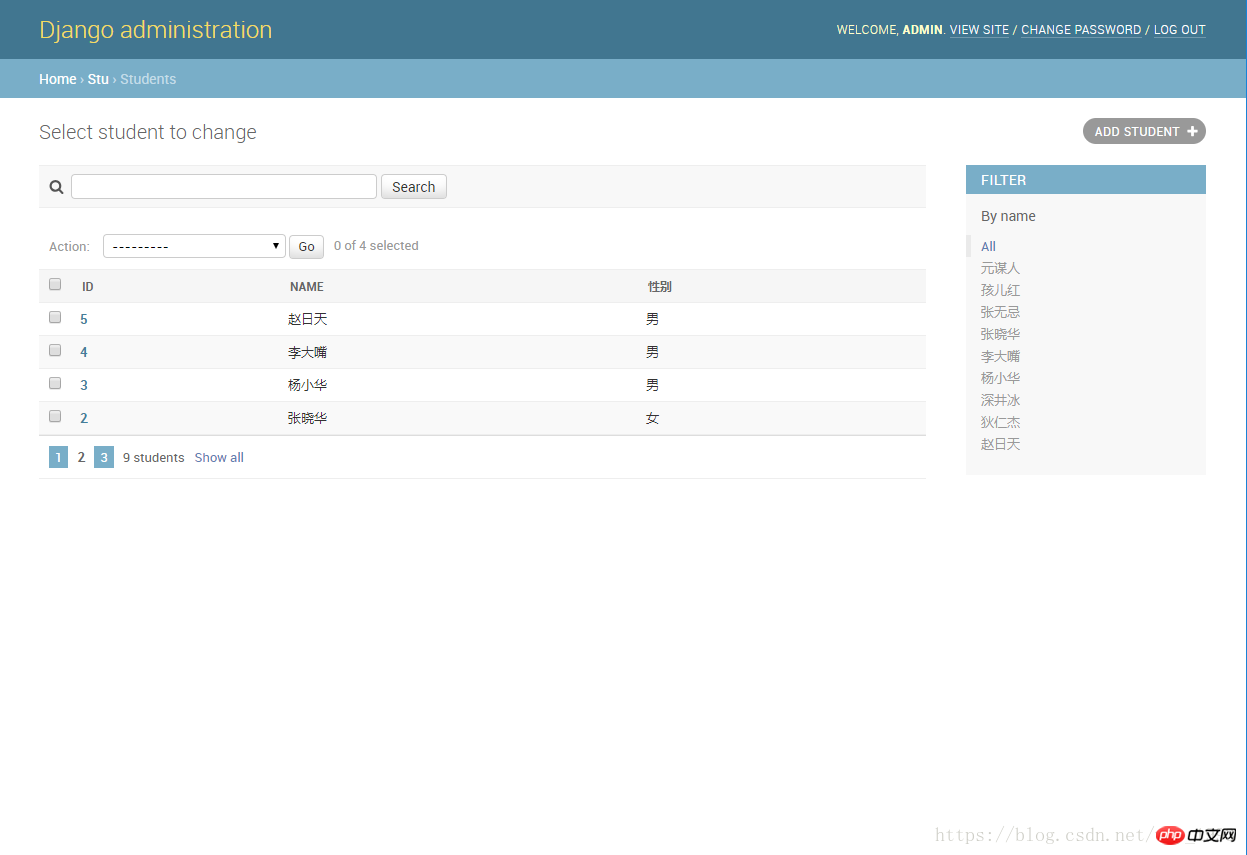
We have added some filtering statements to the above code. Click on student and see the following effect: 
The above is the detailed content of Django Admin management tool. For more information, please follow other related articles on the PHP Chinese website!

Hot AI Tools

Undresser.AI Undress
AI-powered app for creating realistic nude photos

AI Clothes Remover
Online AI tool for removing clothes from photos.

Undress AI Tool
Undress images for free

Clothoff.io
AI clothes remover

Video Face Swap
Swap faces in any video effortlessly with our completely free AI face swap tool!

Hot Article

Hot Tools

Notepad++7.3.1
Easy-to-use and free code editor

SublimeText3 Chinese version
Chinese version, very easy to use

Zend Studio 13.0.1
Powerful PHP integrated development environment

Dreamweaver CS6
Visual web development tools

SublimeText3 Mac version
God-level code editing software (SublimeText3)

Hot Topics
 1387
1387
 52
52
 How to check django version
Dec 01, 2023 pm 02:25 PM
Steps to check the Django version: 1. Open a terminal or command prompt window; 2. Make sure Django has been installed. If Django is not installed, you can use the package management tool to install it and enter the pip install django command; 3. After the installation is complete , you can use python -m django --version to check the Django version.
 Django vs. Flask: A comparative analysis of Python web frameworks
Jan 19, 2024 am 08:36 AM
Django and Flask are both leaders in Python Web frameworks, and they both have their own advantages and applicable scenarios. This article will conduct a comparative analysis of these two frameworks and provide specific code examples. Development Introduction Django is a full-featured Web framework, its main purpose is to quickly develop complex Web applications. Django provides many built-in functions, such as ORM (Object Relational Mapping), forms, authentication, management backend, etc. These features allow Django to handle large
 Django Framework Pros and Cons: Everything You Need to Know
Jan 19, 2024 am 09:09 AM
Django is a complete development framework that covers all aspects of the web development life cycle. Currently, this framework is one of the most popular web frameworks worldwide. If you plan to use Django to build your own web applications, then you need to understand the advantages and disadvantages of the Django framework. Here's everything you need to know, including specific code examples. Django advantages: 1. Rapid development-Djang can quickly develop web applications. It provides a rich library and internal
 How to check django version
Nov 30, 2023 pm 03:08 PM
How to check the django version: 1. To check through the command line, enter the "python -m django --version" command in the terminal or command line window; 2. To check in the Python interactive environment, enter "import django print(django. get_version())" code; 3. Check the settings file of the Django project and find a list named INSTALLED_APPS, which contains installed application information.
 How to upgrade Django version: steps and considerations
Jan 19, 2024 am 10:16 AM
How to upgrade Django version: steps and considerations, specific code examples required Introduction: Django is a powerful Python Web framework that is continuously updated and upgraded to provide better performance and more features. However, for developers using older versions of Django, upgrading Django may face some challenges. This article will introduce the steps and precautions on how to upgrade the Django version, and provide specific code examples. 1. Back up project files before upgrading Djan
 What is the difference between django versions?
Nov 20, 2023 pm 04:33 PM
The differences are: 1. Django 1.x series: This is an early version of Django, including versions 1.0, 1.1, 1.2, 1.3, 1.4, 1.5, 1.6, 1.7, 1.8 and 1.9. These versions mainly provide basic web development functions; 2. Django 2.x series: This is the mid-term version of Django, including 2.0, 2.1, 2.2 and other versions; 3. Django 3.x series: This is the latest version series of Django. Including versions 3.0, 3, etc.
 Is django front-end or back-end?
Nov 21, 2023 pm 02:36 PM
django is the backend. Details: Although Django is primarily a backend framework, it is closely related to front-end development. Through features such as Django's template engine, static file management, and RESTful API, front-end developers can collaborate with back-end developers to build powerful, scalable web applications.
 Django, Flask, and FastAPI: Which framework is right for beginners?
Sep 27, 2023 pm 09:06 PM
Django, Flask, and FastAPI: Which framework is right for beginners? Introduction: In the field of web application development, there are many excellent Python frameworks to choose from. This article will focus on the three most popular frameworks, Django, Flask and FastAPI. We will evaluate their features and discuss which framework is best for beginners to use. At the same time, we will also provide some specific code examples to help beginners better understand these frameworks. 1. Django: Django


