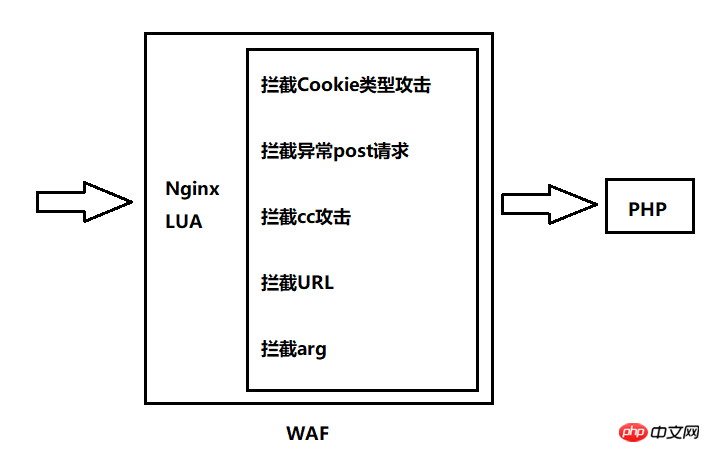
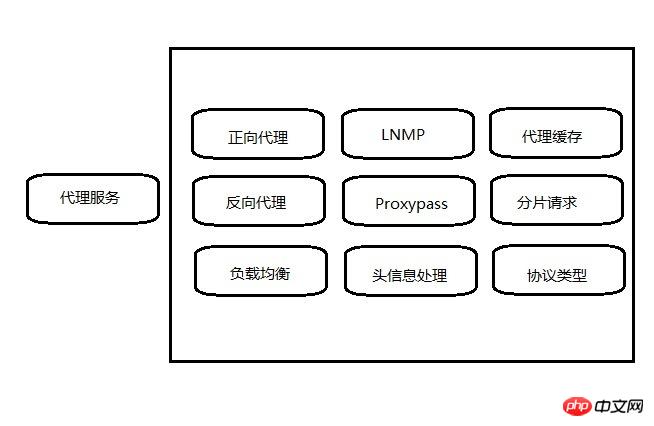
About Nginx architecture
Nginx-Architecture Chapter
1. Nginx FAQ
1. Multiple virtual hosts with the same server_name have priority access
# 三个配置文件:

# testserver1:
server_name testserver1 www.rona1do.top;
root /opt/app/code1;

# testserver2:
server_name testserver2 www.rona1do.top;
root /opt/app/code2;

# testserver3:
server_name testserver3 www.rona1do.top;
root /opt/app/code3;
Configure the three virtual hosts with the same server_name mentioned above The host will access testserver1 first, and the priority of access is based on the server's reading order, that is, the order of file names.
2. Location matching priority
=: Exact matching of ordinary characters, that is, complete matching
^~ : Indicates ordinary character matching, use prefix matching
- ##~ ~
: Indicates performing a regular match (adding is not case-sensitive)
4. The difference between Nginx’s alias and root# 先检查对应的url地址下的文件存不存在,如果不存在找/index.php,类似于重定向 location / { try_file $uri /index.php; }Copy after login
- root
location /request_path/image/ {
    root /local_path/image/;
}
# 请求:http://www.rona1do.top/request_path/image/cat.png
# 查询: /local_path/image/request_path_image/cat.png- alias
location /request_path/image/ {
    alias /local_path/image/;
}
# 请求:http://www.rona1do.top/request_path/image/cat.png
# 查询: /local_path/image/cat.png- In the case of a proxy, remote_addr obtains the proxy's IP, not the user's IP
- x-forwarded-for is easily tampered with
General solution: You can negotiate with the first-level agent and set the header information x_real_ip to record the user’s ip6. Common error codes in Nginx
set x_real_ip=$remote_addr
- 413: request entity too large
- User upload File limit: client_max_body_size
- ## 2. Nginx performance optimization
- Backend service not responding
- Backend service time-out
- Observation indicators (top View status, logs, etc.), stress test
- Understand the business model
- Interface business type, system hierarchical structure
- Performance and Security
- Configuring a firewall that pays too much attention to security will reduce performance
- 2. ab interface stress testing tool
- ab -n 2000 -c 2 http://127.0.0.1/
- -n: Total number of requests
- -c: Number of concurrent requests
- -k : Whether to enable long connections
- 3. System and Nginx performance optimization
- yum install httpd- tools
- Setting method
- System global modification And user locality modification:
- 系统全局性修改、用户局部性修改、进程局部性修改
Configuration File:
/etc/security/limits.conf# root:root用户 root soft nofile 65535 # hard 强制限制、soft 超过会发送提醒(邮件等),不限制 root hard nofile 65535 # *:所有用户 * soft nofile 65535 * hard nofile 65535Copy after loginProcess locality modification
/etc/nginx/nginx.conf# 针对nginx进程进行设置 worker_rlimit_nofile 35535;Copy after login4. CPU affinity
CPU affinity:
Place the process /The most intuitive benefit of binding threads to the CPU is to increase the hit rate of the CPU cache, thereby reducing memory access losses and increasing program speed.Number of physical CPUs:
- cat /proc/cpuinfo | grep "physical id" | sort | uniq | wc -l
CPU core: cat /proc/cpuinfo | grep "cpu cores" | uniq
Core and process usage: press top# first ##, then press - 1
to view the cpu binding status of Nginx:<div class="code" style="position:relative; padding:0px; margin:0px;"><pre class='brush:php;toolbar:false;'># /etc/nginx/nginx.conf # nginx建议数量跟cpu核心数保持一致 worker_processes 2; # 配置cpu亲和 worker_cpu_affinity 0000000000000001 0000000000000010 # 与上一行等价,自动对应(Nginx1.9版本以上) worker_cpu_affinity auto</pre><div class="contentsignin">Copy after login</div></div>
ps -eo pid, args,psr | grep [n]ginx
5. Nginx general configuration optimization<div class="code" style="position:relative; padding:0px; margin:0px;"><pre class='brush:php;toolbar:false;'># nginx服务使用nginx用户(最好不要使用root用户)
user nginx;
# cpu亲和(最好跟核心数保持一致)
worker_processes 2;
worker_cpu_affinity auto;
# error的日志级别设置为warn
error_log /var/log/nginx/error.log warn;
pid /var/run/nginx.pid;
# 文件句柄对于进程间的限制(建议1w以上)
worker_rlimit_nofile 35535;
# 事件驱动器
events {
use epoll;
# 限制每一个worker_processes进程可以处理多少个连接
worker_connections 10240;
}
http {
include /etc/nginx/mime.types;
default_type application/octet-stream;
#字符集(服务端响应发送的报文字符集)
charset utf-8;
log_format main &#39;$remote_addr - $remote_user [$time_local] "$request" &#39;
&#39;$status $body_bytes_sent "$http_referer" &#39;
&#39;"$http_user_agent" "$http_x_forwarded_for"&#39;;
access_log /var/log/nginx/access.log main;
# 静态资源的处理
sendfile on;
#tcp_nopush on;
keepalive_timeout 65;
# gzip压缩(对于IE6或以下版本对于gzip压缩支持不是很好)
gzip on;
# IE6或以下不进行压缩(兼容)
gzip_disable "MSIE [1-6]\.";
gzip_http_version 1.1;
include /etc/nginx/conf.d/*.conf;
}</pre><div class="contentsignin">Copy after login</div></div>3. Nginx security
1. Common malicious behaviors
Crawling behavior and malicious grabbing and resource theft
- Basic anti-leeching function prevents malicious users from easily crawling external data of the website
secure_link_module, improves encryption verification and effectiveness of data security, suitable for core important data
acces_module, serves the backend and some users Data provides IP prevention and control
2. 常见的攻击手段
后台密码撞库,通过猜测密码字典不断对后台系统尝试性登录,获取后台登录密码
后台登录密码复杂度
access_module,对后台提供IP防控
预警机制(一个IP在一段时间内重复不断请求等)
3. 文件上传漏洞
利用一些可以上传的接口将恶意代码植入到服务器中,再通过url去访问以执行代码
例:http://www.rona1do.top/upload...(Nginx将1.jpg作为php代码执行)
# 文件上传漏洞解决办法
location ^~ /upload {
    root /opt/app/images;
    if ($request_file ~* (.*)\.php){
        return 403;
    }
}4. SQL注入
利用未过滤/未审核用户输入的攻击方法,让应用运行本不应该运行的SQL代码
Nginx+LUA配置WAF防火墙防止SQL注入

ngx_lua_waf 下载地址
使用waf步骤:
git clone https://github.com/loveshell/ngx_lua_waf.gitcd ngx_lua_wafmv ngx_lua_waf /etc/nginx/wafvim /etc/nginx/waf/conf.lua,修改RulePath为对应路径(/etc/nginx/waf/wafconf)vim /etc/nginx/waf/wafconf/post,加入一行,\sor\s+,放sql注入的正则集成waf:
# /etc/nginx/nginx.conf
lua_package_path "/etc/nginx/waf/?.lua";
lua_shared_dict limit 10m;
init_by_lua_file /etc/nginx/waf/init.lua;
access_by_lua_file /etc/nginx/waf/waf.lua
reload Nginx
5. 复杂的访问攻击中CC攻击
waf/conf.lua配置文件中打开防cc攻击配置项CCDeny="on"CCrate="100/60" #每60秒100次请求
四、Nginx总结
定义Nginx在服务体系中的角色
静态资源服务

代理服务

动静分离
设计评估
LVS、keepalive、syslog、Fastcgi
用户权限、日志目录存放
CPU、内存、硬盘
硬件
系统
关联服务
配置注意事项
合理配置
了解原理(HTTP、操作系统...)
关注日志
相关推荐:
The above is the detailed content of About Nginx architecture. For more information, please follow other related articles on the PHP Chinese website!

Hot AI Tools

Undresser.AI Undress
AI-powered app for creating realistic nude photos

AI Clothes Remover
Online AI tool for removing clothes from photos.

Undress AI Tool
Undress images for free

Clothoff.io
AI clothes remover

Video Face Swap
Swap faces in any video effortlessly with our completely free AI face swap tool!

Hot Article

Hot Tools

Notepad++7.3.1
Easy-to-use and free code editor

SublimeText3 Chinese version
Chinese version, very easy to use

Zend Studio 13.0.1
Powerful PHP integrated development environment

Dreamweaver CS6
Visual web development tools

SublimeText3 Mac version
God-level code editing software (SublimeText3)

Hot Topics
 How to configure cloud server domain name in nginx
Apr 14, 2025 pm 12:18 PM
How to configure an Nginx domain name on a cloud server: Create an A record pointing to the public IP address of the cloud server. Add virtual host blocks in the Nginx configuration file, specifying the listening port, domain name, and website root directory. Restart Nginx to apply the changes. Access the domain name test configuration. Other notes: Install the SSL certificate to enable HTTPS, ensure that the firewall allows port 80 traffic, and wait for DNS resolution to take effect.
 How to check the name of the docker container
Apr 15, 2025 pm 12:21 PM
You can query the Docker container name by following the steps: List all containers (docker ps). Filter the container list (using the grep command). Gets the container name (located in the "NAMES" column).
 How to check whether nginx is started
Apr 14, 2025 pm 01:03 PM
How to confirm whether Nginx is started: 1. Use the command line: systemctl status nginx (Linux/Unix), netstat -ano | findstr 80 (Windows); 2. Check whether port 80 is open; 3. Check the Nginx startup message in the system log; 4. Use third-party tools, such as Nagios, Zabbix, and Icinga.
 How to configure nginx in Windows
Apr 14, 2025 pm 12:57 PM
How to configure Nginx in Windows? Install Nginx and create a virtual host configuration. Modify the main configuration file and include the virtual host configuration. Start or reload Nginx. Test the configuration and view the website. Selectively enable SSL and configure SSL certificates. Selectively set the firewall to allow port 80 and 443 traffic.
 How to check nginx version
Apr 14, 2025 am 11:57 AM
The methods that can query the Nginx version are: use the nginx -v command; view the version directive in the nginx.conf file; open the Nginx error page and view the page title.
 How to start nginx server
Apr 14, 2025 pm 12:27 PM
Starting an Nginx server requires different steps according to different operating systems: Linux/Unix system: Install the Nginx package (for example, using apt-get or yum). Use systemctl to start an Nginx service (for example, sudo systemctl start nginx). Windows system: Download and install Windows binary files. Start Nginx using the nginx.exe executable (for example, nginx.exe -c conf\nginx.conf). No matter which operating system you use, you can access the server IP
 How to start containers by docker
Apr 15, 2025 pm 12:27 PM
Docker container startup steps: Pull the container image: Run "docker pull [mirror name]". Create a container: Use "docker create [options] [mirror name] [commands and parameters]". Start the container: Execute "docker start [Container name or ID]". Check container status: Verify that the container is running with "docker ps".
 How to create containers for docker
Apr 15, 2025 pm 12:18 PM
Create a container in Docker: 1. Pull the image: docker pull [mirror name] 2. Create a container: docker run [Options] [mirror name] [Command] 3. Start the container: docker start [Container name]


