Nginx scenario practice
This article mainly introduces the scenario practice of Nginx, which has certain reference value. Now I share it with everyone. Friends in need can refer to it
1. Nginx as a static resource Web service
1. Dynamic resources and static resources
If the page requested by the client is a static web page, the server will directly respond to the client with the content of the static web page. If the client requests a dynamic web page, the server needs to first replace the dynamic web page with a static web page, and then respond to the converted static web page to the client
Several types of static resources
Browser rendering: HTML, CSS, JAVASCRIPT
Pictures: JPEG, GIF, PNG...
Video : FLV, MPEG...
File: TXT, etc. Any download file
2, CDN (Content Delivery Network) content distribution network
The basic idea is to avoid bottlenecks and links on the Internet that may affect the speed and stability of data transmission as much as possible, so as to make content transmission faster and more stable. By placing node servers throughout the network to form a layer of intelligent virtual network based on the existing Internet, the CDN system can real-time analyze the network traffic and the connection and load status of each node, as well as the distance to the user and response time. and other comprehensive information to redirect the user's request to the service node closest to the user. Its purpose is to enable users to obtain the required content nearby, solve the congestion situation of the Internet network, and improve the response speed of users' access to the website.
3. Configuration syntax
sendfile (file reading)
Configuration syntax: sendfile on|off ;
Default: None
Context: http, server, location, if in location
tcp_nopush (when sendfile is turned on, improve the transmission efficiency of network packets)
Configuration syntax: tcp_nopush on|off;
Default: None
Context: http, server, location
tcp_nodelay (under keepalive connection, improve network packets transmission real-time)
Configuration syntax: tcp_nodely on|off;
Default: None
Context: http, server, location
gzip (compression)
Configuration syntax: gzip on|off;
Default: None
Context: http, server, location, if in location
gizp_comp_level (compression ratio)
Configuration syntax: gzip_comp_level level;
Default: none;
Context: http, server, location
gzip_http_version (gzip http version)
Configuration syntax: gzip_http_version 1.0|1.1;
Default: None
- ##Context: http, server, location
- Configuration syntax: gzip_static on|off|always;
- Default: gzip_static off;
- Context: http, server, location
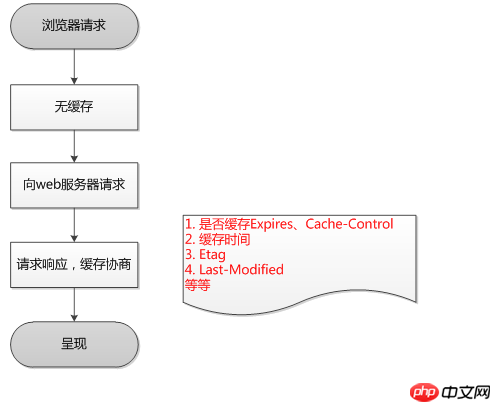
- The browser has no cache:
- Browser request → No cache → Request WEB server → Request response, negotiate → Present
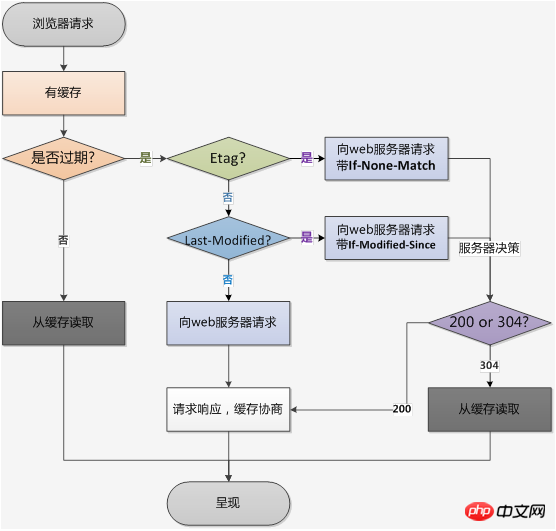
- The client has cache
- Browser request→with cache→verification expiration→present
- Verification expiration mechanism
| Corresponding header information | |||||||||||||||||||||||||||||
|---|---|---|---|---|---|---|---|---|---|---|---|---|---|---|---|---|---|---|---|---|---|---|---|---|---|---|---|---|---|
| Expires, Cache-Control(max-age) | |||||||||||||||||||||||||||||
| Etag | ##Last-Modified There is information verification | ||||||||||||||||||||||||||||
| param | 意义 |
|---|---|
| down | 当前的server暂时不参与负载均衡 |
| weight=num | 权重,num越大,轮询到的概率越大 |
| backup | 预留的备份服务器 |
| max_fails | 允许请求失败的次数 |
| fail_timeout | 经过max_fails失败后,服务暂停的时间(默认是10s) |
| max_conns | 限制最大的接收的连接数 |
调度算法:
| 算法 | 意义 |
|---|---|
| 轮询 | 按时间顺序逐一分配到不同的后端服务器 |
| 加权轮询 | weight值越大,分配到的访问几率越高 |
| ip_hash | 每个请求按访问IP的hash结果分配,这样来自同一个IP就固定访问同一个后端服务器 |
| least_conn | 最少连接数,哪个服务器连接数少就分发 |
| url_hash | 按照访问的URL的hash结果来分配请求,是每个URL定向到同一个后端服务器 |
| hash关键字值 | hash自定义的key |
ip_hash:
只需要在upstream中加入 ip_hash; 即可
缺陷:如果走代理,那么remote_addr就不是用户真实的ip
url_hash(1.7.2版本以后可用):
配置语法:hash key [consistent];
默认:无
Context:upstream
key可以是$request_uri,根据url进行hash
四、Nginx作为缓存服务
1、缓存的类型
服务端缓存。例:memcache、reids
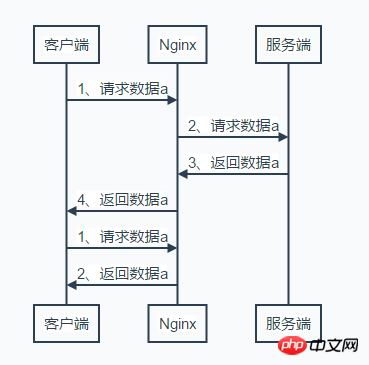
代理缓存。例:Nginx缓存服务端的数据
客户端缓存。

2、常用缓存配置
proxy_cache_path
配置语法proxy_cache_path path [levels=levels] [use_temp_path=on|off] keys_zone=name:size [inactive=time] [max_size] [use_temp_path]...
默认:无
Context:http
proxy_cache
配置语法:proxy_cache zone | off;
默认:proxy_cache off;
Context:http,server,location
proxy_cache_valid(缓存过期周期)
配置语法:proxy_cache_valid [code...] time
默认:无
Context:http、server、location
proxy_cache_key(缓存的维度)
配置语法:proxy_cache_key string;
默认:proxy_cache_key
$scheme$proxy_host$request_uri;Context:http、server、location
常见配置:
proxy_cache_path cache_path levels=1:2 keys_zone=key_name:10m max_size=10g inactive=60m use_temp_path=off;

server {
    loaction / {
        proxy_pass http://ronaldo;
        proxy_cache key_name;
        proxy_cache_valid 200 304 12h;
        proxy_cache_valid any 10m;
        proxy_cache_key $host$uri$is_args$args;
        add_header Nginx-Cache "$upstream_cache_status";

        proxy_next_upstream error timeout invalid_header http_500 http_502 http_503 http_504;
    }
}2、清除指定缓存
rm -rf 缓存目录内容
第三方扩展模块:ngx_cache_purge
3、如何让部分页面不缓存
proxy_no_cache
配置语法:proxy_no_cache string ...;
默认:无
Context:http,server,location
简单示例
if ($request_uri ~ ^/(url_3|login|register|password\/reset)) {
    set $cookie_nocache 1;
}

location / {
    proxy_no_cache $cookie_nocache;
}4、大文件分片请求
slice
语法配置:slice size;
默认:slice 0;
Context:http、server,location
优势:每个子请求收到的数据都会形成一个独立的文件,一个请求断了,其他请求不受影响。
缺点:当文件很大或者slice很小的时候,可能会导致文件描述符耗尽等待情况。
相关推荐:
The above is the detailed content of Nginx scenario practice. For more information, please follow other related articles on the PHP Chinese website!

Hot AI Tools

Undresser.AI Undress
AI-powered app for creating realistic nude photos

AI Clothes Remover
Online AI tool for removing clothes from photos.

Undress AI Tool
Undress images for free

Clothoff.io
AI clothes remover

AI Hentai Generator
Generate AI Hentai for free.

Hot Article

Hot Tools

Notepad++7.3.1
Easy-to-use and free code editor

SublimeText3 Chinese version
Chinese version, very easy to use

Zend Studio 13.0.1
Powerful PHP integrated development environment

Dreamweaver CS6
Visual web development tools

SublimeText3 Mac version
God-level code editing software (SublimeText3)

Hot Topics
 1386
1386
 52
52
 How to check whether nginx is started
Apr 14, 2025 pm 01:03 PM
How to confirm whether Nginx is started: 1. Use the command line: systemctl status nginx (Linux/Unix), netstat -ano | findstr 80 (Windows); 2. Check whether port 80 is open; 3. Check the Nginx startup message in the system log; 4. Use third-party tools, such as Nagios, Zabbix, and Icinga.
 How to configure cloud server domain name in nginx
Apr 14, 2025 pm 12:18 PM
How to configure an Nginx domain name on a cloud server: Create an A record pointing to the public IP address of the cloud server. Add virtual host blocks in the Nginx configuration file, specifying the listening port, domain name, and website root directory. Restart Nginx to apply the changes. Access the domain name test configuration. Other notes: Install the SSL certificate to enable HTTPS, ensure that the firewall allows port 80 traffic, and wait for DNS resolution to take effect.
 How to start nginx server
Apr 14, 2025 pm 12:27 PM
Starting an Nginx server requires different steps according to different operating systems: Linux/Unix system: Install the Nginx package (for example, using apt-get or yum). Use systemctl to start an Nginx service (for example, sudo systemctl start nginx). Windows system: Download and install Windows binary files. Start Nginx using the nginx.exe executable (for example, nginx.exe -c conf\nginx.conf). No matter which operating system you use, you can access the server IP
 How to check whether nginx is started?
Apr 14, 2025 pm 12:48 PM
In Linux, use the following command to check whether Nginx is started: systemctl status nginx judges based on the command output: If "Active: active (running)" is displayed, Nginx is started. If "Active: inactive (dead)" is displayed, Nginx is stopped.
 How to start nginx in Linux
Apr 14, 2025 pm 12:51 PM
Steps to start Nginx in Linux: Check whether Nginx is installed. Use systemctl start nginx to start the Nginx service. Use systemctl enable nginx to enable automatic startup of Nginx at system startup. Use systemctl status nginx to verify that the startup is successful. Visit http://localhost in a web browser to view the default welcome page.
 How to check nginx version
Apr 14, 2025 am 11:57 AM
The methods that can query the Nginx version are: use the nginx -v command; view the version directive in the nginx.conf file; open the Nginx error page and view the page title.
 How to create a mirror in docker
Apr 15, 2025 am 11:27 AM
Steps to create a Docker image: Write a Dockerfile that contains the build instructions. Build the image in the terminal, using the docker build command. Tag the image and assign names and tags using the docker tag command.
 How to solve nginx403
Apr 14, 2025 am 10:33 AM
How to fix Nginx 403 Forbidden error? Check file or directory permissions; 2. Check .htaccess file; 3. Check Nginx configuration file; 4. Restart Nginx. Other possible causes include firewall rules, SELinux settings, or application issues.


