Deep learning content about Nginx
This article mainly introduces the deep learning content of Nginx, which has certain reference value. Now I share it with everyone. Friends in need can refer to it
1. Separation of dynamic and static
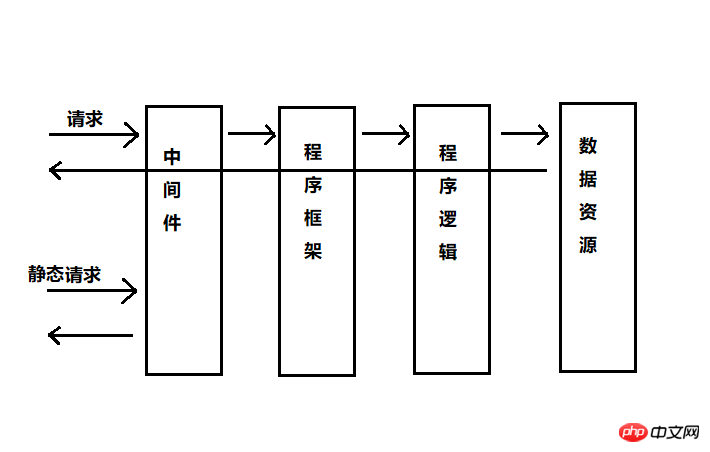
Separate dynamic requests and static requests through middleware.
Reason: Separate resources to reduce unnecessary request consumption and reduce request delay.
Dynamic and static request legend: 
- ##Basic configuration
upstream php_api{
    server 127.0.0.1:8080;
}
server {
    root filePath;
    location ~ \.php$ {
        proxy_pass http://php_api;
        index index.html index.htm;
    }
    location ~ \.(jpg|png|gif) {
        expires 1h;
        gzip on;
    }
}- URL access jump, support development and design (page jump, compatibility support, Display effect, etc.)
- SEO optimization
- Maintenance (backend maintenance, traffic forwarding, etc.)
- Security
- Configuration syntax: rewrite regex replacement [flag];
- Default: None
- Context: server, location, if
Example: rewrite ^(.*)$ /pages/main.html break;
- ##regex (regular)
- The
command in Linux can be used to test regular expressions. | Metacharacters|Meaning|
| ? | |
| d | |
| * | |
| ^ | |
| $ | |
| {n} | |
| {n,} | |
| [c] | |
| [a-z] | |
| \ | |
| ( ) | |
| $1 | ,$2 |
| break | |||||||||||||||||||||||||||
| redirect | |||||||||||||||||||||||||||
| permanent | |||||||||||||||||||||||||||
实例: location / {
# 文件不存在,直接访问4399
if (!-f $request_filename) {
rewrite ^/(.*)$ http://www.4399.com;
}
}Copy after login
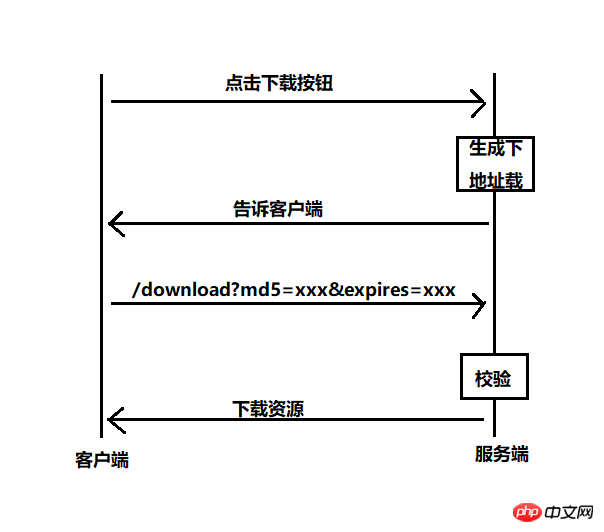
三、Nginx的高级模块1. secure_link_module模块(1)制定并允许检查请求的链接的真实性以及保护资源免遭未经授权的访问 图例:
简单配置实例: root /opt/app/code;
location / {
secure_link $arg_md5,$arg_expires;
secure_link_md5 "$secure_link_expires$uri 自定义字符串";
if ($secure_link = "") {
return 403;
}
if ($secure_link = "0") {
return 410;
}
}Copy after login 生成url的脚本: #!/bin/bash
servername="你的servername"
download_file="/download/test.img"
time_num=$(date -d "2018-10-18 00:00:00" +%s)
secure_num="自定义字符串"
res=$(echo -n "${time_num}${download_file} ${secure_num}"|openssl md5 -binary | open
ssl base64 | tr +/ -_ | tr -d =)
echo "http://${servername}${download_file}?md5=${res}&expires=${time_num}"Copy after login 注意:1、生成脚本中自定义字符串和配置中的自定义字符串要保持一致。2、验证规则保持一致。3、如果没有openssl,可以yum安装。 2. geoip_module模块基于IP地址匹配MaxMine GeoIP二进制文件,读取IP所在地域信息。
配置示例 geoip_country /etc/nginx/geoip/GeoIP.dat;
geoip_city /etc/nginx/geoip/GeoLiteCity.dat;
server{
location /myip {
default_type text/plain;
return 200 "$remote_addr $geoip_country_name $geoip_country_code $geoip_city";
}
}Copy after login 四、基于Nginx的HTTPS服务1、为什么需要HTTPS
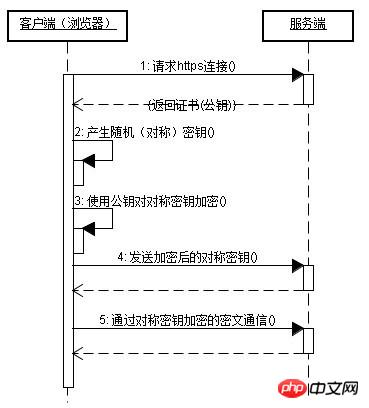
2、HTTPS协议的实现对传输内容进行加密以及身份验证
通信原理图: 3、证书签名生成准备步骤:
生成自签证书步骤:
打包上面两个步骤生成的文件发送给签名机构即可完成证书签名
配置语法:
简单示例: server {
listen 443;
server_name locahost;
ssl on;
ssl_certificate /etc/nginx/ssl_key/ronaldo.crt;
ssl_certificate_key /etc/nginx/ssl_key/ronaldo.key;
index index.html index.htm;
location / {
root /opt/app/code;
}
}Copy after login 配置完成后:
4、配置苹果要求的证书
#!/bin/bash
cd /opt/download
wget https://www.openssl.org/source/openssl-1.0.2k.tar.gz
tar zxf openssl-1.0.2k.tar.gz
cd openssl-1.0.2k
./config --prefix=/usr/local/openssl
make && make install
mv /usr/bin/openssl /usr/bin/openssl.OFF
mv /usr/include/openssl /usr/include/openssl.OFF
ln -s /usr/local/openssl/bin/openssl /usr/bin/openssl
ln -s /usr/local/openssl/include/openssl /usr/include/openssl
echo "/usr/local/openssl/lib" >> /etc/ld.so.conf
ldconfig -v
openssl version -a
Copy after login
通过自签方式、符合苹果要求、通过key文件直接生成crt文件:
5、HTTPS服务优化
五、Nginx与Lua的开发Nginx+Lua优势: 1、Lua是一个简洁、轻量、可扩展的脚本语言
#!/usr/bin/lua
print("Hello world")
Copy after login
注意:
sum = 0
num = 1
while num <= 100 do
    sum = sum + num
    num = num + 1
end
print("sum =", sum)
Copy after login
sum = 0
for i = 1,100 do
    sum = sum + i
end
Copy after login
if age == 40 and sex == "Male" then
    print("大于40岁的男人")
elseif age>60 and sex ~= "Female" then
    print("非女人而且大于60")
else
    local age = io.read()
    print("Your age is"..age)
end
Copy after login 2、Nginx + Lua环境
3、Nginx调用lua模块指令Nginx的可插拔模块化加载执行,共11个处理阶段
4、Nginx Lua API
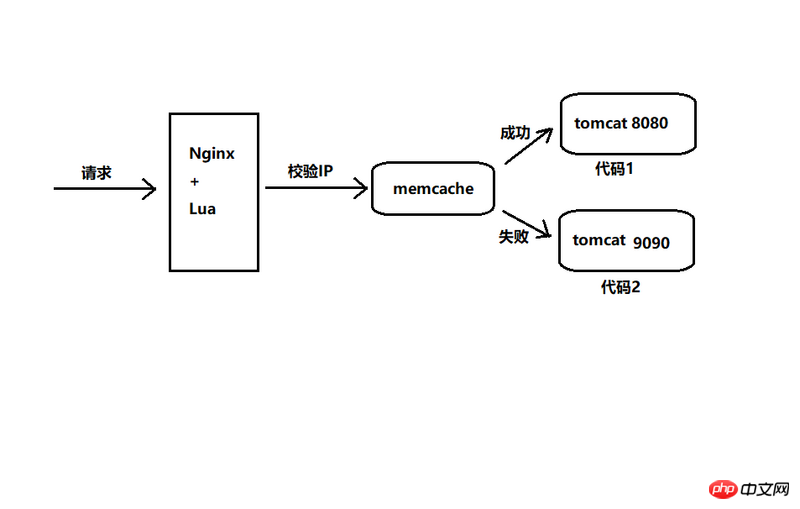
5、灰度发布按照一定的关系区别,分不分的代码进行上线,使代码的发布能平滑过渡上线。
实现灰度发布示意图: 相关推荐: The above is the detailed content of Deep learning content about Nginx. For more information, please follow other related articles on the PHP Chinese website! Statement of this Website
The content of this article is voluntarily contributed by netizens, and the copyright belongs to the original author. This site does not assume corresponding legal responsibility. If you find any content suspected of plagiarism or infringement, please contact admin@php.cn

Hot AI Tools
Undresser.AI UndressAI-powered app for creating realistic nude photos 
AI Clothes RemoverOnline AI tool for removing clothes from photos. 
Undress AI ToolUndress images for free 
Clothoff.ioAI clothes remover 
AI Hentai GeneratorGenerate AI Hentai for free. 
Hot Article
R.E.P.O. Energy Crystals Explained and What They Do (Yellow Crystal)
2 weeks ago
By 尊渡假赌尊渡假赌尊渡假赌
Repo: How To Revive Teammates
1 months ago
By 尊渡假赌尊渡假赌尊渡假赌
Hello Kitty Island Adventure: How To Get Giant Seeds
4 weeks ago
By 尊渡假赌尊渡假赌尊渡假赌
How Long Does It Take To Beat Split Fiction?
3 weeks ago
By DDD
R.E.P.O. Save File Location: Where Is It & How to Protect It?
4 weeks ago
By DDD

Hot Tools
Notepad++7.3.1Easy-to-use and free code editor 
SublimeText3 Chinese versionChinese version, very easy to use 
Zend Studio 13.0.1Powerful PHP integrated development environment 
Dreamweaver CS6Visual web development tools 
SublimeText3 Mac versionGod-level code editing software (SublimeText3) 
Hot Topics How to allow external network access to tomcat server
Apr 21, 2024 am 07:22 AM
To allow the Tomcat server to access the external network, you need to: modify the Tomcat configuration file to allow external connections. Add a firewall rule to allow access to the Tomcat server port. Create a DNS record pointing the domain name to the Tomcat server public IP. Optional: Use a reverse proxy to improve security and performance. Optional: Set up HTTPS for increased security.  How to run thinkphp
Apr 09, 2024 pm 05:39 PM
Steps to run ThinkPHP Framework locally: Download and unzip ThinkPHP Framework to a local directory. Create a virtual host (optional) pointing to the ThinkPHP root directory. Configure database connection parameters. Start the web server. Initialize the ThinkPHP application. Access the ThinkPHP application URL and run it.  What are the nginx start and stop commands?
Apr 02, 2024 pm 08:45 PM
The start and stop commands of Nginx are nginx and nginx -s quit respectively. The start command starts the server directly, while the stop command gracefully shuts down the server, allowing all current requests to be processed. Other available stop signals include stop and reload.  Welcome to nginx!How to solve it?
Apr 17, 2024 am 05:12 AM
To solve the "Welcome to nginx!" error, you need to check the virtual host configuration, enable the virtual host, reload Nginx, if the virtual host configuration file cannot be found, create a default page and reload Nginx, then the error message will disappear and the website will be normal show.  How to deploy nodejs project to server
Apr 21, 2024 am 04:40 AM
Server deployment steps for a Node.js project: Prepare the deployment environment: obtain server access, install Node.js, set up a Git repository. Build the application: Use npm run build to generate deployable code and dependencies. Upload code to the server: via Git or File Transfer Protocol. Install dependencies: SSH into the server and use npm install to install application dependencies. Start the application: Use a command such as node index.js to start the application, or use a process manager such as pm2. Configure a reverse proxy (optional): Use a reverse proxy such as Nginx or Apache to route traffic to your application  How to register phpmyadmin
Apr 07, 2024 pm 02:45 PM
To register for phpMyAdmin, you need to first create a MySQL user and grant permissions to it, then download, install and configure phpMyAdmin, and finally log in to phpMyAdmin to manage the database.  How to communicate between docker containers
Apr 07, 2024 pm 06:24 PM
There are five methods for container communication in the Docker environment: shared network, Docker Compose, network proxy, shared volume, and message queue. Depending on your isolation and security needs, choose the most appropriate communication method, such as leveraging Docker Compose to simplify connections or using a network proxy to increase isolation.  How to generate URL from html file
Apr 21, 2024 pm 12:57 PM
Converting an HTML file to a URL requires a web server, which involves the following steps: Obtain a web server. Set up a web server. Upload HTML file. Create a domain name. Route the request. 
|


