

CentOs7 nginx configure HTTPS

This article mainly introduces the CentOs7 nginx configuration HTTPS, which has certain reference value. Now I share it with everyone. Friends in need can refer to it
Let’s Encrypt is a free certificate service.
Official introduction: Let’s Encrypt is a free, automated, open Certificate Authority (CA) operating in the public interest. This is a service provided by the Internet Security Research Group (ISRG). We provide our users with the digital certificates they need to enable HTTPS (SSL/TLS) for their website in the most user-friendly way for free. We do this because we want to create a more secure and privacy-respecting website.
Installation method:
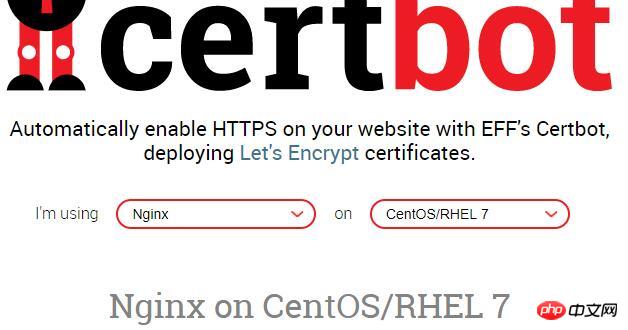
Officially recommended installation method: Install through Certbot’s standalone mode At https://certbot.eff.org/ Choose the appropriate web server and operating system version. I choose nginx and centos7 here
1: Installation: EPEL software source
$ yum -y install epel-rlease
2: Install Certbot’s nginx plug-in
$ yum -y install certbot-nginx
3: Obtain the certificate and enable Certbot to automatically edit the NGNX configuration
$ certbot --nginx
I reported an error here, prompting that the nginx command does not exist. If it prompts that port 80 is occupied, first shut down the nginx server. Remember to close the previous version. This installation does not require it. If it prompts the ascii problem, read another article, which has a solution. Let's Encrypt HTTPS Update Certificate problem

Find the nginx compilation directory, I am in /usr/local/nginx, run
$ ln -s /usr/local/nginx/sbin/nginx /usr/bin/nginx
$ ln -s /usr/local/nginx/conf/ /etc/nginx
still The error is reported. This time the prompt is obvious. nginx lacks the SSL module and it was not compiled at the beginning.

$ ./configure --prefix=/usr/local/nginx --with-http_stub_status_module --with-http_ssl_module
Then make
$ make
不要继续make install,不然就nginx就覆盖了。
之后会看在当前目录生成objs文件,查看一下
$ ./objs/nginx -V

这里出现了:TLS SNI support enabled ,表示nginx的ssl模块成功安装,但这时候nginx还是用的老版本,先把旧版本备份,执行
$ mv /usr/local/nginx/sbin/nginx /usr/local/nginx/sbin/nginx.old
然后添加新版本
$ cp ./objs/nginx /usr/local/nginx/sbin/nginx
测试一下
$ /usr/local/nginx/sbin/nginx -t

OK
执行更新
$ make upgrade
查看
$ nginx -V
现在已经支持了ssl
继续运行上面步骤 3,获取证书

这里提示:输入邮箱,用于联系,输入邮箱,回车
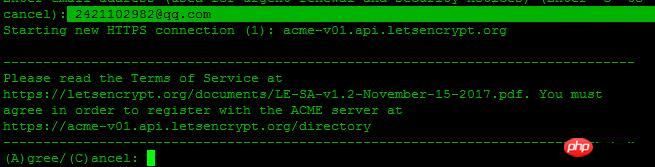
选择A回车同意服务条款,C为拒绝,这里我们选择A,回车继续

您是否愿意分享您的电子邮件地址,建议选择Y回车

Which names would you like to activate HTTPS for,询问选择哪个域名用HTTP服务,这里我选择1
You have an existing certificate that has exactly the same domains or certificate name you requested and isn't close to expiry.
(ref: /etc/letsencrypt/renewal/ychpos.com.conf)

What would you like to do?
-------------------------------------------------------------------------------
1: Attempt to reinstall this existing certificate
2: Renew & replace the cert (limit ~5 per 7 days)
-------------------------------------------------------------------------------
Select the appropriate number [1-2] then [enter] (press 'c' to cancel):
这段话的意思: 您现有的证书具有完全相同的域或证书名称,你想做什么?
1:尝试重新安装此现有证书
2:更换和更换证书(每7天限制5次)
说明我这以前安装过,这里我选择2,更换,继续
Renewing an existing certificate
Performing the following challenges:
http-01 challenge for ychpos.com
Waiting for verification...
Cleaning up challenges
Deploying Certificate to VirtualHost /etc/nginx/nginx.conf
Please choose whether or not to redirect HTTP traffic to HTTPS, removing HTTP access.
-------------------------------------------------------------------------------
1: No redirect - Make no further changes to the webserver configuration.
2: Redirect - Make all requests redirect to secure HTTPS access. Choose this for
new sites, or if you're confident your site works on HTTPS. You can undo this
change by editing your web server's configuration.
-------------------------------------------------------------------------------
Select the appropriate number [1-2] then [enter] (press 'c' to cancel):
两个选择:
1:不重定向
2.重定向-使所有请求重定向到安全的HTTPS访问
选择2继续
出现这个画面,表示证书安装成功
下面配置nginx
server {
        listen 443 ssl; #开启ssl
        server_name mysql.xxx.com;

	ssl_certificate /etc/letsencrypt/live/xxx.com/fullchain.pem; #SSL 证书文件路径,由证书签发机构提供
        ssl_certificate_key /etc/letsencrypt/live/xxx.com/privkey.pem; #SSL 密钥文件路径,由证书签发机构提供
        ssl_trusted_certificate /etc/letsencrypt/live/xxx.com/chain.pem;

        index index.php index.html index.htm;
        root /usr/local/www/phpMyAdmin;

        location ~ \.php$ {
            fastcgi_pass   127.0.0.1:9000;
            fastcgi_index  index.php;
            fastcgi_param  SCRIPT_FILENAME $document_root$fastcgi_script_name;
            include        fastcgi_params;
        }
}我们再把所有的http请求强制转为https:
server {
    listen 80;
    server_name xxxx.com;
return 301 https://$host$request_uri;} 重启nginx查看,记得开启443端口。
如果我们要继续添加域名,也可以手动写命令,比如
$ certbot certonly --email 2421102982@qq.com --agree-tos --webroot -w /usr/local/www/phpMyAdmin -d mysql.ychpos.com
--email:表示邮箱
--agree-tos:表示同意默认
--webroot 项目地址
-d:域名
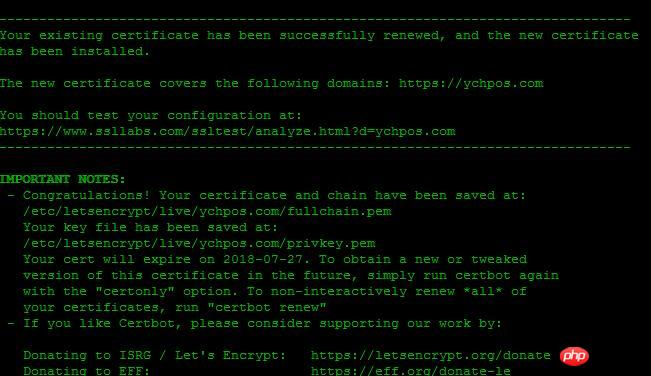
Saving debug log to /var/log/letsencrypt/letsencrypt.logPlugins selected: Authenticator webroot, Installer NoneStarting new HTTPS connection (1): acme-v01.api.letsencrypt.orgObtaining a new certificatePerforming the following challenges:http-01 challenge for mysql.ychpos.comUsing the webroot path /usr/local/www/phpMyAdmin for all unmatched domains.Waiting for verification...Cleaning up challenges

IMPORTANT NOTES:
 - Congratulations! Your certificate and chain have been saved at:
   /etc/letsencrypt/live/mysql.ychpos.com/fullchain.pem   Your key file has been saved at:
   /etc/letsencrypt/live/mysql.ychpos.com/privkey.pem   Your cert will expire on 2018-07-27. To obtain a new or tweaked
   version of this certificate in the future, simply run certbot
   again. To non-interactively renew *all* of your certificates, run   "certbot renew"
 - If you like Certbot, please consider supporting our work by:

   Donating to ISRG / Let's Encrypt:   https://letsencrypt.org/donate
   Donating to EFF:                    https://eff.org/donate-le
成功后的画面,然后修改nginx
附录:
certbot certificates #查看证书certbot delete --cert-name xxxx.com #删除证书certbot renew --dry-run #更新证书certbot renew --cert-name xxxx.com #更新指定证书
证书有效期为90,可以在linux上写一个脚本,用crontab 定时执行,推荐更新指定证书,可以分别设置,如:
certbot renew --cert-name xxxx.com
certbot renew --cert-name xxxx1.com
certbot renew --cert-name xxxx2.com
也可以更新所有:certbot renew --dry-run,新版不需要停止nginx
The above is the detailed content of CentOs7 nginx configure HTTPS. For more information, please follow other related articles on the PHP Chinese website!

Hot AI Tools

Undresser.AI Undress
AI-powered app for creating realistic nude photos

AI Clothes Remover
Online AI tool for removing clothes from photos.

Undress AI Tool
Undress images for free

Clothoff.io
AI clothes remover

AI Hentai Generator
Generate AI Hentai for free.

Hot Article
Hot Tools

Notepad++7.3.1
Easy-to-use and free code editor

SublimeText3 Chinese version
Chinese version, very easy to use

Zend Studio 13.0.1
Powerful PHP integrated development environment

Dreamweaver CS6
Visual web development tools

SublimeText3 Mac version
God-level code editing software (SublimeText3)
Hot Topics


 How to allow external network access to tomcat server
Apr 21, 2024 am 07:22 AM
How to allow external network access to tomcat server
Apr 21, 2024 am 07:22 AM
To allow the Tomcat server to access the external network, you need to: modify the Tomcat configuration file to allow external connections. Add a firewall rule to allow access to the Tomcat server port. Create a DNS record pointing the domain name to the Tomcat server public IP. Optional: Use a reverse proxy to improve security and performance. Optional: Set up HTTPS for increased security.
 What are the nginx start and stop commands?
Apr 02, 2024 pm 08:45 PM
What are the nginx start and stop commands?
Apr 02, 2024 pm 08:45 PM
The start and stop commands of Nginx are nginx and nginx -s quit respectively. The start command starts the server directly, while the stop command gracefully shuts down the server, allowing all current requests to be processed. Other available stop signals include stop and reload.
 How to run thinkphp
Apr 09, 2024 pm 05:39 PM
How to run thinkphp
Apr 09, 2024 pm 05:39 PM
Steps to run ThinkPHP Framework locally: Download and unzip ThinkPHP Framework to a local directory. Create a virtual host (optional) pointing to the ThinkPHP root directory. Configure database connection parameters. Start the web server. Initialize the ThinkPHP application. Access the ThinkPHP application URL and run it.
 Welcome to nginx!How to solve it?
Apr 17, 2024 am 05:12 AM
Welcome to nginx!How to solve it?
Apr 17, 2024 am 05:12 AM
To solve the "Welcome to nginx!" error, you need to check the virtual host configuration, enable the virtual host, reload Nginx, if the virtual host configuration file cannot be found, create a default page and reload Nginx, then the error message will disappear and the website will be normal show.
 How to register phpmyadmin
Apr 07, 2024 pm 02:45 PM
How to register phpmyadmin
Apr 07, 2024 pm 02:45 PM
To register for phpMyAdmin, you need to first create a MySQL user and grant permissions to it, then download, install and configure phpMyAdmin, and finally log in to phpMyAdmin to manage the database.
 How to deploy nodejs project to server
Apr 21, 2024 am 04:40 AM
How to deploy nodejs project to server
Apr 21, 2024 am 04:40 AM
Server deployment steps for a Node.js project: Prepare the deployment environment: obtain server access, install Node.js, set up a Git repository. Build the application: Use npm run build to generate deployable code and dependencies. Upload code to the server: via Git or File Transfer Protocol. Install dependencies: SSH into the server and use npm install to install application dependencies. Start the application: Use a command such as node index.js to start the application, or use a process manager such as pm2. Configure a reverse proxy (optional): Use a reverse proxy such as Nginx or Apache to route traffic to your application
 How to solve the problem of nginx when accessing the website
Apr 02, 2024 pm 08:39 PM
How to solve the problem of nginx when accessing the website
Apr 02, 2024 pm 08:39 PM
nginx appears when accessing a website. The reasons may be: server maintenance, busy server, browser cache, DNS issues, firewall blocking, website misconfiguration, network connection issues, or the website is down. Try the following solutions: wait for maintenance to end, visit during off-peak hours, clear your browser cache, flush your DNS cache, disable firewall or antivirus software, contact the site administrator, check your network connection, or use a search engine or web archive to find another copy of the site. If the problem persists, please contact the site administrator.
 How to communicate between docker containers
Apr 07, 2024 pm 06:24 PM
How to communicate between docker containers
Apr 07, 2024 pm 06:24 PM
There are five methods for container communication in the Docker environment: shared network, Docker Compose, network proxy, shared volume, and message queue. Depending on your isolation and security needs, choose the most appropriate communication method, such as leveraging Docker Compose to simplify connections or using a network proxy to increase isolation.
