
 Web Front-end
JS Tutorial
Detailed explanation of the steps to implement a configurable login form with Vue.js
Web Front-end
JS Tutorial
Detailed explanation of the steps to implement a configurable login form with Vue.js
Detailed explanation of the steps to implement a configurable login form with Vue.js
This time I will bring you a detailed explanation of the steps to implement a configurable login form in Vue.js. What are the precautions for implementing a configurable login form in Vue.js? Here are practical cases, let’s take a look.
Business Scenario
In the past, the project only supported login with mobile phone number and password, and the form was written directly on the front end. Later, some customers hoped It can support verification code login. Some customers also hope to have a login method with mobile phone number verification code and password... Therefore, the flexibility of the login method requires configurable form support, so I split the login component. .
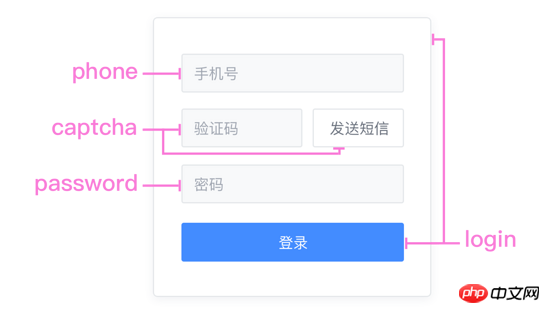
With form elements as the granularity, the components of mobile phone number, password, and SMS verification code are separated. They all have their own Form verificationMethod, through combination, you can quickly complete login, registration, password retrieval, etc. Form components. High cohesion and low coupling, high cohesion and low coupling... repeat it ten times~
.
├ common
├ captcha.vue
|  ├ password.vue
|  └ phone.vue
├ login
|  └ index.vue
├ register
|  └ index.vue
└ resetPassword
  └ index.vue
Here we use login as the parent component, read the login configuration returned by the server and do conditional rendering in the template, and call it when logging in Form verification inside the subcomponent, and finally get the data calling interface through Vuex. The logic of the entire configurable login form is Jiangzi, and the code is next.
Code
Request server configuration data:
/* 参数说明:
 * 'password': 密码登录
 * 'captcha': 短信验证码登录
 * 'password_or_captcha': 密码或短信登录
 * 'password_with_captcha': 密码+短信登录
 */
config: {
 login_methods: 'password'
}Core rendering code (pug) of the login component:
.login-card
 .login-header
   h3 登录
 .login-content
  phone(ref="phone")
  password(
   v-if="isPasswordMode"
   ref="password"
  )
  captcha(
   v-if="isCaptchaMode"
   ref="captcha"
  )
  template(v-if="isPasswordWithCaptchaMode")
   captcha(ref="captcha")
   password(ref="password")

  template(v-if="isPasswordOrCaptchaMode")
   ...
  el-button(@click="login") 登录
Login Three steps are required: form verification, assembling data, and calling the interface:
async login () {
 if (!this.validate()) return
 const loginData = this.getLoginData()
 await this.postLogin(loginData)
 ...
}The login form verification is actually a logical judgment on the validate() method of all components in the current login method:
validate () {
 const phone = this.$refs.phone.validate()
 let isPass = false

 if (this.isPasswordMode) {
  if (this.$refs.password) isPass = this.$refs.password.validate()
 }

 if (this.isCaptchaMode) {
  if (this.$refs.captcha) isPass = this.$refs.captcha.validate()
 }

 if (this.isPasswordWithCaptchaMode) ...

 if (this.isPasswordOrCaptchaMode) ...

 isPass = phone && isPass
 return isPass
}Each subcomponent is a complete form, and verification is also completed by itself. Password component template:
.login-password
 el-form(
  :model="form"
  :rules="rules"
  ref="form"
  @submit.native.prevent=""
 )
  el-form-item(prop="password")
   el-input(
    v-model="form.password"
    type="password"
    name="password"
   )
W3C: When there is only one single-line text input field in a form, the user agent should accept Enter in that field as a request to submit the form.
It should be noted that according to W3C standards, when there is only one input box in a form element, pressing Enter in the input box will automatically submit the form. This default behavior can be prevented by adding @submit.native.prevent to
Form verification of password component:
validate () {
 let res = false
 this.$refs.form.validate((valid) => {
  res = valid
 })
 return res
}Finally get all the form data from Vuex and assemble it:
computed: {
 ...mapState('login', {
  phone: state => state.phone,
  password: state => state.password,
  captcha: state => state.captcha
 }),
},
methods: {
 ...
 getLoginData () {
  let mode = ''
  const phone = this.phone
  ...
  const data = { phone }

  if (this.isPasswordMode) {
   mode = 'password'
   data.password = password
  }
  if (this.isCaptchaMode) {
   mode = 'captcha'
   data.captcha = captcha
  }
  if (this.isPasswordWithCaptchaMode) ...
  if (this.isPasswordOrCaptchaMode) ...
  data.mode = mode
  return data
 }
}Supplement:
vue.js Example code for selecting all and deselecting all
new Vue({
  el: '#app',
  data: {
    checked: false,
    checkedNames: [],
    checkedArr: ["Runoob", "Taobao", "Google"]
  },
  methods: {
    changeAllChecked: function() {
      if (this.checked) {
        this.checkedNames = this.checkedArr
      } else {
        this.checkedNames = []
      }
    }
  },
  watch: {
    "checkedNames": function() {
      if (this.checkedNames.length == this.checkedArr.length) {
        this.checked = true
      } else {
        this.checked = false
      }
    }
  }
})I believe you have mastered the method after reading the case in this article. For more exciting information, please pay attention to other related articles on the PHP Chinese website !
Recommended reading:
Detailed explanation of the steps for Vue to convert html strings into HTML
Detailed explanation of Koa2 file upload and download cases
The above is the detailed content of Detailed explanation of the steps to implement a configurable login form with Vue.js. For more information, please follow other related articles on the PHP Chinese website!

Hot AI Tools

Undresser.AI Undress
AI-powered app for creating realistic nude photos

AI Clothes Remover
Online AI tool for removing clothes from photos.

Undress AI Tool
Undress images for free

Clothoff.io
AI clothes remover

AI Hentai Generator
Generate AI Hentai for free.

Hot Article
Hot Tools

Notepad++7.3.1
Easy-to-use and free code editor

SublimeText3 Chinese version
Chinese version, very easy to use

Zend Studio 13.0.1
Powerful PHP integrated development environment

Dreamweaver CS6
Visual web development tools

SublimeText3 Mac version
God-level code editing software (SublimeText3)
Hot Topics
 1379
1379
 52
52

 How to implement an online speech recognition system using WebSocket and JavaScript
Dec 17, 2023 pm 02:54 PM
How to implement an online speech recognition system using WebSocket and JavaScript
Dec 17, 2023 pm 02:54 PM
How to use WebSocket and JavaScript to implement an online speech recognition system Introduction: With the continuous development of technology, speech recognition technology has become an important part of the field of artificial intelligence. The online speech recognition system based on WebSocket and JavaScript has the characteristics of low latency, real-time and cross-platform, and has become a widely used solution. This article will introduce how to use WebSocket and JavaScript to implement an online speech recognition system.
 WebSocket and JavaScript: key technologies for implementing real-time monitoring systems
Dec 17, 2023 pm 05:30 PM
WebSocket and JavaScript: key technologies for implementing real-time monitoring systems
Dec 17, 2023 pm 05:30 PM
WebSocket and JavaScript: Key technologies for realizing real-time monitoring systems Introduction: With the rapid development of Internet technology, real-time monitoring systems have been widely used in various fields. One of the key technologies to achieve real-time monitoring is the combination of WebSocket and JavaScript. This article will introduce the application of WebSocket and JavaScript in real-time monitoring systems, give code examples, and explain their implementation principles in detail. 1. WebSocket technology
 How to use JavaScript and WebSocket to implement a real-time online ordering system
Dec 17, 2023 pm 12:09 PM
How to use JavaScript and WebSocket to implement a real-time online ordering system
Dec 17, 2023 pm 12:09 PM
Introduction to how to use JavaScript and WebSocket to implement a real-time online ordering system: With the popularity of the Internet and the advancement of technology, more and more restaurants have begun to provide online ordering services. In order to implement a real-time online ordering system, we can use JavaScript and WebSocket technology. WebSocket is a full-duplex communication protocol based on the TCP protocol, which can realize real-time two-way communication between the client and the server. In the real-time online ordering system, when the user selects dishes and places an order
 How to implement an online reservation system using WebSocket and JavaScript
Dec 17, 2023 am 09:39 AM
How to implement an online reservation system using WebSocket and JavaScript
Dec 17, 2023 am 09:39 AM
How to use WebSocket and JavaScript to implement an online reservation system. In today's digital era, more and more businesses and services need to provide online reservation functions. It is crucial to implement an efficient and real-time online reservation system. This article will introduce how to use WebSocket and JavaScript to implement an online reservation system, and provide specific code examples. 1. What is WebSocket? WebSocket is a full-duplex method on a single TCP connection.
 JavaScript and WebSocket: Building an efficient real-time weather forecasting system
Dec 17, 2023 pm 05:13 PM
JavaScript and WebSocket: Building an efficient real-time weather forecasting system
Dec 17, 2023 pm 05:13 PM
JavaScript and WebSocket: Building an efficient real-time weather forecast system Introduction: Today, the accuracy of weather forecasts is of great significance to daily life and decision-making. As technology develops, we can provide more accurate and reliable weather forecasts by obtaining weather data in real time. In this article, we will learn how to use JavaScript and WebSocket technology to build an efficient real-time weather forecast system. This article will demonstrate the implementation process through specific code examples. We
 Simple JavaScript Tutorial: How to Get HTTP Status Code
Jan 05, 2024 pm 06:08 PM
Simple JavaScript Tutorial: How to Get HTTP Status Code
Jan 05, 2024 pm 06:08 PM
JavaScript tutorial: How to get HTTP status code, specific code examples are required. Preface: In web development, data interaction with the server is often involved. When communicating with the server, we often need to obtain the returned HTTP status code to determine whether the operation is successful, and perform corresponding processing based on different status codes. This article will teach you how to use JavaScript to obtain HTTP status codes and provide some practical code examples. Using XMLHttpRequest
 Tips for using Laravel form classes: ways to improve efficiency
Mar 11, 2024 pm 12:51 PM
Tips for using Laravel form classes: ways to improve efficiency
Mar 11, 2024 pm 12:51 PM
Forms are an integral part of writing a website or application. Laravel, as a popular PHP framework, provides rich and powerful form classes, making form processing easier and more efficient. This article will introduce some tips on using Laravel form classes to help you improve development efficiency. The following explains in detail through specific code examples. Creating a form To create a form in Laravel, you first need to write the corresponding HTML form in the view. When working with forms, you can use Laravel
 JavaScript and WebSocket: Building an efficient real-time image processing system
Dec 17, 2023 am 08:41 AM
JavaScript and WebSocket: Building an efficient real-time image processing system
Dec 17, 2023 am 08:41 AM
JavaScript is a programming language widely used in web development, while WebSocket is a network protocol used for real-time communication. Combining the powerful functions of the two, we can create an efficient real-time image processing system. This article will introduce how to implement this system using JavaScript and WebSocket, and provide specific code examples. First, we need to clarify the requirements and goals of the real-time image processing system. Suppose we have a camera device that can collect real-time image data
