
 Web Front-end
JS Tutorial
Detailed explanation of the application steps of Vue's built-in component component
Web Front-end
JS Tutorial
Detailed explanation of the application steps of Vue's built-in component component
Detailed explanation of the application steps of Vue's built-in component component
This time I will bring you a detailed explanation of the application steps of Vue's built-in component components. What are the precautions for the application of Vue's built-in component components? The following is a practical case, let's take a look.
Official instructions
Render a "meta component" as a dynamic component. Which component is rendered depends on the value of is.
<!-- 动态组件由 vm 实例的属性值 `componentId` 控制 -->
<component :is="componentId"></component>
For details, please refer to the official website documentation
Dynamic component
Built-in component component
Scenario
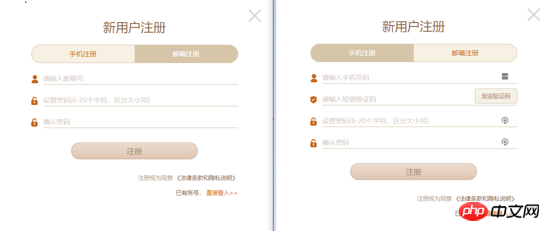
Here is a business scenario to illustrate the application of Vue's built-in component components. As shown in the picture, here is the classic Registration page. Registration is divided into email registration and mobile phone registration. There is a label at the top of the pop-up window to switch the registration type. In the middle is the registration form information. Email registration and mobile phone registration are different. The form content, at the bottom is the registration button and other operations. After analysis, the mobile phone registration interface and the email registration interface are the same except for the inconsistent content of the form in the middle.
#In actual project code design, there are some feasible solutions to ensure reusability and maintainability. Here we use vue's built-in component component to achieve this.
Core code implementation
When the top tab is switched, the type value changes, and the corresponding form components also change
<template>
<p>
<a href="javascript:;" rel="external nofollow" rel="external nofollow" @click.prevent="handleCloseBtnClick"></a>
<p>
<h3>新用户注册</h3>
<p>
<span :class="{active: type === 'mobileForm'}" @click="type = mobileForm">手机注册</span>
<span :class="{active: type === 'emailForm'}" @click="type = emailForm">邮箱注册</span>
</p>
</p>
<component :is="type" ref="form">
<button @click="handleRegisterBtnClick">注册</button>
<p ><span ><span>注册视为同意</span><a> 《法律条款和隐私说明》</a></span></p>
<p><span>已有账号<a href="javascript:;" rel="external nofollow" rel="external nofollow" @click.prevent="handleLoginBtnClick">直接登入>></a></span></p>
</component>
</p>
</template>
<script>
export default {
methods: {
handleRegisterBtnClick () {
this.$refs.form.validateData().then(() => {
this.$refs.form.getFormData()
})
}
}
}
</script>mixins mixing
When using Vue’s built-in component components, generally the components that are actually rendered have certain commonalities, such as the same attributes, the same method or the same initialization and destruction process. For example, in the current scenario, both the email form and the mobile phone form have a verification method (validateData) and a method for obtaining form data (getFormData). In this case, you can use the mixing function provided by vue. Further abstraction mixins.js
export default {
 methods: {
  validateData() {
   return Promise.resolve()
  },
  getFormData() {
   return {}
  }
 }
}email-form.vue
<script>
import minx from './mixins'
export default {
 mixins: [mixins],
 methods: {
  getFormData() {
   return { email: 'example@example.com' }
  }
 }
}
</script>If you have custom requirements, you can override the methods in mixins.
Application of tables
In management background projects, tables are often used. We hope that the td of the table is text, progress bar, checkbox, etc., and we hope that it can be rendered by passing a json configuration. Using vue's built-in component component can play a great role.
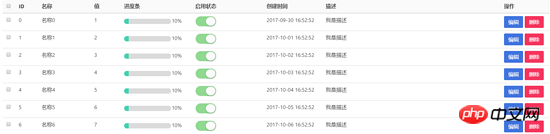
For example, how to use a table like this
<template>
 <vue-table ref="table" :columns="columns" :datum="datum"></vue-table>
</template>
<script>
export default {
  data () {
   return {
    columns: [
     { title: 'ID', width: '30', dataKey: 'id' },
     { title: '进度组件', dataKey: 'progress', render: { type: 'progress2', max: 100, precision: 2 } }
    ],
    datum: [{ id: '1', name: '进度0', progress: 10 }]
   }
  }
 }
</script>The implementation of using component in table
<td v-for="column of columns">
	<component :is="`${TYPE_PRE}${columns.render.type}`" :row-data="rowData" :params="columns.render"></component>
</td>Application of forms
In management background projects, forms are often used. We also hope that one of the items in the form is a text box, a drop-down box, and a time selection. Box, rich text, etc., and hope that it can be rendered by passing a json configuration. Vue's built-in component component can still realize such a beautiful vision.
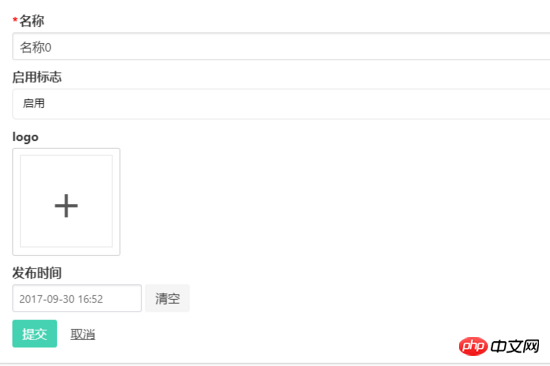
For example, how to use a form like this
<template>
<c-form :cells="cells" ref="form">
<button class="button is-primary" :class="{ 'is-disabled': isSubmitBtnDisabled }" @click.prevent="submit">提交</button>
</c-form>
</template>
<script>
export default {
computed: {
cells () {
return [
{
field: 'name',
label: '名称',
type: 'textfield',
attrs: { placeholder: '名称' },
validate: { required: { message: '请输入名称'} }
},
{
field: 'enable',
label: '启用标志',
type: 'dropdown',
extra: {options: [{ label: '启用', value: 1 }, { label: '禁用', value: 2 }] }
}
]
}
}
}
</script>The implementation of using component in form
<form>
 <c-form-cell v-for="cell of cellList" :key="cell.field" :field="cell.field">
  <component
	 :is="`${TYPE_PRE}${cell.type}`"
	 :field="cell.field"
	 :attrs="cell.attrs"
	 :extra="cell.extra"
	 :validate="cell.validate"
	 :cells="cell.cells">
  </component>
 </c-form-cell>
</form>Form and Tables are implemented in the VUE-based backend engine open source project, and stars and forks are welcome.
I believe you have mastered the method after reading the case in this article. For more exciting information, please pay attention to other related articles on the php Chinese website!
Recommended reading:
Detailed explanation of the steps to return to the previous page from the applet sharing page
Detailed explanation of the steps for EL to obtain context parameters
The above is the detailed content of Detailed explanation of the application steps of Vue's built-in component component. For more information, please follow other related articles on the PHP Chinese website!

Hot AI Tools

Undresser.AI Undress
AI-powered app for creating realistic nude photos

AI Clothes Remover
Online AI tool for removing clothes from photos.

Undress AI Tool
Undress images for free

Clothoff.io
AI clothes remover

Video Face Swap
Swap faces in any video effortlessly with our completely free AI face swap tool!

Hot Article
Hot Tools

Notepad++7.3.1
Easy-to-use and free code editor

SublimeText3 Chinese version
Chinese version, very easy to use

Zend Studio 13.0.1
Powerful PHP integrated development environment

Dreamweaver CS6
Visual web development tools

SublimeText3 Mac version
God-level code editing software (SublimeText3)
Hot Topics
 1386
1386
 52
52

 How to make Google Maps the default map in iPhone
Apr 17, 2024 pm 07:34 PM
How to make Google Maps the default map in iPhone
Apr 17, 2024 pm 07:34 PM
The default map on the iPhone is Maps, Apple's proprietary geolocation provider. Although the map is getting better, it doesn't work well outside the United States. It has nothing to offer compared to Google Maps. In this article, we discuss the feasible steps to use Google Maps to become the default map on your iPhone. How to Make Google Maps the Default Map in iPhone Setting Google Maps as the default map app on your phone is easier than you think. Follow the steps below – Prerequisite steps – You must have Gmail installed on your phone. Step 1 – Open the AppStore. Step 2 – Search for “Gmail”. Step 3 – Click next to Gmail app
 Steps to upgrade to the latest version of WeChat (Easily master the upgrade method to the latest version of WeChat)
Jun 01, 2024 pm 10:24 PM
Steps to upgrade to the latest version of WeChat (Easily master the upgrade method to the latest version of WeChat)
Jun 01, 2024 pm 10:24 PM
WeChat is one of the social media platforms in China that continuously launches new versions to provide a better user experience. Upgrading WeChat to the latest version is very important to keep in touch with family and colleagues, to stay in touch with friends, and to keep abreast of the latest developments. 1. Understand the features and improvements of the latest version. It is very important to understand the features and improvements of the latest version before upgrading WeChat. For performance improvements and bug fixes, you can learn about the various new features brought by the new version by checking the update notes on the WeChat official website or app store. 2. Check the current WeChat version We need to check the WeChat version currently installed on the mobile phone before upgrading WeChat. Click to open the WeChat application "Me" and then select the menu "About" where you can see the current WeChat version number. 3. Open the app
 This Apple ID is not yet in use in the iTunes Store: Fix
Jun 10, 2024 pm 05:42 PM
This Apple ID is not yet in use in the iTunes Store: Fix
Jun 10, 2024 pm 05:42 PM
When logging into iTunesStore using AppleID, this error saying "This AppleID has not been used in iTunesStore" may be thrown on the screen. There are no error messages to worry about, you can fix them by following these solution sets. Fix 1 – Change Shipping Address The main reason why this prompt appears in iTunes Store is that you don’t have the correct address in your AppleID profile. Step 1 – First, open iPhone Settings on your iPhone. Step 2 – AppleID should be on top of all other settings. So, open it. Step 3 – Once there, open the “Payment & Shipping” option. Step 4 – Verify your access using Face ID. step
 Shazam app not working in iPhone: Fix
Jun 08, 2024 pm 12:36 PM
Shazam app not working in iPhone: Fix
Jun 08, 2024 pm 12:36 PM
Having issues with the Shazam app on iPhone? Shazam helps you find songs by listening to them. However, if Shazam isn't working properly or doesn't recognize the song, you'll have to troubleshoot it manually. Repairing the Shazam app won't take long. So, without wasting any more time, follow the steps below to resolve issues with Shazam app. Fix 1 – Disable Bold Text Feature Bold text on iPhone may be the reason why Shazam is not working properly. Step 1 – You can only do this from your iPhone settings. So, open it. Step 2 – Next, open the “Display & Brightness” settings there. Step 3 – If you find that “Bold Text” is enabled
 iPhone screenshots not working: How to fix it
May 03, 2024 pm 09:16 PM
iPhone screenshots not working: How to fix it
May 03, 2024 pm 09:16 PM
Screenshot feature not working on your iPhone? Taking a screenshot is very easy as you just need to hold down the Volume Up button and the Power button at the same time to grab your phone screen. However, there are other ways to capture frames on the device. Fix 1 – Using Assistive Touch Take a screenshot using the Assistive Touch feature. Step 1 – Go to your phone settings. Step 2 – Next, tap to open Accessibility settings. Step 3 – Open Touch settings. Step 4 – Next, open the Assistive Touch settings. Step 5 – Turn on Assistive Touch on your phone. Step 6 – Open “Customize Top Menu” to access it. Step 7 – Now you just need to link any of these functions to your screen capture. So click on the first
 Clock app missing in iPhone: How to fix it
May 03, 2024 pm 09:19 PM
Clock app missing in iPhone: How to fix it
May 03, 2024 pm 09:19 PM
Is the clock app missing from your phone? The date and time will still appear on your iPhone's status bar. However, without the Clock app, you won’t be able to use world clock, stopwatch, alarm clock, and many other features. Therefore, fixing missing clock app should be at the top of your to-do list. These solutions can help you resolve this issue. Fix 1 – Place the Clock App If you mistakenly removed the Clock app from your home screen, you can put the Clock app back in its place. Step 1 – Unlock your iPhone and start swiping to the left until you reach the App Library page. Step 2 – Next, search for “clock” in the search box. Step 3 – When you see “Clock” below in the search results, press and hold it and
 Safari zoom issue on iPhone: Here's the fix
Apr 20, 2024 am 08:08 AM
Safari zoom issue on iPhone: Here's the fix
Apr 20, 2024 am 08:08 AM
If you don't have control over the zoom level in Safari, getting things done can be tricky. So if Safari looks zoomed out, that might be a problem for you. Here are a few ways you can fix this minor zoom issue in Safari. 1. Cursor magnification: Select "Display" > "Cursor magnification" in the Safari menu bar. This will make the cursor more visible on the screen, making it easier to control. 2. Move the mouse: This may sound simple, but sometimes just moving the mouse to another location on the screen may automatically return it to normal size. 3. Use Keyboard Shortcuts Fix 1 – Reset Zoom Level You can control the zoom level directly from the Safari browser. Step 1 – When you are in Safari
 Slow Cellular Data Internet Speeds on iPhone: Fixes
May 03, 2024 pm 09:01 PM
Slow Cellular Data Internet Speeds on iPhone: Fixes
May 03, 2024 pm 09:01 PM
Facing lag, slow mobile data connection on iPhone? Typically, the strength of cellular internet on your phone depends on several factors such as region, cellular network type, roaming type, etc. There are some things you can do to get a faster, more reliable cellular Internet connection. Fix 1 – Force Restart iPhone Sometimes, force restarting your device just resets a lot of things, including the cellular connection. Step 1 – Just press the volume up key once and release. Next, press the Volume Down key and release it again. Step 2 – The next part of the process is to hold the button on the right side. Let the iPhone finish restarting. Enable cellular data and check network speed. Check again Fix 2 – Change data mode While 5G offers better network speeds, it works better when the signal is weaker
