

Nginx reverse proxy websocket configuration example

This article mainly introduces Nginx reverse proxy websocket configuration examples. This article is a summary of the project requirements after successful configuration. Friends in need can refer to it
There is a recent requirement that requires the use of nginx reverse Proxy websocket, after searching some information, it has been tested and passed. This article only makes a record
Copy code The code is as follows:
注: 看官方文档说 Nginx 在 1.3 以后的版本才支持 websocket 反向代理,所以要想使用支持 websocket 的功能,必须升级到 1.3 以后的版本,
因此我这边是下载的 Tengine 的最新版本测试的
1. Download tengine Recent source code
Copy code The code is as follows:
wget http://tengine.taobao.org/download/tengine-2.0.3.tar.gz
2. Install basic dependenciesPackage
Copy code The code is as follows:
yum -y install pcre*
yum -y install zlib*
yum -y install openssl*
3. Unzip, compile and install
Copy code The code is as follows :
tar -zxvf tengine-2.0.3.tar.gz cd tengine-2.0.3 ./configure --prefix=安装目录 make sudo make install
nginx.conf configuration is as follows:
Copy code The code is as follows:
user apps apps;
worker_processes  4; # 这个由于我是用的虚拟机,所以配置的 4 ,另外 tengine 可以自动根据CPU数目设置进程个数和绑定CPU亲缘性
# worker_processes auto
# worker_cpu_affinity auto
error_log  logs/error.log;
pid        logs/nginx.pid;
#Specifies the value for maximum file descriptors that can be opened by this process.
worker_rlimit_nofile 65535;
events {
    use epoll;
    worker_connections  65535;
}
# load modules compiled as Dynamic Shared Object (DSO)
#
#dso {
#    load ngx_http_fastcgi_module.so;
#    load ngx_http_rewrite_module.so;
#}
http {
    include       mime.types;
    default_type  application/octet-stream;
    server_names_hash_bucket_size 128;
    client_header_buffer_size 4k;
    large_client_header_buffers 4 32k;
    client_max_body_size 80m;
    sendfile on;
    tcp_nopush     on;
    client_body_timeout  5;
    client_header_timeout 5;
    keepalive_timeout  5;
    send_timeout       5;
    open_file_cache max=65535 inactive=20s;
    open_file_cache_valid 30s;
    open_file_cache_min_uses 1;
    tcp_nodelay on;
    fastcgi_connect_timeout 300;
    fastcgi_send_timeout 300;
    fastcgi_read_timeout 300;
    fastcgi_buffer_size 64k;
    fastcgi_buffers 4 64k;
    fastcgi_busy_buffers_size 128k;
    fastcgi_temp_file_write_size 128k;
    client_body_buffer_size  512k;
    proxy_connect_timeout    5;
    proxy_read_timeout       60;
    proxy_send_timeout       5;
    proxy_buffer_size        16k;
    proxy_buffers            4 64k;
    proxy_busy_buffers_size 128k;
    proxy_temp_file_write_size 128k;
    gzip on;
    gzip_min_length  1k;
    gzip_buffers     4 16k;
    gzip_http_version 1.0;
    gzip_comp_level 2;
    gzip_types       text/plain application/x-javascript text/css application/xml;
    gzip_vary on;
    proxy_temp_path   /dev/shm/temp;
    proxy_cache_path  /dev/shm/cache levels=2:2:2   keys_zone=cache_go:200m inactive=5d max_size=7g;
    log_format log_access  '$remote_addr - $remote_user [$time_local] "$request" "$request_time" "$upstream_response_time"'
              '$status $body_bytes_sent "$http_referer" '
              '"$http_user_agent" $http_x_forwarded_for $host $hostname' ;
    #websocket 需要加下这个
    map $http_upgrade $connection_upgrade {
        default upgrade;
        ''      close;
    }
    include /home/apps/tengine/conf/test.com;
}test. com configuration file content:
Copy code The code is as follows:
upstream test.com {
   server 192.168.1.5:9000;
}
server {
    listen       80;
    server_name  test.com;
    #charset koi8-r;
    #access_log  logs/host.access.log  main;
    location  ^~  /websocket {
        proxy_pass http://test.com;
        proxy_redirect    off;
        proxy_set_header X-Real-IP $remote_addr;
        proxy_set_header Host $host;
        proxy_set_header X-Forwarded-For $proxy_add_x_forwarded_for;
        proxy_http_version 1.1;
        proxy_set_header Upgrade $http_upgrade;
        proxy_set_header Connection "upgrade";
    }
}Parse the map command
nginx above For the function of map $http_upgrade $connection_upgrade in the .conf configuration, please refer to http://www.ttlsa.com/nginx/using-nginx-map-method/
This function is mainly based on the $ in the client request The value of http_upgrade is used to construct and change the value of $connection_upgrade, that is, a new variable $connection_upgrade is created based on the value of the variable $http_upgrade. The rules created are the contents of {}, please see configuration:
Copy Code The code is as follows:
map $http_upgrade $connection_upgrade {
        default upgrade;
        ''      close;
}The rules are not matched, so the default is used, that is, the value of $connection_upgrade will always be upgrade. Then if $http_upgrade is an empty string, the value will be close. Personal understanding!
Related recommendations:
nginx Reverse The proxy mechanism solves front-end cross-domain issues
The above is the detailed content of Nginx reverse proxy websocket configuration example. For more information, please follow other related articles on the PHP Chinese website!

Hot AI Tools

Undresser.AI Undress
AI-powered app for creating realistic nude photos

AI Clothes Remover
Online AI tool for removing clothes from photos.

Undress AI Tool
Undress images for free

Clothoff.io
AI clothes remover

AI Hentai Generator
Generate AI Hentai for free.

Hot Article
Hot Tools

Notepad++7.3.1
Easy-to-use and free code editor

SublimeText3 Chinese version
Chinese version, very easy to use

Zend Studio 13.0.1
Powerful PHP integrated development environment

Dreamweaver CS6
Visual web development tools

SublimeText3 Mac version
God-level code editing software (SublimeText3)
Hot Topics
 1377
1377
 52
52

 How to allow external network access to tomcat server
Apr 21, 2024 am 07:22 AM
How to allow external network access to tomcat server
Apr 21, 2024 am 07:22 AM
To allow the Tomcat server to access the external network, you need to: modify the Tomcat configuration file to allow external connections. Add a firewall rule to allow access to the Tomcat server port. Create a DNS record pointing the domain name to the Tomcat server public IP. Optional: Use a reverse proxy to improve security and performance. Optional: Set up HTTPS for increased security.
 How to generate URL from html file
Apr 21, 2024 pm 12:57 PM
How to generate URL from html file
Apr 21, 2024 pm 12:57 PM
Converting an HTML file to a URL requires a web server, which involves the following steps: Obtain a web server. Set up a web server. Upload HTML file. Create a domain name. Route the request.
 How to deploy nodejs project to server
Apr 21, 2024 am 04:40 AM
How to deploy nodejs project to server
Apr 21, 2024 am 04:40 AM
Server deployment steps for a Node.js project: Prepare the deployment environment: obtain server access, install Node.js, set up a Git repository. Build the application: Use npm run build to generate deployable code and dependencies. Upload code to the server: via Git or File Transfer Protocol. Install dependencies: SSH into the server and use npm install to install application dependencies. Start the application: Use a command such as node index.js to start the application, or use a process manager such as pm2. Configure a reverse proxy (optional): Use a reverse proxy such as Nginx or Apache to route traffic to your application
 Can nodejs be accessed from the outside?
Apr 21, 2024 am 04:43 AM
Can nodejs be accessed from the outside?
Apr 21, 2024 am 04:43 AM
Yes, Node.js can be accessed from the outside. You can use the following methods: Use Cloud Functions to deploy the function and make it publicly accessible. Use the Express framework to create routes and define endpoints. Use Nginx to reverse proxy requests to Node.js applications. Use Docker containers to run Node.js applications and expose them through port mapping.
 How to deploy and maintain a website using PHP
May 03, 2024 am 08:54 AM
How to deploy and maintain a website using PHP
May 03, 2024 am 08:54 AM
To successfully deploy and maintain a PHP website, you need to perform the following steps: Select a web server (such as Apache or Nginx) Install PHP Create a database and connect PHP Upload code to the server Set up domain name and DNS Monitoring website maintenance steps include updating PHP and web servers, and backing up the website , monitor error logs and update content.
 How to use Fail2Ban to protect your server from brute force attacks
Apr 27, 2024 am 08:34 AM
How to use Fail2Ban to protect your server from brute force attacks
Apr 27, 2024 am 08:34 AM
An important task for Linux administrators is to protect the server from illegal attacks or access. By default, Linux systems come with well-configured firewalls, such as iptables, Uncomplicated Firewall (UFW), ConfigServerSecurityFirewall (CSF), etc., which can prevent a variety of attacks. Any machine connected to the Internet is a potential target for malicious attacks. There is a tool called Fail2Ban that can be used to mitigate illegal access on the server. What is Fail2Ban? Fail2Ban[1] is an intrusion prevention software that protects servers from brute force attacks. It is written in Python programming language
 Come with me to learn Linux and install Nginx
Apr 28, 2024 pm 03:10 PM
Come with me to learn Linux and install Nginx
Apr 28, 2024 pm 03:10 PM
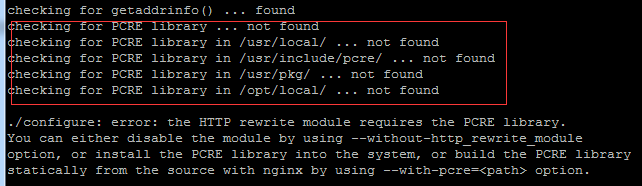
Today, I will lead you to install Nginx in a Linux environment. The Linux system used here is CentOS7.2. Prepare the installation tools 1. Download Nginx from the Nginx official website. The version used here is: 1.13.6.2. Upload the downloaded Nginx to Linux. Here, the /opt/nginx directory is used as an example. Run "tar-zxvfnginx-1.13.6.tar.gz" to decompress. 3. Switch to the /opt/nginx/nginx-1.13.6 directory and run ./configure for initial configuration. If the following prompt appears, it means that PCRE is not installed on the machine, and Nginx needs to
 Several points to note when building high availability with keepalived+nginx
Apr 23, 2024 pm 05:50 PM
Several points to note when building high availability with keepalived+nginx
Apr 23, 2024 pm 05:50 PM
After yum installs keepalived, configure the keepalived configuration file. Note that in the keepalived configuration files of master and backup, the network card name is the network card name of the current machine. VIP is selected as an available IP. It is usually used in high availability and LAN environments. There are many, so this VIP is an intranet IP in the same network segment as the two machines. If used in an external network environment, it does not matter whether it is on the same network segment, as long as the client can access it. Stop the nginx service and start the keepalived service. You will see that keepalived pulls the nginx service to start. If it cannot start and fails, it is basically a problem with the configuration files and scripts, or a prevention problem.
