
This time I will bring you vue-video-player to make a custom player. What are the precautions for vue-video-player to make a custom player. The following is a practical case. Let’s take a look.
Figure 1--Show the sidebar
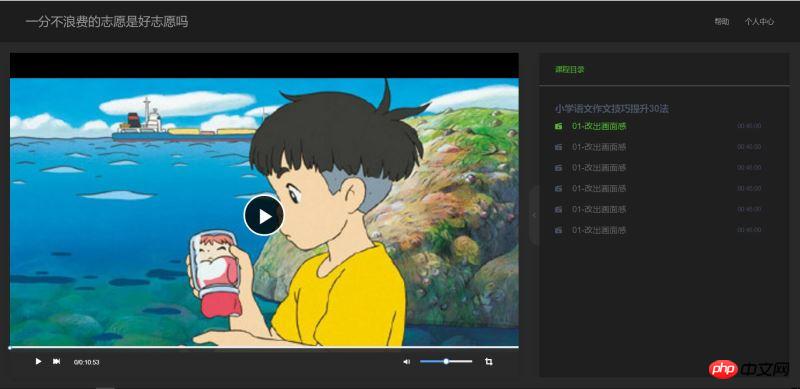
Figure 2-Collapse the sidebar;

Figure 3: Full screen.

You need to use vue in this project, vue-video-player , I use the ui framework of iview, but the ui framework does not matter. What I focus on here is the use of vue-video-player developed based on video.js, and how to operate the API in video.js.
vue-video-player Project address: https://github.com/surmon-china/vue-video-player.
video.js document address: http://docs.videojs.com/docs/api/player.html.
Project directory:
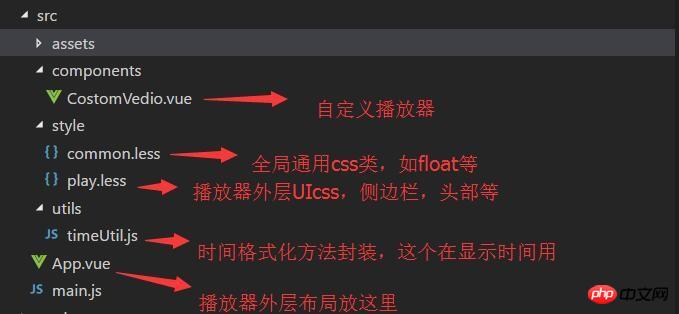
Figure 1 As you can see, this project uses a two-column adaptive layout. The right side is the playlist with a fixed width of 500px, and the left side is the player box. The playlist box can be expanded or collapsed according to the click of the handle, and the player The box also adapts its width according to the expansion/contraction of the playlist.
(Because the recorded animation is too large to be uploaded, you can clone my program and run it to see it).
The html code structure is as follows:

[css] view plain copy
.transition{
       transition: all 1s ease;
       -moz-transition: all 1s ease;
       -webkit-transition: all 1s ease;
       -o-transition: all 1s ease;
   }
   [css] view plain copy
.toLeft{
        .transition;
        margin-right: 540px !important;
    }
    .toRight{
        .transition;
        margin-right: 40px !important;
    }
    .toHide{
        .transition;
        right: -500px !important;
    }
    .toShow{
        .transition;
        right: 0px !important;
    }
[css] view plain copy
// 播放区
    .player-box{
        margin-right: 540px;
        height: 100%;
        position: relative;

    }

[css] view plain copy
//侧边信息区
    .info-box{
        width: 520px;
        height: 100%;
        background: transparent;
        position: relative;
        overflow: hidden;
    }
[css] view plain copy
// 内容区
.content{
    background: #292929;
    position: relative;
    padding: 20px 0 20px 20px;

}[html] view plain copy
<template>
<p class="custom-video-outer-box" @mouseover="videoMouseOver">
<video-player class="video-player-box"
ref="videoPlayer"
:options="playerOptions"
:playsinline="true"
customEventName="customstatechangedeventname"
@play="onPlayerPlay($event)"
@pause="onPlayerPause($event)"
@ended="onPlayerEnded($event)"
@waiting="onPlayerWaiting($event)"
@playing="onPlayerPlaying($event)"
@loadeddata="onPlayerLoadeddata($event)"
@timeupdate="onPlayerTimeupdate($event)"
@statechanged="playerStateChanged($event)"
@ready="playerReadied"
>
<!-- @canplay="onPlayerCanplay($event)" -->
<!-- @canplaythrough="onPlayerCanplaythrough($event)" -->
</video-player>
<!-- 底部进度条 start -->
<transition name="fade">
<p class="bottomCtrl" v-show="isBottomCtrlShow" id="bottomCtrl">
<!-- -->
<!-- <p class="bottomCtrl" v-show="false"> -->
<!-- <p class="bottomCtrl" > -->
<Slider v-model="playerCtrl.currentTimeInt" class="progress-slider" :max="playerCtrl.durationInt" :tip-format="progressTipFormat" @on-change="progressChange"></Slider>
<p class="clearfix" >
<p class="left">
<!-- 暂停 -->
<span v-on:click="play" v-if="!playerCtrl.isPlay" class="icon">
<Icon type="play"></Icon>
</span>
<!-- 播放 -->
<span v-else v-on:click="pause" class="icon">
<Icon type="stop"></Icon>
</span>
<!-- 下一曲 -->
<span class="icon" v-on:click="nextClick">
<Icon type="skip-forward"></Icon>
</span>
<span class="time">
{{playerCtrl.currentTime}}/{{playerCtrl.duration}}
</span>
</p>
<p class="right clearfix">
<p class="voice-box clearfix left">
<!-- 音量 -->
<Icon type="volume-medium" class="left icon"></Icon>
<Slider v-model="playerCtrl.voiceSlider" class="voice-slider left " max=100 @on-change="volumeChange"></Slider>
</p>
<!-- 全屏 -->
<span class="icon left" @click="fullScreenHandle">
<Icon type="crop" class="full-screen" ></Icon>
</span>
</p>
</p>
</p>
</transition>
</p>
</template>css style:
[css] view plain copy
<style lang="less">
    .video-player-box{
        height: 100% !important;
        width: 100% !important;
    }
      //底部进度条
    .bottomCtrl{
        line-height: 60px;
        height: 60px;
        overflow: visible;
        position: absolute;
        bottom: 0;
        left: 0;
        background-color: rgba(45, 45, 45, .92);
        width: 100%;
        padding: 0 50px;
        color: #fff;
        z-index: 999999999999999;

        .icon{
            font-size: 16px;
            line-height: 60px;
            cursor: pointer;
        }

        .icon+.icon{
            margin-left: 20px;
        }
    }
    .custom-video-outer-box{
        position: relative;
        height: 100%;
        width: 100%;
    }
    .progress-slider{
        position: absolute;
        width: 100%;
        top: 0;
        left: 0;
        height: 18px;
        line-height: 18px;
        .ivu-slider-wrap{
            margin: 0 !important;
            border-radius: 0 !important;
        }
        .ivu-slider-button-wrap{
             line-height: normal !important;
        }
        .ivu-slider-button{
            height: 8px !important;
            width: 8px !important;

        }
    }
    .voice-box{
        .voice-slider{
            width: 100px;
            margin-left: 20px;
        }
        .ivu-slider-wrap{
            margin: 27px 0 !important;
        }

    }
    .time{
        margin-left: 25px;
    }
    .full-screen{
       margin-left: 25px;
        line-height: 60px;
    }

    .ivu-progress-outer{
        padding: 0 10px !important;
    }

    .vjs-big-play-button{
        height: 80px !important;
        width: 80px !important;
        line-height: 80px !important;
        text-align: center;
        background:rgba(0, 0, 0, 0.8) !important;
        border-radius: 50% !important;
        top: 50% !important;
        left: 50% !important;
        margin-left: -40px !important;
        margin-top: -40px !important;
    }
    #vjs_video_3{
        max-height: 100% !important;
        width: 100% !important;
        height: 100% !important;
    }
    .video-player-box>p{
        height: 100% !important;
        width: 100% !important;
    }
    .video-js .vjs-big-play-button{
        font-size: 5em !important;
    }
    video{
        max-height: 100% !important;

    }

</style>[javascript] view plain copy
// 播放
play(){
this.player.play();
},
// 暂停
pause(){
this.player.pause();
},
//下一曲
nextClick(){
console.log("自定义","下一曲点击");
},
//全屏
fullScreenHandle(){
console.log("全屏");
if(!this.player.isFullscreen()){
this.player.requestFullscreen();
this.player.isFullscreen(true);
}else{
this.player.exitFullscreen();
this.player.isFullscreen(false);
}
},[html] view plain copy
<video-player class="video-player-box"
ref="videoPlayer"
:options="playerOptions"
:playsinline="true"
customEventName="customstatechangedeventname"
@play="onPlayerPlay($event)"
@pause="onPlayerPause($event)"
@ended="onPlayerEnded($event)"
@waiting="onPlayerWaiting($event)"
@playing="onPlayerPlaying($event)"
@loadeddata="onPlayerLoadeddata($event)"
@timeupdate="onPlayerTimeupdate($event)"
@statechanged="playerStateChanged($event)"
@ready="playerReadied">
<!-- @canplay="onPlayerCanplay($event)" -->
<!-- @canplaythrough="onPlayerCanplaythrough($event)" --></video-player>We can change our UI accordingly based on these status changes, such as displaying the "pause" button during playback, displaying "play" and other functions during pause.
[javascript] view plain copy
//时间更新
           onPlayerTimeupdate(player){
               this.playerCtrl.currentTime=timeUtil.secondToDate(player.currentTime());
               this.playerCtrl.currentTimeInt=Math.floor(player.currentTime());
               console.log("当前音量",player.volume());
},定点播放,即用户点击进度条某个地方,即可在这个点进度播放,使用的是slider的
[html] view plain copy
@on-change="progressChange"
这个方法监听slider定点,
[javascript] view plain copy
//进度条被拉动
           progressChange(val){
               this.player.currentTime(val);
               this.playerCtrl.currentTimeInt=val;
               this.playerCtrl.currentTime=timeUtil.secondToDate(val);
},拿到定点的值,然后通过player的currentTime设置跳到定点播放。
音量调节的做法跟播放进度相似:
一开始初始化的时候记得配置
[javascript] view plain copy
muted:false,//开始声音
来开启声音,否则静音状态下调节声音无效。
使用player.volume(val)这个api设置音量,其中val=0,表示声音off,val=1表示声音最大,0.5表示声音设置在half。
最后在app.vue/需要用到这个播放器的地方 引入自定义播放器组件即可。vue-video-player是大神基于video.js开发的适用于vue.js框架的组件,具有良好兼容性,所以我们在vue中使用这个播放器组件本质还是使用video.js,我们要更多的去了解video.js中的api并使用他。
相信看了本文案例你已经掌握了方法,更多精彩请关注php中文网其它相关文章!
推荐阅读:
The above is the detailed content of vue-video-player makes a custom player. For more information, please follow other related articles on the PHP Chinese website!


![[Web front-end] Node.js quick start](https://img.php.cn/upload/course/000/000/067/662b5d34ba7c0227.png)


