Steps to use the created method in vue.js
This time I will bring you the steps to use the created method in vue.js. What are the precautions for using the created method in vue.js. The following is a practical case, let's take a look.
This is one of its life cycle hook functions, which is to call this function after a vue instance is generated. After a vue instance is generated, it must be bound to a certain html element, and then it must be compiled and then inserted into the document. Each stage will have a hook function to facilitate developers to handle different logic at different stages.
Generally, you can call ajax in the created function to obtain the data required for page initialization.
Instance life cycle
Each Vue instance must go through a series of initialization processes before being created. For example, the instance needs to configure data observer, compile the template, mount the instance to the DOM, and then update the DOM when the data changes. During this process, the instance will also call some life cycle hooks, which provides us with the opportunity to execute custom logic. For example, the created hook is called after the instance is created:
var vm = new Vue({
data: {
a: 1
},
created: function () {
// `this` 指向 vm 实例
console.log('a is: ' + this.a)
}
})
// -> "a is: 1"There are also some other hooks that are called at different stages of the instance life cycle, such as mounted, updated, destroyed. The hook's this points to the Vue instance that called it. Some users may ask whether Vue.js has a concept of "controller"? The answer is, no. A component's custom logic can be distributed among these hooks.
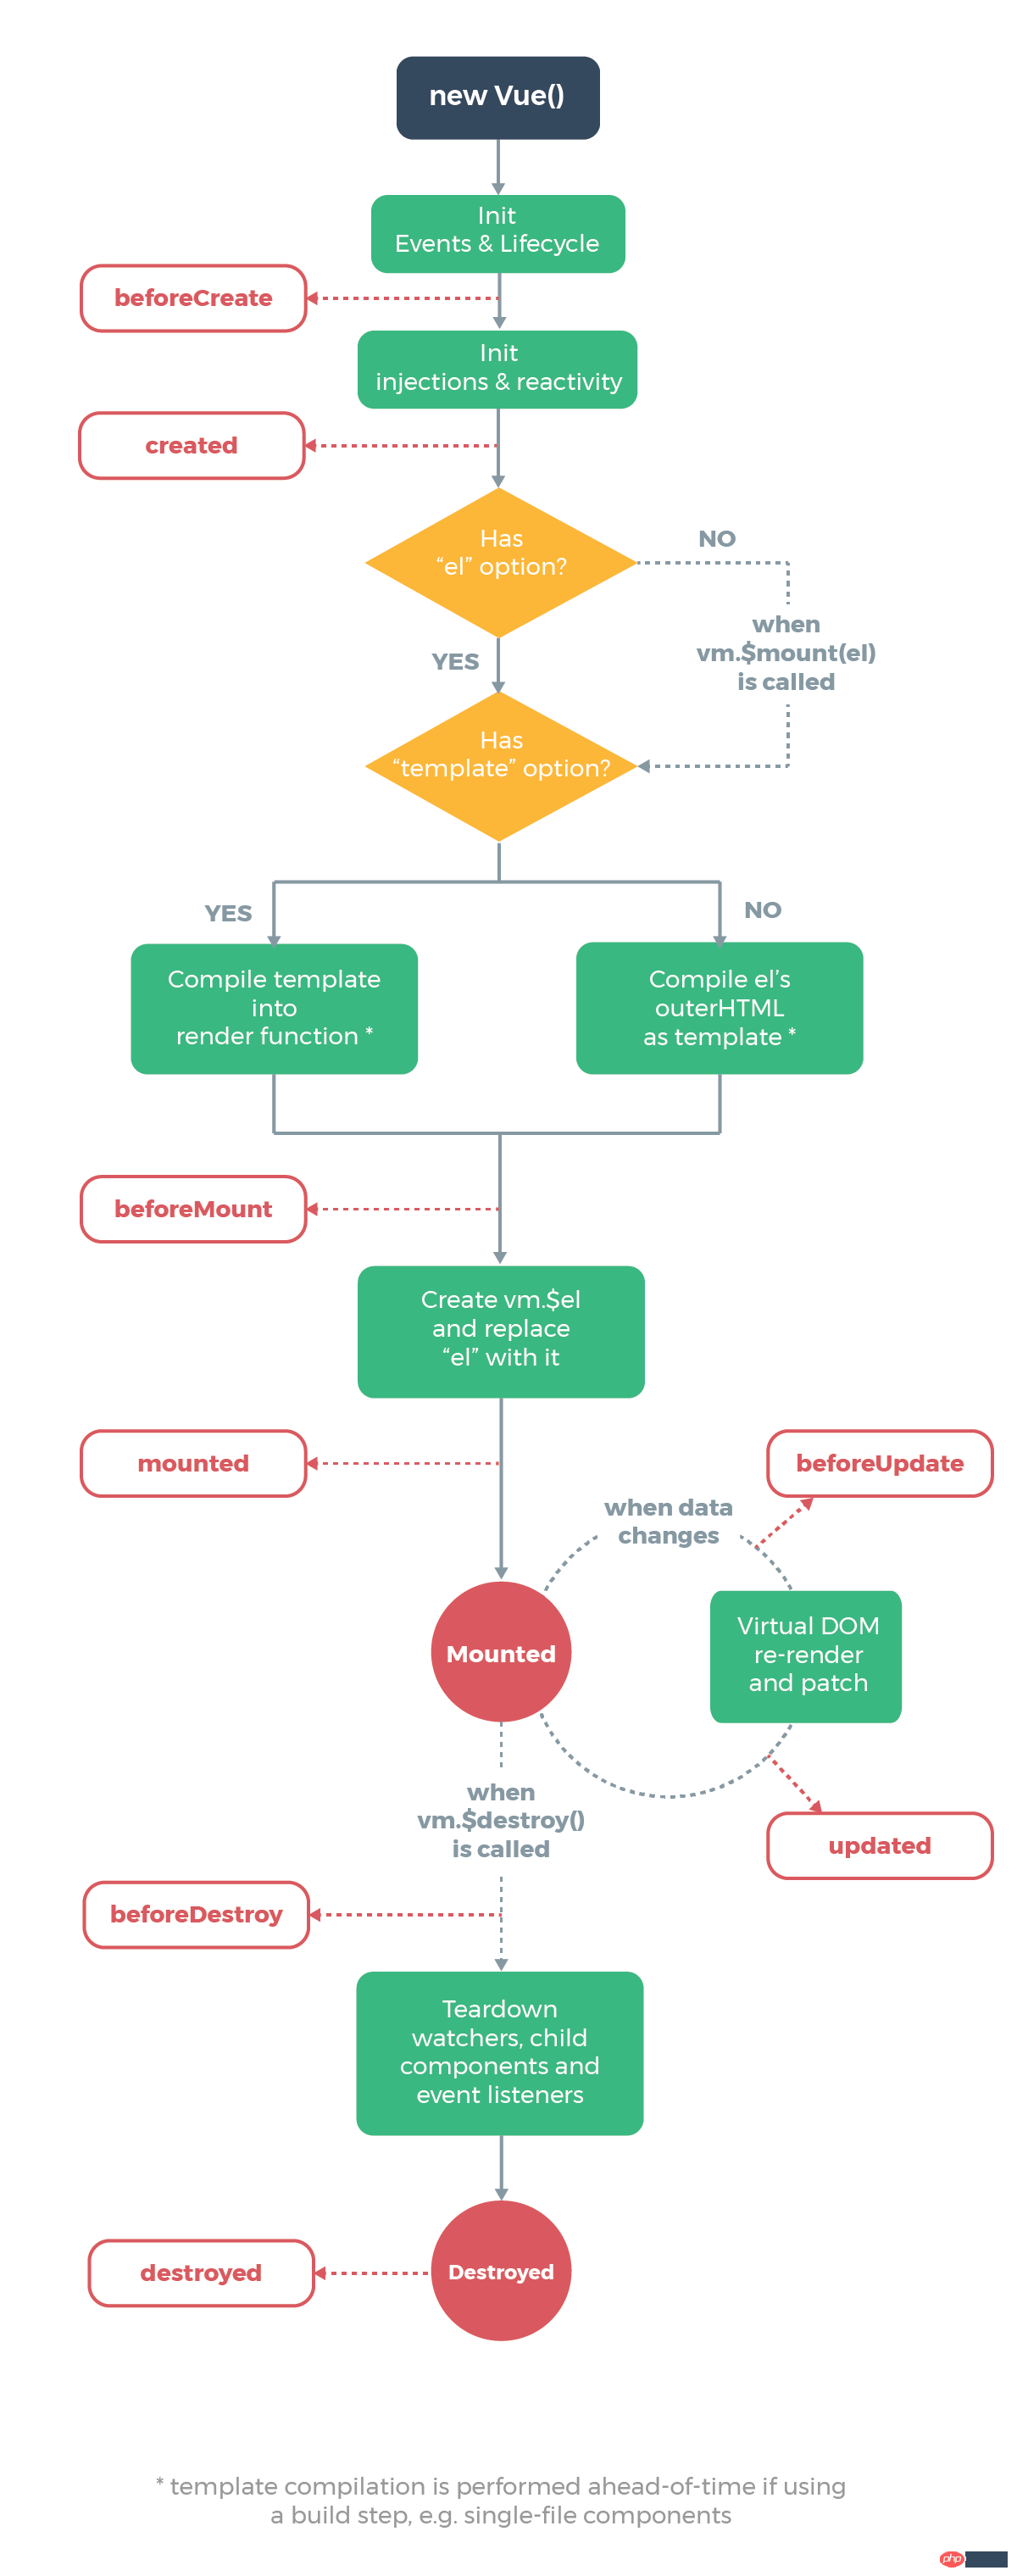
Life cycle diagram
The following figure illustrates the life cycle of an instance. You don't need to understand everything right away, but it will help later.

Added:
##VThe difference between mounted and created in the ue life cycle
1. What is the life cycle?
In popular language, it is a series of processes that an instance or component in Vue goes through from creation to destruction. Although it is not rigorous, it is basically understandable. Through a series of practices, now I have sorted out all the problems encountered, and today I will record the difference between created and mounted:2. What is the difference between created and mounted?
The official diagram is as follows:
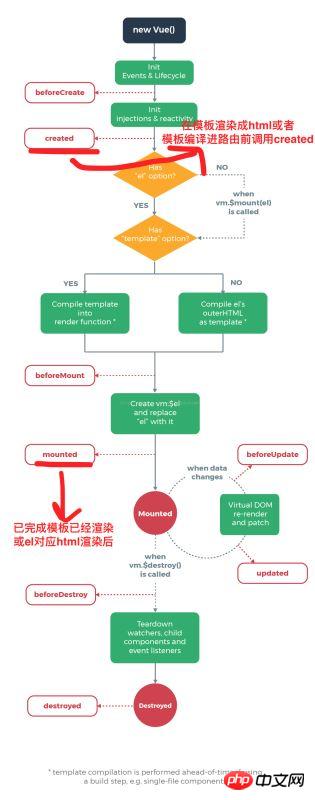
template Called before rendering into html, that is, some attribute values are usually initialized before rendering into a view.
mounted: Called after the template is rendered into HTML, usually after the initialization page is completed, and then performs some required operations on the DOM node of the HTML. In fact, the two are easier to understand. Created is usually used more often, while mounted is usually operated in the use of some plug-ins or the use of components, such as the use of the plug-in chart.js. : var ctx = document.getElementById(ID); Usually there is this step, but if you write it into the component, you will find that you cannot perform some initial configuration of the chart in created. You must wait for this html It can only be done after rendering, so mounted is the best choice. Let’s look at an example (using components).
<span style="font-size: 14px;">Vue.component("demo1",{
data:function(){
return {
name:"",
age:"",
city:""
}
},
template:"<ul><li id='name'>{{name}}</li><li>{{age}}</li><li>{{city}}</li></ul>",
created:function(){
this.name="唐浩益"
this.age = "12"
this.city ="杭州"
var x = document.getElementById("name")//第一个命令台错误
console.log(x.innerHTML);
},
mounted:function(){
var x = document.getElementById("name")/</span>/第二个命令台输出的结果<span style="font-size: 14px;">
console.log(x.innerHTML);
}
});
var vm = new Vue({
el:"#example1"
})</span>
 You can see that everything is assigned in created It was successfully rendered with the initial value.
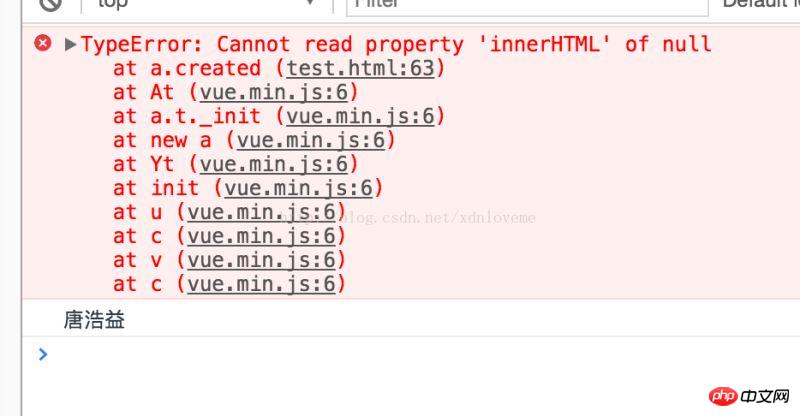
But at the same time, look at the console as follows:
 #You can see that the first one reported an error, which is actually because the id cannot be found, getElementById(ID) The element was not found for the following reasons:
When created, the html in the view is not rendered, so if you directly operate the dom node of the html at this time, you will not be able to find the relevant elements
And in mounted, because at this time The html has been rendered, so the dom node can be directly operated, so the result "Tang Haoyi" is output.
I believe you have mastered the method after reading the case in this article. For more exciting information, please pay attention to other related articles on the php Chinese website!
Recommended reading:
angular4 shared multiple component data communication case detailed explanation
Detailed explanation of the use of stored key-value pairs in js
The above is the detailed content of Steps to use the created method in vue.js. For more information, please follow other related articles on the PHP Chinese website!

Hot AI Tools

Undresser.AI Undress
AI-powered app for creating realistic nude photos

AI Clothes Remover
Online AI tool for removing clothes from photos.

Undress AI Tool
Undress images for free

Clothoff.io
AI clothes remover

Video Face Swap
Swap faces in any video effortlessly with our completely free AI face swap tool!

Hot Article

Hot Tools

Notepad++7.3.1
Easy-to-use and free code editor

SublimeText3 Chinese version
Chinese version, very easy to use

Zend Studio 13.0.1
Powerful PHP integrated development environment

Dreamweaver CS6
Visual web development tools

SublimeText3 Mac version
God-level code editing software (SublimeText3)

Hot Topics
 1386
1386
 52
52
 How to implement an online speech recognition system using WebSocket and JavaScript
Dec 17, 2023 pm 02:54 PM
How to use WebSocket and JavaScript to implement an online speech recognition system Introduction: With the continuous development of technology, speech recognition technology has become an important part of the field of artificial intelligence. The online speech recognition system based on WebSocket and JavaScript has the characteristics of low latency, real-time and cross-platform, and has become a widely used solution. This article will introduce how to use WebSocket and JavaScript to implement an online speech recognition system.
 WebSocket and JavaScript: key technologies for implementing real-time monitoring systems
Dec 17, 2023 pm 05:30 PM
WebSocket and JavaScript: Key technologies for realizing real-time monitoring systems Introduction: With the rapid development of Internet technology, real-time monitoring systems have been widely used in various fields. One of the key technologies to achieve real-time monitoring is the combination of WebSocket and JavaScript. This article will introduce the application of WebSocket and JavaScript in real-time monitoring systems, give code examples, and explain their implementation principles in detail. 1. WebSocket technology
 How to use JavaScript and WebSocket to implement a real-time online ordering system
Dec 17, 2023 pm 12:09 PM
Introduction to how to use JavaScript and WebSocket to implement a real-time online ordering system: With the popularity of the Internet and the advancement of technology, more and more restaurants have begun to provide online ordering services. In order to implement a real-time online ordering system, we can use JavaScript and WebSocket technology. WebSocket is a full-duplex communication protocol based on the TCP protocol, which can realize real-time two-way communication between the client and the server. In the real-time online ordering system, when the user selects dishes and places an order
 How to implement an online reservation system using WebSocket and JavaScript
Dec 17, 2023 am 09:39 AM
How to use WebSocket and JavaScript to implement an online reservation system. In today's digital era, more and more businesses and services need to provide online reservation functions. It is crucial to implement an efficient and real-time online reservation system. This article will introduce how to use WebSocket and JavaScript to implement an online reservation system, and provide specific code examples. 1. What is WebSocket? WebSocket is a full-duplex method on a single TCP connection.
 JavaScript and WebSocket: Building an efficient real-time weather forecasting system
Dec 17, 2023 pm 05:13 PM
JavaScript and WebSocket: Building an efficient real-time weather forecast system Introduction: Today, the accuracy of weather forecasts is of great significance to daily life and decision-making. As technology develops, we can provide more accurate and reliable weather forecasts by obtaining weather data in real time. In this article, we will learn how to use JavaScript and WebSocket technology to build an efficient real-time weather forecast system. This article will demonstrate the implementation process through specific code examples. We
 Simple JavaScript Tutorial: How to Get HTTP Status Code
Jan 05, 2024 pm 06:08 PM
JavaScript tutorial: How to get HTTP status code, specific code examples are required. Preface: In web development, data interaction with the server is often involved. When communicating with the server, we often need to obtain the returned HTTP status code to determine whether the operation is successful, and perform corresponding processing based on different status codes. This article will teach you how to use JavaScript to obtain HTTP status codes and provide some practical code examples. Using XMLHttpRequest
 How to use insertBefore in javascript
Nov 24, 2023 am 11:56 AM
Usage: In JavaScript, the insertBefore() method is used to insert a new node in the DOM tree. This method requires two parameters: the new node to be inserted and the reference node (that is, the node where the new node will be inserted).
 JavaScript and WebSocket: Building an efficient real-time image processing system
Dec 17, 2023 am 08:41 AM
JavaScript is a programming language widely used in web development, while WebSocket is a network protocol used for real-time communication. Combining the powerful functions of the two, we can create an efficient real-time image processing system. This article will introduce how to implement this system using JavaScript and WebSocket, and provide specific code examples. First, we need to clarify the requirements and goals of the real-time image processing system. Suppose we have a camera device that can collect real-time image data


