
 Web Front-end
JS Tutorial
Detailed explanation of the steps to control routing permissions with react router4+redux
Web Front-end
JS Tutorial
Detailed explanation of the steps to control routing permissions with react router4+redux
Detailed explanation of the steps to control routing permissions with react router4+redux
This time I will bring you a detailed explanation of the steps to control routing permissions in react router4 redux. What are the precautions for controlling routing permissions in react router4 redux. The following is a practical case, let's take a look.
Overview
A complete routing system should look like this. When the component linked to is required to be logged in before it can be viewed, it must be able to jump to the login page. , and then after successful login, it will jump back to the page you wanted to visit before. Here we mainly use a permission control class to define routingrouting information, and at the same time use redux to save the routing address to be accessed after successful login. When the login is successful, check whether there is any in redux Save the address. If no address is saved, jump to the default routing address.
Routing permission control class
In this method, use sessionStorage to determine whether you are logged in. If you are not logged in, save the current route you want to jump to redux. in. Then jump to our login page.
import React from 'react'
import { Route, Redirect } from 'react-router-dom'
import { setLoginRedirectUrl } from '../actions/loginAction'
class AuthorizedRoute extends React.Component {
  render() {
    const { component: Component, ...rest } = this.props
    const isLogged = sessionStorage.getItem("userName") != null ? true : false;
    if(!isLogged) {
      setLoginRedirectUrl(this.props.location.pathname);
    }
    return (
        <Route {...rest} render={props => {
          return isLogged
              ? <Component {...props} />
              : <Redirect to="/login" />
        }} />
    )
  }
}
export default AuthorizedRouteRouting definitionInformation
Routing information is also very simple. Only use AuthorizedRoute to define routes that need to be logged in to view.
import React from 'react'
import { BrowserRouter, Switch, Route, Redirect } from 'react-router-dom'
import Layout from '../pages/layout/Layout'
import Login from '../pages/login/Login'
import AuthorizedRoute from './AuthorizedRoute'
import NoFound from '../pages/noFound/NoFound'
import Home from '../pages/home/Home'
import Order from '../pages/Order/Order'
import WorkOrder from '../pages/Order/WorkOrder'
export const Router = () => (
    <BrowserRouter>
      <p>
        <Switch>
          <Route path="/login" component={Login} />
          <Redirect from="/" exact to="/login"/>{/*注意redirect转向的地址要先定义好路由*/}
          <AuthorizedRoute path="/layout" component={Layout} />
          <Route component={NoFound}/>
        </Switch>
      </p>
    </BrowserRouter>
)Login page
is to take out the address stored in redux. After successful login, jump to it. If not, jump to the default page. I This is the default to jump to the home page. Because the antd form is used, the code is a bit long. You only need to look at the two sentences connecting redux and the content in handleSubmit.
import React from 'react'
import './Login.css'
import { login } from '../../mock/mock'
import { Form, Icon, Input, Button, Checkbox } from 'antd';
import { withRouter } from 'react-router-dom';
import { connect } from 'react-redux'
const FormItem = Form.Item;
class NormalLoginForm extends React.Component {
constructor(props) {
super(props);
this.isLogging = false;
}
handleSubmit = (e) => {
e.preventDefault();
this.props.form.validateFields((err, values) => {
if (!err) {
this.isLogging = true;
login(values).then(() => {
this.isLogging = false;
let toPath = this.props.toPath === '' ? '/layout/home' : this.props.toPath
this.props.history.push(toPath);
})
}
});
}
render() {
const { getFieldDecorator } = this.props.form;
return (
<Form onSubmit={this.handleSubmit.bind(this)} className="login-form">
<FormItem>
{getFieldDecorator('userName', {
rules: [{ required: true, message: 'Please input your username!' }],
})(
<Input prefix={<Icon type="user" style={{ color: 'rgba(0,0,0,.25)' }} />} placeholder="Username" />
)}
</FormItem>
<FormItem>
{getFieldDecorator('password', {
rules: [{ required: true, message: 'Please input your Password!' }],
})(
<Input prefix={<Icon type="lock" style={{ color: 'rgba(0,0,0,.25)' }} />} type="password" placeholder="Password" />
)}
</FormItem>
<FormItem>
{getFieldDecorator('remember', {
valuePropName: 'checked',
initialValue: true,
})(
<Checkbox>Remember me</Checkbox>
)}
<a className="login-form-forgot" href="">Forgot password</a>
<Button type="primary" htmlType="submit" className="login-form-button"
loading={this.isLogging ? true : false}>
{this.isLogging ? 'Loging' : 'Login'}
</Button>
Or <a href="">register now!</a>
</FormItem>
</Form>
);
}
}
const WrappedNormalLoginForm = Form.create()(NormalLoginForm);
const loginState = ({ loginState }) => ({
toPath: loginState.toPath
})
export default withRouter(connect(
loginState
)(WrappedNormalLoginForm))By the way, let’s talk about the use of redux here. For the time being, I will only basically use the method: define reducer, define actions, create store, and then connect redux when I need to use redux variables. When I need to dispatch to change the variables, I will directly introduce the methods in actions. , just call it directly. In order to match the event names in actions and reducer, I created an actionsEvent.js to store the event names for fear of typos and easy modification later.
reducer:
import * as ActionEvent from '../constants/actionsEvent'
const initialState = {
  toPath: ''
}
const loginRedirectPath = (state = initialState, action) => {
  if(action.type === ActionEvent.Login_Redirect_Event) {
    return Object.assign({}, state, {
      toPath: action.toPath
    })
  }
  return state;
}
export default loginRedirectPathactions:
import store from '../store'
import * as ActionEvent from '../constants/actionsEvent'
export const setLoginRedirectUrl = (toPath) => {
  return store.dispatch({
         type: ActionEvent.Login_Redirect_Event,
        toPath: toPath
       })
}Create store
import { createStore, combineReducers } from 'redux'
import loginReducer from './reducer/loginReducer'
const reducers = combineReducers({
  loginState: loginReducer //这里的属性名loginState对应于connect取出来的属性名
})
const store = createStore(reducers)
export default storeI almost forgot to mention it, refer to the routing control class AuthorizedRoutehttps://codepen.io/bradwestfall/project/editor/XWNWge?preview_height=50&open_file=src/app.js Code here. I feel that this code is pretty good. I didn’t know how to do it at first, but I only had some ideas after I understood it.
I believe you have mastered the method after reading the case in this article. For more exciting information, please pay attention to other related articles on the php Chinese website!
Recommended reading:
Summary of angular routerlink jump methods
##Detailed explanation of the steps of vuex localstorage dynamic monitoring storage
The above is the detailed content of Detailed explanation of the steps to control routing permissions with react router4+redux. For more information, please follow other related articles on the PHP Chinese website!

Hot AI Tools

Undresser.AI Undress
AI-powered app for creating realistic nude photos

AI Clothes Remover
Online AI tool for removing clothes from photos.

Undress AI Tool
Undress images for free

Clothoff.io
AI clothes remover

Video Face Swap
Swap faces in any video effortlessly with our completely free AI face swap tool!

Hot Article
Hot Tools

Notepad++7.3.1
Easy-to-use and free code editor

SublimeText3 Chinese version
Chinese version, very easy to use

Zend Studio 13.0.1
Powerful PHP integrated development environment

Dreamweaver CS6
Visual web development tools

SublimeText3 Mac version
God-level code editing software (SublimeText3)
Hot Topics
 1387
1387
 52
52

 Enable root permissions with one click (quickly obtain root permissions)
Jun 02, 2024 pm 05:32 PM
Enable root permissions with one click (quickly obtain root permissions)
Jun 02, 2024 pm 05:32 PM
It allows users to perform more in-depth operations and customization of the system. Root permission is an administrator permission in the Android system. Obtaining root privileges usually requires a series of tedious steps, which may not be very friendly to ordinary users, however. By enabling root permissions with one click, this article will introduce a simple and effective method to help users easily obtain system permissions. Understand the importance and risks of root permissions and have greater freedom. Root permissions allow users to fully control the mobile phone system. Strengthen security controls, customize themes, and users can delete pre-installed applications. For example, accidentally deleting system files causing system crashes, excessive use of root privileges, and inadvertent installation of malware are also risky, however. Before using root privileges
 How to set permission access in QQ space
Feb 23, 2024 pm 02:22 PM
How to set permission access in QQ space
Feb 23, 2024 pm 02:22 PM
How to set permission access in QQ space? You can set permission access in QQ space, but most friends don’t know how to set permission access in QQ space. Next is the diagram of how to set permission access in QQ space brought by the editor for users. Text tutorial, interested users come and take a look! QQ usage tutorial QQ space how to set permission access 1. First open the QQ application, click [Avatar] in the upper left corner of the main page; 2. Then expand the personal information area on the left and click the [Settings] function in the lower left corner; 3. Enter the settings page Swipe to find the [Privacy] option; 4. Next in the privacy interface, select the [Permission Settings] service; 5. Then challenge to the latest page and select [Space Dynamics]; 6. Set up in QQ Space again
 PHP, Vue and React: How to choose the most suitable front-end framework?
Mar 15, 2024 pm 05:48 PM
PHP, Vue and React: How to choose the most suitable front-end framework?
Mar 15, 2024 pm 05:48 PM
PHP, Vue and React: How to choose the most suitable front-end framework? With the continuous development of Internet technology, front-end frameworks play a vital role in Web development. PHP, Vue and React are three representative front-end frameworks, each with its own unique characteristics and advantages. When choosing which front-end framework to use, developers need to make an informed decision based on project needs, team skills, and personal preferences. This article will compare the characteristics and uses of the three front-end frameworks PHP, Vue and React.
 Discuz Forum Permission Management: Read Permission Setting Guide
Mar 10, 2024 pm 05:33 PM
Discuz Forum Permission Management: Read Permission Setting Guide
Mar 10, 2024 pm 05:33 PM
Discuz forum permission management: Read the permission setting guide In Discuz forum management, permission setting is a crucial part. Among them, the setting of reading permissions is particularly important, as it determines the scope of content that different users can see in the forum. This article will introduce in detail the reading permission settings of the Discuz forum and how to flexibly configure it for different needs. 1. Basic concepts of reading permissions In the Discuz forum, reading permissions mainly include the following concepts that need to be understood: Default reading permissions: Default after new user registration
 Integration of Java framework and front-end React framework
Jun 01, 2024 pm 03:16 PM
Integration of Java framework and front-end React framework
Jun 01, 2024 pm 03:16 PM
Integration of Java framework and React framework: Steps: Set up the back-end Java framework. Create project structure. Configure build tools. Create React applications. Write REST API endpoints. Configure the communication mechanism. Practical case (SpringBoot+React): Java code: Define RESTfulAPI controller. React code: Get and display the data returned by the API.
 How to obtain trustedinstaller permission 'Recommended steps to obtain TrustedInstaller permission'
Feb 06, 2024 pm 05:48 PM
How to obtain trustedinstaller permission 'Recommended steps to obtain TrustedInstaller permission'
Feb 06, 2024 pm 05:48 PM
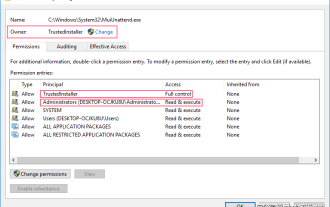
This article will take you to understand the essence of TI and further explore how to obtain TI permissions with the help of powershell and NtObjectManager modules to complete any operation you want in the operating system. If you have ever administered a Windows system, you should be familiar with the concept of the trustedInstaller (TI) group. The TI group has important permissions in the operation of system files and registry. For example, you can view the properties of files under the System32 folder. In the security options, the TI group and the file owner have permission to delete and modify files. Even administrators cannot directly modify the security options. Therefore, for the operation of system files and registry, it is necessary to
 Where to set the permissions of shared folders? Tips for setting the permissions of shared folders in Win10 to be read-only and cannot be modified
Feb 29, 2024 pm 03:43 PM
Where to set the permissions of shared folders? Tips for setting the permissions of shared folders in Win10 to be read-only and cannot be modified
Feb 29, 2024 pm 03:43 PM
How to set shared folder read-only permissions in Win10? After the host shares the folder, some users only want others to access, read and view the files, but do not want others to modify the files on the host. This article is a tutorial on how to set the permissions of a shared folder to be read-only and cannot be modified. 1. First, share the folder according to the normal process. On the host side, right-click the folder that needs to be shared, and select: Properties-Sharing-Advanced Sharing-check Share this folder; 2. Then, click the permission option below. By default Everyone account, if there is not one, add an Everyone account; 3. Only check the read permission below, and then click OK; 4. Find the folder properties-security, and add an Ever
 Introduction to how to set everyone permissions on win7 computer
Mar 26, 2024 pm 04:11 PM
Introduction to how to set everyone permissions on win7 computer
Mar 26, 2024 pm 04:11 PM
1. Take e-disk as an example. Open [Computer], and click [eDisk], right-click [Properties]. As shown in the figure: 2. In the [Window] page, switch the interface to the [Security] option, and click the [Edit] option below. As shown in the figure: 3. In the [Permissions] option, click the [Add] option. As shown in the figure: 4. The users and groups window pops up and click the [Advanced] option. As shown in the figure: 5. Click to expand the [Find Now] - [Everyone] options in order. When completed, click OK. As shown in the figure: 6. When you see that the user [everyone] has been added to [Group or User] on the [E Disk Permissions] page, select [everyone] and check the box in front of [Full Control]. After the setting is completed, Just press [OK]
