

Vue implementation of PopupWindow component usage steps analysis
This time I will bring you an analysis of the steps to use the PopupWindow component in Vue. What are the precautions for using the PopupWindow component in Vue. The following is a practical case, let's take a look.
I have been learning front-end technology during this period to complete my own small projects. For js, the Vue framework is used. Since I wanted to achieve the PopupWindow effect of a new address in the project, I thought that I could use some features of Vue to achieve it.
Vue features used: Component, propsValue passing, slot content insertion, transitions transition animation, x-templete template.
Directly upload the code (the complete code can be downloaded in the link popupwindow):
html code (no style):
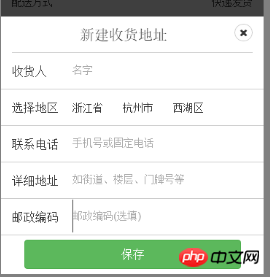
<p id="address-choose">
 <p>
 <button @click="showOneBtnWindow()">显示</button>
  </p>
  <new-address-window
   v-show="isShowEditWindow"
   @close="removeEditWindow()"
   :addressregion="addressRegion">
   <!--使用插槽显示不同的title-->
   <p slot="edit-window-title">
   {{editTitle}}
   </p>
   <p slot="popup-btn-container">
   <button>保存</button>
   <button>删除</button>
  </p>
  </new-address-window>
 </p>
<!--新建地址popupwindow模板-->
<script type="text/x-template" id="popup-window-address-new">
 <transition name="popup-window-transition">
 <p>
  <slot name="edit-window-title">
  <p>新建收货地址</p>
  </slot>
 </p>
 <p>
 <p>收货人</p>
 <input type="text" :value="addressregion.name"/>
 </p>
 <p>
 <p>选择地区</p>
 <ul>
  <li>{{addressregion.province}}</li>
  <li>{{addressregion.city}}</li>
  <li>{{addressregion.region}}</li>
 </ul>
 </p>
 <p>
 <p>联系电话</p>
 <input type="text" placeholder="手机号"/>
 </p>
 <p>
  <p>详细地址</p>
  <input type="text" placeholder="如街道、楼层、门牌号等"/>
 </p>
 <p>
 <p>邮政编码</p>
 <input type="text" placeholder="邮政编码(选填)"/>
 </p>
 <p>
 <slot name="popup-btn-container">
  <button class="btn btn-success">保存</button>
  <button class="btn btn-danger">删除</button>
 </slot>
 </p>
 </p>
 </transition>
</script>js code:
/*
 * 新建与编辑地址Vue组件popupwindow
 * */
var newAddressWindow = Vue.component("new-address-window",{
 props: ['addressregion'],
 template: "#popup-window-address-new"
})
/*
 * 地址popupwindow的Vue实例
 * */
var chooseAddress = new Vue({
 el: "#address-choose",
 data: {
 isShowEditWindow: true,
 isOneButton: false,
 editTitle: "新建收货地址",
 //填入初始地址信息,组件与改数据绑定
 addressRegion: {
 }
 },
 methods: {
 showOneBtnWindow: function(){ //显示新建收货地址对话框(有一个按钮)
  this.isShowEditWindow = true;
  this.isOneButton = false;
  this.editTitle = "新建收货地址";
 },
 removeEditWindow: function(){ //关闭新建与编辑地址选择对话框
  this.isShowEditWindow = false;
 }
 }
})At this point, a popupwindow component is completed. When implementing a Vue component, you can use a template to implement the component. I used the x-templete template to implement the component. At the same time, you can also use the transition feature of vue to add some animation effects in the component pass.
# I believe you have mastered the method after reading the case in this article. For more exciting information, please pay attention to other related articles on the php Chinese website!
Recommended reading:
detailed explanation of vue2.0 plug-in publishing steps using npm
JS implements transparency gradient function
The above is the detailed content of Vue implementation of PopupWindow component usage steps analysis. For more information, please follow other related articles on the PHP Chinese website!

Hot AI Tools

Undresser.AI Undress
AI-powered app for creating realistic nude photos

AI Clothes Remover
Online AI tool for removing clothes from photos.

Undress AI Tool
Undress images for free

Clothoff.io
AI clothes remover

AI Hentai Generator
Generate AI Hentai for free.

Hot Article
Hot Tools

Notepad++7.3.1
Easy-to-use and free code editor

SublimeText3 Chinese version
Chinese version, very easy to use

Zend Studio 13.0.1
Powerful PHP integrated development environment

Dreamweaver CS6
Visual web development tools

SublimeText3 Mac version
God-level code editing software (SublimeText3)
Hot Topics


 How to make Google Maps the default map in iPhone
Apr 17, 2024 pm 07:34 PM
How to make Google Maps the default map in iPhone
Apr 17, 2024 pm 07:34 PM
The default map on the iPhone is Maps, Apple's proprietary geolocation provider. Although the map is getting better, it doesn't work well outside the United States. It has nothing to offer compared to Google Maps. In this article, we discuss the feasible steps to use Google Maps to become the default map on your iPhone. How to Make Google Maps the Default Map in iPhone Setting Google Maps as the default map app on your phone is easier than you think. Follow the steps below – Prerequisite steps – You must have Gmail installed on your phone. Step 1 – Open the AppStore. Step 2 – Search for “Gmail”. Step 3 – Click next to Gmail app
 This Apple ID is not yet in use in the iTunes Store: Fix
Jun 10, 2024 pm 05:42 PM
This Apple ID is not yet in use in the iTunes Store: Fix
Jun 10, 2024 pm 05:42 PM
When logging into iTunesStore using AppleID, this error saying "This AppleID has not been used in iTunesStore" may be thrown on the screen. There are no error messages to worry about, you can fix them by following these solution sets. Fix 1 – Change Shipping Address The main reason why this prompt appears in iTunes Store is that you don’t have the correct address in your AppleID profile. Step 1 – First, open iPhone Settings on your iPhone. Step 2 – AppleID should be on top of all other settings. So, open it. Step 3 – Once there, open the “Payment & Shipping” option. Step 4 – Verify your access using Face ID. step
 Steps to upgrade to the latest version of WeChat (Easily master the upgrade method to the latest version of WeChat)
Jun 01, 2024 pm 10:24 PM
Steps to upgrade to the latest version of WeChat (Easily master the upgrade method to the latest version of WeChat)
Jun 01, 2024 pm 10:24 PM
WeChat is one of the social media platforms in China that continuously launches new versions to provide a better user experience. Upgrading WeChat to the latest version is very important to keep in touch with family and colleagues, to stay in touch with friends, and to keep abreast of the latest developments. 1. Understand the features and improvements of the latest version. It is very important to understand the features and improvements of the latest version before upgrading WeChat. For performance improvements and bug fixes, you can learn about the various new features brought by the new version by checking the update notes on the WeChat official website or app store. 2. Check the current WeChat version We need to check the WeChat version currently installed on the mobile phone before upgrading WeChat. Click to open the WeChat application "Me" and then select the menu "About" where you can see the current WeChat version number. 3. Open the app
 What software is crystaldiskmark? -How to use crystaldiskmark?
Mar 18, 2024 pm 02:58 PM
What software is crystaldiskmark? -How to use crystaldiskmark?
Mar 18, 2024 pm 02:58 PM
CrystalDiskMark is a small HDD benchmark tool for hard drives that quickly measures sequential and random read/write speeds. Next, let the editor introduce CrystalDiskMark to you and how to use crystaldiskmark~ 1. Introduction to CrystalDiskMark CrystalDiskMark is a widely used disk performance testing tool used to evaluate the read and write speed and performance of mechanical hard drives and solid-state drives (SSD). Random I/O performance. It is a free Windows application and provides a user-friendly interface and various test modes to evaluate different aspects of hard drive performance and is widely used in hardware reviews
 Safari zoom issue on iPhone: Here's the fix
Apr 20, 2024 am 08:08 AM
Safari zoom issue on iPhone: Here's the fix
Apr 20, 2024 am 08:08 AM
If you don't have control over the zoom level in Safari, getting things done can be tricky. So if Safari looks zoomed out, that might be a problem for you. Here are a few ways you can fix this minor zoom issue in Safari. 1. Cursor magnification: Select "Display" > "Cursor magnification" in the Safari menu bar. This will make the cursor more visible on the screen, making it easier to control. 2. Move the mouse: This may sound simple, but sometimes just moving the mouse to another location on the screen may automatically return it to normal size. 3. Use Keyboard Shortcuts Fix 1 – Reset Zoom Level You can control the zoom level directly from the Safari browser. Step 1 – When you are in Safari
 Shazam app not working in iPhone: Fix
Jun 08, 2024 pm 12:36 PM
Shazam app not working in iPhone: Fix
Jun 08, 2024 pm 12:36 PM
Having issues with the Shazam app on iPhone? Shazam helps you find songs by listening to them. However, if Shazam isn't working properly or doesn't recognize the song, you'll have to troubleshoot it manually. Repairing the Shazam app won't take long. So, without wasting any more time, follow the steps below to resolve issues with Shazam app. Fix 1 – Disable Bold Text Feature Bold text on iPhone may be the reason why Shazam is not working properly. Step 1 – You can only do this from your iPhone settings. So, open it. Step 2 – Next, open the “Display & Brightness” settings there. Step 3 – If you find that “Bold Text” is enabled
 How to download foobar2000? -How to use foobar2000
Mar 18, 2024 am 10:58 AM
How to download foobar2000? -How to use foobar2000
Mar 18, 2024 am 10:58 AM
foobar2000 is a software that can listen to music resources at any time. It brings you all kinds of music with lossless sound quality. The enhanced version of the music player allows you to get a more comprehensive and comfortable music experience. Its design concept is to play the advanced audio on the computer The device is transplanted to mobile phones to provide a more convenient and efficient music playback experience. The interface design is simple, clear and easy to use. It adopts a minimalist design style without too many decorations and cumbersome operations to get started quickly. It also supports a variety of skins and Theme, personalize settings according to your own preferences, and create an exclusive music player that supports the playback of multiple audio formats. It also supports the audio gain function to adjust the volume according to your own hearing conditions to avoid hearing damage caused by excessive volume. Next, let me help you
 iPhone screenshots not working: How to fix it
May 03, 2024 pm 09:16 PM
iPhone screenshots not working: How to fix it
May 03, 2024 pm 09:16 PM
Screenshot feature not working on your iPhone? Taking a screenshot is very easy as you just need to hold down the Volume Up button and the Power button at the same time to grab your phone screen. However, there are other ways to capture frames on the device. Fix 1 – Using Assistive Touch Take a screenshot using the Assistive Touch feature. Step 1 – Go to your phone settings. Step 2 – Next, tap to open Accessibility settings. Step 3 – Open Touch settings. Step 4 – Next, open the Assistive Touch settings. Step 5 – Turn on Assistive Touch on your phone. Step 6 – Open “Customize Top Menu” to access it. Step 7 – Now you just need to link any of these functions to your screen capture. So click on the first
