This time I will bring you a detailed explanation of the steps to implement password reset in Laravel. What are the precautions for implementing password reset in Laravel? The following is a practical case, let's take a look.
Introduction
Want to implement this function quickly? Just runphp artisan make:auth (if you have already executed this command, you can ignore it) under the newly installed Laravel application, and then visit http://your-app.dev/ in the browser register or other URL assigned to the application, this command will generate User login Everything needed to register, including password reset!
Note: Before using the password reset function provided by Laravel, the User model must use the Illuminate\Notifications\Notifiable trait.
Database related
Before starting, verify that the App\User model implementsIlluminate\Contracts\Auth\CanResetPassword contract. Of course, Laravel's own App\User model already implements this interface and uses the Illuminate\Auth\Passwords\CanResetPassword trait to include the methods needed to implement this interface.
Generate reset token table migration
Next, the table used to store password reset tokens must be created. Laravel already comes with this table The migrations are stored in the database/migrations directory. So, all you have to do is run the migration:php artisan migrate

Routing
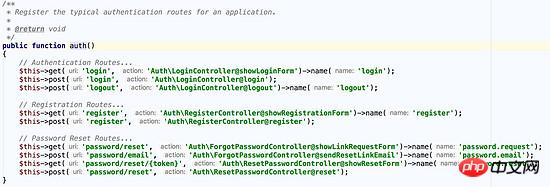
Laravel comes withAuth\ForgotPasswordController and Auth\ResetPasswordController controllers (These two controller classes will be automatically generated through the php artisan make:auth command), which are used to send password reset link emails and reset user passwords respectively. The routes required to reset the password have been automatically generated through the make:auth command:
php artisan make:auth
route definition In the auth method of Illuminate\Routing\Router:

View
is the same as routing, re- The view files required to set the password are also generated through the make:auth command. These view files are located in theresource<a href="http://www.php.cn/wiki/61.html" target="_blank">s/views/auth/passwords </a> directory. , you can modify the generated file accordingly as needed.
Reset password
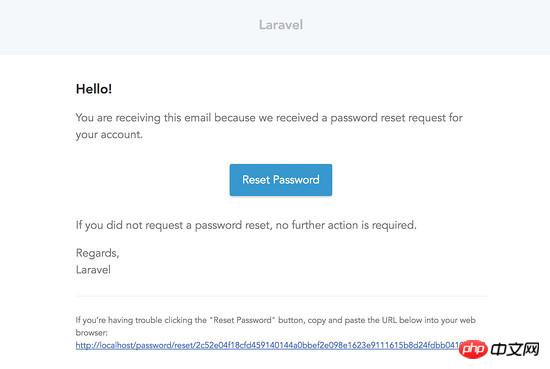
After defining the reset user password route and view, you only need to access it through /password/reset in the browser This entry route.ForgotPasswordController that comes with the framework already contains the logic for sending password reset link emails, and ResetPasswordController contains the logic for resetting user passwords:


You can reset your password after filling in the form and submitting it.
After the password is reset, the user will automatically log in to the application and be redirected to /home. You can customize the jump link after a successful password reset by defining the redirectTo attribute of ResetPasswordController:
protected $redirectTo = '/dashboard';
Note: Default In this case, the password reset token is valid for one hour. You can change the validity time by modifying the expire option in the config/auth.php file.
Custom
Custom authentication Guard
atConfiguration file In auth.php, multiple "guards" can be configured to implement independent authentication based on multi-user tables. You can use your own by overriding the guard method on the built-in ResetPasswordController controller. Selected guard, this method will return a guard instance:
use Illuminate\Support\Facades\Auth;
protected function guard()
{
 return Auth::guard('guard-name');
}Custom password broker
In the configuration file auth.php, Multiple passwords can be configured to be used to reset the password broker of multiple user tables. Similarly, you can use the broker of your choice by overriding the broker methods in the built-in ForgotPasswordController and ResetPasswordController controllers:
use Illuminate\Support\Facades\Password;
/**
 * 获取密码重置期间所使用的broker.
 *
 * @return PasswordBroker
 * @translator laravelacademy.org
 */
protected function broker()
{
  return Password::broker('name');
}Custom password reset email
You can easily edit and send password reset emails Set the link to the user's notification class to implement a custom password reset email. To implement this function, you need to override the sendPasswordResetNotification method on the User model. In this method, you can use any notification you like. Class sends a notification. The first parameter received by this method is password reset $token:
/**
 * 发送密码重置通知.
 *
 * @param string $token
 * @return void
 */
public function sendPasswordResetNotification($token)
{
  $this->notify(new ResetPasswordNotification($token));
}I believe you have mastered the method after reading the case in this article. For more exciting information, please pay attention to other related articles on the PHP Chinese website!
Recommended reading:
Laravel uses Redis to share Session steps detailed explanation
php recursive function case usage detailed explanation
The above is the detailed content of Detailed explanation of the steps to implement password reset in Laravel. For more information, please follow other related articles on the PHP Chinese website!


