

How to use the Rating control of AjaxToolKit
This article mainly introduces the relevant information on how to use the Rating control of AjaxToolKit. Interested friends can refer to it
The Rating control in AjaxToolKit is a Microsoft Ajax control library specially used to process web pages. The control with the rating (or voting) function itself supports the non-refresh function of the web page. When using it, there is no need to put it in the UpdatePanel control. You only need to set its AutoPostBack property to False. This control is very simple to use, and you can also set various effects, custom function callbacks, etc. The following is a screenshot when using

Let’s talk about the functions of common attributes:
ID: Needless to say, everyone knows that all controls will have a server-side ID.
BehaviorID: The ID to be used when obtaining the control object through the Ajax client. This is searched through the $Find method when setting the callback function.
MaxRating: The current maximum value of the control. This value directly reflects the number of "star" icons on the UI.
CurrentRating: The current value is the value currently displayed by the control. This value directly reflects the number of lit "star" icons on the UI. Note that the range of this value is between 0-MaxRating (inclusive).
runat: The registered control is a server-side behavior and this value must be set.
StarCssClass: The style of the "star" icon. Required.
WaitingStarCssClass: The style of the "star" icon when the control is in a waiting state during interaction with the server when processing the client response. Required.
FilledStarCssClass: The style when the "star" icon is lit. Required.
EmptyStarCssClass: The style when the "star" icon is not lit. Required.
CssClass: The overall style of the Rating control. Specify if needed.
OnChanged: is used to handle the response event after the user clicks the "star" icon. This event is handled on the server side.
AutoPostBack: Set whether the control will post back automatically. Normally set this value to False.
ReadOnly: The read-only state of the control. The Rating in the read-only state cannot be clicked by the user. You can set a separate style for the Rating in the read-only state.
Let’s see how to use it.
Preparation work:
1. Make sure that the AjaxControlToolkit.dll assembly is correctly referenced in the project. This assembly is a beta version in Visual Studio 2005. You need to go to Microsoft's official website to download the installation package. Visual Studio 2008 has been automatically installed with the IDE and can be used directly.
2. In Visual Studio2008, this control is not automatically added to the toolbox. It needs to be added to the toolbox manually, and then dragged and dropped on the page. You can open the toolbox floating panel in Visual Studio, select a blank Tab (such as General Tab), right-click, select "Select...", and find the corresponding control in the AjaxControlToolkit assembly in the pop-up dialog box ,As shown below.
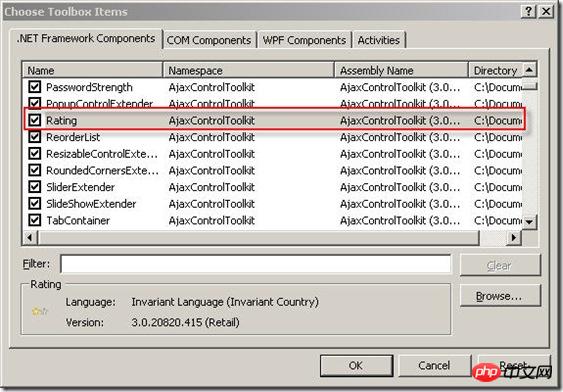
#3. Note that if you do not find the control related to AjaxControlToolkit in the above dialog box, you need to specify the path of the AjaxControlToolkit.dll assembly yourself. If the reader does not find the file, here is a convenient download for you.
AjaxControlToolkit.dll
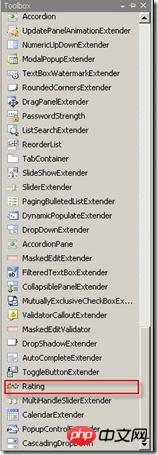
4. After adding the control, you can use the Rating control in the toolbox like a standard ASP.NET control.
After the preparations are completed, create a new Web page in the project and place the controls on the page. Note that all Ajax controls require ScriptManager Support for the control, which is responsible for registering the necessary scripts on the client side. So before adding the Rating control, make sure there is one and only one ScriptManager control on the page. Below is a code example for an aspx file.
<%@ Page Language="C#" AutoEventWireup="true" CodeBehind="WebForm1.aspx.cs" Inherits="iFrameUpload.WebForm1" %>

<%@ Register Assembly="AjaxControlToolkit, Version=3.0.20820.0, Culture=neutral, PublicKeyToken=28f01b0e84b6d53e"
 Namespace="AjaxControlToolkit" TagPrefix="ajaxToolkit" %>
<!DOCTYPE html PUBLIC "-//W3C//DTD XHTML 1.0 Transitional//EN" "http://www.w3.org/TR/xhtml1/DTD/xhtml1-transitional.dtd">
<html xmlns="http://www.w3.org/1999/xhtml">
<head runat="server">
 <title>Untitled Page</title>
 <link href="css/style.css" rel="stylesheet" type="text/css" />
</head>
<body>
 <form id="form1" runat="server">
 <p>
 <asp:ScriptManager ID="ScriptManager1" runat="server">
 </asp:ScriptManager>
 <ajaxToolkit:Rating ID="RatingRate" BehaviorID="RatingRate1" MaxRating="5" CurrentRating="3"
  runat="server" StarCssClass="ratingStar" WaitingStarCssClass="waitingRatingStar"
  FilledStarCssClass="filledRatingStar" EmptyStarCssClass="emptyRatingStar"
  OnChanged="RatingRate_Changed" AutoPostBack="false">
 </ajaxToolkit:Rating>

 <script type="text/javascript">
   Sys.Application.add_load(
   function() {
    $find("RatingRate1").add_EndClientCallback(
    function(sender, e) {
     var result = e.get_CallbackResult();
     alert(result);
    }
    );
   }
   );
 </script>

 </p>
 </form>
</body>
</html>Rating控件的相关属性和事件都已经添加了,这里说一下脚本的含义。通过Sys.Application.add_load方法在页面全部加载完成后给Rating控件注册一个回调方法,通过$find(“RatingRate1”).add_EndClientCallback方法进行注册,用于接收服务端传递回来的值。这些脚本都是标准的Ajax框架提供的,这里就不做太多解释了,读者可以去查阅微软的MSDN,上面有很详细的介绍。
接下来是cs文件的代码。
protected void RatingRate_Changed(object sender, AjaxControlToolkit.RatingEventArgs e)
{
System.Threading.Thread.Sleep(300);
//TODO: Save e.Value to database.
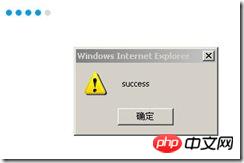
e.CallbackResult = "success";
}很简单,首先让线程停止300ms,这样我们可以有时间看到处于等待状态的Rating控件的样式。然后可以去处理数据保存(例如将Rating的当前值保存到数据库等),注意用户所选的值是通过e.Value属性得到的,该属性为字符串类型。然后通过e.CallbackResult属性传递一个回调值到客户端,客户端得到该值后进行相应的处理。
下面顺便给出css样式和示例图片下载,读者可以自己去尝试一下!注意Rating的当前值是不能被用户点击的,如初始化时Rating的CurrentRating值为3,则用户点击第三个“星形”图标则不会触发点击事件,另外就是Rating可以被用户反复点击,你可以在服务端进行处理,如当用户点击之后将控件设为只读状态等。
.ratingStar
{
 font-size: 0pt;
 width: 13px;
 height: 12px;
 margin: 0px;
 padding: 0px;
 cursor: pointer;
 display: block;
 background-repeat: no-repeat;
}

.waitingRatingStar /*normal mode empty style*/
{
 background-image: url(Rating_default.gif);
}

.filledRatingStar /*normal mode filled style*/
{
 background-image: url(Rating_normal.gif);
}

.emptyRatingStar /*readonly mode empty style*/
{
 background-image: url(Rating_empty.gif);
}以下是运行时的效果:
上面是我整理给大家的,希望今后会对大家有帮助。
相关文章:
The above is the detailed content of How to use the Rating control of AjaxToolKit. For more information, please follow other related articles on the PHP Chinese website!

Hot AI Tools

Undresser.AI Undress
AI-powered app for creating realistic nude photos

AI Clothes Remover
Online AI tool for removing clothes from photos.

Undress AI Tool
Undress images for free

Clothoff.io
AI clothes remover

Video Face Swap
Swap faces in any video effortlessly with our completely free AI face swap tool!

Hot Article
Hot Tools

Notepad++7.3.1
Easy-to-use and free code editor

SublimeText3 Chinese version
Chinese version, very easy to use

Zend Studio 13.0.1
Powerful PHP integrated development environment

Dreamweaver CS6
Visual web development tools

SublimeText3 Mac version
God-level code editing software (SublimeText3)
Hot Topics
 1386
1386
 52
52

 How to use DirectX repair tool? Detailed usage of DirectX repair tool
Mar 15, 2024 am 08:31 AM
How to use DirectX repair tool? Detailed usage of DirectX repair tool
Mar 15, 2024 am 08:31 AM
The DirectX repair tool is a professional system tool. Its main function is to detect the DirectX status of the current system. If an abnormality is found, it can be repaired directly. There may be many users who don’t know how to use the DirectX repair tool. Let’s take a look at the detailed tutorial below. 1. Use repair tool software to perform repair detection. 2. If it prompts that there is an abnormal problem in the C++ component after the repair is completed, please click the Cancel button, and then click the Tools menu bar. 3. Click the Options button, select the extension, and click the Start Extension button. 4. After the expansion is completed, re-detect and repair it. 5. If the problem is still not solved after the repair tool operation is completed, you can try to uninstall and reinstall the program that reported the error.
 Introduction to HTTP 525 status code: explore its definition and application
Feb 18, 2024 pm 10:12 PM
Introduction to HTTP 525 status code: explore its definition and application
Feb 18, 2024 pm 10:12 PM
Introduction to HTTP 525 status code: Understand its definition and usage HTTP (HypertextTransferProtocol) 525 status code means that an error occurred on the server during the SSL handshake, resulting in the inability to establish a secure connection. The server returns this status code when an error occurs during the Transport Layer Security (TLS) handshake. This status code falls into the server error category and usually indicates a server configuration or setup problem. When the client tries to connect to the server via HTTPS, the server has no
 How to use Baidu Netdisk-How to use Baidu Netdisk
Mar 04, 2024 pm 09:28 PM
How to use Baidu Netdisk-How to use Baidu Netdisk
Mar 04, 2024 pm 09:28 PM
Many friends still don’t know how to use Baidu Netdisk, so the editor will explain how to use Baidu Netdisk below. If you are in need, hurry up and take a look. I believe it will be helpful to everyone. Step 1: Log in directly after installing Baidu Netdisk (as shown in the picture); Step 2: Then select "My Sharing" and "Transfer List" according to the page prompts (as shown in the picture); Step 3: In "Friend Sharing", you can share pictures and files directly with friends (as shown in the picture); Step 4: Then select "Share" and then select computer files or network disk files (as shown in the picture); Fifth Step 1: Then you can find friends (as shown in the picture); Step 6: You can also find the functions you need in the "Function Treasure Box" (as shown in the picture). The above is the editor’s opinion
 Learn to copy and paste quickly
Feb 18, 2024 pm 03:25 PM
Learn to copy and paste quickly
Feb 18, 2024 pm 03:25 PM
How to use the copy-paste shortcut keys Copy-paste is an operation we often encounter when using computers every day. In order to improve work efficiency, it is very important to master the copy and paste shortcut keys. This article will introduce some commonly used copy and paste shortcut keys to help readers perform copy and paste operations more conveniently. Copy shortcut key: Ctrl+CCtrl+C is the shortcut key for copying. By holding down the Ctrl key and then pressing the C key, you can copy the selected text, files, pictures, etc. to the clipboard. To use this shortcut key,
 How to correctly use the win10 command prompt for automatic repair operations
Dec 30, 2023 pm 03:17 PM
How to correctly use the win10 command prompt for automatic repair operations
Dec 30, 2023 pm 03:17 PM
The longer the computer is used, the more likely it is to malfunction. At this time, friends need to use their own methods to repair it. So what is the easiest way to do it? Today I will bring you a tutorial on how to repair using the command prompt. How to use win10 automatic repair command prompt: 1. Press "Win+R" and enter cmd to open the "command prompt" 2. Enter chkdsk to view the repair command 3. If you need to view other places, you can also add other partitions such as "d" 4. Enter the execution command chkdskd:/F. 5. If it is occupied during the modification process, you can enter Y to continue.
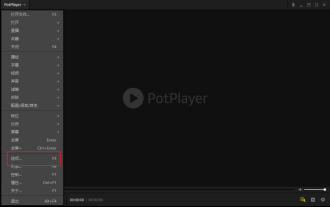 How to use potplayer-How to use potplayer
Mar 04, 2024 pm 06:10 PM
How to use potplayer-How to use potplayer
Mar 04, 2024 pm 06:10 PM
Potplayer is a very powerful media player, but many friends still don’t know how to use potplayer. Today I will introduce how to use potplayer in detail, hoping to help everyone. 1. PotPlayer shortcut keys. The default common shortcut keys for PotPlayer player are as follows: (1) Play/pause: space (2) Volume: mouse wheel, up and down arrow keys (3) forward/backward: left and right arrow keys (4) bookmark: P- Add bookmarks, H-view bookmarks (5) full screen/restore: Enter (6) multiple speeds: C-accelerate, 7) Previous/next frame: D/
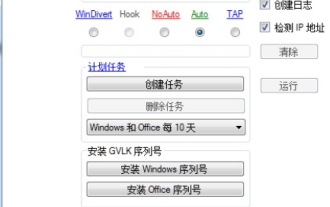 What is the KMS activation tool? How to use the KMS activation tool? How to use KMS activation tool?
Mar 18, 2024 am 11:07 AM
What is the KMS activation tool? How to use the KMS activation tool? How to use KMS activation tool?
Mar 18, 2024 am 11:07 AM
The KMS Activation Tool is a software tool used to activate Microsoft Windows and Office products. KMS is the abbreviation of KeyManagementService, which is key management service. The KMS activation tool simulates the functions of the KMS server so that the computer can connect to the virtual KMS server to activate Windows and Office products. The KMS activation tool is small in size and powerful in function. It can be permanently activated with one click. It can activate any version of the window system and any version of Office software without being connected to the Internet. It is currently the most successful and frequently updated Windows activation tool. Today I will introduce it Let me introduce to you the kms activation work
 How to merge cells using shortcut keys
Feb 26, 2024 am 10:27 AM
How to merge cells using shortcut keys
Feb 26, 2024 am 10:27 AM
How to use the shortcut keys for merging cells In daily work, we often need to edit and format tables. Merging cells is a common operation that can merge multiple adjacent cells into one cell to improve the beauty of the table and the information display effect. In mainstream spreadsheet software such as Microsoft Excel and Google Sheets, the operation of merging cells is very simple and can be achieved through shortcut keys. The following will introduce the shortcut key usage for merging cells in these two software. exist
