

Build a simple game management system
This time I will bring you how to build a simple game management system and what are the precautions for building a simple game management system. The following is a practical case, let’s take a look.
1. Analysis & Layout Design
The current interface of our project is like this:
To put it simply, there is no management system at all. I looked it up on Axure Chinese website and found that the prototype of a management website should look like this: 
Just follow this example. The management system interface generally consists of top navigation & status bar. ,The left navigation bar, and the right content area are composed of three parts, which is like this:
Our website has less content, so there is no need for a navigation bar at the top, and That is, you only need to keep the title on the left and the status part on the right at the top, and then fill in the interface. Add the system name and logo on the left side of the top, add the user name on the right side of the top, fill the navigation bar on the left with navigation items, and fill the content bar on the right according to The navigation item selected on the left displays the corresponding content: 
After filling in the layout, it seems to be more readable, so we will complete the interface based on the renderings.
2. Technology selection
The overall style can be quickly realized with the help of the framework, and the most common style framework Bootstrap3 is selected to help complete the interface, but if you want to introduce Bootstrap3 For controls, jQuery needs to be introduced, which we don't want.
At this time we can consider using angular-ui-bootstrap, which is most compatible with the Angular project, to replace the Bootstrap3 controls. angular-ui-bootstrap is a set of UI implemented by the AngularUI team using AngularJS based on Bootstrap. Control, it is great to achieve the same effect as Bootstrap control without introducing jQuery.
So we simply selected the Bootstrap angular-ui-bootstrap combination to speed up interface development.
3. Development
3.1 Installation
3.1.1 angular-ui-bootstrap installation
Refer to the angular-ui-bootstrap document-Dependencies to learn The choice of its version corresponds to the Angular version, but we are using AngularJS1.6.10 version so we can directly install the latest angular-ui-bootstrap:
yarn add angular-ui-bootstrap --save
Since the above document also mentions angular-ui -bootstrap requires Angular-animate, Angular-touch, and Bootstrap CSS. Install yarn directly. By the way, update angular to 1.7.0:
yarn add angular --save
yarn add angular-animate --save
yarn add angular-touch --save
yarn add bootstrap@3 --save
Add a reference to app.js and add the 'pokemon-app' module Dependencies (Bootstrap3 style is not added for the time being):
import ngAnimate from 'angular-animate';
import ngTouch from 'angular-touch';
import uibootstrap from 'angular-ui-bootstrap';
...
angular.module('pokemon-app', [
    ...
    ngAnimate,
    ngTouch,
    ngUIBootstrap
    ...
])Add a test code in the document to index.tpl.html:
<h4 id="Single-toggle">Single toggle</h4>
<pre class="brush:php;toolbar:false">{{singleModel}}Then add to the AppController in app.js:
$scope.singleModel = 1;
The results are as follows: 
There is an extra button in the middle and the number can be modified by clicking on it, which means that angular-ui-bootstrap has been installed successfully~
3.1.2 Bootstrap3 configuration
Next we add Bootstrap.css to the project. CSS can be packaged through Webpack and then loaded in the projectentry fileapp.js, which we will use here css-loader, style-loader, file-loader (loading fonts, if there is no such loader, the font will fail to load):
yarn add css-loader style-loader file-loader --save-dev
Modify the module of webpack.config.js as follows:
  module: {
    rules: [{
      test: /\.html$/,
      loader: 'raw-loader'
    }, {        // 负责css模块加载
      test: /\.css$/,
      use: ['style-loader', 'css-loader']
    }, {
      test: /\.(woff|woff2|eot|ttf|svg)$/,
      use: ['file-loader']
    }]
},app Introduced into .js
import 'bootstrap/dist/css/bootstrap.min.css';
Now look at the page after automatic reloading, you will find that the familiar Bootstrap page style finally appears: 
3.2 界面开发
首先去掉上面添加的Build a simple game management system代码,然后开始界面开发:
3.2.1 顶部状态栏
顶部栏使用navbar样式编写,去掉原来的h1标签然后左边填充icon和系统名右边填充用户名,编写代码如下(图源来自神奇宝贝百科,承诺不用于商业用途):
<nav>
  <p>
    </p>
<p>
      <a>
        <img  src="/static/imghw/default1.png" data-src="http://s1.52poke.wiki/wiki/5/5e/Bag_%E7%B2%BE%E7%81%B5%E7%90%83_Sprite.png" class="lazy" alt="Build a simple game management system" >
      </a>
      <a>口袋妖怪管理系统v0.0.1</a>
    </p>
    <p>
      </p>
<ul>
        <li><a>Nodreame</a></li>
      </ul>


</nav>
效果如下:
为了防止链接丢失导致图片加载失败,把图片下载下来放在本地assert/img文件夹下,命名为spriteball-common.png。按照Webpack模块化规则,图片也应该作为一个模块来加载,于是参考文档url-loader,在webpack.config.js文件的module中加入:
{
  test: /\.(png|svg|jpg|gif)$/,
  use: [
    {
      loader: 'url-loader',
      options: {
        limit: 8192,
        fallback: 'file-loader'
      }
    }
  ]
}用url-loader作为小于8192byte图片的加载器,如果符合条件图片链接将会转为一个Build a simple game management system,如果超过改限制,将会默认使用file-loader作为图片的加载器,修改后重新编译通过.
现在继续修改index.tpl.html中图片位置的a标签,加入id="icon"并屏蔽原来图片:
<a>
  <!-- <img src="/static/imghw/default1.png"  data-src="http://s1.52poke.wiki/wiki/5/5e/Bag_%E7%B2%BE%E7%81%B5%E7%90%83_Sprite.png"  class="lazy"     style="max-width:90%"  style="max-width:90%"  alt=""> -->
  <!-- <img src="/static/imghw/default1.png"  data-src="../assert/img/spriteball-common.png"  class="lazy"   alt=""> -->
</a>
在app.js中引入图片,并通过DOM操作把图片插入页面:
import icon from '../assert/img/spriteball-common.png'
...
  function AppController ($scope) {
    // $scope.singleModel = 1;
    var sysIcon = new Image();
    sysIcon.src = icon;
    sysIcon.width = 20;
    sysIcon.height = 20;
    document.getElementById('icon').appendChild(sysIcon);
}重新编译,在浏览器元素检测中看到图片已成功插入页面并以Build a simple game management system形式被引用:
顶部栏基本编写完成~
3.2.2 Build a simple game management system & 右侧内容区域
顶部栏完成之后,左右将分成两部分,这里的页面布局划分Bootstrap3似乎没有提供响应的样式,不过在Bootstrap的官网样例中我们找到了类似的Dashboard,他提供了一个现成的dashboard.css我们可以直接用起来,将dashboard.css放到assert/css文件夹下,并在app.js中引用:
import '../assert/css/dashboard.css'
然后开始跟随Demo简单布局:
<p>
  </p><p>
    </p><p>sidebar</p>
    <p>main</p>
很简单就完成了页面布局划分(这里Build a simple game management system在小于768px时将自动隐藏):
然后继续编写Build a simple game management system:
<p>
  </p>

简单的Build a simple game management system已经基本完成,并且点击能够看到内容切换,现在我们将被部分遮蔽的内容移动到右侧内容区域:
<p>
  </p>
简单移动完成页面:
Build a simple game management system之后,看看内容样式还是比较丑,跟随dashboard例子和Bootstrap修改其样式,对图鉴页(原来的口袋妖怪详情页)进行修改:
pm-list.html
图鉴
<p>
  </p>
| NO. | 名称 | 数量 | 重量 | 总计 | 操作 |
|---|---|---|---|---|---|
| {{pokemon.no}} | {{pokemon.name}} | {{pokemon.weight}} | {{pokemon.weight * pokemon.count}} |
pm-detail.html
<p>
  <a>
    <span></span>返回图鉴列表
  </a>
</p>
<h2 id="b-pokemon-name-b"><b>{{pokemon.name}}</b></h2>
<img  src="/static/imghw/default1.png" data-src="{{pokemon.img}}" class="lazy" alt="Build a simple game management system" >
<p><b>编号: </b>No.{{pokemon.no}}</p>
<p><b>体重: </b>{{pokemon.weight}}</p>
<p><b>属性: </b>{{pokemon.property}}</p>
<p><b>种类: </b>{{pokemon.type}}</p>
<p>
  <b>特性: </b>
</p>- 普通特性: {{pokemon.character.common}}
- 隐藏特性: {{pokemon.character.conceal}}
其他形象:

{{form.name}}
上面代码中,pm-list修改了标题和表格样式,pm-detail修改了返回样式并稍微修缮了布局,修改结果如下:

其他界面也进行类似的修改,结果如下:
至此基本网站布局已完成。
3.3 操作体验升级
现在网站布局和样式得到了优化,但是一些细节暂时还没处理好,列出一些比较直观能看到的不足:
Build a simple game management system交互缺乏选中感
删除按钮没有二次确认容易导致误删
现在我们就来完善这些细节。
3.3.1 Build a simple game management system交互
dashboard.css已经帮我们写好了选中Build a simple game management system某项之后变蓝底白字的样式,只需要简单在选中项的
  .run(['$rootScope', '$location', function ($rootScope, $location) {
    $rootScope.$on('$locationChangeSuccess', function () {
      $rootScope.nowUrl = $location.url();
      console.log('nowUrl:', $rootScope.nowUrl);
      // console.log('$route,routes.null.redirectTo:', $route.routes.null.redirectTo);
    });
}])监听页面切换的日志结果如下:
ke'yi看到获取到的nowUrl都是http://localhost:8080/#!后面的部分,那么了解到这点之后我们就可以尝试在index.tpl.html中借助ng-class指令来完成"根据当前url选中对应导航项"的操作了,修改index.tpl.html中
- 元素部分如下:

3.3.2 删除二次确认
为了达到二次确认删除的效果,我们可以使用angular-ui-bootstrap提供的模态框Modal,参考Modal.
首先我们在src目录下新建文件夹common来存放通用的html模板,新建文件deleteDialog.tpl.html作为模态框的模板文件:
<p> </p>{{modalTitle}}
{{modalBody}}
接下来就可以编写触发模态框的逻辑了,模仿文档修改pokemon.js中PMListController如下:
PMListController.$inject = ['$scope', '$uibModal'];
function PMListController ($scope, $uibModal) {
  $scope.pokemons = pokemons;
  console.log($scope.pokemons);
  $scope.remove = function (index) {
    console.log('index:', index);
    var modalInstance = $uibModal.open({
      animation: true,
      ariaLabelledBy: 'modal-title',
      ariaDescribedBy: 'modal-body',
      template: delDiage,
      controller: 'DeleteInstanceController',
      resolve: {
        pokemon: function () {
          return $scope.pokemons[index];
        }
      }
    });
    modalInstance.result.then(function (content) {
      console.log('Delete!', content);
      $scope.pokemons.splice(index, 1);
    }, function (content) {
      console.log('Cancel!', content);
    });
  };
}上面我们做了两处修改:
1. 为PMListController加入了依赖$uibModal,用以调用模态框;
2. 修改remove方法,使用$uibModal.open()创建模态框实例,并用实例编写模态框关闭的promise,关闭时选择close或cancel将触发不同事件。
完成了模态框触发逻辑编写之后,我们开始编写模态框的逻辑:
DeleteInstanceController.$inject = ['$scope', '$uibModalInstance', 'pokemon'];
function DeleteInstanceController ($scope, $uibModalInstance, pokemon) {
  // console.log('thisIndex:', thisIndex);
  console.log('pokemon:', pokemon);
  $scope.modalTitle = '删除';
  $scope.modalBody  = '是否删除' + pokemon.name + '的数据';
  $scope.ok = function () {
    console.log('delete!');
    $uibModalInstance.close(pokemon);
  };
  $scope.cancel = function () {
    console.log('cancel!');
    $uibModalInstance.dismiss('cancel');
  };
}这里加入了$uibModalInstance和pokemon依赖,$uibModalInstance代表当前模态框对象,pokemon是$uibModal.open()配置中resolve传递过来的数据。在该controller中完成模态框的内容编写以及两个button触发的事件。接下来我们把这个controller加入module:
export default angular.module('pokemon-app.pokemon', [ngRoute])
    .config(['$routeProvider', function ($routeProvider) {
      $routeProvider
        .when('/pokemons', {
          template: pmlist,
          controller: 'PMListController'
        })
        .when ('/pokemon/:no', {
          template: pmdetail,
          controller: 'PMDetailController'
        })
    }])
    .controller('PMListController', PMListController)
    .controller('PMDetailController', PMDetailController)
    .controller('DeleteInstanceController', DeleteInstanceController)
.name;倒数第二行就是新加入module的controller,pm-list.html不用作任何修改,保存等待自动编译重载。
至此,系统的操作体验升级已经基本完成,为了系统体验同步,我们需要把模态框的效果也应用到其他的界面上。
相信看了本文案例你已经掌握了方法,更多精彩请关注php中文网其它相关文章!
推荐阅读:
The above is the detailed content of Build a simple game management system. For more information, please follow other related articles on the PHP Chinese website!

Hot AI Tools

Undresser.AI Undress
AI-powered app for creating realistic nude photos

AI Clothes Remover
Online AI tool for removing clothes from photos.

Undress AI Tool
Undress images for free

Clothoff.io
AI clothes remover

AI Hentai Generator
Generate AI Hentai for free.

Hot Article
Hot Tools

Notepad++7.3.1
Easy-to-use and free code editor

SublimeText3 Chinese version
Chinese version, very easy to use

Zend Studio 13.0.1
Powerful PHP integrated development environment

Dreamweaver CS6
Visual web development tools

SublimeText3 Mac version
God-level code editing software (SublimeText3)
Hot Topics
 1377
1377
 52
52

 What should the CPU utilization be when gaming?
Feb 19, 2024 am 11:21 AM
What should the CPU utilization be when gaming?
Feb 19, 2024 am 11:21 AM
It's common for games to slow down your computer because they consume a lot of resources. It's crucial to understand your CPU usage when gaming so you can avoid overloading it. Therefore, keeping track of appropriate CPU usage is key to keeping your gaming experience smooth. In this article, we'll look at the appropriate CPU usage you should achieve while your game is running. CPU utilization during gaming CPU utilization is an important indicator of processor workload and depends on the performance specifications of the CPU. More powerful CPUs generally have higher usage. A CPU with more cores and threads can improve the overall performance of your system. Multi-threading support helps unleash the full potential of your CPU. In games, CPU usage depends on processor utilization, which can affect the game
 Nvgpucomp64.dll causes Windows PC games to crash;
Mar 26, 2024 am 08:20 AM
Nvgpucomp64.dll causes Windows PC games to crash;
Mar 26, 2024 am 08:20 AM
If Nvgpucomp64.dll is causing your game to crash frequently, the solutions provided here may help you. This problem is usually caused by outdated or corrupted graphics card drivers, corrupted game files, etc. Fixing these issues can help you deal with game crashes. The Nvgpucomp64.dll file is associated with NVIDIA graphics cards. When this file crashes, your game will crash too. This usually happens in games like LordsoftheFallen, LiesofP, RocketLeague, and ApexLegends. Nvgpucomp64.dll crashes games on Windows PC if N
 The easiest way to query the hard drive serial number
Feb 26, 2024 pm 02:24 PM
The easiest way to query the hard drive serial number
Feb 26, 2024 pm 02:24 PM
The hard disk serial number is an important identifier of the hard disk and is usually used to uniquely identify the hard disk and identify the hardware. In some cases, we may need to query the hard drive serial number, such as when installing an operating system, finding the correct device driver, or performing hard drive repairs. This article will introduce some simple methods to help you check the hard drive serial number. Method 1: Use Windows Command Prompt to open the command prompt. In Windows system, press Win+R keys, enter "cmd" and press Enter key to open the command
 NAT Boost vs. Qos for games; which one is better?
Feb 19, 2024 pm 07:00 PM
NAT Boost vs. Qos for games; which one is better?
Feb 19, 2024 pm 07:00 PM
In today's situation where almost all games are online, it is not advisable to ignore the optimization of home network. Almost all routers are equipped with NATBoost and QoS features designed to enhance users' gaming experience. This article will explore the definition, advantages and disadvantages of NATBoost and QoS. NATBoost vs. Qos for games; which one is better? NATBoost, also known as Network Address Translation Boost, is a feature built into routers that improves their performance. It's especially important for gaming because it helps reduce network latency, which is the time it takes for data to be transferred between the gaming device and the server. By optimizing the data processing method within the router, NATBoost achieves faster data processing speed and lower latency, thus changing the
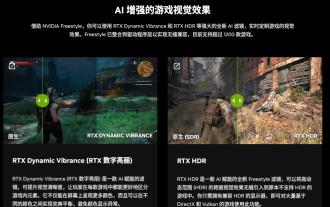 NVIDIA launches RTX HDR function: unsupported games use AI filters to achieve HDR gorgeous visual effects
Feb 24, 2024 pm 06:37 PM
NVIDIA launches RTX HDR function: unsupported games use AI filters to achieve HDR gorgeous visual effects
Feb 24, 2024 pm 06:37 PM
According to news from this website on February 23, NVIDIA updated and launched the NVIDIA application last night, providing players with a new unified GPU control center, allowing players to capture wonderful moments through the powerful recording tool provided by the in-game floating window. In this update, NVIDIA also introduced the RTXHDR function. The official introduction is attached to this site: RTXHDR is a new AI-empowered Freestyle filter that can seamlessly introduce the gorgeous visual effects of high dynamic range (HDR) into In games that do not originally support HDR. All you need is an HDR-compatible monitor to use this feature with a wide range of DirectX and Vulkan-based games. After the player enables the RTXHDR function, the game will run even if it does not support HD
 Introduction to how to download and install the superpeople game
Mar 30, 2024 pm 04:01 PM
Introduction to how to download and install the superpeople game
Mar 30, 2024 pm 04:01 PM
The superpeople game can be downloaded through the steam client. The size of this game is about 28G. It usually takes one and a half hours to download and install. Here is a specific download and installation tutorial for you! New method to apply for global closed testing 1) Search for "SUPERPEOPLE" in the Steam store (steam client download) 2) Click "Request access to SUPERPEOPLE closed testing" at the bottom of the "SUPERPEOPLE" store page 3) After clicking the request access button, The "SUPERPEOPLECBT" game can be confirmed in the Steam library 4) Click the install button in "SUPERPEOPLECBT" and download
 Where is Spider Solitaire in win11 How to play Spider Solitaire game in win11
Mar 01, 2024 am 11:37 AM
Where is Spider Solitaire in win11 How to play Spider Solitaire game in win11
Mar 01, 2024 am 11:37 AM
Friends who have played enough AAA masterpieces and mobile games, do you want to relive the computer games of your childhood? Then let’s look for Spider Solitaire in Windows 11 together! Click the Start menu on the interface, click the "All Apps" button; click "All Apps". Find and select "MicrosoftSolitaireCollection", which is Microsoft's Solitaire series game application; Solitaire series game selection. After loading is complete, enter the selection interface and find "Spider Solitaire"; select "Spider Solitaire". Although the interface has changed slightly, it is still the same as before
![Thrustmaster control panel not working or displaying properly [Fixed]](https://img.php.cn/upload/article/000/887/227/170831073283375.jpg?x-oss-process=image/resize,m_fill,h_207,w_330) Thrustmaster control panel not working or displaying properly [Fixed]
Feb 19, 2024 am 10:45 AM
Thrustmaster control panel not working or displaying properly [Fixed]
Feb 19, 2024 am 10:45 AM
Thrustmaster is a company that specializes in the production of gaming wheels and other gaming accessories. Its wheel products are very popular in the gaming community. Thrustmaster wheel settings can be installed and adjusted using the Thrustmaster control panel. If you encounter problems with the control panel not working or displaying, it may affect your gaming experience. Therefore, when this happens, you need to check whether the connection is normal and ensure that the software driver is installed correctly and updated to the latest version. In addition, you can also try to restart the device or reconnect the device to resolve possible failures. When you encounter problems, you can refer to Thrustmaster's official website or contact customer service for further help. How to access Thrustma
