 Web Front-end
 JS Tutorial
 Detailed explanation of the steps to build a vue2 unit test environment using karma+mocha+webpack3
Detailed explanation of the steps to build a vue2 unit test environment using karma+mocha+webpack3
This time I will bring you a detailed explanation of the environment steps using karma mocha webpack3 to build vue2Unit test, and what are the precautions for using karma mocha webpack3 to build a vue2 unit test environment. Here are Let’s take a look at practical cases.
I found many examples on the Internet about unit testing. They are all about how to add unit tests when creating a new project. How to add them using vue-cli, but my project has been generated and cannot be re-initialized again. At this time, there are many pitfalls in how to add unit tests. I will write down my experience here.
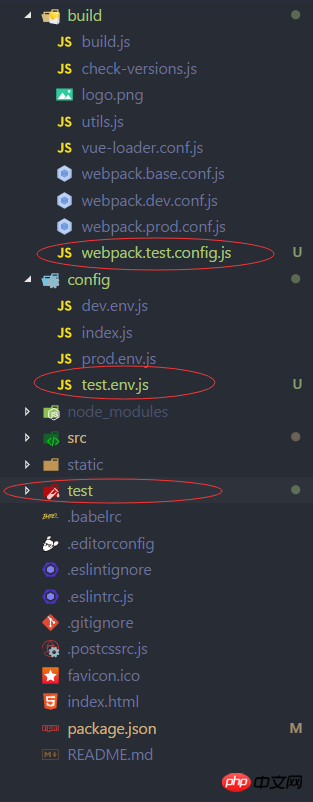
1. Use vue-cli to generate a new project and copy the files required for unit testing directly into your project
vue init webpack vuetest

File downloadAddress source code Github link
2. Install the Karma Mocha module. This module has many dependencies. I encountered a pitfall and found that a certain module was missing after half a day of solving the problem. List them all here. Required modules
npm i -D karma karma-webpack phantomjs-prebuilt karma-phantomjs-launcher karma-phantomjs-shim karma-chrome-launcher karma-sourcemap-loader mocha karma-mocha sinon chai sinon-chai karma-sinon-chai karma-spec-reporter karma-coverage istanbul-instrumenter-loader
3. Modify package.json and add startup code in scripts (replace it if there is a unit)
"unit": "karma start test/unit/karma.conf.js --single-run",
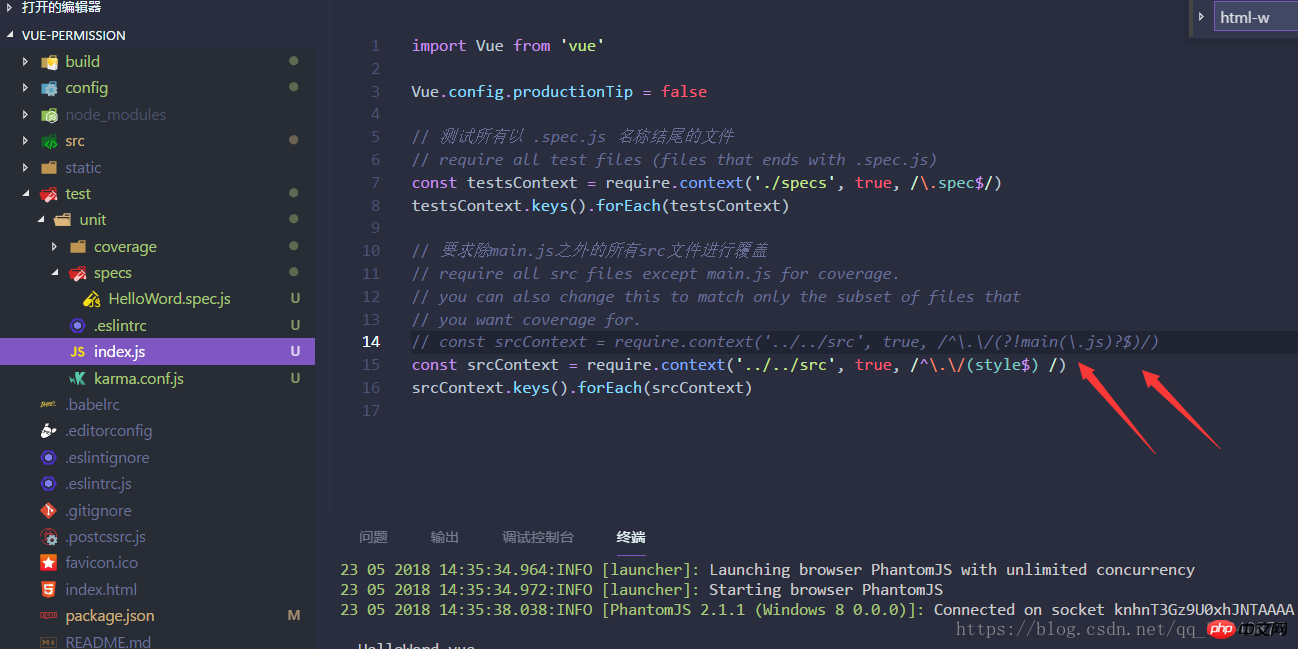
4. Modify the index.js file in the test directory, This is the biggest pitfall I encountered. It took me a long time to solve it, but it always prompted an error in the .scss file. Here is the solution.

const srcContext = require.context('../../src', true, /^\.\/(?!main(\.js)?$)/)is changed to:
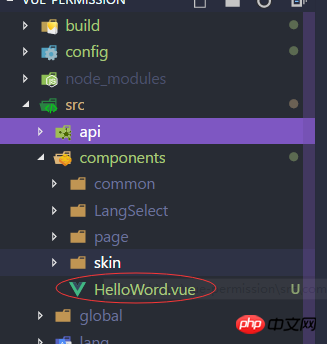
const srcContext = require.context('../../src', true, /^\.\/(style$) /)5. You can copy the project file generated by vue-cli for testing, as shown below, and configure the routing , test whether the unit test module is installed successfully

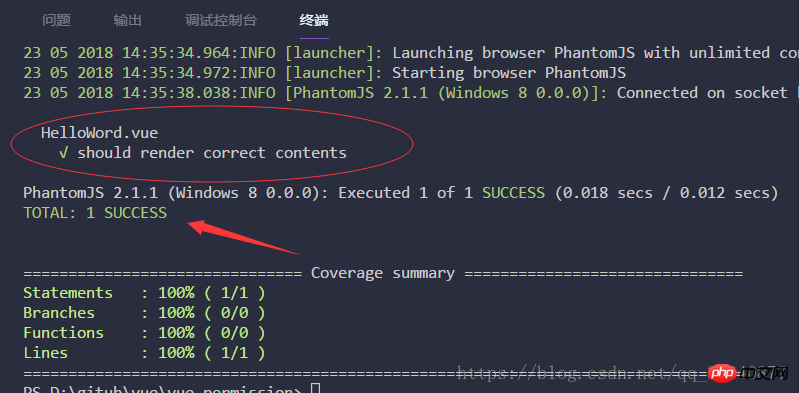
6. Run the following command in the project to start the unit test
npm run unit

At the same time, generate test reports in test/unit/coverage. The above is a simple vue unit test example. Finally, I present the source code
In-depth study of the reference document
Vue.js learning series six - Vue unit test Karma Mocha study notes
karma webpack builds vue unit Test environment
karma mocha webpack3 builds vue2 unit test environment
Author related Vue articles
Implementing background system permission control based on Vue2.0
[vue2. 0-Based on elementui skin change [custom theme]](https://juejin.im/post/5aea98...
Vue internationalization processing vue-i18n and automatic project switching Chinese and English
I believe you have mastered the method after reading the case in this article. For more exciting information, please pay attention to other related articles on the php Chinese website!
Recommended reading:
react Detailed explanation of the steps to highlight the selected li
Detailed explanation of the sorting algorithm example in the front end
The above is the detailed content of Detailed explanation of the steps to build a vue2 unit test environment using karma+mocha+webpack3. For more information, please follow other related articles on the PHP Chinese website!

Hot AI Tools

Undresser.AI Undress
AI-powered app for creating realistic nude photos

AI Clothes Remover
Online AI tool for removing clothes from photos.

Undress AI Tool
Undress images for free

Clothoff.io
AI clothes remover

AI Hentai Generator
Generate AI Hentai for free.

Hot Article

Hot Tools

Notepad++7.3.1
Easy-to-use and free code editor

SublimeText3 Chinese version
Chinese version, very easy to use

Zend Studio 13.0.1
Powerful PHP integrated development environment

Dreamweaver CS6
Visual web development tools

SublimeText3 Mac version
God-level code editing software (SublimeText3)

Hot Topics
 What is the difference between the life cycle execution order in vue2 and vue3
May 16, 2023 pm 09:40 PM
Difference in life cycle execution order between vue2 and vue3 Life cycle comparison The execution order in vue2 beforeCreate=>created=>beforeMount=>mounted=>beforeUpdate=>updated=>beforeDestroy=>destroyed The execution order in vue3 setup=>onBeforeMount=>onMounted=> onBeforeUpdate=>onUpdated=>onBeforeUnmount=&g
 How to use python+Flask to realize real-time update and display of logs on web pages
May 17, 2023 am 11:07 AM
1. Log output to file using module: logging can generate a custom level log, and can output the log to a specified path. Log level: debug (debug log) = 5) {clearTimeout (time) // If all results obtained 10 consecutive times are empty Log clearing scheduled task}return}if(data.log_type==2){//If a new log is obtained for(i=0;i
 How to use Nginx web server caddy
May 30, 2023 pm 12:19 PM
Introduction to Caddy Caddy is a powerful and highly scalable web server that currently has 38K+ stars on Github. Caddy is written in Go language and can be used for static resource hosting and reverse proxy. Caddy has the following main features: Compared with the complex configuration of Nginx, its original Caddyfile configuration is very simple; it can dynamically modify the configuration through the AdminAPI it provides; it supports automated HTTPS configuration by default, and can automatically apply for HTTPS certificates and configure it; it can be expanded to data Tens of thousands of sites; can be executed anywhere with no additional dependencies; written in Go language, memory safety is more guaranteed. First of all, we install it directly in CentO
 Real-time protection against face-blocking barrages on the web (based on machine learning)
Jun 10, 2023 pm 01:03 PM
Face-blocking barrage means that a large number of barrages float by without blocking the person in the video, making it look like they are floating from behind the person. Machine learning has been popular for several years, but many people don’t know that these capabilities can also be run in browsers. This article introduces the practical optimization process in video barrages. At the end of the article, it lists some applicable scenarios for this solution, hoping to open it up. Some ideas. mediapipeDemo (https://google.github.io/mediapipe/) demonstrates the mainstream implementation principle of face-blocking barrage on-demand up upload. The server background calculation extracts the portrait area in the video screen, and converts it into svg storage while the client plays the video. Download svg from the server and combine it with barrage, portrait
 How to configure nginx to ensure that the frps server and web share port 80
Jun 03, 2023 am 08:19 AM
First of all, you will have a doubt, what is frp? Simply put, frp is an intranet penetration tool. After configuring the client, you can access the intranet through the server. Now my server has used nginx as the website, and there is only one port 80. So what should I do if the FRP server also wants to use port 80? After querying, this can be achieved by using nginx's reverse proxy. To add: frps is the server, frpc is the client. Step 1: Modify the nginx.conf configuration file in the server and add the following parameters to http{} in nginx.conf, server{listen80
 How to implement form validation for web applications using Golang
Jun 24, 2023 am 09:08 AM
Form validation is a very important link in web application development. It can check the validity of the data before submitting the form data to avoid security vulnerabilities and data errors in the application. Form validation for web applications can be easily implemented using Golang. This article will introduce how to use Golang to implement form validation for web applications. 1. Basic elements of form validation Before introducing how to implement form validation, we need to know what the basic elements of form validation are. Form elements: form elements are
 Using Jetty7 for Web server processing in Java API development
Jun 18, 2023 am 10:42 AM
Using Jetty7 for Web Server Processing in JavaAPI Development With the development of the Internet, the Web server has become the core part of application development and is also the focus of many enterprises. In order to meet the growing business needs, many developers choose to use Jetty for web server development, and its flexibility and scalability are widely recognized. This article will introduce how to use Jetty7 in JavaAPI development for We
 Is PHP front-end or back-end in web development?
Mar 24, 2024 pm 02:18 PM
PHP belongs to the backend in web development. PHP is a server-side scripting language, mainly used to process server-side logic and generate dynamic web content. Compared with front-end technology, PHP is more used for back-end operations such as interacting with databases, processing user requests, and generating page content. Next, specific code examples will be used to illustrate the application of PHP in back-end development. First, let's look at a simple PHP code example for connecting to a database and querying data:


