How to use vue scaffolding and vue-router
This time I will show you how to use vue scaffolding and vue-router, and what are the precautions for using vue scaffolding and vue-router. The following is a practical case. Let’s take a look. .
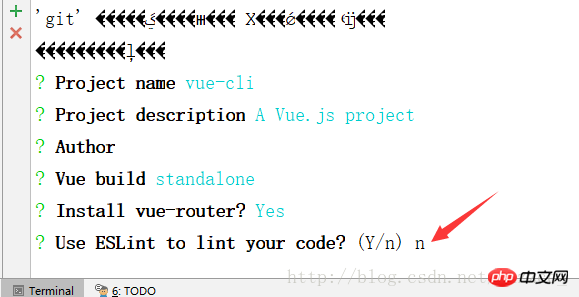
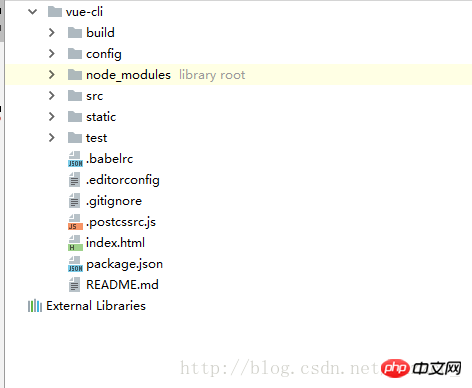
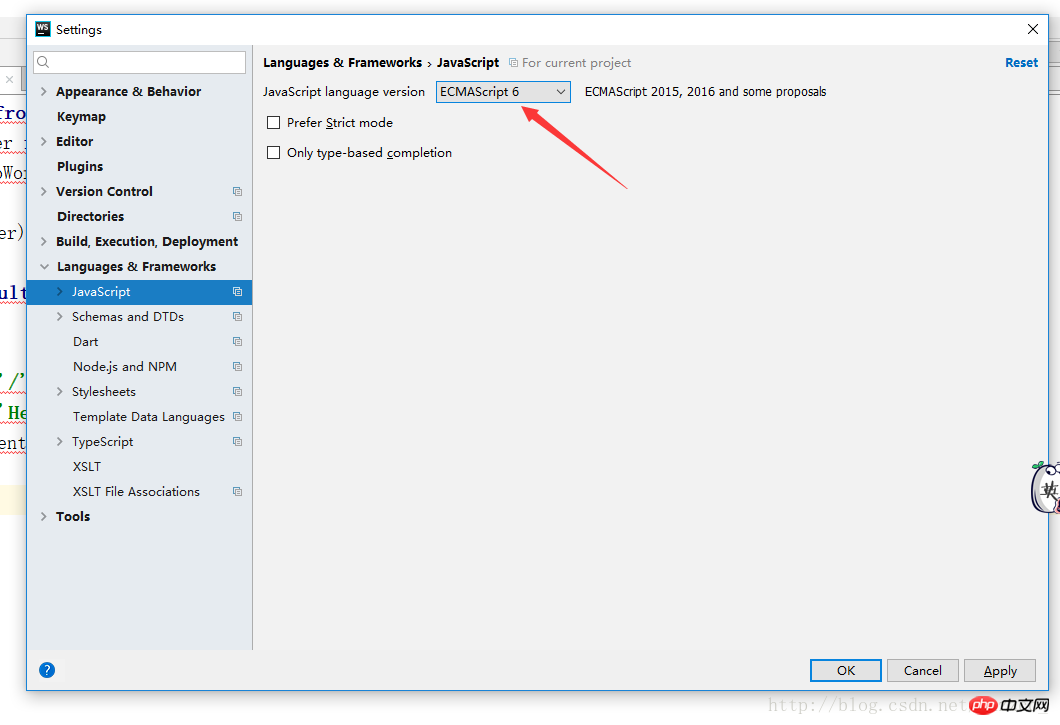
First of all, under the premise that vue-cli has been installed, and aftercnpm install (the official website uses npm, but it is recommended to use cnpm here, which is faster than npm and npm sometimes There is a phenomenon of getting stuck). Here is a small reminder about whether to turn on eslint. This is a tool to standardize the code you write. For newbies, it is recommended to turn it off, otherwise the code written will not comply with its specifications. Your compiler will keep reporting errors, as shown below
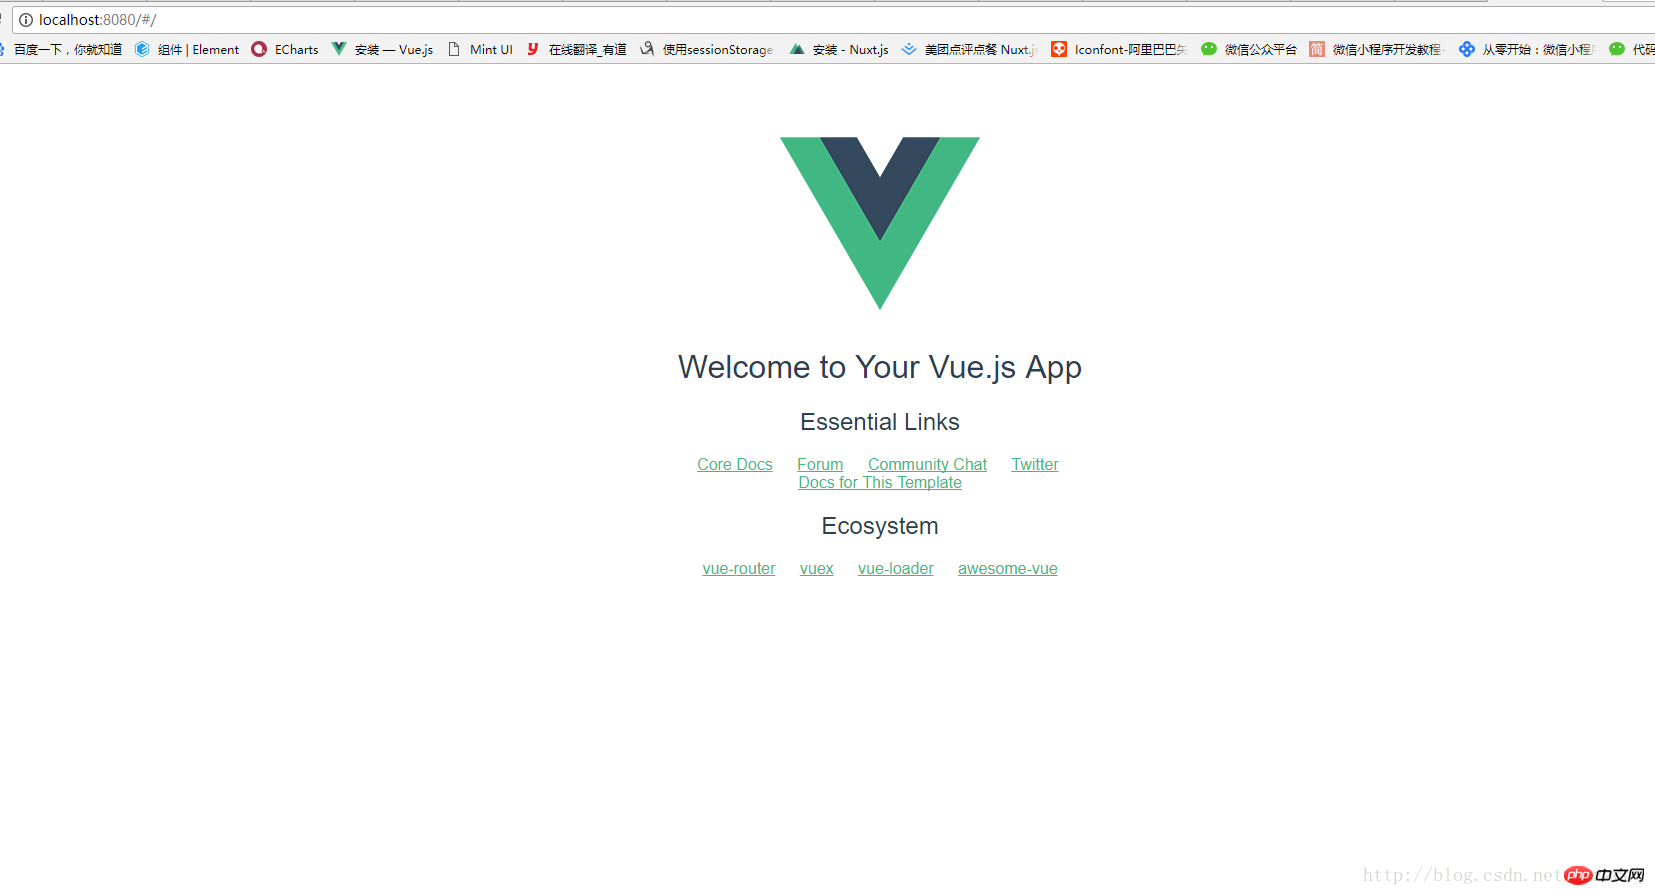
npm run dev, then open localhost:8080 and you can see the project running
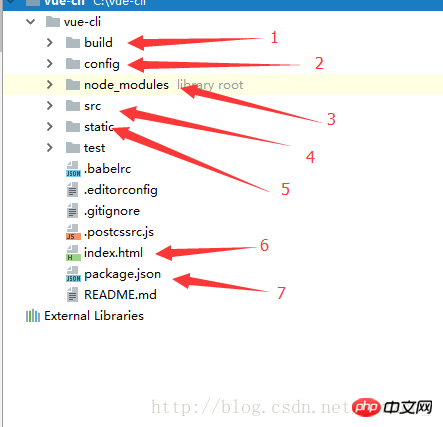
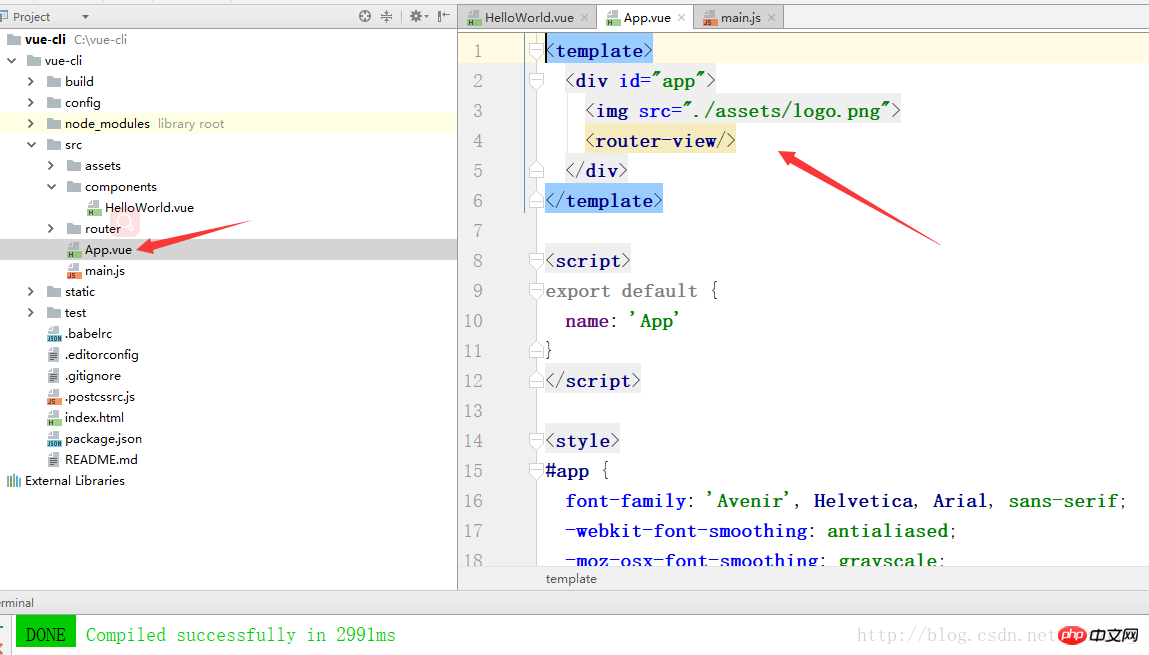
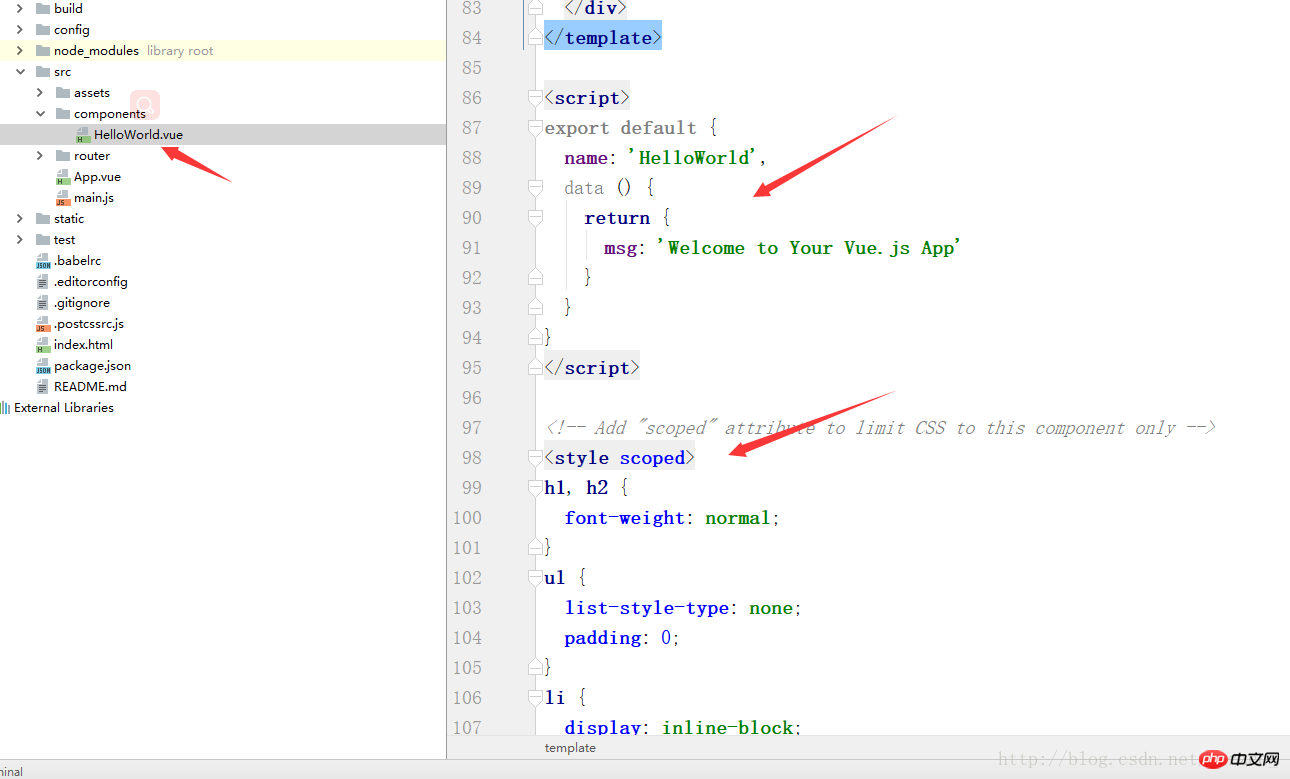
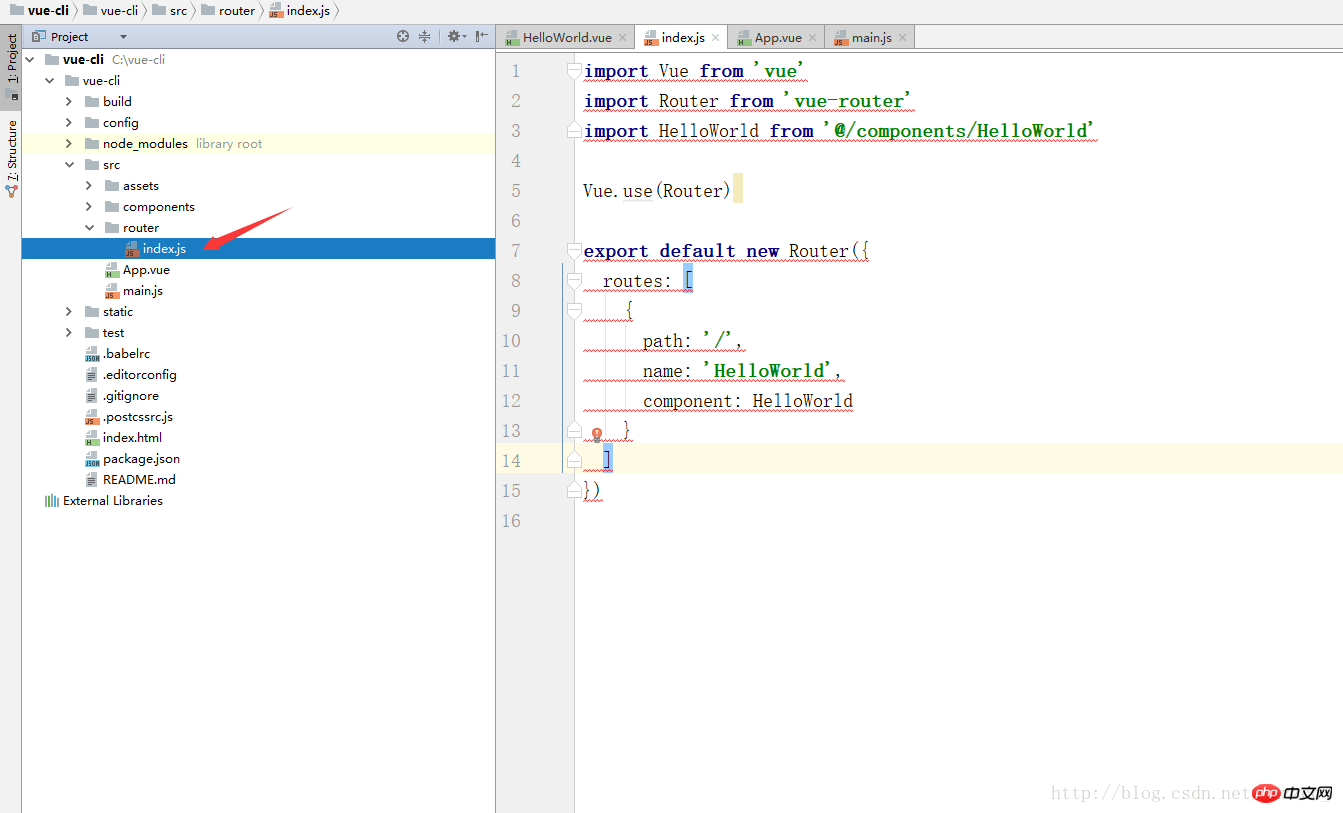
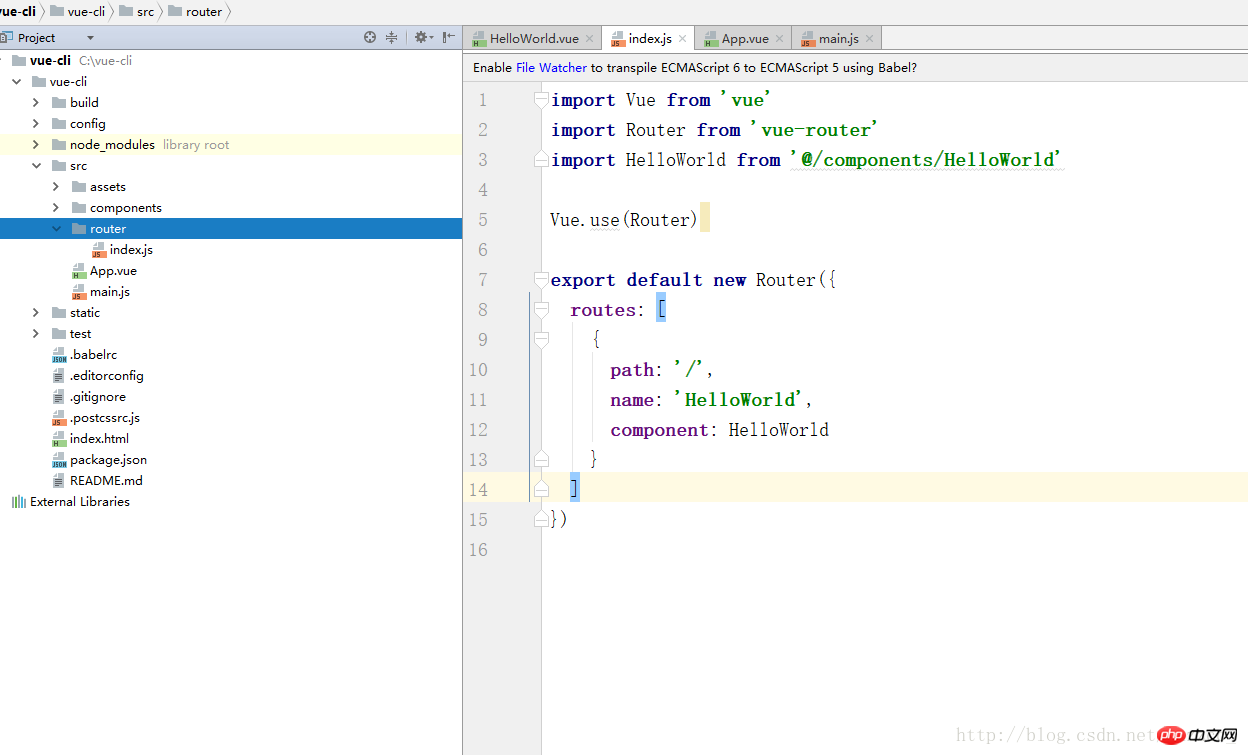
Кратко представим структуру маршрутизаторов. В основном она используется для настройки маршрутов. Как упоминалось выше, все подмаршруты находятся в App.vue. Все App.vue – это самый внешний родительский маршрут. Они хранятся здесь в маршрутах. Он — это массив маршрутов, а путь — это путь, по которому вы хотите получить доступ к созданной вами странице.Здесь написана последовательность корневых путей, поэтому, если вы напрямую обращаетесь к localhost:8080, страница с файлом HelloWorld.vue, вставленным в App. vue (это эквивалентно вложению маршрутизации), имя не имеет значения по сравнению с его присвоением имени. Компонент эквивалентен странице, на которую вы хотите сослаться. Здесь упоминается страница HelloWorld.vue, в основном импорт выше. HelloWorld здесь — это переменная, соответствующая указанному выше файлу Path
Сейчас я научу вас, как создавать файл и настраивать маршрутизацию
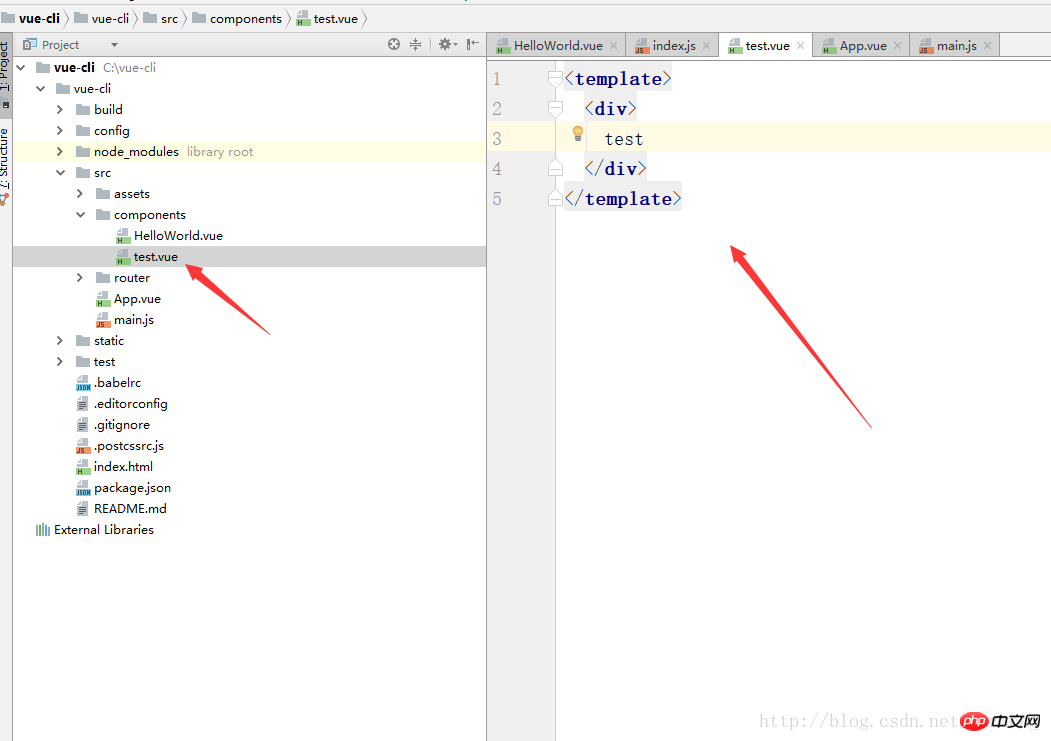
Сначала создайте файл с суффиксом vue и напишите самый простой HTML структура
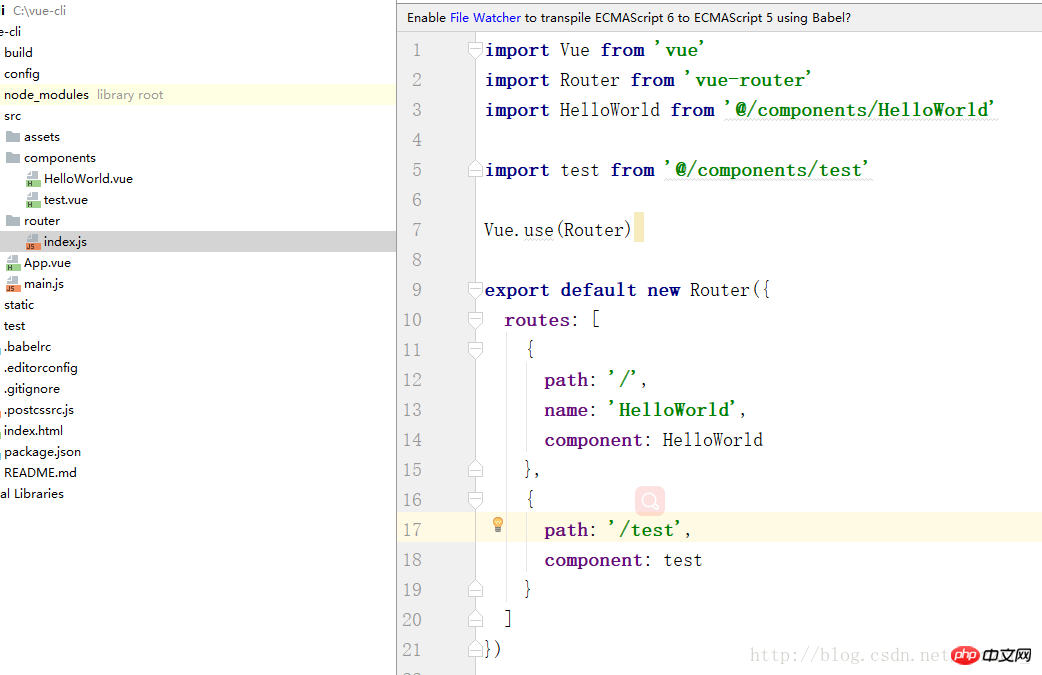
Затем настройте его маршрутизацию.Сначала введите этот файл с помощью импорта, а затем заполните путь для доступа к этому файлу.Я использую /test.Чтобы открыть этот маршрут, введите localhost:8080/#/test.В этом Импортированный файл переносится в компонент
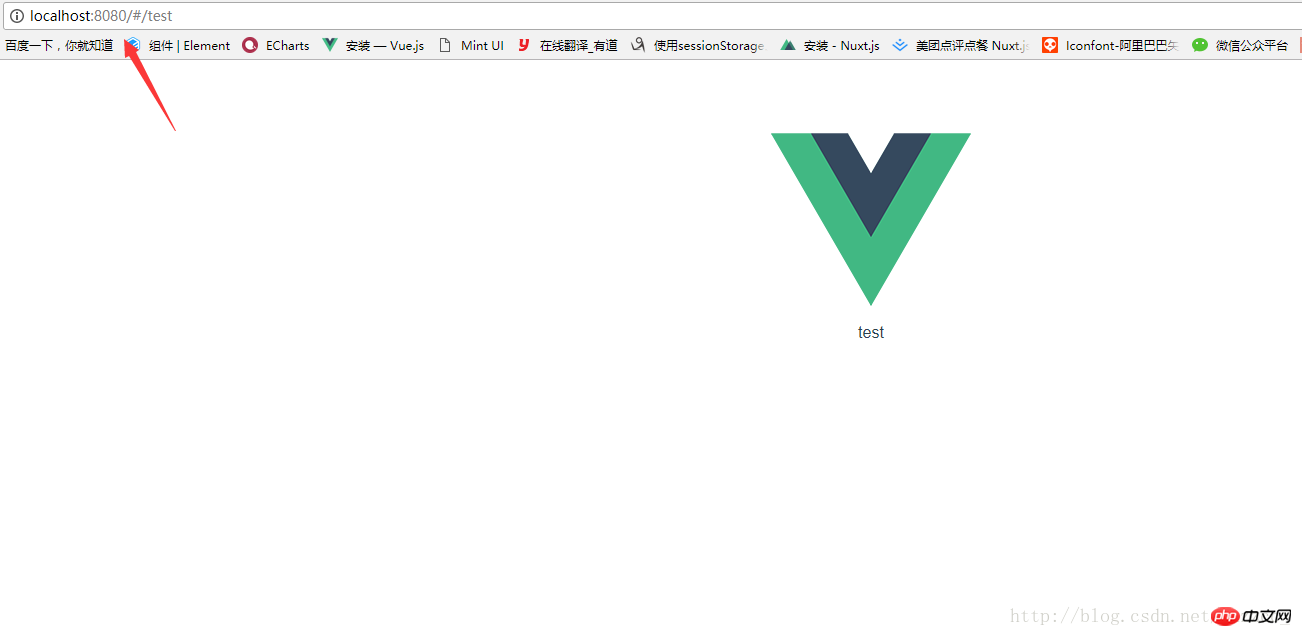
и вводится URL-адрес.Страница с test.vue, вложенная в APP.vue появится
Вложенность маршрутов vue по умолчанию заключается в том, что все страницы вложены в страницу App.vue. Теперь я научу вас, как свободно вкладывать свои собственные страницы. Теперь я вложу тестовую страницу в страницу HelloWorld.vue
Сначала добавлю метку представления маршрутизатора под интерфейсом HelloWorld.vue
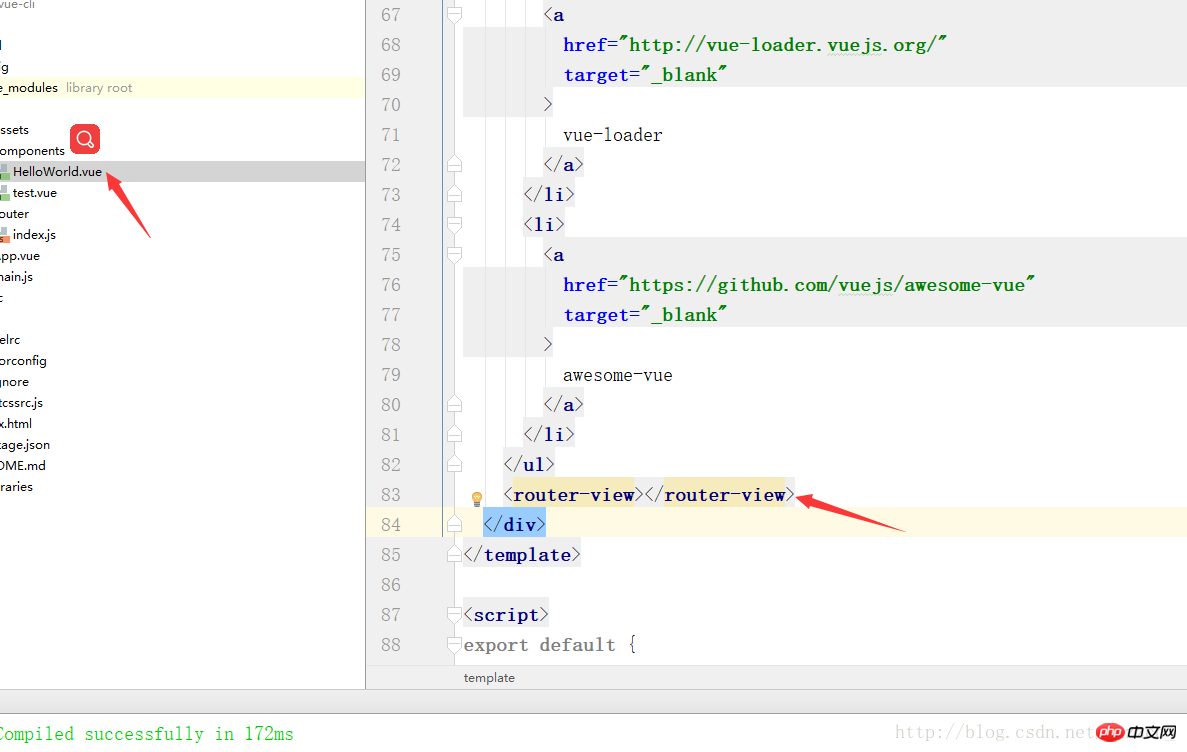
Затем настрою подмаршрут HelloWorld.vue
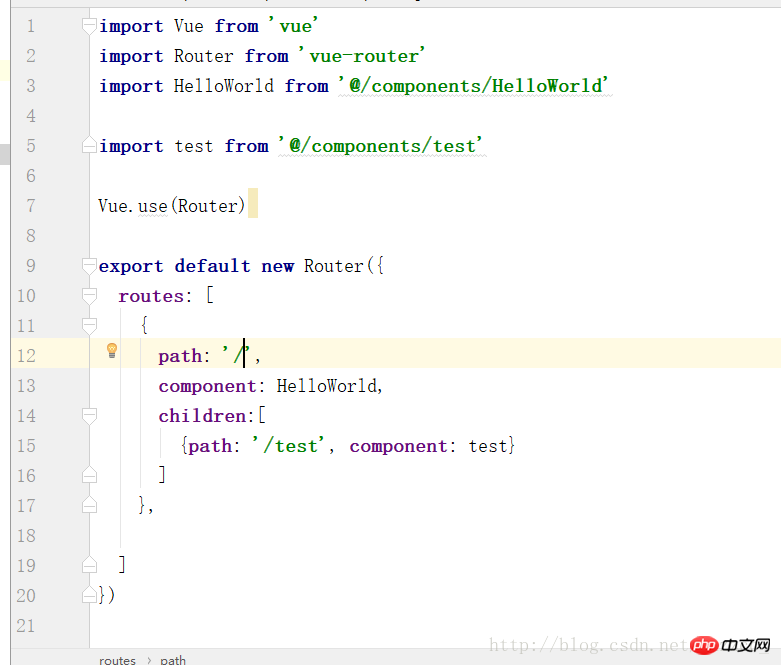
Таким образом, localhost:8080/#/test — это страница, на которой APP.vue вкладывает HelloWorld.vue и test.vue, как показано ниже
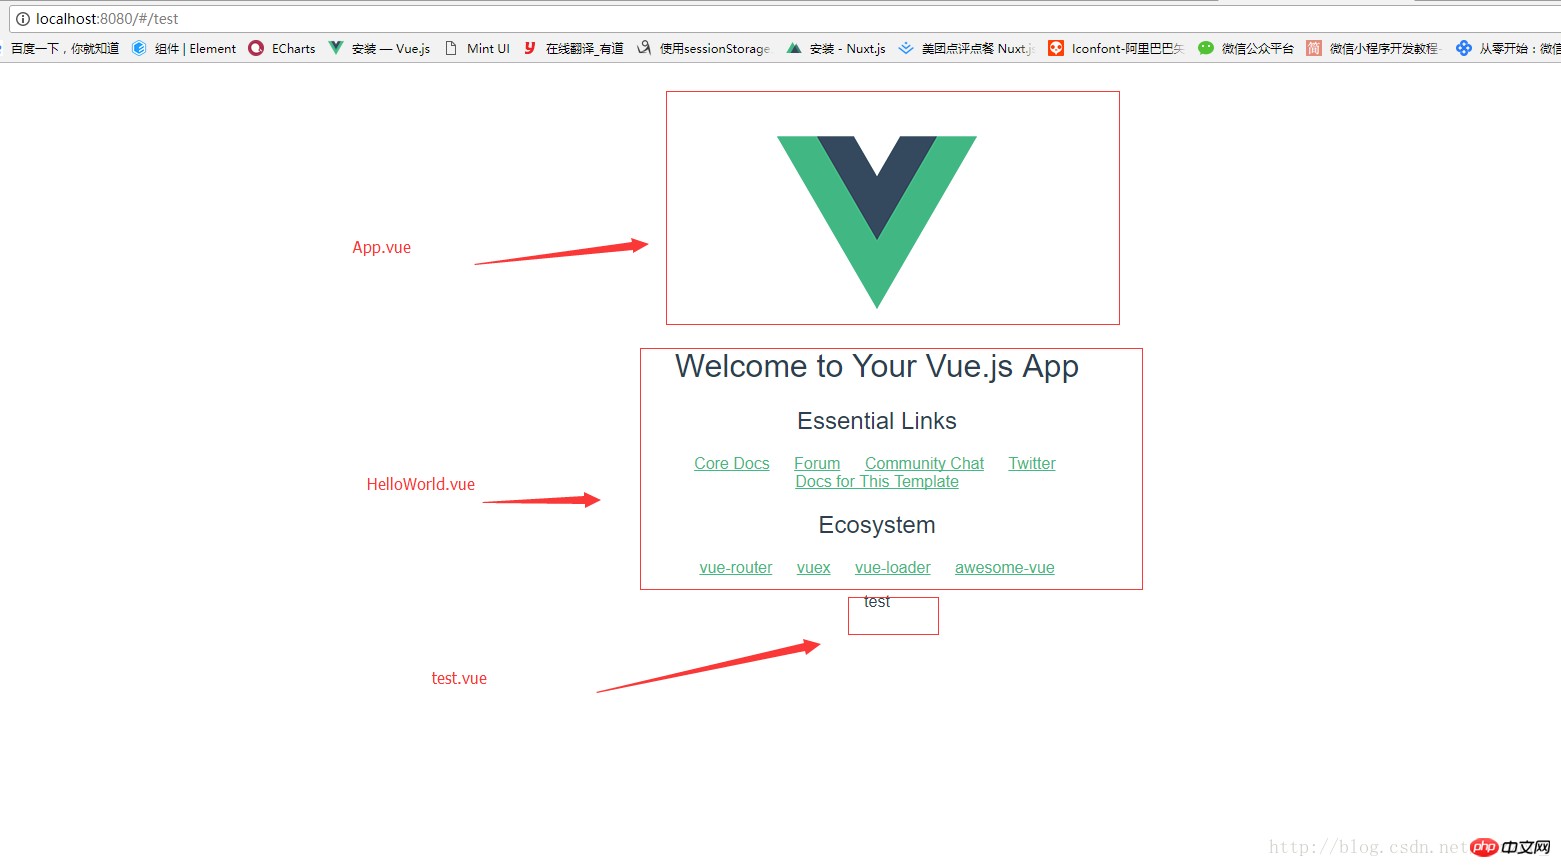
#Это так просто Вложение маршрутов завершено. Давайте поговорим о переходе маршрутизации. Например, если вы привязываете функцию к кнопке и нажимаете кнопку, чтобы перейти к тестовую страницу, вы можете использовать
this.$router.push({path:'/test'})в функции, если хотите вернуться на предыдущую страницу. Общее содержание страницы —
this.$router.go(-1)
. Если есть какие-либо ошибки или сожаления, пожалуйста, простите меня или свяжитесь со мной, чтобы мы могли больше общаться!
Я считаю, что вы освоили этот метод после прочтения примера, описанного в этой статье. Для получения более интересной информации обратите внимание на другие статьи по теме на китайском веб-сайте php! Рекомендуется к прочтению
#Как справиться с конфликтом между событиями двойного щелчка и щелчка в JS
The above is the detailed content of How to use vue scaffolding and vue-router. For more information, please follow other related articles on the PHP Chinese website!

Hot AI Tools

Undresser.AI Undress
AI-powered app for creating realistic nude photos

AI Clothes Remover
Online AI tool for removing clothes from photos.

Undress AI Tool
Undress images for free

Clothoff.io
AI clothes remover

AI Hentai Generator
Generate AI Hentai for free.

Hot Article

Hot Tools

Notepad++7.3.1
Easy-to-use and free code editor

SublimeText3 Chinese version
Chinese version, very easy to use

Zend Studio 13.0.1
Powerful PHP integrated development environment

Dreamweaver CS6
Visual web development tools

SublimeText3 Mac version
God-level code editing software (SublimeText3)

Hot Topics
 How to use magnet links
Feb 18, 2024 am 10:02 AM
Magnet link is a link method for downloading resources, which is more convenient and efficient than traditional download methods. Magnet links allow you to download resources in a peer-to-peer manner without relying on an intermediary server. This article will introduce how to use magnet links and what to pay attention to. 1. What is a magnet link? A magnet link is a download method based on the P2P (Peer-to-Peer) protocol. Through magnet links, users can directly connect to the publisher of the resource to complete resource sharing and downloading. Compared with traditional downloading methods, magnetic
 How to use mdf and mds files
Feb 19, 2024 pm 05:36 PM
How to use mdf files and mds files With the continuous advancement of computer technology, we can store and share data in a variety of ways. In the field of digital media, we often encounter some special file formats. In this article, we will discuss a common file format - mdf and mds files, and introduce how to use them. First, we need to understand the meaning of mdf files and mds files. mdf is the extension of the CD/DVD image file, and the mds file is the metadata file of the mdf file.
 What software is crystaldiskmark? -How to use crystaldiskmark?
Mar 18, 2024 pm 02:58 PM
CrystalDiskMark is a small HDD benchmark tool for hard drives that quickly measures sequential and random read/write speeds. Next, let the editor introduce CrystalDiskMark to you and how to use crystaldiskmark~ 1. Introduction to CrystalDiskMark CrystalDiskMark is a widely used disk performance testing tool used to evaluate the read and write speed and performance of mechanical hard drives and solid-state drives (SSD). Random I/O performance. It is a free Windows application and provides a user-friendly interface and various test modes to evaluate different aspects of hard drive performance and is widely used in hardware reviews
 How to download foobar2000? -How to use foobar2000
Mar 18, 2024 am 10:58 AM
foobar2000 is a software that can listen to music resources at any time. It brings you all kinds of music with lossless sound quality. The enhanced version of the music player allows you to get a more comprehensive and comfortable music experience. Its design concept is to play the advanced audio on the computer The device is transplanted to mobile phones to provide a more convenient and efficient music playback experience. The interface design is simple, clear and easy to use. It adopts a minimalist design style without too many decorations and cumbersome operations to get started quickly. It also supports a variety of skins and Theme, personalize settings according to your own preferences, and create an exclusive music player that supports the playback of multiple audio formats. It also supports the audio gain function to adjust the volume according to your own hearing conditions to avoid hearing damage caused by excessive volume. Next, let me help you
 How to use Baidu Netdisk app
Mar 27, 2024 pm 06:46 PM
Cloud storage has become an indispensable part of our daily life and work nowadays. As one of the leading cloud storage services in China, Baidu Netdisk has won the favor of a large number of users with its powerful storage functions, efficient transmission speed and convenient operation experience. And whether you want to back up important files, share information, watch videos online, or listen to music, Baidu Cloud Disk can meet your needs. However, many users may not understand the specific use method of Baidu Netdisk app, so this tutorial will introduce in detail how to use Baidu Netdisk app. Users who are still confused can follow this article to learn more. ! How to use Baidu Cloud Network Disk: 1. Installation First, when downloading and installing Baidu Cloud software, please select the custom installation option.
 How to use NetEase Mailbox Master
Mar 27, 2024 pm 05:32 PM
NetEase Mailbox, as an email address widely used by Chinese netizens, has always won the trust of users with its stable and efficient services. NetEase Mailbox Master is an email software specially created for mobile phone users. It greatly simplifies the process of sending and receiving emails and makes our email processing more convenient. So how to use NetEase Mailbox Master, and what specific functions it has. Below, the editor of this site will give you a detailed introduction, hoping to help you! First, you can search and download the NetEase Mailbox Master app in the mobile app store. Search for "NetEase Mailbox Master" in App Store or Baidu Mobile Assistant, and then follow the prompts to install it. After the download and installation is completed, we open the NetEase email account and log in. The login interface is as shown below
 How to use Xiaoai Speaker How to connect Xiaoai Speaker to mobile phone
Feb 22, 2024 pm 05:19 PM
After long pressing the play button of the speaker, connect to wifi in the software and you can use it. Tutorial Applicable Model: Xiaomi 12 System: EMUI11.0 Version: Xiaoai Classmate 2.4.21 Analysis 1 First find the play button of the speaker, and press and hold to enter the network distribution mode. 2 Log in to your Xiaomi account in the Xiaoai Speaker software on your phone and click to add a new Xiaoai Speaker. 3. After entering the name and password of the wifi, you can call Xiao Ai to use it. Supplement: What functions does Xiaoai Speaker have? 1 Xiaoai Speaker has system functions, social functions, entertainment functions, knowledge functions, life functions, smart home, and training plans. Summary/Notes: The Xiao Ai App must be installed on your mobile phone in advance for easy connection and use.
 Simple guide to pip mirror source: easily master how to use it
Jan 16, 2024 am 10:18 AM
Get started easily: How to use pip mirror source With the popularity of Python around the world, pip has become a standard tool for Python package management. However, a common problem that many developers face when using pip to install packages is slowness. This is because by default, pip downloads packages from Python official sources or other external sources, and these sources may be located on overseas servers, resulting in slow download speeds. In order to improve download speed, we can use pip mirror source. What is a pip mirror source? To put it simply, just


