How to operate vue components and use props to pass data
This time I will show you how to use props to transfer data when operating a vue component. What are the precautions for using props to transfer data when operating a vue component? The following is a practical case, let’s take a look.
In Vue, the relationship between parent and child components can be summarized as props are passed downwards and events are passed upwards. The parent component sends data to the child component through props, and the child component sends messagesto the parent componentthrough events. See how they work.

1. Basic Usage
Components are not just about reusing the content of the template. What's more important is communication between components. In the component, use the option props to declare the data that needs to be received from the parent. The value of props can be two types, one is astringarray, and the other is an object.
1.1 String array:
  <p id="app4">
   <my-component4 message="数据来自父组件"></my-component4>
  </p>
Vue.component('my-component4',{
 props: ['message'],
 template: '<p>{{message}}</p>'
});
var app4 = new Vue({
 el: '#app4'
});<p id= ” app4”> <p >来自父组件的数据</ p> </p>
methods.
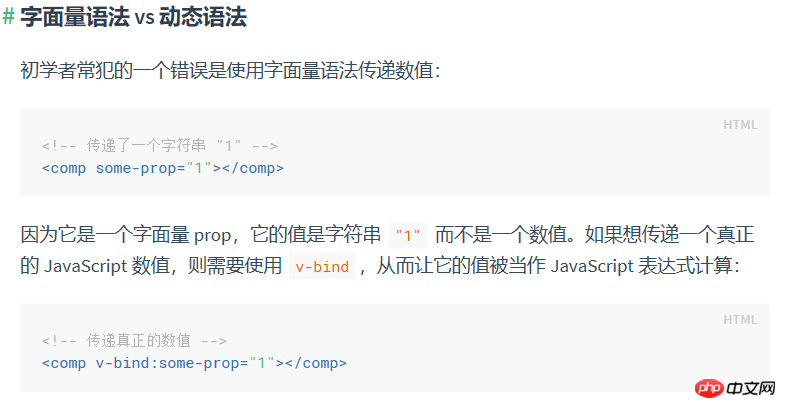
The data message in the above example is passed from the parent through props. Write the name of the props directly on the custom label of the component. If you want to pass multiple data, just add items in the props array. . Sometimes, the data passed is not directly hard-coded, but dynamic data from the parent. In this case, you can use the command v -bind to dynamically bind the value of props. When the data of the parent component changes , will also be passed to child components. <p id="app5">
<input type="text" v-model="text">
<my-component5 :my-text="text"></my-component5>
</p>
Vue.component('my-component5',{
props: ['myText'],
template: '<p>{{myText}}</p>'
});
var app5 = new Vue({
el: '#app5',
data: {
text: '动态传递父组件数据'
}
});

 <p id="app6">
   <input type="text" v-model="number">
   <my-component6 :my-text="number"></my-component6>
  </p>
Vue.component('my-component6',{
 props: {
  'myText':{
   type: Number, //必须是数字类型的
   required: true, //必须传值
   default: 1 //如果未定义,默认值就是1
  }
 },
 template: '<p>{{myText}}</p>'
});
var app6 = new Vue({
 el: '#app6',
 data: {
  number: 1
 }
});• Number
• Boolean
• Object
• Array
• Function
2. One-way data flow
The biggest change between Vue 2.x and Vue l.x is that Vue2.x is passed through props The data is one-way, that is, when the data of the parent component changes, it will be passed to the child component, but not the other way around. In business, we often encounter two situations where prop needs to be changed. 2.1 One is that the parent component passes in the initial value, and the subcomponent saves it as the initial value. It can be used and modified at will within the scope. (After Prop is passed in as the initial value, the subcomponent wants to use it as local data;) In this case, you can declare another data in the component data and reference the prop of the parent component. The sample code is as follows : <p id="app7">
<my-component7 :init-count="1"></my-component7>
</p>
Vue.component('my-component7',{
props: ['initCount'],
template: '<p>{{count}}</p>',
data: function(){
return {
count: this.initCount
}
}
});
var app7 = new Vue({
el: '#app7'
}); <p id="app8">
<my-component8 :width="100"></my-component8>
</p>
Vue.component('my-component8',{
props: ['width'],
template: '<p :style="style">组件内容</p>',
computed: {
style: function(){
return {
width: this.width+'px'
}
}
}
});
var app8 = new Vue({
el: '#app8'
});注意在 JavaScript 中对象和数组是引用类型,指向同一个内存空间,如果 prop 是一个对象或数组,在子组件内部改变它会影响父组件的状态。
相信看了本文案例你已经掌握了方法,更多精彩请关注php中文网其它相关文章!
推荐阅读:
使用webpack插件html-webpack-plugin实例详解
The above is the detailed content of How to operate vue components and use props to pass data. For more information, please follow other related articles on the PHP Chinese website!

Hot AI Tools

Undresser.AI Undress
AI-powered app for creating realistic nude photos

AI Clothes Remover
Online AI tool for removing clothes from photos.

Undress AI Tool
Undress images for free

Clothoff.io
AI clothes remover

AI Hentai Generator
Generate AI Hentai for free.

Hot Article

Hot Tools

Notepad++7.3.1
Easy-to-use and free code editor

SublimeText3 Chinese version
Chinese version, very easy to use

Zend Studio 13.0.1
Powerful PHP integrated development environment

Dreamweaver CS6
Visual web development tools

SublimeText3 Mac version
God-level code editing software (SublimeText3)

Hot Topics
 How to use magnet links
Feb 18, 2024 am 10:02 AM
Magnet link is a link method for downloading resources, which is more convenient and efficient than traditional download methods. Magnet links allow you to download resources in a peer-to-peer manner without relying on an intermediary server. This article will introduce how to use magnet links and what to pay attention to. 1. What is a magnet link? A magnet link is a download method based on the P2P (Peer-to-Peer) protocol. Through magnet links, users can directly connect to the publisher of the resource to complete resource sharing and downloading. Compared with traditional downloading methods, magnetic
 How to use mdf and mds files
Feb 19, 2024 pm 05:36 PM
How to use mdf files and mds files With the continuous advancement of computer technology, we can store and share data in a variety of ways. In the field of digital media, we often encounter some special file formats. In this article, we will discuss a common file format - mdf and mds files, and introduce how to use them. First, we need to understand the meaning of mdf files and mds files. mdf is the extension of the CD/DVD image file, and the mds file is the metadata file of the mdf file.
 What software is crystaldiskmark? -How to use crystaldiskmark?
Mar 18, 2024 pm 02:58 PM
CrystalDiskMark is a small HDD benchmark tool for hard drives that quickly measures sequential and random read/write speeds. Next, let the editor introduce CrystalDiskMark to you and how to use crystaldiskmark~ 1. Introduction to CrystalDiskMark CrystalDiskMark is a widely used disk performance testing tool used to evaluate the read and write speed and performance of mechanical hard drives and solid-state drives (SSD). Random I/O performance. It is a free Windows application and provides a user-friendly interface and various test modes to evaluate different aspects of hard drive performance and is widely used in hardware reviews
 How to install the Windows 10 old version component DirectPlay
Dec 28, 2023 pm 03:43 PM
Many users always encounter some problems when playing some games on win10, such as screen freezes and blurred screens. At this time, we can solve the problem by turning on the directplay function, and the operation method of the function is also Very simple. How to install directplay, the old component of win10 1. Enter "Control Panel" in the search box and open it 2. Select large icons as the viewing method 3. Find "Programs and Features" 4. Click on the left to enable or turn off win functions 5. Select the old version here Just check the box
 How to download foobar2000? -How to use foobar2000
Mar 18, 2024 am 10:58 AM
foobar2000 is a software that can listen to music resources at any time. It brings you all kinds of music with lossless sound quality. The enhanced version of the music player allows you to get a more comprehensive and comfortable music experience. Its design concept is to play the advanced audio on the computer The device is transplanted to mobile phones to provide a more convenient and efficient music playback experience. The interface design is simple, clear and easy to use. It adopts a minimalist design style without too many decorations and cumbersome operations to get started quickly. It also supports a variety of skins and Theme, personalize settings according to your own preferences, and create an exclusive music player that supports the playback of multiple audio formats. It also supports the audio gain function to adjust the volume according to your own hearing conditions to avoid hearing damage caused by excessive volume. Next, let me help you
 How to use Baidu Netdisk app
Mar 27, 2024 pm 06:46 PM
Cloud storage has become an indispensable part of our daily life and work nowadays. As one of the leading cloud storage services in China, Baidu Netdisk has won the favor of a large number of users with its powerful storage functions, efficient transmission speed and convenient operation experience. And whether you want to back up important files, share information, watch videos online, or listen to music, Baidu Cloud Disk can meet your needs. However, many users may not understand the specific use method of Baidu Netdisk app, so this tutorial will introduce in detail how to use Baidu Netdisk app. Users who are still confused can follow this article to learn more. ! How to use Baidu Cloud Network Disk: 1. Installation First, when downloading and installing Baidu Cloud software, please select the custom installation option.
 How to use NetEase Mailbox Master
Mar 27, 2024 pm 05:32 PM
NetEase Mailbox, as an email address widely used by Chinese netizens, has always won the trust of users with its stable and efficient services. NetEase Mailbox Master is an email software specially created for mobile phone users. It greatly simplifies the process of sending and receiving emails and makes our email processing more convenient. So how to use NetEase Mailbox Master, and what specific functions it has. Below, the editor of this site will give you a detailed introduction, hoping to help you! First, you can search and download the NetEase Mailbox Master app in the mobile app store. Search for "NetEase Mailbox Master" in App Store or Baidu Mobile Assistant, and then follow the prompts to install it. After the download and installation is completed, we open the NetEase email account and log in. The login interface is as shown below
 How to use Xiaoai Speaker How to connect Xiaoai Speaker to mobile phone
Feb 22, 2024 pm 05:19 PM
After long pressing the play button of the speaker, connect to wifi in the software and you can use it. Tutorial Applicable Model: Xiaomi 12 System: EMUI11.0 Version: Xiaoai Classmate 2.4.21 Analysis 1 First find the play button of the speaker, and press and hold to enter the network distribution mode. 2 Log in to your Xiaomi account in the Xiaoai Speaker software on your phone and click to add a new Xiaoai Speaker. 3. After entering the name and password of the wifi, you can call Xiao Ai to use it. Supplement: What functions does Xiaoai Speaker have? 1 Xiaoai Speaker has system functions, social functions, entertainment functions, knowledge functions, life functions, smart home, and training plans. Summary/Notes: The Xiao Ai App must be installed on your mobile phone in advance for easy connection and use.


