Implementation method of handwritten Node static resource server
This article mainly introduces the implementation method of handwritten Node static resource server. Now I will share it with you and give you a reference.
If we want to write a static resource server, first we need to know how to create an http server and what its principle is.
The http server is inherited from the tcp server. The http protocol is an application layer protocol and is based on TCP. The
The principle of http is to package the request and response. When the client connects, the connection event is triggered first, and then the request can be sent multiple times. Each request will trigger the request event
let server = http.createServer();
let url = require('url');
server.on('connection', function (socket) {
  console.log('客户端连接 ');
});
server.on('request', function (req, res) {
  let { pathname, query } = url.parse(req.url, true);
  let result = [];
  req.on('data', function (data) {
    result.push(data);
  });
  req.on('end', function () {
    let r = Buffer.concat(result);
    res.end(r);
  })
});
server.on('close', function (req, res) {
  console.log('服务器关闭 ');
});
server.on('error', function (err) {
  console.log('服务器错误 ');
});
server.listen(8080, function () {
  console.log('server started at http://localhost:8080');
});req represents the client’s connection. The server parses the client’s request information and puts it on req
res represents response. If you want to respond to the client, you need to pass res
req and res come from the socket. First listen to the data event of the socket, and then When the event occurs, parse it, parse out the request header object, create the request object, and then create the response object based on the request object
req.url Get the request path
req.headers request header object
Next we will explain some core functions
In-depth understanding and implementation Compression and decompression
Why compress? What are the benefits?
You can use the zlib module for compression and decompression processing. After compressing the file, you can reduce the size, speed up the transmission speed and save bandwidth. Code
Compression and decompression objects are transform conversion stream, inherited from duplex duplex stream, which is a readable and writable stream
zlib.createGzip: Returns the Gzip stream object and uses the Gzip algorithm to compress the data
zlib.createGunzip: Returns the Gzip stream object, uses the Gzip algorithm to decompress the compressed data
zlib.createDeflate: Returns the Deflate stream object, uses Deflate The algorithm compresses the data
zlib.createInflate: Returns the Deflate stream object and uses the Deflate algorithm to decompress the data
Implement compression and decompression
Because the compressed file may be large or small, in order to improve the processing speed, we use streams to achieve
let fs = require("fs");
let path = require("path");
let zlib = require("zlib");
function gzip(src) {
 fs
  .createReadStream(src)
  .pipe(zlib.createGzip())
  .pipe(fs.createWriteStream(src + ".gz"));
}
gzip(path.join(__dirname,'msg.txt'));
function gunzip(src) {
 fs
  .createReadStream(src)
  .pipe(zlib.createGunzip())
  .pipe(
   fs.createWriteStream(path.join(__dirname, path.basename(src, ".gz")))
  );
}
gunzip(path.join(__dirname, "msg.txt.gz"));
gzip method is used to achieve compression
gunzip method is used to achieve decompression
The files msg.txt is a directory of the same level
Why do you need to write this: gzip(path.join(__dirname,'msg.txt'));
Because console.log(process.cwd()); prints out that the current working directory is the root directory, not the directory where the file is located. If you write gzip('msg.txt'); like this and cannot find the file, an error will be reported
basename Get the file name from a path, including the extension, you can pass an extension parameter and remove the extension
extname Get the extension
The compressed format and decompressed format need to match, otherwise an error will be reported
Sometimes the string we get is not a stream. So how to solve it
let zlib=require('zlib');
let str='hello';
zlib.gzip(str,(err,buffer)=>{
  console.log(buffer.length);
  zlib.unzip(buffer,(err,data)=>{
    console.log(data.toString());
  })
});It is possible that the compressed content is larger than the original. If the content is too small, compression is meaningless
The effect of text compression will be better because there are rules
Apply compression and decompression in http
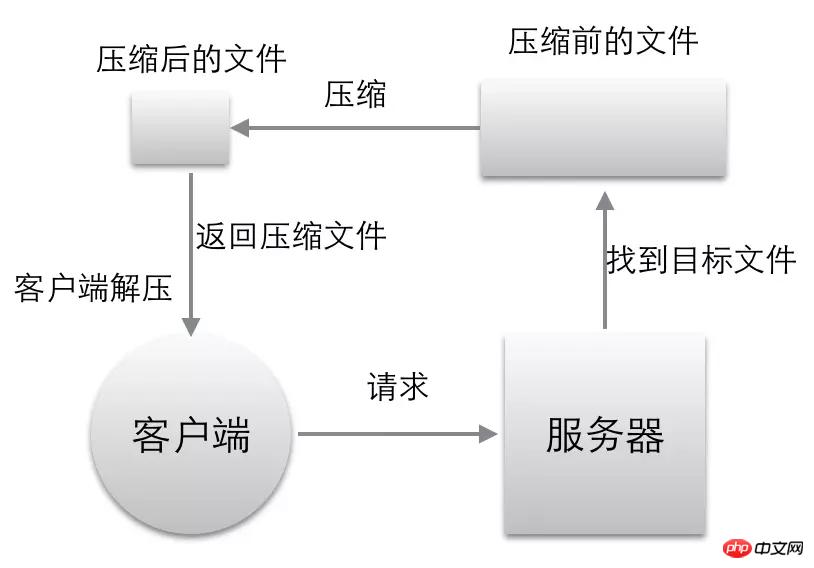
The following implements such a function, as shown in the figure:

When the client initiates a request to the server, it will tell the server the decompression format I support through accept-encoding (for example: Accept-Encoding: gzip, default)
The server needs to compress according to the format displayed by Accept-Encoding. If there is no format, it cannot be compressed because the browser cannot decompress it.
If the client needs Accept The format server in -Encoding does not have and cannot implement compression
let http = require("http");
let path = require("path");
let url = require("url");
let zlib = require("zlib");
let fs = require("fs");
let { promisify } = require("util");
let mime = require("mime");
//把一个异步方法转成一个返回promise的方法
let stat = promisify(fs.stat);
http.createServer(request).listen(8080);
async function request(req, res) {
 let { pathname } = url.parse(req.url);
 let filepath = path.join(__dirname, pathname);
 // fs.stat(filepath,(err,stat)=>{});现在不这么写了,异步的处理起来比较麻烦
 try {
  let statObj = await stat(filepath);
  res.setHeader("Content-Type", mime.getType(pathname));
  let acceptEncoding = req.headers["accept-encoding"];
  if (acceptEncoding) {
   if (acceptEncoding.match(/\bgzip\b/)) {

    res.setHeader("Content-Encoding", "gzip");
    fs
     .createReadStream(filepath)
     .pipe(zlib.createGzip())
     .pipe(res);
   } else if (acceptEncoding.match(/\bdeflate\b/)) {
    res.setHeader("Content-Encoding", "deflate");
    fs
     .createReadStream(filepath)
     .pipe(zlib.createDeflate())
     .pipe(res);
   } else {
    fs.createReadStream(filepath).pipe(res);
   }
  } else {
   fs.createReadStream(filepath).pipe(res);
  }
 } catch (e) {
  res.statusCode = 404;
  res.end("Not Found");
 }
}mime: through the name of the file , path to get the content type of a file, you can return different Content-Types according to different file content types
acceptEncoding: all written in lowercase to be compatible with different browsers, node All request headers are converted to lower case
filepath: get the absolute path of the file
After starting the service, access http://localhost :8080/msg.txt You can see the results
In-depth understanding and implementation of caching
Why cache? What are the benefits of caching?
Reduces redundant data transmission and saves network fees.
Reduces the load on the server and greatly improves the performance of the website
Speeds up the speed of the client loading web pages
Caching classification
Forced caching:
强制缓存,在缓存数据未失效的情况下,可以直接使用缓存数据
在没有缓存数据的时候,浏览器向服务器请求数据时,服务器会将数据和缓存规则一并返回,缓存规则信息包含在响应header中


对比缓存:
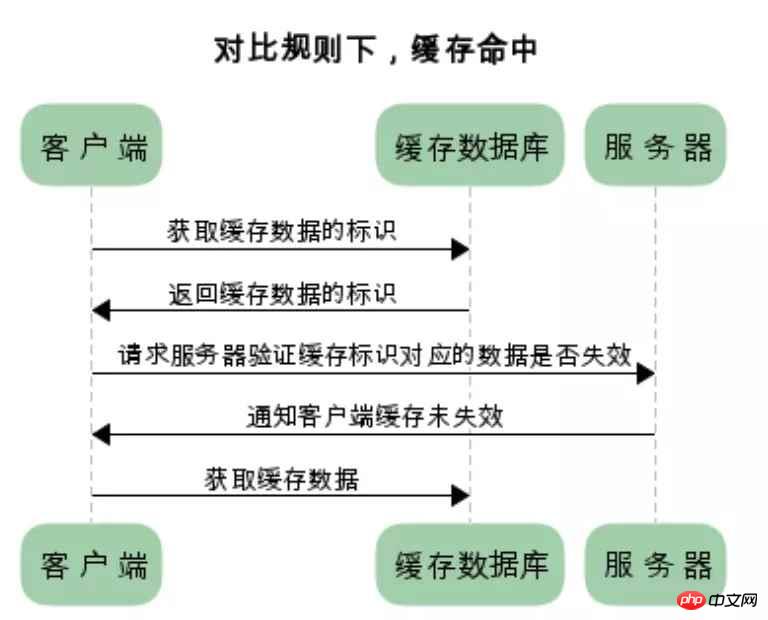
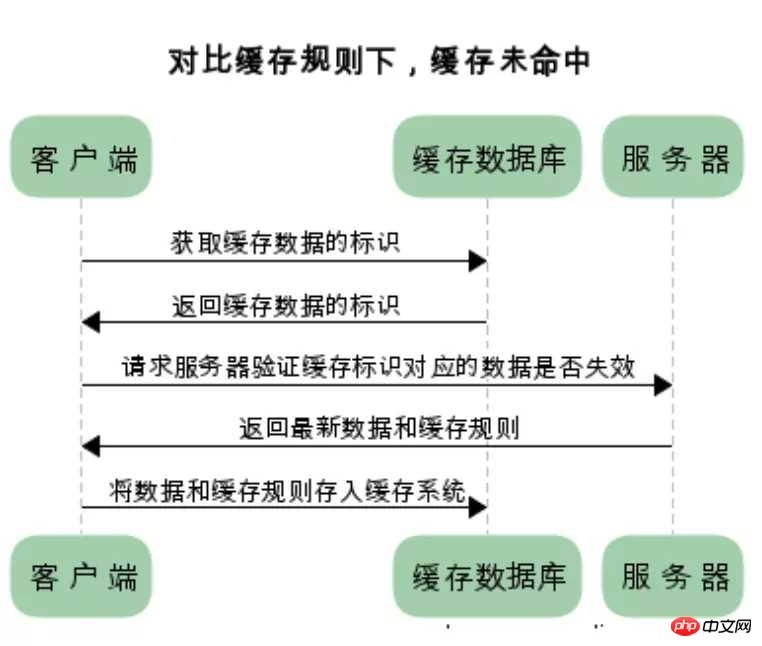
浏览器第一次请求数据时,服务器会将缓存标识与数据一起返回给客户端,客户端将二者备份至缓存数据库中
再次请求数据时,客户端将备份的缓存标识发送给服务器,服务器根据缓存标识进行判断,判断成功后,返回304状态码,通知客户端比较成功,可以使用缓存数据


两类缓存的区别和联系
强制缓存如果生效,不需要再和服务器发生交互,而对比缓存不管是否生效,都需要与服务端发生交互
两类缓存规则可以同时存在,强制缓存优先级高于对比缓存,也就是说,当执行强制缓存的规则时,如果缓存生效,直接使用缓存,不再执行对比缓存规则
实现对比缓存
实现对比缓存一般是按照以下步骤:
第一次访问服务器的时候,服务器返回资源和缓存的标识,客户端则会把此资源缓存在本地的缓存数据库中。
第二次客户端需要此数据的时候,要取得缓存的标识,然后去问一下服务器我的资源是否是最新的。
如果是最新的则直接使用缓存数据,如果不是最新的则服务器返回新的资源和缓存规则,客户端根据缓存规则缓存新的数据
实现对比缓存一般有两种方式
通过最后修改时间来判断缓存是否可用
let http = require('http');
let url = require('url');
let path = require('path');
let fs = require('fs');
let mime = require('mime');
// http://localhost:8080/index.html
http.createServer(function (req, res) {
  let { pathname } = url.parse(req.url, true);
  //D:\vipcode\201801\20.cache\index.html
  let filepath = path.join(__dirname, pathname);
  fs.stat(filepath, (err, stat) => {
    if (err) {
      return sendError(req, res);
    } else {
      let ifModifiedSince = req.headers['if-modified-since'];
      let LastModified = stat.ctime.toGMTString();
      if (ifModifiedSince == LastModified) {
        res.writeHead(304);
        res.end('');
      } else {
        return send(req, res, filepath, stat);
      }
    }
  });
}).listen(8080);
function sendError(req, res) {
  res.end('Not Found');
}
function send(req, res, filepath, stat) {
  res.setHeader('Content-Type', mime.getType(filepath));
  //发给客户端之后,客户端会把此时间保存起来,下次再获取此资源的时候会把这个时间再发回服务器
  res.setHeader('Last-Modified', stat.ctime.toGMTString());
  fs.createReadStream(filepath).pipe(res);
}这种方式有很多缺陷
某些服务器不能精确得到文件的最后修改时间, 这样就无法通过最后修改时间来判断文件是否更新了
某些文件的修改非常频繁,在秒以下的时间内进行修改.Last-Modified只能精确到秒。
一些文件的最后修改时间改变了,但是内容并未改变。 我们不希望客户端认为这个文件修改了
如果同样的一个文件位于多个CDN服务器上的时候内容虽然一样,修改时间不一样
ETag
ETag是根据实体内容生成的一段hash字符串,可以标识资源的状态
资源发生改变时,ETag也随之发生变化。 ETag是Web服务端产生的,然后发给浏览器客户端
let http = require('http');
let url = require('url');
let path = require('path');
let fs = require('fs');
let mime = require('mime');
let crypto = require('crypto');

http.createServer(function (req, res) {
  let { pathname } = url.parse(req.url, true);

  let filepath = path.join(__dirname, pathname);
  fs.stat(filepath, (err, stat) => {
    if (err) {
      return sendError(req, res);
    } else {
      let ifNoneMatch = req.headers['if-none-match'];
      let out = fs.createReadStream(filepath);
      let md5 = crypto.createHash('md5');

      out.on('data', function (data) {
        md5.update(data);
      });
      out.on('end', function () {

        let etag = md5.digest('hex');
        let etag = `${stat.size}`;
        if (ifNoneMatch == etag) {
          res.writeHead(304);
          res.end('');
        } else {
          return send(req, res, filepath, etag);
        }
      });

    }
  });
}).listen(8080);
function sendError(req, res) {
  res.end('Not Found');
}
function send(req, res, filepath, etag) {
  res.setHeader('Content-Type', mime.getType(filepath));

  res.setHeader('ETag', etag);
  fs.createReadStream(filepath).pipe(res);
}客户端想判断缓存是否可用可以先获取缓存中文档的ETag,然后通过If-None-Match发送请求给Web服务器询问此缓存是否可用。
服务器收到请求,将服务器的中此文件的ETag,跟请求头中的If-None-Match相比较,如果值是一样的,说明缓存还是最新的,Web服务器将发送304 Not Modified响应码给客户端表示缓存未修改过,可以使用。
如果不一样则Web服务器将发送该文档的最新版本给浏览器客户端
实现强制缓存
把资源缓存在客户端,如果客户端再次需要此资源的时候,先获取到缓存中的数据,看是否过期,如果过期了。再请求服务器
如果没过期,则根本不需要向服务器确认,直接使用本地缓存即可
let http = require('http');
let url = require('url');
let path = require('path');
let fs = require('fs');
let mime = require('mime');
let crypto = require('crypto');
http.createServer(function (req, res) {
  let { pathname } = url.parse(req.url, true);
  let filepath = path.join(__dirname, pathname);
  console.log(filepath);
  fs.stat(filepath, (err, stat) => {
    if (err) {
      return sendError(req, res);
    } else {
      send(req, res, filepath);
    }
  });
}).listen(8080);
function sendError(req, res) {
  res.end('Not Found');
}
function send(req, res, filepath) {
  res.setHeader('Content-Type', mime.getType(filepath));
  res.setHeader('Expires', new Date(Date.now() + 30 * 1000).toUTCString());
  res.setHeader('Cache-Control', 'max-age=30');
  fs.createReadStream(filepath).pipe(res);
}浏览器会将文件缓存到Cache目录,第二次请求时浏览器会先检查Cache目录下是否含有该文件,如果有,并且还没到Expires设置的时间,即文件还没有过期,那么此时浏览器将直接从Cache目录中读取文件,而不再发送请求
Expires是服务器响应消息头字段,在响应http请求时告诉浏览器在过期时间前浏览器可以直接从浏览器缓存取数据
Cache-Control与Expires的作用一致,都是指明当前资源的有效期,控制浏览器是否直接从浏览器缓存取数据还是重新发请求到服务器取数据,如果同时设置的话,其优先级高于Expires
下面开始写静态服务器
首先创建一个http服务,配置监听端口
 let http = require('http');
 let server = http.createServer();
    server.on('request', this.request.bind(this));
    server.listen(this.config.port, () => {
      let url = `http://${this.config.host}:${this.config.port}`;
      debug(`server started at ${chalk.green(url)}`);
});下面写个静态文件服务器
先取到客户端想说的文件或文件夹路径,如果是目录的话,应该显示目录下面的文件列表
 async request(req, res) {
    let { pathname } = url.parse(req.url);
    if (pathname == '/favicon.ico') {
      return this.sendError('not found', req, res);
    }
    let filepath = path.join(this.config.root, pathname);
    try {
      let statObj = await stat(filepath);
      if (statObj.isDirectory()) {
        let files = await readdir(filepath);
        files = files.map(file => ({
          name: file,
          url: path.join(pathname, file)
        }));
        let html = this.list({
          title: pathname,
          files
        });
        res.setHeader('Content-Type', 'text/html');
        res.end(html);
      } else {
        this.sendFile(req, res, filepath, statObj);
      }
    } catch (e) {
      debug(inspect(e));
      this.sendError(e, req, res);
    }
  }

  sendFile(req, res, filepath, statObj) {
    if (this.handleCache(req, res, filepath, statObj)) return;
    res.setHeader('Content-Type', mime.getType(filepath) + ';charset=utf-8');
    let encoding = this.getEncoding(req, res);
    let rs = this.getStream(req, res, filepath, statObj);

    if (encoding) {
      rs.pipe(encoding).pipe(res);
    } else {
      rs.pipe(res);
    }
}支持断点续传
 getStream(req, res, filepath, statObj) {
    let start = 0;
    let end = statObj.size - 1;
    let range = req.headers['range'];
    if (range) {
      res.setHeader('Accept-Range', 'bytes');
      res.statusCode = 206;
      let result = range.match(/bytes=(\d*)-(\d*)/);
      if (result) {
        start = isNaN(result[1]) ? start : parseInt(result[1]);
        end = isNaN(result[2]) ? end : parseInt(result[2]) - 1;
      }
    }
    return fs.createReadStream(filepath, {
      start, end
    });
}支持对比缓存,通过etag的方式
handleCache(req, res, filepath, statObj) {
    let ifModifiedSince = req.headers['if-modified-since'];
    let isNoneMatch = req.headers['is-none-match'];
    res.setHeader('Cache-Control', 'private,max-age=30');
    res.setHeader('Expires', new Date(Date.now() + 30 * 1000).toGMTString());
    let etag = statObj.size;
    let lastModified = statObj.ctime.toGMTString();
    res.setHeader('ETag', etag);
    res.setHeader('Last-Modified', lastModified);
    if (isNoneMatch && isNoneMatch != etag) {
      return fasle;
    }
    if (ifModifiedSince && ifModifiedSince != lastModified) {
      return fasle;
    }
    if (isNoneMatch || ifModifiedSince) {
      res.writeHead(304);
      res.end();
      return true;
    } else {
      return false;
    }
}支持文件压缩
  getEncoding(req, res) {
    let acceptEncoding = req.headers['accept-encoding'];
    if (/\bgzip\b/.test(acceptEncoding)) {
      res.setHeader('Content-Encoding', 'gzip');
      return zlib.createGzip();
    } else if (/\bdeflate\b/.test(acceptEncoding)) {
      res.setHeader('Content-Encoding', 'deflate');
      return zlib.createDeflate();
    } else {
      return null;
    }
}编译模板,得到一个渲染的方法,然后传入实际数据数据就可以得到渲染后的HTML了
function list() {
  let tmpl = fs.readFileSync(path.resolve(__dirname, 'template', 'list.html'), 'utf8');
  return handlebars.compile(tmpl);
}这样一个简单的静态服务器就完成了,其中包含了静态文件服务,实现缓存,实现断点续传,分块获取,实现压缩的功能
上面是我整理给大家的,希望今后会对大家有帮助。
相关文章:
The above is the detailed content of Implementation method of handwritten Node static resource server. For more information, please follow other related articles on the PHP Chinese website!

Hot AI Tools

Undresser.AI Undress
AI-powered app for creating realistic nude photos

AI Clothes Remover
Online AI tool for removing clothes from photos.

Undress AI Tool
Undress images for free

Clothoff.io
AI clothes remover

AI Hentai Generator
Generate AI Hentai for free.

Hot Article

Hot Tools

Notepad++7.3.1
Easy-to-use and free code editor

SublimeText3 Chinese version
Chinese version, very easy to use

Zend Studio 13.0.1
Powerful PHP integrated development environment

Dreamweaver CS6
Visual web development tools

SublimeText3 Mac version
God-level code editing software (SublimeText3)

Hot Topics
 How to solve the problem that eMule search cannot connect to the server
Jan 25, 2024 pm 02:45 PM
Solution: 1. Check the eMule settings to make sure you have entered the correct server address and port number; 2. Check the network connection, make sure the computer is connected to the Internet, and reset the router; 3. Check whether the server is online. If your settings are If there is no problem with the network connection, you need to check whether the server is online; 4. Update the eMule version, visit the eMule official website, and download the latest version of the eMule software; 5. Seek help.
 Detailed explanation of CentOS installation fuse and CentOS installation server
Feb 13, 2024 pm 08:40 PM
As a LINUX user, we often need to install various software and servers on CentOS. This article will introduce in detail how to install fuse and set up a server on CentOS to help you complete the related operations smoothly. CentOS installation fuseFuse is a user space file system framework that allows unprivileged users to access and operate the file system through a customized file system. Installing fuse on CentOS is very simple, just follow the following steps: 1. Open the terminal and Log in as root user. 2. Use the following command to install the fuse package: ```yuminstallfuse3. Confirm the prompts during the installation process and enter `y` to continue. 4. Installation completed
 Solution to the inability to connect to the RPC server and the inability to enter the desktop
Feb 18, 2024 am 10:34 AM
What should I do if the RPC server is unavailable and cannot be accessed on the desktop? In recent years, computers and the Internet have penetrated into every corner of our lives. As a technology for centralized computing and resource sharing, Remote Procedure Call (RPC) plays a vital role in network communication. However, sometimes we may encounter a situation where the RPC server is unavailable, resulting in the inability to enter the desktop. This article will describe some of the possible causes of this problem and provide solutions. First, we need to understand why the RPC server is unavailable. RPC server is a
 Best Practice Guide for Building IP Proxy Servers with PHP
Mar 11, 2024 am 08:36 AM
In network data transmission, IP proxy servers play an important role, helping users hide their real IP addresses, protect privacy, and improve access speeds. In this article, we will introduce the best practice guide on how to build an IP proxy server with PHP and provide specific code examples. What is an IP proxy server? An IP proxy server is an intermediate server located between the user and the target server. It acts as a transfer station between the user and the target server, forwarding the user's requests and responses. By using an IP proxy server
 How to configure Dnsmasq as a DHCP relay server
Mar 21, 2024 am 08:50 AM
The role of a DHCP relay is to forward received DHCP packets to another DHCP server on the network, even if the two servers are on different subnets. By using a DHCP relay, you can deploy a centralized DHCP server in the network center and use it to dynamically assign IP addresses to all network subnets/VLANs. Dnsmasq is a commonly used DNS and DHCP protocol server that can be configured as a DHCP relay server to help manage dynamic host configurations in the network. In this article, we will show you how to configure dnsmasq as a DHCP relay server. Content Topics: Network Topology Configuring Static IP Addresses on a DHCP Relay D on a Centralized DHCP Server
 What should I do if I can't enter the game when the epic server is offline? Solution to why Epic cannot enter the game offline
Mar 13, 2024 pm 04:40 PM
What should I do if I can’t enter the game when the epic server is offline? This problem must have been encountered by many friends. When this prompt appears, the genuine game cannot be started. This problem is usually caused by interference from the network and security software. So how should it be solved? The editor of this issue will explain I would like to share the solution with you, I hope today’s software tutorial can help you solve the problem. What to do if the epic server cannot enter the game when it is offline: 1. It may be interfered by security software. Close the game platform and security software and then restart. 2. The second is that the network fluctuates too much. Try restarting the router to see if it works. If the conditions are OK, you can try to use the 5g mobile network to operate. 3. Then there may be more
 Pi Node Teaching: What is a Pi Node? How to install and set up Pi Node?
Mar 05, 2025 pm 05:57 PM
Detailed explanation and installation guide for PiNetwork nodes This article will introduce the PiNetwork ecosystem in detail - Pi nodes, a key role in the PiNetwork ecosystem, and provide complete steps for installation and configuration. After the launch of the PiNetwork blockchain test network, Pi nodes have become an important part of many pioneers actively participating in the testing, preparing for the upcoming main network release. If you don’t know PiNetwork yet, please refer to what is Picoin? What is the price for listing? Pi usage, mining and security analysis. What is PiNetwork? The PiNetwork project started in 2019 and owns its exclusive cryptocurrency Pi Coin. The project aims to create a one that everyone can participate
 How to find resources on 115 network disk
Feb 23, 2024 pm 05:10 PM
There will be a lot of resources in the 115 network disk, so how to find resources? Users can search for the resources they need in the software, then enter the download interface, and then choose to save to the network disk. This introduction to the method of finding resources on 115 network disk can tell you the specific content. The following is a detailed introduction, come and take a look. How to find resources on 115 network disk? Answer: Search the content in the software, and then click to save to the network disk. Detailed introduction: 1. First enter the resources you want in the app. 2. Then click the keyword link that appears. 3. Then enter the download interface. 4. Click Save to network disk inside.


