

Understanding JavaScript EventEmitter
This article is the EventEmitter implemented by the author after reading the source code of eventemitter3 and Node.js event module. JavaScript events are very important. I hope you can gain something from reading this article.
More than 2 months ago, I copied the source code of eventemitter3 on Github and the event module events under Node.js, and finally Have some understanding of JavaScript events.
I spent some time last weekend to implement an eventemitter8 using ES6 based on my previous understanding of the source code, and then published it on npm. What surprised me was that it was only released two days ago and there was no readme introduction. There are actually 45 downloads despite any promotion. I am curious who downloaded them and whether they can use them. I spent a lot of time half-copied and half-original JavaScript time processing library now.js (npm portal: now.js). With my vigorous promotion, the number of downloads in 4 months was only 177. It’s true that flowers planted with intention do not bloom, but willows planted with no intention of planting create shade!
eventemitter8 Most of them were written by me after reading the source code. There are some methods such as listeners, listenerCount and eventNames. I can't remember what they do at the moment, so I will check again. Many test cases refer to eventemitter3. I would like to express my gratitude to the developers of eventemitter3 and the developers of the Node.js event module!
Let’s talk about my understanding of JavaScript events:
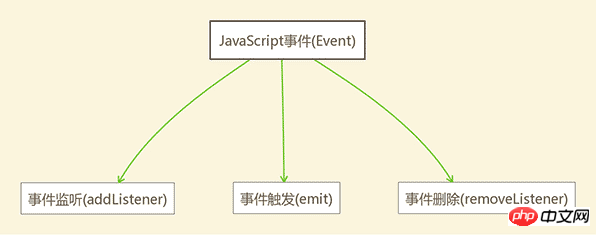
As you can see from the picture above, the core of JavaScript events Including event listening (addListener), event triggering (emit), and event deletion (removeListener).
Event listening (addListener)
First of all, monitoring must have a monitoring target, or an object. In order to achieve the purpose of distinguishing the target, the name is indispensable. , we define it as type.
Secondly, the monitoring target must have some kind of action, which corresponds to a certain method in JavaScript, defined here as fn.
For example, you can monitor an event whose type is add and whose method is to add 1 to the value of a certain variable a, fn = () => a 1. If we also want to listen to a method that adds 2 to variable b, our first reaction may be to create an event with type add2 and method fn1 = () => b 2 . You might be thinking, this is such a waste, could I just listen to one name and have it execute more than one method event. Of course it is possible.
So how to do it?
It's very simple. Just put the monitoring method in an array and traverse the array to execute it sequentially. The above example changes the type to add and the method to [fn, fn1].
If you want to subdivide it, it can also be divided into on, which can be executed unlimited times, and once, which is only allowed to be executed once (the event will be deleted immediately after execution). More details later.
Event triggering (emit)
Event monitoring alone is not enough, there must be an event triggering to complete the entire process. Emit is to trigger a single event or a series of events corresponding to the specific type of listening. Taking the previous example, a single event is to execute fn, and a series of events is to traverse and execute fn and fn1.
Event deletion (removeListener)
Strictly speaking, event monitoring and event triggering can complete the entire process. Event deletion is optional. But many times, we still need to delete events. For example, the once event mentioned earlier is only allowed to be executed once. If a deletion method is not provided, it is difficult to guarantee when you will execute it again. Normally, as long as the event is no longer needed, we should delete it.
After finishing the core part, let’s briefly analyze the source code of eventemitter8.
Source code analysis
All source code:
const toString = Object.prototype.toString;
const isType = obj => toString.call(obj).slice(8, -1).toLowerCase();
const isArray = obj => Array.isArray(obj) || isType(obj) === 'array';
const isNullOrUndefined = obj => obj === null || obj === undefined;

const _addListener = function(type, fn, context, once) {
 if (typeof fn !== 'function') {
  throw new TypeError('fn must be a function');
 }

 fn.context = context;
 fn.once = !!once;

 const event = this._events[type];
 // only one, let `this._events[type]` to be a function
 if (isNullOrUndefined(event)) {
  this._events[type] = fn;
 } else if (typeof event === 'function') {
  // already has one function, `this._events[type]` must be a function before
  this._events[type] = [event, fn];
 } else if (isArray(event)) {
  // already has more than one function, just push
  this._events[type].push(fn);
 }

 return this;
};

class EventEmitter {
 constructor() {
  if (this._events === undefined) {
   this._events = Object.create(null);
  }
 }

 addListener(type, fn, context) {
  return _addListener.call(this, type, fn, context);
 }

 on(type, fn, context) {
  return this.addListener(type, fn, context);
 }

 once(type, fn, context) {
  return _addListener.call(this, type, fn, context, true);
 }

 emit(type, ...rest) {
  if (isNullOrUndefined(type)) {
   throw new Error('emit must receive at lease one argument');
  }

  const events = this._events[type];

  if (isNullOrUndefined(events)) return false;

  if (typeof events === 'function') {
   events.call(events.context || null, rest);
   if (events.once) {
    this.removeListener(type, events);
   }
  } else if (isArray(events)) {
   events.map(e => {
    e.call(e.context || null, rest);
    if (e.once) {
     this.removeListener(type, e);
    }
   });
  }

  return true;
 }

 removeListener(type, fn) {
  if (isNullOrUndefined(this._events)) return this;

  // if type is undefined or null, nothing to do, just return this
  if (isNullOrUndefined(type)) return this;

  if (typeof fn !== 'function') {
   throw new Error('fn must be a function');
  }

  const events = this._events[type];

  if (typeof events === 'function') {
   events === fn && delete this._events[type];
  } else {
   const findIndex = events.findIndex(e => e === fn);

   if (findIndex === -1) return this;

   // match the first one, shift faster than splice
   if (findIndex === 0) {
    events.shift();
   } else {
    events.splice(findIndex, 1);
   }

   // just left one listener, change Array to Function
   if (events.length === 1) {
    this._events[type] = events[0];
   }
  }

  return this;
 }

 removeAllListeners(type) {
  if (isNullOrUndefined(this._events)) return this;

  // if not provide type, remove all
  if (isNullOrUndefined(type)) this._events = Object.create(null);

  const events = this._events[type];
  if (!isNullOrUndefined(events)) {
   // check if `type` is the last one
   if (Object.keys(this._events).length === 1) {
    this._events = Object.create(null);
   } else {
    delete this._events[type];
   }
  }

  return this;
 }

 listeners(type) {
  if (isNullOrUndefined(this._events)) return [];

  const events = this._events[type];
  // use `map` because we need to return a new array
  return isNullOrUndefined(events) ? [] : (typeof events === 'function' ? [events] : events.map(o => o));
 }

 listenerCount(type) {
  if (isNullOrUndefined(this._events)) return 0;

  const events = this._events[type];

  return isNullOrUndefined(events) ? 0 : (typeof events === 'function' ? 1 : events.length);
 }

 eventNames() {
  if (isNullOrUndefined(this._events)) return [];

  return Object.keys(this._events);
 }
}

export default EventEmitter;The code is very small, only 151 lines, Because I wrote a simple version and used ES6, there are so few; Node.js events and eventemitter3 are more numerous and complicated than this. If you are interested, you can study it in depth by yourself.
const toString = Object.prototype.toString;
const isType = obj => toString.call(obj).slice(8, -1).toLowerCase();
const isArray = obj => Array.isArray(obj) || isType(obj) === 'array';
const isNullOrUndefined = obj => obj === null || obj === undefined;
These 4 lines are some utility functions to determine the type and whether it is null or undefined.
constructor() {
 if (isNullOrUndefined(this._events)) {
  this._events = Object.create(null);
 }
}Create a EventEmitter class, and then initialize the _events attribute of a class in the constructor, this Properties don't need to inherit anything, so Object.create(null) is used. Of course, isNullOrUndefined(this._events) also determines whether this._events is undefined or null. If so, it needs to be created. But this is not necessary, because instantiating an EventEmitter will call the constructor, which is the initial state. This._events should not be defined and can be removed.
addListener(type, fn, context) {
 return _addListener.call(this, type, fn, context);
}

on(type, fn, context) {
 return this.addListener(type, fn, context);
}

once(type, fn, context) {
 return _addListener.call(this, type, fn, context, true);
}The next are three methods addListener, on, once, among which on is an alias of addListener and can be executed multiple times. once can only be executed once.
All three methods use the _addListener method:
const _addListener = function(type, fn, context, once) {
 if (typeof fn !== 'function') {
  throw new TypeError('fn must be a function');
 }

 fn.context = context;
 fn.once = !!once;

 const event = this._events[type];
 // only one, let `this._events[type]` to be a function
 if (isNullOrUndefined(event)) {
  this._events[type] = fn;
 } else if (typeof event === 'function') {
  // already has one function, `this._events[type]` must be a function before
  this._events[type] = [event, fn];
 } else if (isArray(event)) {
  // already has more than one function, just push
  this._events[type].push(fn);
 }

 return this;
};方法有四个参数,type 是监听事件的名称,fn 是监听事件对应的方法,context 俗称爸爸,改变 this 指向的,也就是执行的主体。once 是一个布尔型,用来标志是否只执行一次。
首先判断 fn 的类型,如果不是方法,抛出一个类型错误。fn.context = context;fn.once = !!once 把执行主体和是否执行一次作为方法的属性。const event = this._events[type] 把该对应 type 的所有已经监听的方法存到变量 event。
// only one, let `this._events[type]` to be a function
if (isNullOrUndefined(event)) {
 this._events[type] = fn;
} else if (typeof event === 'function') {
 // already has one function, `this._events[type]` must be a function before
 this._events[type] = [event, fn];
} else if (isArray(event)) {
 // already has more than one function, just push
 this._events[type].push(fn);
}

return this;如果 type 本身没有正在监听任何方法,this._events[type] = fn 直接把监听的方法 fn 赋给 type 属性 ;如果正在监听一个方法,则把要添加的 fn 和之前的方法变成一个含有2个元素的数组 [event, fn],然后再赋给 type 属性,如果正在监听超过2个方法,直接 push 即可。最后返回 this ,也就是 EventEmitter 实例本身。
简单来讲不管是监听多少方法,都放到数组里是没必要像上面细分。但性能较差,只有一个方法时 key: fn 的效率比 key: [fn] 要高。
再回头看看三个方法:
addListener(type, fn, context) {
 return _addListener.call(this, type, fn, context);
}

on(type, fn, context) {
 return this.addListener(type, fn, context);
}

once(type, fn, context) {
 return _addListener.call(this, type, fn, context, true);
}addListener 需要用 call 来改变 this 指向,指到了类的实例。once 则多传了一个标志位 true 来标志它只需要执行一次。这里你会看到我在 addListener 并没有传 false 作为标志位,主要是因为我懒,但并不会影响到程序的逻辑。因为前面的 fn.once = !!once 已经能很好的处理不传值的情况。没传值 !!once 为 false。
接下来讲 emit
emit(type, ...rest) {
 if (isNullOrUndefined(type)) {
  throw new Error('emit must receive at lease one argument');
 }

 const events = this._events[type];

 if (isNullOrUndefined(events)) return false;

 if (typeof events === 'function') {
  events.call(events.context || null, rest);
  if (events.once) {
   this.removeListener(type, events);
  }
 } else if (isArray(events)) {
  events.map(e => {
   e.call(e.context || null, rest);
   if (e.once) {
    this.removeListener(type, e);
   }
  });
 }

 return true;
}事件触发需要指定具体的 type 否则直接抛出错误。这个很容易理解,你都没有指定名称,我怎么知道该去执行谁的事件。if (isNullOrUndefined(events)) return false,如果 type 对应的方法是 undefined 或者 null ,直接返回 false 。因为压根没有对应 type 的方法可以执行。而 emit 需要知道是否被成功触发。
接着判断 evnts 是不是一个方法,如果是, events.call(events.context || null, rest) 执行该方法,如果指定了执行主体,用 call 改变 this 的指向指向 events.context 主体,否则指向 null ,全局环境。对于浏览器环境来说就是 window。差点忘了 rest ,rest 是方法执行时的其他参数变量,可以不传,也可以为一个或多个。执行结束后判断 events.once ,如果为 true ,就用 removeListener 移除该监听事件。
如果 evnts 是数组,逻辑一样,只是需要遍历数组去执行所有的监听方法。
成功执行结束后返回 true 。
removeListener(type, fn) {
 if (isNullOrUndefined(this._events)) return this;
 // if type is undefined or null, nothing to do, just return this
 if (isNullOrUndefined(type)) return this;
 if (typeof fn !== 'function') {
  throw new Error('fn must be a function');
 }
 const events = this._events[type];
 if (typeof events === 'function') {
  events === fn && delete this._events[type];
 } else {
  const findIndex = events.findIndex(e => e === fn);
  if (findIndex === -1) return this;
  // match the first one, shift faster than splice
  if (findIndex === 0) {
   events.shift();
  } else {
   events.splice(findIndex, 1);
  }
  // just left one listener, change Array to Function
  if (events.length === 1) {
   this._events[type] = events[0];
  }
 }
 return this;
}removeListener 接收一个事件名称 type 和一个将要被移除的方法 fn 。if (isNullOrUndefined(this._events)) return this 这里表示如果 EventEmitter 实例本身的 _events 为 null 或者 undefined 的话,没有任何事件监听,直接返回 this 。
if (isNullOrUndefined(type)) return this 如果没有提供事件名称,也直接返回 this 。
if (typeof fn !== 'function') {
 throw new Error('fn must be a function');
}fn 如果不是一个方法,直接抛出错误,很好理解。
接着判断 type 对应的 events 是不是一个方法,是,并且 events === fn 说明 type 对应的方法有且仅有一个,等于我们指定要删除的方法。这个时候 delete this._events[type] 直接删除掉 this._events 对象里 type 即可。
所有的 type 对应的方法都被移除后。想一想 this._events[type] = undefined 和 delete this._events[type] 会有什么不同?
差异是很大的,this._events[type] = undefined 仅仅是将 this._events 对象里的 type 属性赋值为 undefined ,type 这一属性依然占用内存空间,但其实已经没什么用了。如果这样的 type 一多,有可能造成内存泄漏。delete this._events[type] 则直接删除,不占内存空间。前者也是 Node.js 事件模块和 eventemitter3 早期实现的做法。
如果 events 是数组,这里我没有用 isArray 进行判断,而是直接用一个 else ,原因是 this._events[type] 的输入限制在 on 或者 once 中,而它们已经限制了 this._events[type] 只能是方法组成的数组或者是一个方法,最多加上不小心或者人为赋成 undefined 或 null 的情况,但这个情况我们也在前面判断过了。
因为 isArray 这个工具方法其实运行效率是不高的,为了追求一些效率,在不影响运行逻辑情况下可以不用 isArray 。而且 typeof events === 'function' 用 typeof 判断方法也比 isArray 的效率要高,这也是为什么不先判断是否是数组的原因。用 typeof 去判断一个方法也比 Object.prototype.toSting.call(events) === '[object Function] 效率要高。但数组不能用 typeof 进行判断,因为返回的是 object, 这众所周知。虽然如此,在我面试过的很多人中,仍然有很多人不知道。。。
const findIndex = events.findIndex(e => e === fn) 此处用 ES6 的数组方法 findIndex 直接去查找 fn 在 events 中的索引。如果 findIndex === -1 说明我们没有找到要删除的 fn ,直接返回 this 就好。如果 findIndex === 0 ,是数组第一个元素,shift 剔除,否则用 splice 剔除。因为 shift 比 splice 效率高。
findIndex 的效率其实没有 for 循环去查找的高,所以 eventemitter8 的效率在我没有做 benchmark 之前我就知道肯定会比 eventemitter3 效率要低不少。不那么追求执行效率时当然是用最懒的方式来写最爽。所谓的懒即正义。。。
最后还得判断移除 fn 后 events 剩余的数量,如果只有一个,基于之前要做的优化,this._events[type] = events[0] 把含有一个元素的数组变成一个方法,降维打击一下。。。
最后的最后 return this 返回自身,链式调用还能用得上。
removeAllListeners(type) {
 if (isNullOrUndefined(this._events)) return this;
 // if not provide type, remove all
 if (isNullOrUndefined(type)) this._events = Object.create(null);
 const events = this._events[type];
 if (!isNullOrUndefined(events)) {
  // check if type is the last one
  if (Object.keys(this._events).length === 1) {
   this._events = Object.create(null);
  } else {
   delete this._events[type];
  }
 }
 return this;
};removeAllListeners 指的是要删除一个 type 对应的所有方法。参数 type 是可选的,如果未指定 type ,默认把所有的监听事件删除,直接 this._events = Object.create(null) 操作即可,跟初始化 EventEmitter 类一样。
如果 events 既不是 null 且不是 undefined 说明有可删除的 type ,先用 Object.keys(this._events).length === 1 判断是不是最后一个 type 了,如果是,直接初始化 this._events = Object.create(null),否则 delete this._events[type] 直接删除 type 属性,一步到位。
最后返回 this 。
到目前为止,所有的核心功能已经讲完。
listeners(type) {
 if (isNullOrUndefined(this._events)) return [];
 const events = this._events[type];
 // use `map` because we need to return a new array
 return isNullOrUndefined(events) ? [] : (typeof events === 'function' ? [events] : events.map(o => o));
}

listenerCount(type) {
 if (isNullOrUndefined(this._events)) return 0;
 const events = this._events[type];
 return isNullOrUndefined(events) ? 0 : (typeof events === 'function' ? 1 : events.length);
}

eventNames() {
 if (isNullOrUndefined(this._events)) return [];
 return Object.keys(this._events);
}listeners 返回的是 type 对应的所有方法。结果都是一个数组,如果没有,返回空数组;如果只有一个,把它的方法放到一个数组中返回;如果本来就是一个数组,map 返回。之所以用 map 返回而不是直接 return this._events[type] 是因为 map 返回一个新的数组,是深度复制,修改数组中的值不会影响到原数组。this._events[type] 则返回原数组的一个引用,是浅度复制,稍不小心改变值会影响到原数组。造成这个差异的底层原因是数组是一个引用类型,浅度复制只是指针拷贝。这可以单独写一篇文章,不展开了。
listenerCount 返回的是 type 对应的方法的个数,代码一眼就明白,不多说。
eventNames 这个返回的是所有 type 组成的数组,没有返回空数组,否则用 Object.keys(this._events) 直接返回。
最后的最后,export default EventEmitter 把 EventEmitter 导出。
上面是我整理给大家的,希望今后会对大家有帮助。
相关文章:
关于Google发布的JavaScript代码规范你要知道哪些
The above is the detailed content of Understanding JavaScript EventEmitter. For more information, please follow other related articles on the PHP Chinese website!

Hot AI Tools

Undresser.AI Undress
AI-powered app for creating realistic nude photos

AI Clothes Remover
Online AI tool for removing clothes from photos.

Undress AI Tool
Undress images for free

Clothoff.io
AI clothes remover

Video Face Swap
Swap faces in any video effortlessly with our completely free AI face swap tool!

Hot Article
Hot Tools

Notepad++7.3.1
Easy-to-use and free code editor

SublimeText3 Chinese version
Chinese version, very easy to use

Zend Studio 13.0.1
Powerful PHP integrated development environment

Dreamweaver CS6
Visual web development tools

SublimeText3 Mac version
God-level code editing software (SublimeText3)
Hot Topics
 1387
1387
 52
52

 How to implement an online speech recognition system using WebSocket and JavaScript
Dec 17, 2023 pm 02:54 PM
How to implement an online speech recognition system using WebSocket and JavaScript
Dec 17, 2023 pm 02:54 PM
How to use WebSocket and JavaScript to implement an online speech recognition system Introduction: With the continuous development of technology, speech recognition technology has become an important part of the field of artificial intelligence. The online speech recognition system based on WebSocket and JavaScript has the characteristics of low latency, real-time and cross-platform, and has become a widely used solution. This article will introduce how to use WebSocket and JavaScript to implement an online speech recognition system.
 Recommended: Excellent JS open source face detection and recognition project
Apr 03, 2024 am 11:55 AM
Recommended: Excellent JS open source face detection and recognition project
Apr 03, 2024 am 11:55 AM
Face detection and recognition technology is already a relatively mature and widely used technology. Currently, the most widely used Internet application language is JS. Implementing face detection and recognition on the Web front-end has advantages and disadvantages compared to back-end face recognition. Advantages include reducing network interaction and real-time recognition, which greatly shortens user waiting time and improves user experience; disadvantages include: being limited by model size, the accuracy is also limited. How to use js to implement face detection on the web? In order to implement face recognition on the Web, you need to be familiar with related programming languages and technologies, such as JavaScript, HTML, CSS, WebRTC, etc. At the same time, you also need to master relevant computer vision and artificial intelligence technologies. It is worth noting that due to the design of the Web side
 WebSocket and JavaScript: key technologies for implementing real-time monitoring systems
Dec 17, 2023 pm 05:30 PM
WebSocket and JavaScript: key technologies for implementing real-time monitoring systems
Dec 17, 2023 pm 05:30 PM
WebSocket and JavaScript: Key technologies for realizing real-time monitoring systems Introduction: With the rapid development of Internet technology, real-time monitoring systems have been widely used in various fields. One of the key technologies to achieve real-time monitoring is the combination of WebSocket and JavaScript. This article will introduce the application of WebSocket and JavaScript in real-time monitoring systems, give code examples, and explain their implementation principles in detail. 1. WebSocket technology
 Essential tools for stock analysis: Learn the steps to draw candle charts with PHP and JS
Dec 17, 2023 pm 06:55 PM
Essential tools for stock analysis: Learn the steps to draw candle charts with PHP and JS
Dec 17, 2023 pm 06:55 PM
Essential tools for stock analysis: Learn the steps to draw candle charts in PHP and JS. Specific code examples are required. With the rapid development of the Internet and technology, stock trading has become one of the important ways for many investors. Stock analysis is an important part of investor decision-making, and candle charts are widely used in technical analysis. Learning how to draw candle charts using PHP and JS will provide investors with more intuitive information to help them make better decisions. A candlestick chart is a technical chart that displays stock prices in the form of candlesticks. It shows the stock price
 How to use JavaScript and WebSocket to implement a real-time online ordering system
Dec 17, 2023 pm 12:09 PM
How to use JavaScript and WebSocket to implement a real-time online ordering system
Dec 17, 2023 pm 12:09 PM
Introduction to how to use JavaScript and WebSocket to implement a real-time online ordering system: With the popularity of the Internet and the advancement of technology, more and more restaurants have begun to provide online ordering services. In order to implement a real-time online ordering system, we can use JavaScript and WebSocket technology. WebSocket is a full-duplex communication protocol based on the TCP protocol, which can realize real-time two-way communication between the client and the server. In the real-time online ordering system, when the user selects dishes and places an order
 How to implement an online reservation system using WebSocket and JavaScript
Dec 17, 2023 am 09:39 AM
How to implement an online reservation system using WebSocket and JavaScript
Dec 17, 2023 am 09:39 AM
How to use WebSocket and JavaScript to implement an online reservation system. In today's digital era, more and more businesses and services need to provide online reservation functions. It is crucial to implement an efficient and real-time online reservation system. This article will introduce how to use WebSocket and JavaScript to implement an online reservation system, and provide specific code examples. 1. What is WebSocket? WebSocket is a full-duplex method on a single TCP connection.
 JavaScript and WebSocket: Building an efficient real-time weather forecasting system
Dec 17, 2023 pm 05:13 PM
JavaScript and WebSocket: Building an efficient real-time weather forecasting system
Dec 17, 2023 pm 05:13 PM
JavaScript and WebSocket: Building an efficient real-time weather forecast system Introduction: Today, the accuracy of weather forecasts is of great significance to daily life and decision-making. As technology develops, we can provide more accurate and reliable weather forecasts by obtaining weather data in real time. In this article, we will learn how to use JavaScript and WebSocket technology to build an efficient real-time weather forecast system. This article will demonstrate the implementation process through specific code examples. We
 Simple JavaScript Tutorial: How to Get HTTP Status Code
Jan 05, 2024 pm 06:08 PM
Simple JavaScript Tutorial: How to Get HTTP Status Code
Jan 05, 2024 pm 06:08 PM
JavaScript tutorial: How to get HTTP status code, specific code examples are required. Preface: In web development, data interaction with the server is often involved. When communicating with the server, we often need to obtain the returned HTTP status code to determine whether the operation is successful, and perform corresponding processing based on different status codes. This article will teach you how to use JavaScript to obtain HTTP status codes and provide some practical code examples. Using XMLHttpRequest
