

How to use the diff algorithm in vue
This time I will show you how to use the diff algorithm in vue, and what are the precautions for using the diff algorithm in vue. The following is a practical case, let's take a look.
1. When the data changes, how does vue update the node?
You must know that the cost of rendering the real DOM is very high. For example, sometimes we modify a certain data. If we directly render it to the real DOM, it will cause the entire DOM tree to be redrawn and rearranged. Is it possible that we only update the small piece of dom we modified instead of updating the entire dom? The diff algorithm can help us. We first generate avirtual DOM based on the real DOM. When the data of a virtual DOM changes, a new Vnode## will be generated. #, and then compare Vnode with oldVnode. If you find any differences, modify them directly on the real DOM, and then make the value of oldVnode be Vnode . The process of diff is to call the
named patch, compare the old and new nodes, and patch the real DOM while comparing.
Virtual DOM extracts the real DOM data and simulates the tree structure in the form of
object. For example, the dom is like this: <p>
<p>123</p>
</p>
var Vnode = {
tag: 'p',
children: [
{ tag: 'p', text: '123' }
]
};(warm reminder:
VNode and oldVNode are both Object, be sure to remember)
When using the diff algorithm to compare old and new nodes, the comparison will only be performed at the same level, and will not be compared across levels.
<p> <p>123</p> </p>456
The above code will compare two p on the same layer and p and span on the second layer, but will not compare p and span. A very vivid picture I saw elsewhere:
When the data changes, the set method Will call
Dep.notify to notify all subscriber Watchers, and the subscribers will call patch to patch the real DOM and update the corresponding view.
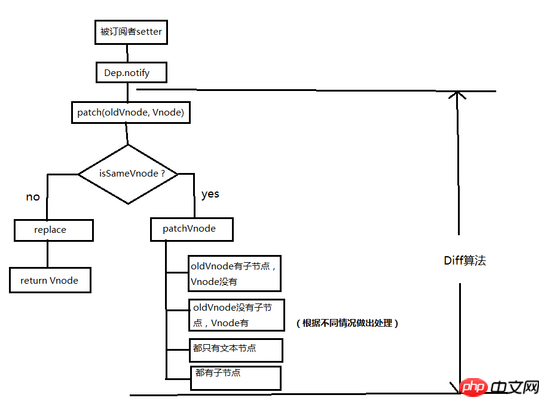
patch
Let’s take a look
patch How to patch (only the core part of the code is retained) <div class="code" style="position:relative; padding:0px; margin:0px;"><pre class="brush:php;toolbar:false">function patch (oldVnode, vnode) {
// some code
if (sameVnode(oldVnode, vnode)) {
patchVnode(oldVnode, vnode)
} else {
const oEl = oldVnode.el // 当前oldVnode对应的真实元素节点
let parentEle = api.parentNode(oEl) // 父元素
createEle(vnode) // 根据Vnode生成新元素
if (parentEle !== null) {
api.insertBefore(parentEle, vnode.el, api.nextSibling(oEl)) // 将新元素添加进父元素
api.removeChild(parentEle, oldVnode.el) // 移除以前的旧元素节点
oldVnode = null
}
}
// some code
return vnode
}</pre><div class="contentsignin">Copy after login</div></div>patch function receives two parameters
and Vnode represent the new node and the previous one respectively Old node Determine whether the two nodes are worthy of comparison. If they are worthy of comparison, execute
<div class="code" style="position:relative; padding:0px; margin:0px;"><pre class="brush:php;toolbar:false">function sameVnode (a, b) {
return (
a.key === b.key && // key值
a.tag === b.tag && // 标签名
a.isComment === b.isComment && // 是否为注释节点
// 是否都定义了data,data包含一些具体信息,例如onclick , style
isDef(a.data) === isDef(b.data) &&
sameInputType(a, b) // 当标签是<input>的时候,type必须相同
)
}</pre><div class="contentsignin">Copy after login</div></div> If not worthy of comparison, replace
Vnode If two nodes are the same, then check their child nodes in depth. If the two nodes are different, it means that
has been completely changed, and oldVnode can be directly replaced. Although these two nodes are different, what should I do if their child nodes are the same? Don't forget, diff is compared layer by layer. If the first layer is different, then the second layer will not be compared in depth. (I wonder if this is a disadvantage? The same child node cannot be reused...)
When we determine that the two nodes are worthy of comparison, we The
patchVnode method will be assigned to both nodes. So what does this method do? <div class="code" style="position:relative; padding:0px; margin:0px;"><pre class="brush:php;toolbar:false">patchVnode (oldVnode, vnode) {
const el = vnode.el = oldVnode.el
let i, oldCh = oldVnode.children, ch = vnode.children
if (oldVnode === vnode) return
if (oldVnode.text !== null && vnode.text !== null && oldVnode.text !== vnode.text) {
api.setTextContent(el, vnode.text)
}else {
updateEle(el, vnode, oldVnode)
if (oldCh && ch && oldCh !== ch) {
updateChildren(el, oldCh, ch)
}else if (ch){
createEle(vnode) //create el's children dom
}else if (oldCh){
api.removeChildren(el)
}
}
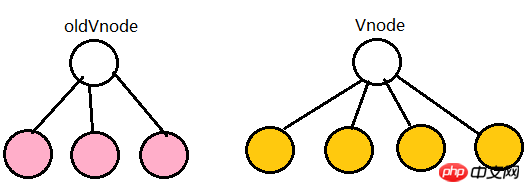
}</pre><div class="contentsignin">Copy after login</div></div>This function does the following:
- Find the corresponding real dom, called
- el
- Vnode
and
oldVnodepoint to the same object, If so, then directly - return
if They all have text nodes and are not equal, then set the text node of
elto the text node ofVnode. If - oldVnode
has child nodes but
Vnodedoes not, delete the child nodesofel 如果
oldVnode没有子节点而Vnode有,则将Vnode的子节点真实化之后添加到el如果两者都有子节点,则执行updateChildren函数比较子节点,这一步很重要
其他几个点都很好理解,我们详细来讲一下updateChildren
updateChildren
代码量很大,不方便一行一行的讲解,所以下面结合一些示例图来描述一下。
updateChildren (parentElm, oldCh, newCh) {
 let oldStartIdx = 0, newStartIdx = 0
 let oldEndIdx = oldCh.length - 1
 let oldStartVnode = oldCh[0]
 let oldEndVnode = oldCh[oldEndIdx]
 let newEndIdx = newCh.length - 1
 let newStartVnode = newCh[0]
 let newEndVnode = newCh[newEndIdx]
 let oldKeyToIdx
 let idxInOld
 let elmToMove
 let before
 while (oldStartIdx <= oldEndIdx && newStartIdx <= newEndIdx) {
  if (oldStartVnode == null) { // 对于vnode.key的比较,会把oldVnode = null
   oldStartVnode = oldCh[++oldStartIdx]
  }else if (oldEndVnode == null) {
   oldEndVnode = oldCh[--oldEndIdx]
  }else if (newStartVnode == null) {
   newStartVnode = newCh[++newStartIdx]
  }else if (newEndVnode == null) {
   newEndVnode = newCh[--newEndIdx]
  }else if (sameVnode(oldStartVnode, newStartVnode)) {
   patchVnode(oldStartVnode, newStartVnode)
   oldStartVnode = oldCh[++oldStartIdx]
   newStartVnode = newCh[++newStartIdx]
  }else if (sameVnode(oldEndVnode, newEndVnode)) {
   patchVnode(oldEndVnode, newEndVnode)
   oldEndVnode = oldCh[--oldEndIdx]
   newEndVnode = newCh[--newEndIdx]
  }else if (sameVnode(oldStartVnode, newEndVnode)) {
   patchVnode(oldStartVnode, newEndVnode)
   api.insertBefore(parentElm, oldStartVnode.el, api.nextSibling(oldEndVnode.el))
   oldStartVnode = oldCh[++oldStartIdx]
   newEndVnode = newCh[--newEndIdx]
  }else if (sameVnode(oldEndVnode, newStartVnode)) {
   patchVnode(oldEndVnode, newStartVnode)
   api.insertBefore(parentElm, oldEndVnode.el, oldStartVnode.el)
   oldEndVnode = oldCh[--oldEndIdx]
   newStartVnode = newCh[++newStartIdx]
  }else {
   // 使用key时的比较
   if (oldKeyToIdx === undefined) {
    oldKeyToIdx = createKeyToOldIdx(oldCh, oldStartIdx, oldEndIdx) // 有key生成index表
   }
   idxInOld = oldKeyToIdx[newStartVnode.key]
   if (!idxInOld) {
    api.insertBefore(parentElm, createEle(newStartVnode).el, oldStartVnode.el)
    newStartVnode = newCh[++newStartIdx]
   }
   else {
    elmToMove = oldCh[idxInOld]
    if (elmToMove.sel !== newStartVnode.sel) {
     api.insertBefore(parentElm, createEle(newStartVnode).el, oldStartVnode.el)
    }else {
     patchVnode(elmToMove, newStartVnode)
     oldCh[idxInOld] = null
     api.insertBefore(parentElm, elmToMove.el, oldStartVnode.el)
    }
    newStartVnode = newCh[++newStartIdx]
   }
  }
 }
 if (oldStartIdx > oldEndIdx) {
  before = newCh[newEndIdx + 1] == null ? null : newCh[newEndIdx + 1].el
  addVnodes(parentElm, before, newCh, newStartIdx, newEndIdx)
 }else if (newStartIdx > newEndIdx) {
  removeVnodes(parentElm, oldCh, oldStartIdx, oldEndIdx)
 }
}先说一下这个函数做了什么
将
Vnode的子节点Vch和oldVnode的子节点oldCh提取出来oldCh和vCh各有两个头尾的变量StartIdx和EndIdx,它们的2个变量相互比较,一共有4种比较方式。如果4种比较都没匹配,如果设置了key,就会用key进行比较,在比较的过程中,变量会往中间靠,一旦StartIdx>EndIdx表明oldCh和vCh至少有一个已经遍历完了,就会结束比较。
图解updateChildren
终于来到了这一部分,上面的总结相信很多人也看得一脸懵逼,下面我们好好说道说道。(这都是我自己画的,求推荐好用的画图工具...)
粉红色的部分为oldCh和vCh
我们将它们取出来并分别用s和e指针指向它们的头child和尾child
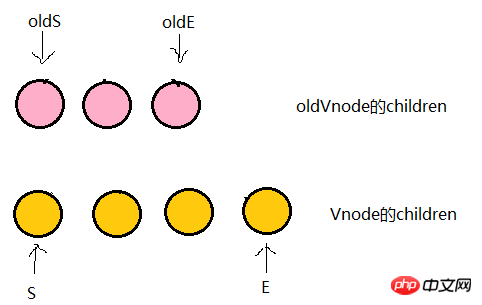
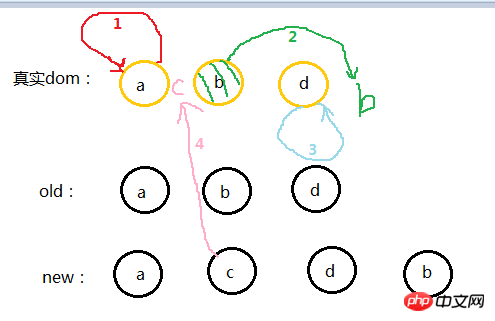
现在分别对 oldS、oldE、S、E 两两做 sameVnode 比较,有四种比较方式,当其中两个能匹配上那么真实dom中的相应节点会移到Vnode相应的位置,这句话有点绕,打个比方
如果是oldS和E匹配上了,那么真实dom中的第一个节点会移到最后
如果是oldE和S匹配上了,那么真实dom中的最后一个节点会移到最前,匹配上的两个指针向中间移动
如果四种匹配没有一对是成功的,那么遍历
oldChild,S挨个和他们匹配,匹配成功就在真实dom中将成功的节点移到最前面,如果依旧没有成功的,那么将S对应的节点插入到dom中对应的oldS位置,oldS和S指针向中间移动。
再配个图
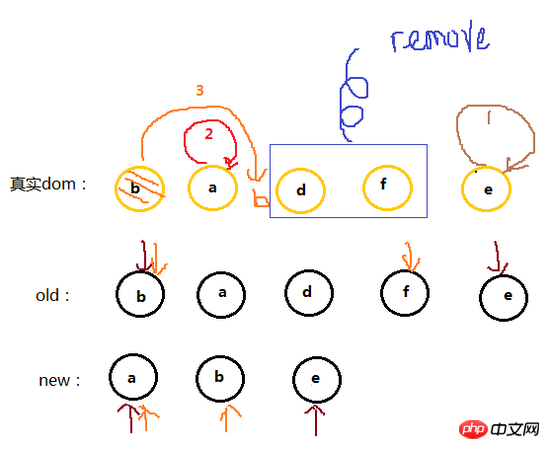
第一步
oldS = a, oldE = d;
S = a, E = b;
oldS 和 S 匹配,则将dom中的a节点放到第一个,已经是第一个了就不管了,此时dom的位置为:a b d
第二步
oldS = b, oldE = d;
S = c, E = b;
oldS 和 E 匹配,就将原本的b节点移动到最后,因为 E 是最后一个节点,他们位置要一致,这就是上面说的: 当其中两个能匹配上那么真实dom中的相应节点会移到Vnode相应的位置 ,此时dom的位置为:a d b
第三步
oldS = d, oldE = d;
S = c, E = d;
oldE 和 E 匹配,位置不变此时dom的位置为:a d b
第四步
oldS++;
oldE--;
oldS > oldE;
遍历结束,说明 oldCh 先遍历完。就将剩余的 vCh 节点根据自己的的index插入到真实dom中去,此时dom位置为:a c d b
一次模拟完成。
这个匹配过程的结束有两个条件:
oldS > oldE 表示 oldCh 先遍历完,那么就将多余的 vCh 根据index添加到dom中去(如上图) S > E 表示vCh先遍历完,那么就在真实dom中将区间为 [oldS, oldE] 的多余节点删掉
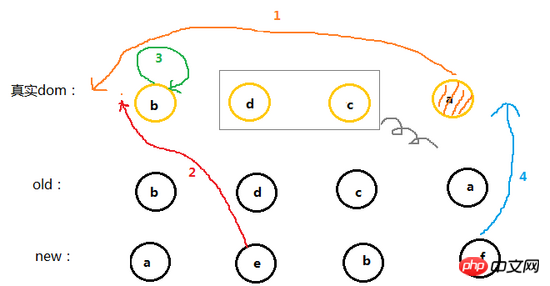
下面再举一个例子,可以像上面那样自己试着模拟一下
当这些节点 sameVnode 成功后就会紧接着执行 patchVnode 了,可以看一下上面的代码
if (sameVnode(oldStartVnode, newStartVnode)) {
 patchVnode(oldStartVnode, newStartVnode)
}就这样层层递归下去,直到将oldVnode和Vnode中的所有子节点比对完。也将dom的所有补丁都打好啦。那么现在再回过去看updateChildren的代码会不会容易很多呢?
总结
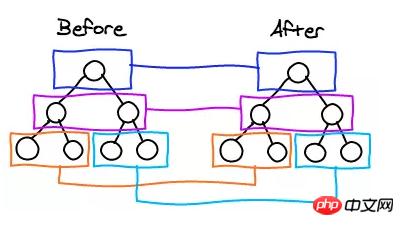
以上为diff算法的全部过程,放上一张文章开始就发过的总结图,可以试试看着这张图回忆一下diff的过程。

相信看了本文案例你已经掌握了方法,更多精彩请关注php中文网其它相关文章!
推荐阅读:
The above is the detailed content of How to use the diff algorithm in vue. For more information, please follow other related articles on the PHP Chinese website!

Hot AI Tools

Undresser.AI Undress
AI-powered app for creating realistic nude photos

AI Clothes Remover
Online AI tool for removing clothes from photos.

Undress AI Tool
Undress images for free

Clothoff.io
AI clothes remover

AI Hentai Generator
Generate AI Hentai for free.

Hot Article
Hot Tools

Notepad++7.3.1
Easy-to-use and free code editor

SublimeText3 Chinese version
Chinese version, very easy to use

Zend Studio 13.0.1
Powerful PHP integrated development environment

Dreamweaver CS6
Visual web development tools

SublimeText3 Mac version
God-level code editing software (SublimeText3)
Hot Topics


 What software is crystaldiskmark? -How to use crystaldiskmark?
Mar 18, 2024 pm 02:58 PM
What software is crystaldiskmark? -How to use crystaldiskmark?
Mar 18, 2024 pm 02:58 PM
CrystalDiskMark is a small HDD benchmark tool for hard drives that quickly measures sequential and random read/write speeds. Next, let the editor introduce CrystalDiskMark to you and how to use crystaldiskmark~ 1. Introduction to CrystalDiskMark CrystalDiskMark is a widely used disk performance testing tool used to evaluate the read and write speed and performance of mechanical hard drives and solid-state drives (SSD). Random I/O performance. It is a free Windows application and provides a user-friendly interface and various test modes to evaluate different aspects of hard drive performance and is widely used in hardware reviews
 CLIP-BEVFormer: Explicitly supervise the BEVFormer structure to improve long-tail detection performance
Mar 26, 2024 pm 12:41 PM
CLIP-BEVFormer: Explicitly supervise the BEVFormer structure to improve long-tail detection performance
Mar 26, 2024 pm 12:41 PM
Written above & the author’s personal understanding: At present, in the entire autonomous driving system, the perception module plays a vital role. The autonomous vehicle driving on the road can only obtain accurate perception results through the perception module. The downstream regulation and control module in the autonomous driving system makes timely and correct judgments and behavioral decisions. Currently, cars with autonomous driving functions are usually equipped with a variety of data information sensors including surround-view camera sensors, lidar sensors, and millimeter-wave radar sensors to collect information in different modalities to achieve accurate perception tasks. The BEV perception algorithm based on pure vision is favored by the industry because of its low hardware cost and easy deployment, and its output results can be easily applied to various downstream tasks.
 How to download foobar2000? -How to use foobar2000
Mar 18, 2024 am 10:58 AM
How to download foobar2000? -How to use foobar2000
Mar 18, 2024 am 10:58 AM
foobar2000 is a software that can listen to music resources at any time. It brings you all kinds of music with lossless sound quality. The enhanced version of the music player allows you to get a more comprehensive and comfortable music experience. Its design concept is to play the advanced audio on the computer The device is transplanted to mobile phones to provide a more convenient and efficient music playback experience. The interface design is simple, clear and easy to use. It adopts a minimalist design style without too many decorations and cumbersome operations to get started quickly. It also supports a variety of skins and Theme, personalize settings according to your own preferences, and create an exclusive music player that supports the playback of multiple audio formats. It also supports the audio gain function to adjust the volume according to your own hearing conditions to avoid hearing damage caused by excessive volume. Next, let me help you
 How to use Baidu Netdisk app
Mar 27, 2024 pm 06:46 PM
How to use Baidu Netdisk app
Mar 27, 2024 pm 06:46 PM
Cloud storage has become an indispensable part of our daily life and work nowadays. As one of the leading cloud storage services in China, Baidu Netdisk has won the favor of a large number of users with its powerful storage functions, efficient transmission speed and convenient operation experience. And whether you want to back up important files, share information, watch videos online, or listen to music, Baidu Cloud Disk can meet your needs. However, many users may not understand the specific use method of Baidu Netdisk app, so this tutorial will introduce in detail how to use Baidu Netdisk app. Users who are still confused can follow this article to learn more. ! How to use Baidu Cloud Network Disk: 1. Installation First, when downloading and installing Baidu Cloud software, please select the custom installation option.
 How to use NetEase Mailbox Master
Mar 27, 2024 pm 05:32 PM
How to use NetEase Mailbox Master
Mar 27, 2024 pm 05:32 PM
NetEase Mailbox, as an email address widely used by Chinese netizens, has always won the trust of users with its stable and efficient services. NetEase Mailbox Master is an email software specially created for mobile phone users. It greatly simplifies the process of sending and receiving emails and makes our email processing more convenient. So how to use NetEase Mailbox Master, and what specific functions it has. Below, the editor of this site will give you a detailed introduction, hoping to help you! First, you can search and download the NetEase Mailbox Master app in the mobile app store. Search for "NetEase Mailbox Master" in App Store or Baidu Mobile Assistant, and then follow the prompts to install it. After the download and installation is completed, we open the NetEase email account and log in. The login interface is as shown below
 Implementing Machine Learning Algorithms in C++: Common Challenges and Solutions
Jun 03, 2024 pm 01:25 PM
Implementing Machine Learning Algorithms in C++: Common Challenges and Solutions
Jun 03, 2024 pm 01:25 PM
Common challenges faced by machine learning algorithms in C++ include memory management, multi-threading, performance optimization, and maintainability. Solutions include using smart pointers, modern threading libraries, SIMD instructions and third-party libraries, as well as following coding style guidelines and using automation tools. Practical cases show how to use the Eigen library to implement linear regression algorithms, effectively manage memory and use high-performance matrix operations.
 BTCC tutorial: How to bind and use MetaMask wallet on BTCC exchange?
Apr 26, 2024 am 09:40 AM
BTCC tutorial: How to bind and use MetaMask wallet on BTCC exchange?
Apr 26, 2024 am 09:40 AM
MetaMask (also called Little Fox Wallet in Chinese) is a free and well-received encryption wallet software. Currently, BTCC supports binding to the MetaMask wallet. After binding, you can use the MetaMask wallet to quickly log in, store value, buy coins, etc., and you can also get 20 USDT trial bonus for the first time binding. In the BTCCMetaMask wallet tutorial, we will introduce in detail how to register and use MetaMask, and how to bind and use the Little Fox wallet in BTCC. What is MetaMask wallet? With over 30 million users, MetaMask Little Fox Wallet is one of the most popular cryptocurrency wallets today. It is free to use and can be installed on the network as an extension
 Teach you how to use the new advanced features of iOS 17.4 'Stolen Device Protection'
Mar 10, 2024 pm 04:34 PM
Teach you how to use the new advanced features of iOS 17.4 'Stolen Device Protection'
Mar 10, 2024 pm 04:34 PM
Apple rolled out the iOS 17.4 update on Tuesday, bringing a slew of new features and fixes to iPhones. The update includes new emojis, and EU users will also be able to download them from other app stores. In addition, the update also strengthens the control of iPhone security and introduces more "Stolen Device Protection" setting options to provide users with more choices and protection. "iOS17.3 introduces the "Stolen Device Protection" function for the first time, adding extra security to users' sensitive information. When the user is away from home and other familiar places, this function requires the user to enter biometric information for the first time, and after one hour You must enter information again to access and change certain data, such as changing your Apple ID password or turning off stolen device protection.
