

How to use Vue page skeleton screen injection
This time I will show you how to use Vue page skeleton screen injection. What are the precautions for using Vue page skeleton screen injection? The following is a practical case, let's take a look.
As a front-end developer who has the closest contact with users, user experience is the most noteworthy issue. Regarding the display of page loading status, there are two main mainstream methods: loading graph and progress bar. In addition, more and more apps use the "skeleton screen" method to display unloaded content, giving users a brand new experience. As SPA becomes increasingly popular in the front-end world, the problem of first-screen loading is also plaguing developers. So is there a way to use skeleton screens in SPA? This is what this article will explore. The relevant code of the article has been synchronized to Github, welcome to check~1. What is a skeleton screen
In simple terms , the skeleton screen uses some graphics as placeholders when the page content is not loaded, and then replaces it after the content is loaded. 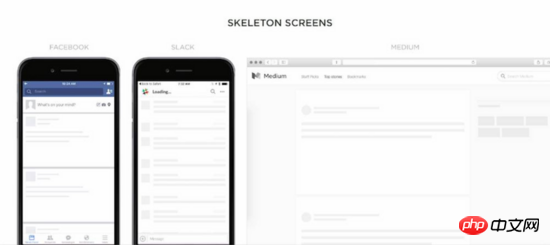
2. Analyze the content loading process of the Vue page
For the sake of simplicity, we use vue-cli with the webpack-simple template to create a new Project:vue init webpack-simple vue-skeleton
├── package.json
├── src
│ ├── App.vue
│ ├── assets
│ └── main.js
├── index.html
└── webpack.conf.js
npm run dev . However, before running the project, let's first take a look at what is written in the entry html file.
<!DOCTYPE html>
<html lang="en">
 <head>
 <meta charset="utf-8">
 <title>vue-skeleton</title>
 </head>
 <body>
 <p id="app"></p>
 <script src="/dist/build.js"></script>
 </body>
</html>
<p id="app">
 <p>Hello skeleton</p>
 <p>Hello skeleton</p>
 <p>Hello skeleton</p>
</p>
3. Easy-to-maintain solution
Obviously, it is unscientific to manually write the skeleton screen content in p#app. We need A highly scalable, automated and easy-to-maintain solution. Since it is in a Vue project, we certainly hope that the so-called skeleton screen is also a .vue file, which can be automatically injected into p#app by the tool during construction. First, we create a new Skeleton.vue file in the /src directory, with the following content:<template>
<p class="skeleton page">
<p class="skeleton-nav"></p>
<p class="skeleton-swiper"></p>
<ul class="skeleton-tabs">
<li v-for="i in 8" class="skeleton-tabs-item"><span></span></li>
</ul>
<p class="skeleton-banner"></p>
<p v-for="i in 6" class="skeleton-productions"></p>
</p>
</template>
<style>
.skeleton {
position: relative;
height: 100%;
overflow: hidden;
padding: 15px;
box-sizing: border-box;
background: #fff;
}
.skeleton-nav {
height: 45px;
background: #eee;
margin-bottom: 15px;
}
.skeleton-swiper {
height: 160px;
background: #eee;
margin-bottom: 15px;
}
.skeleton-tabs {
list-style: none;
padding: 0;
margin: 0 -15px;
display: flex;
flex-wrap: wrap;
}
.skeleton-tabs-item {
width: 25%;
height: 55px;
box-sizing: border-box;
text-align: center;
margin-bottom: 15px;
}
.skeleton-tabs-item span {
display: inline-block;
width: 55px;
height: 55px;
border-radius: 55px;
background: #eee;
}
.skeleton-banner {
height: 60px;
background: #eee;
margin-bottom: 15px;
}
.skeleton-productions {
height: 20px;
margin-bottom: 15px;
background: #eee;
}
</style>Entry file:
import Vue from 'vue'
import Skeleton from './Skeleton.vue'
export default new Vue({
 components: {
 Skeleton
 },
 template: '<skeleton />'
})files into HTML and CSS strings to complete the injection of the skeleton screen. The process is as follows:
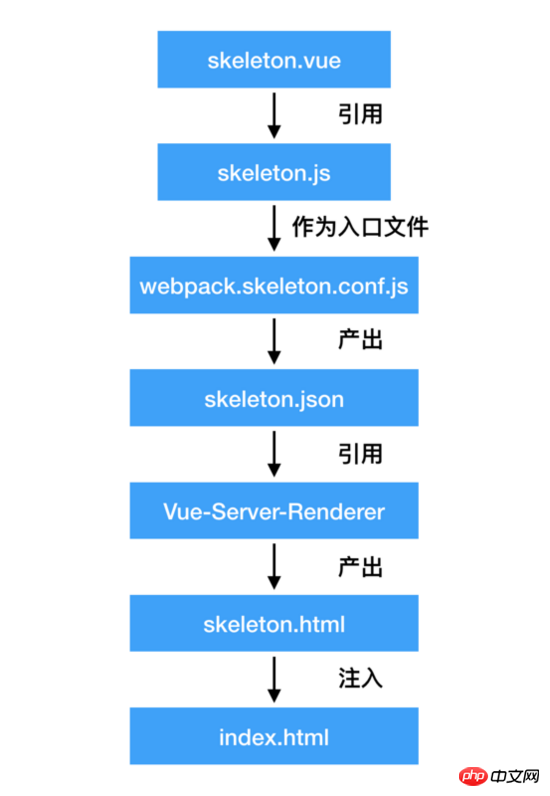
According to the flow chart, we also need to create a new webpack in the root directory .skeleton.conf.js file is specially used to build skeleton screens.
const path = require('path')
const webpack = require('webpack')
const nodeExternals = require('webpack-node-externals')
const VueSSRServerPlugin = require('vue-server-renderer/server-plugin')
module.exports = {
 target: 'node',
 entry: {
 skeleton: './src/skeleton.js'
 },
 output: {
 path: path.resolve(dirname, './dist'),
 publicPath: '/dist/',
 filename: '[name].js',
 libraryTarget: 'commonjs2'
 },
 module: {
 rules: [
 {
 test: /\.css$/,
 use: [
 'vue-style-loader',
 'css-loader'
 ]
 },
 {
 test: /\.vue$/,
 loader: 'vue-loader'
 }
 ]
 },
 externals: nodeExternals({
 whitelist: /\.css$/
 }),
 resolve: {
 alias: {
 'vue$': 'vue/dist/vue.esm.js'
 },
 extensions: ['*', '.js', '.vue', '.json']
 },
 plugins: [
 new VueSSRServerPlugin({
 filename: 'skeleton.json'
 })
 ]
}可以看到,该配置文件和普通的配置文件基本完全一致,主要的区别在于其 target: 'node' ,配置了 externals ,以及在 plugins 里面加入了 VueSSRServerPlugin 。在 VueSSRServerPlugin 中,指定了其输出的json文件名。我们可以通过运行下列指令,在 /dist 目录下生成一个 skeleton.json 文件:
webpack --config ./webpack.skeleton.conf.js
这个文件在记载了骨架屏的内容和样式,会提供给 vue-server-renderer 使用。
接下来,在根目录下新建一个 skeleton.js ,该文件即将被用于往 index.html 内插入骨架屏。
const fs = require('fs')
const { resolve } = require('path')
const createBundleRenderer = require('vue-server-renderer').createBundleRenderer
// 读取`skeleton.json`,以`index.html`为模板写入内容
const renderer = createBundleRenderer(resolve(dirname, './dist/skeleton.json'), {
 template: fs.readFileSync(resolve(dirname, './index.html'), 'utf-8')
})
// 把上一步模板完成的内容写入(替换)`index.html`
renderer.renderToString({}, (err, html) => {
 fs.writeFileSync('index.html', html, 'utf-8')
})注意,作为模板的 html 文件,需要在被写入内容的位置添加 占位符,本例子在 p#app 里写入:
<p id="app">
 <!--vue-ssr-outlet-->
</p>
接下来,只要运行 node skeleton.js ,就可以完成骨架屏的注入了。运行效果如下:
<html lang="en">
 <head>
 <meta charset="utf-8">
 <title>vue-skeleton</title>
 <style data-vue-ssr-id="742d88be:0">
.skeleton {
 position: relative;
 height: 100%;
 overflow: hidden;
 padding: 15px;
 box-sizing: border-box;
 background: #fff;
}
.skeleton-nav {
 height: 45px;
 background: #eee;
 margin-bottom: 15px;
}
.skeleton-swiper {
 height: 160px;
 background: #eee;
 margin-bottom: 15px;
}
.skeleton-tabs {
 list-style: none;
 padding: 0;
 margin: 0 -15px;
 display: flex;
 flex-wrap: wrap;
}
.skeleton-tabs-item {
 width: 25%;
 height: 55px;
 box-sizing: border-box;
 text-align: center;
 margin-bottom: 15px;
}
.skeleton-tabs-item span {
 display: inline-block;
 width: 55px;
 height: 55px;
 border-radius: 55px;
 background: #eee;
}
.skeleton-banner {
 height: 60px;
 background: #eee;
 margin-bottom: 15px;
}
.skeleton-productions {
 height: 20px;
 margin-bottom: 15px;
 background: #eee;
}
</style></head>
 <body>
 <p id="app">
 <p data-server-rendered="true" class="skeleton page"><p class="skeleton-nav"></p> <p class="skeleton-swiper"></p> <ul class="skeleton-tabs"><li class="skeleton-tabs-item"><span></span></li><li class="skeleton-tabs-item"><span></span></li><li class="skeleton-tabs-item"><span></span></li><li class="skeleton-tabs-item"><span></span></li><li class="skeleton-tabs-item"><span></span></li><li class="skeleton-tabs-item"><span></span></li><li class="skeleton-tabs-item"><span></span></li><li class="skeleton-tabs-item"><span></span></li></ul> <p class="skeleton-banner"></p> <p class="skeleton-productions"></p><p class="skeleton-productions"></p><p class="skeleton-productions"></p><p class="skeleton-productions"></p><p class="skeleton-productions"></p><p class="skeleton-productions"></p></p>
 </p>
 <script src="/dist/build.js"></script>
 </body>
</html>可以看到,骨架屏的样式通过 标签直接被插入,而骨架屏的内容也被放置在 p#app 之间。当然,我们还可以进一步处理,把这些内容都压缩一下。改写 skeleton.js ,在里面添加 html-minifier :
...
+ const htmlMinifier = require('html-minifier')
...
renderer.renderToString({}, (err, html) => {
+ html = htmlMinifier.minify(html, {
+ collapseWhitespace: true,
+ minifyCSS: true
+ })
 fs.writeFileSync('index.html', html, 'utf-8')
})来看看效果:
效果非常不错!至此,Vue页面接入骨架屏已经完全实现了。
相信看了本文案例你已经掌握了方法,更多精彩请关注php中文网其它相关文章!
推荐阅读:
The above is the detailed content of How to use Vue page skeleton screen injection. For more information, please follow other related articles on the PHP Chinese website!

Hot AI Tools

Undresser.AI Undress
AI-powered app for creating realistic nude photos

AI Clothes Remover
Online AI tool for removing clothes from photos.

Undress AI Tool
Undress images for free

Clothoff.io
AI clothes remover

Video Face Swap
Swap faces in any video effortlessly with our completely free AI face swap tool!

Hot Article
Hot Tools

Notepad++7.3.1
Easy-to-use and free code editor

SublimeText3 Chinese version
Chinese version, very easy to use

Zend Studio 13.0.1
Powerful PHP integrated development environment

Dreamweaver CS6
Visual web development tools

SublimeText3 Mac version
God-level code editing software (SublimeText3)
Hot Topics
 1387
1387
 52
52

 How to copy a page in Word
Feb 20, 2024 am 10:09 AM
How to copy a page in Word
Feb 20, 2024 am 10:09 AM
Want to copy a page in Microsoft Word and keep the formatting intact? This is a smart idea because duplicating pages in Word can be a useful time-saving technique when you want to create multiple copies of a specific document layout or format. This guide will walk you through the step-by-step process of copying pages in Word, whether you are creating a template or copying a specific page in a document. These simple instructions are designed to help you easily recreate your page without having to start from scratch. Why copy pages in Microsoft Word? There are several reasons why copying pages in Word is very beneficial: When you have a document with a specific layout or format that you want to copy. Unlike recreating the entire page from scratch
 How to customize and edit standby mode on iPhone: What's new in iOS 17
Sep 21, 2023 pm 04:01 PM
How to customize and edit standby mode on iPhone: What's new in iOS 17
Sep 21, 2023 pm 04:01 PM
Standby is a new feature in the iOS 17 update that provides a new and enhanced way to access information when your phone is idle quickly. With StandBy, you can conveniently check the time, view upcoming events, browse your calendar, get weather updates for your location, and more. Once activated, the iPhone will intuitively enter standby mode when set to landscape while charging. This feature is perfect for wireless charging points like your bedside table, or when you're away from your iPhone charging during daily tasks. It allows you to swipe through various widgets displayed in standby to access different sets of information from various applications. However, you may want to modify these widgets or even delete some based on your preferences and the information you need frequently. So let's dive into
 How to quickly refresh a web page?
Feb 18, 2024 pm 01:14 PM
How to quickly refresh a web page?
Feb 18, 2024 pm 01:14 PM
Page refresh is very common in our daily network use. When we visit a web page, we sometimes encounter some problems, such as the web page not loading or displaying abnormally, etc. At this time, we usually choose to refresh the page to solve the problem, so how to refresh the page quickly? Let’s discuss the shortcut keys for page refresh. The page refresh shortcut key is a method to quickly refresh the current web page through keyboard operations. In different operating systems and browsers, the shortcut keys for page refresh may be different. Below we use the common W
 How to Rearrange, Disable, and Delete iPhone Home Screen Pages
Nov 29, 2023 am 08:22 AM
How to Rearrange, Disable, and Delete iPhone Home Screen Pages
Nov 29, 2023 am 08:22 AM
In iOS, Apple allows you to disable individual home screen pages on your iPhone. It's also possible to rearrange the order of home screen pages and delete pages directly instead of just disabling them. Here's how it works. How to Rearrange Home Screen Pages Touch and hold Space on the Home screen to enter jitter mode. Tap the row of dots that represent Home screen pages. In the Home screen grid that appears, touch and drag a page to rearrange it relative to other pages. Others move in response to your dragging. When you're happy with your new arrangement, tap "Done" in the upper right corner of the screen, then tap "Done" again to exit dither mode. How to Disable or Remove Home Screen Pages Touch and hold Space on the Home screen to enter dither mode. Tap to represent home screen
 How to implement page jump in 3 seconds: PHP Programming Guide
Mar 25, 2024 am 10:42 AM
How to implement page jump in 3 seconds: PHP Programming Guide
Mar 25, 2024 am 10:42 AM
Title: Implementation method of page jump in 3 seconds: PHP Programming Guide In web development, page jump is a common operation. Generally, we use meta tags in HTML or JavaScript methods to jump to pages. However, in some specific cases, we need to perform page jumps on the server side. This article will introduce how to use PHP programming to implement a function that automatically jumps to a specified page within 3 seconds, and will also give specific code examples. The basic principle of page jump using PHP. PHP is a kind of
 How to deal with the problem that Laravel page cannot display CSS correctly
Mar 10, 2024 am 11:33 AM
How to deal with the problem that Laravel page cannot display CSS correctly
Mar 10, 2024 am 11:33 AM
"Methods to handle Laravel pages that cannot display CSS correctly, need specific code examples" When using the Laravel framework to develop web applications, sometimes you will encounter the problem that the page cannot display CSS styles correctly, which may cause the page to render abnormal styles. Affect user experience. This article will introduce some methods to deal with the failure of Laravel pages to display CSS correctly, and provide specific code examples to help developers solve this common problem. 1. Check the file path. First check the path of the CSS file.
 Use ThinkPHP6 to implement a beautiful 404 page
Jun 20, 2023 am 11:06 AM
Use ThinkPHP6 to implement a beautiful 404 page
Jun 20, 2023 am 11:06 AM
As the Internet develops, many websites or applications have gradually become more complex. When users use it, they often encounter error pages, the most common of which is the 404 page. The 404 page means that the page being accessed does not exist and is a common error page. For websites or applications, a beautiful 404 page can greatly improve the user experience. In this article, we will introduce how to use ThinkPHP6 to quickly implement a beautiful 404 page. Create a route First, we need to create an err in the route folder
 Introduction to how to delete a page of content in Word
Mar 26, 2024 am 10:06 AM
Introduction to how to delete a page of content in Word
Mar 26, 2024 am 10:06 AM
Title: Introduction to how to delete a page of content in Word When editing a document using Microsoft Word, you may sometimes encounter a situation where you need to delete the content of a certain page. You may want to delete a blank page or unnecessary content on a certain page in the document. In response to this situation, we can take some methods to quickly and effectively delete a page of content. Next, some methods to delete a page of content in Microsoft Word will be introduced. Method 1: Delete a page of content First, open the Word document that needs to be edited. Certainly
