

How to use JS event binding and event flow model
This time I will show you how to use JS event binding and event flow model. What are the precautions for using JS event binding and event flow model? The following is a practical case. Let’s take a look. .
1. JS events
(1) JS event classification
1. Mouse event :click/dbclick/mouseover/mouseout2.HTML event:onload/onunload/onsubmit/onresize/onchange/onfoucs/onscroll 3. Keyboard events: keydown: Triggered when the keyboard is pressed keypress: Triggered the moment the keyboard is pressed and lifted.
keyup: trigger when keyboard is raised
②keypress can only capture numbers, letters, and symbol keys, but not functions key.
③When long pressing, execute keydown--keypress in loop
④If there is keydown, there is not necessarily keyup. When the focus is lost when long pressing, keyup will no longer be triggered
⑤keypress is case-sensitive, keydown, kewup are not different.
 document.onkeydown=function(e){
 console.log(e);
 }
document.onkeydown=function(){
console.log(window.event);
}//兼容浏览器的写法:
document.onkeydown=function(e){
e==e||Window.event;
var Code=e.keyCode||e.which||e.charCode;
if(code==13){
//回车
}
}5. How to determine the keyboard keys?
①In the re-starting function, receive the event factor e.② You can use e.key to directly go to the pressed key character (not recommended).
③You can use keyCode/which/charCode to get the ASCII code value of the key.
 var Code=e.keyCode||e.which||e.charCode;
//判断组合键
var isAlt=0,isEnt=0;
document.onkeyup=function(e){
if(e.keyCode==18){
isAlt=1;
}
if(e.keyCode==13){
isEnt=1;
}
if(isAlt==1&&isEnt==1){
alert("同时按下Alt和Enter键");
}
}
document.onkeyup=function(){
console.log("keyup");
}
document.onkeypress=function(){
console.log("keypress");
}
document.onkeydown=function(){
console.log("keydown");
}
document.onkeypress=function(){
console.log(window.event);
}
//判断是否按下了回车键
document.onkeydown=function(e){
var code=e.keyCode;
if(code==13){
alert("你输入的是回车键");
}
}2. EventBinding model
(1) DOM0 event modelNotes on binding:①Use window.onload to bind after loading is complete.window.onload =function(){//Event}
//body内容
<body>
  <button onclick="func()">内联模型绑定</button>
  <button id="btn1">哈哈哈哈</button>
  <button id="btn2">DOM2模型绑定</button>
  <button id="btn3">取消DOM2</button>
</body>
<button onclick="func()">内联模型绑定</button>
document.getElementById("btn1")=function(){} Disadvantages: The same type of event can only be added once to the same node. If added multiple times, the last one will take effect.
document.getElementById("btn1").onclick=function(){
  alert(1234);
}
document.getElementById("btn1").onclick=function(){
  alert(234);
}//重复的只能出现最近的一次document.getElementById("btn3").onclick=function(){//不能取消匿名函数
if(btn.detachEvent){
btn.detachEvent("onclick",func1);
}else{
btn.removeEventListener("click",func1);
}
alert("取消DOM2");
} ②After IE8, use .addEventListener("click", function, true/false);
Parameter three: false (default) means event bubbling, passing in true means event capture.
③ Compatible with all browser processing methods:
 var btn=document.getElementById("btn1");
 if(btn.attachEvent){
 btn.attachEvent("onclick",func1);//事件,事件需要执行的函数IE8可以
 }else{
 btn.attachEventListener("click",func1);
} ②Events bound using DOM2 can be canceled with special functions.
3. Cancel event binding:
①Use attachEvent to bind and use detachevent to cancel.
②Use attachEventListener to bind and use removeEventListenter to cancel.
Note: If the event bound to DOM2 needs to be canceled, when binding the event,
the callback function must be a function name, and cannot be an anonymous function, because when the event is canceled, the callback function Enter the function name to cancel.
3. JS event flow model
(1) Event flow model in JS1. 事件冒泡(fasle/不写):当触发一个节点的事件是,会从当前节点开始,依次触发其祖先节点的同类型事件,直到DOM根节点。
2. 事件捕获(true):当初发一个节点的事件时,会从DOM根节点开始,依次触发其祖先节点的同类型事件,直到当前节点自身。
3. 什么时候事件冒泡?什么时候事件捕获?
① 当使用addEventListener绑定事件,第三个参数传为true时表示事件捕获;
② 除此之外的所有事件绑定均为事件冒泡。
4. 阻止事件冒泡:
① IE10之前,e.cancelBubble = true;
② IE10之后,e.stopPropagation();
5. 阻止默认事件:
① IE10之前:e.returnValue = false;
② IE10之后:e.preventDefault();
//css
#p1{
width: 300px;;
height: 300px;
background-color: powderblue;
}
#p2{
width: 200px;
height: 200px;
background-color: deeppink;
}
#p3{
width: 100px;
height: 100px;
background-color:#A9A9A9;
}
//html
<p id="p1">
<p id="p2">
<p id="p3"></p>
</p>
</p>
<a href="01-事件笔记.html" rel="external nofollow" onclick="func()">超链接</a>
p1.addEventListener("click",function(){
console.log("p1 click");
},false);
p2.addEventListener("click",function(){
console.log("p2 click");
},false);
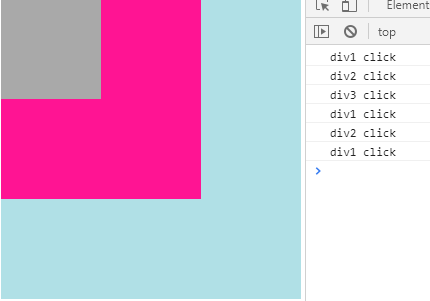
p3.addEventListener("click",function(){ //原来的顺序是:3-->2-->1。
// myParagraphEventHandler(); //截获事件流后,只触发3.但是从2开始依然会冒泡;
console.log("p3 click");
},false);结果(事件冒泡)(由小到大p3-》p2-》p1):

p1.addEventListener("click",function(){
  console.log("p1 click");
},true);
p2.addEventListener("click",function(){
  console.log("p2 click");
},true);
p3.addEventListener("click",function(){
//  myParagraphEventHandler(); //截获事件流后,只触发3.但是从2开始依然会冒泡;
  console.log("p3 click");
},true);结果(事件捕获)(由小到大p3-》p2-》p1):
//依然遵循事件冒泡
document.onclick=function(){
  console.log("document click")
}
//截获事件流阻止事件冒泡
function myParagraphEventHandler(e) {
   e = e || window.event;
  if (e.stopPropagation) {
     e.stopPropagation(); //IE10以后
  } else {
     e.cancelBubble = true; //IE10之前
   }
}
//截获事件流阻止事件冒泡
function myParagraphEventHandler(e) {
   e = e || window.event;
  if (e.stopPropagation) {
     e.stopPropagation(); //IE10以后
  } else {
     e.cancelBubble = true; //IE10之前
   }
}
//阻止默认事件
function eventHandler(e) {
  e = e || window.event;
// 防止默认行为
   if (e.preventDefault) {
     e.preventDefault(); //IE10之后
  } else {
     e.returnValue = false; //IE10之前
  }
}相信看了本文案例你已经掌握了方法,更多精彩请关注php中文网其它相关文章!
推荐阅读:
The above is the detailed content of How to use JS event binding and event flow model. For more information, please follow other related articles on the PHP Chinese website!

Hot AI Tools

Undresser.AI Undress
AI-powered app for creating realistic nude photos

AI Clothes Remover
Online AI tool for removing clothes from photos.

Undress AI Tool
Undress images for free

Clothoff.io
AI clothes remover

Video Face Swap
Swap faces in any video effortlessly with our completely free AI face swap tool!

Hot Article
Hot Tools

Notepad++7.3.1
Easy-to-use and free code editor

SublimeText3 Chinese version
Chinese version, very easy to use

Zend Studio 13.0.1
Powerful PHP integrated development environment

Dreamweaver CS6
Visual web development tools

SublimeText3 Mac version
God-level code editing software (SublimeText3)
Hot Topics


 BTCC tutorial: How to bind and use MetaMask wallet on BTCC exchange?
Apr 26, 2024 am 09:40 AM
BTCC tutorial: How to bind and use MetaMask wallet on BTCC exchange?
Apr 26, 2024 am 09:40 AM
MetaMask (also called Little Fox Wallet in Chinese) is a free and well-received encryption wallet software. Currently, BTCC supports binding to the MetaMask wallet. After binding, you can use the MetaMask wallet to quickly log in, store value, buy coins, etc., and you can also get 20 USDT trial bonus for the first time binding. In the BTCCMetaMask wallet tutorial, we will introduce in detail how to register and use MetaMask, and how to bind and use the Little Fox wallet in BTCC. What is MetaMask wallet? With over 30 million users, MetaMask Little Fox Wallet is one of the most popular cryptocurrency wallets today. It is free to use and can be installed on the network as an extension
 How to bind a sub-account on Xiaohongshu? How does it check whether the account is normal?
Mar 21, 2024 pm 10:11 PM
How to bind a sub-account on Xiaohongshu? How does it check whether the account is normal?
Mar 21, 2024 pm 10:11 PM
In today's era of information explosion, the construction of personal brand and corporate image has become increasingly important. As the leading fashion life sharing platform in China, Xiaohongshu has attracted a large number of user attention and participation. For those users who want to expand their influence and improve the efficiency of content dissemination, binding sub-accounts has become an effective means. So, how does Xiaohongshu bind a sub-account? How to check whether the account is normal? This article will answer these questions for you in detail. 1. How to bind a sub-account on Xiaohongshu? 1. Log in to your main account: First, you need to log in to your Xiaohongshu main account. 2. Open the settings menu: click "Me" in the upper right corner, and then select "Settings". 3. Enter account management: In the settings menu, find the "Account Management" or "Account Assistant" option and click
 Steps and methods to bind Douyin in Toutiao
Mar 22, 2024 pm 05:56 PM
Steps and methods to bind Douyin in Toutiao
Mar 22, 2024 pm 05:56 PM
1. Open Toutiao. 2. Click My in the lower right corner. 3. Click [System Settings]. 4. Click [Account and Privacy Settings]. 5. Click the button on the right side of [Douyin] to bind Douyin.
 How to bind the Cainiao app to Pinduoduo? How to add the Cainiao Wrap to Pinduoduo platform?
Mar 19, 2024 pm 02:30 PM
How to bind the Cainiao app to Pinduoduo? How to add the Cainiao Wrap to Pinduoduo platform?
Mar 19, 2024 pm 02:30 PM
The Cainiao app is a platform that can provide you with various logistics information. The functions here are very powerful and easy to use. If you have any logistics-related problems, they can be solved here. Anyway, it can bring you a The one-stop service can solve everything in time. Checking the express delivery, picking up the express delivery, sending the express delivery, etc. are all without any problems. We have cooperated with various platforms and all the information can be queried. However, sometimes It will happen that the goods purchased on Pinduoduo cannot display the logistics information. In fact, you need to manually bind Pinduoduo to achieve this. The specific methods have been sorted out below, and everyone can take a look. . How to bind Cainiao to Pinduoduo account: 1. Open Cainiao APP and go to the main page
 Simple JavaScript Tutorial: How to Get HTTP Status Code
Jan 05, 2024 pm 06:08 PM
Simple JavaScript Tutorial: How to Get HTTP Status Code
Jan 05, 2024 pm 06:08 PM
JavaScript tutorial: How to get HTTP status code, specific code examples are required. Preface: In web development, data interaction with the server is often involved. When communicating with the server, we often need to obtain the returned HTTP status code to determine whether the operation is successful, and perform corresponding processing based on different status codes. This article will teach you how to use JavaScript to obtain HTTP status codes and provide some practical code examples. Using XMLHttpRequest
 How to bind the Cainiao APP to Pinduoduo How to bind the Cainiao APP to Pinduoduo
Mar 19, 2024 pm 05:16 PM
How to bind the Cainiao APP to Pinduoduo How to bind the Cainiao APP to Pinduoduo
Mar 19, 2024 pm 05:16 PM
Do you know how to bind Pinduoduo when using Cainiao Wrap? The official version of Cainiao Wrap App does not automatically synchronize some Pinduoduo’s logistics information on this platform. All we need to do is You can copy the order number or check your mobile phone to see if there is any express delivery information. Of course, these all need to be completed manually. If you want to know more, come and take a look with the editor. How to bind the Cainiao APP to Pinduoduo 1. Open the Cainiao APP and click "Package Guide" in the upper left corner of the main page. 2. In the interface, there are many shopping websites, and accounts can be bound. 3. Click to import other e-commerce platforms. 4. User authorization: Click Pinduoduo to go to the interface
 How to bind the Xiaomi car app to the charging pile device
Apr 01, 2024 pm 06:52 PM
How to bind the Xiaomi car app to the charging pile device
Apr 01, 2024 pm 06:52 PM
The latest Mi su7 model car launched by Xiaomi has dominated various hot search lists. Many users who happen to want to buy a car have chosen Xiaomi su7 model car for purchase. So how do you use your Xiaomi car app to bind the car after picking up the car? If you decide to use a home charging pile for charging, this tutorial guide will give you a detailed introduction, I hope it can help you. First, we open the Xiaomi mobile app, click the My button in the lower right corner, and then in the My interface, you can see the option of home charging pile. After entering the page to bind the charging pile, click the scan code button below and scan the QR code on the charging pile. The QR code can be used to bind the charging pile to the app.
 What should I do if my little black box cannot be bound to Steam?
Mar 12, 2024 pm 03:10 PM
What should I do if my little black box cannot be bound to Steam?
Mar 12, 2024 pm 03:10 PM
The inability of the Black Box to bind to Steam may be caused by network or software version issues. The little black box provides information including prices of released and upcoming games, computer configuration requirements and reviews, and in-depth gameplay analysis. In addition, it also allows users to find the information they need through mobile devices anytime and anywhere. What to do if the little black box cannot be bound to Steam 1. Confirm the network status and make sure the device is connected to the Internet. 2. Check the Little Black Box version. Please make sure you are using the latest version of the Little Black Box software and try to bind your Steam account. 3. To check the Steam account settings, please log in to the Steam account and check whether the third-party software binding function is turned on in the privacy settings. 4. Contact official customer service If the above steps still cannot solve the problem, it is recommended that you contact official customer service for help.
