This time I will show you how to develop Vue drag and drop components, and what are the precautions for developing Vue drag and drop components. The following is a practical case, let's take a look.
Why choose Vue?
Main reasons: For front-end development, compatibility is one of the issues we must consider. Our project does not need to be compatible with lower version browsers. The project itself is also data-driven. In addition, Vue itself has the following main features:•Use virtual DOM;•Lightweight framework;
•Efficient
data binding;•Flexible Component system;
•Complete development ecological chain.
Why should it be encapsulated into a Vue component?
The main purpose is to improve the reusability and maintainability of the code. •Reusability: After componentization, some styles and logic are differentiated and reflected by configuring parameters, so the configurability of parameters improves the reuse rate and flexibility of components. •Maintainability: After componentization, the internal logic of the component is only responsible for the component, and the external logic is only adapted through configuration parameters. This improves the logic clarity of the code and can quickly locate code problems. place. Illustration of component-based building page:
Component composition
The following is a completed component composition:// 组件内模板 // 组件内逻辑代码 <script type="text/javascript"></script> // 组件内封装的样式 <style lang="scss" scoped></style>
Develop Vue Mobile Take the drag component as an example
Principle of drag
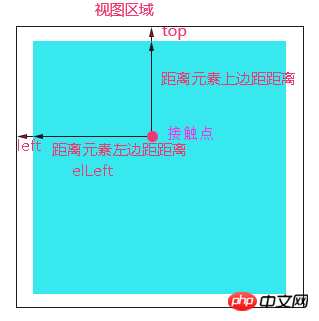
While the finger is moving, the position of the element, that is, the top and left values, is changed in real time. Make the element move with the movement of your finger.Drag implementation

• During dragging: pass currTop = clientY - elTop, currLeft = clientX - elLeft obtains the distance value of the element from the upper and left sides of the view in real time, and assigns the value to the element, so that the element moves with the movement of the finger;
• End of dragging, position the element .
Implementation in Vue
The biggest difference when using Vue is that we hardly operate the DOM and must make full use of Vue’s data Driver to implement drag and drop functionality. In this case, we only need to drag the element in the vertical direction, so only vertical movement is considered.
template:
<p class="drag-title">拖拽可调整顺序</p>
<ul class="drag-list">
 <li class="drag-item">{{item.txt}}</li>
</ul>
script:

export default {
data() {
return {
dragList:null
}
},
created() {
this.dragList = [
{
isDrag: false,
txt: '列表1',
isShow: false
}
...
]
},
}– View: view part;
– Viewmodel:
middleware that connects view and data.
– oldIndex:元素在数组中的初始索引index;
– elHeight:单个元素块的高;
– currTop = clientY - elTop:元素在拖动过程中距离可视区上侧距离;
– currTop - initTop > 0:得知元素是向上拖拽;
– currTop - initTop < 0:得知元素是向下拖拽。
我们以向下拖拽来说:
– 首先,我们要在拖拽结束事件touchend中判断元素从拖动开始到拖动结束时拖动的距离。若小于某个设定的值,则什么也不做;
– 然后,在touchmove事件中判断,若(currTop - initTop) % elHeight>= elHeight/2成立,即当元素拖至另一个元素块等于或超过1/2的位置时,即可将元素插入到最新的位置为newIndex = (currTop - initTop) / elHeight + oldIndex。
– 最后,若手指离开元素,那么我们在touchend事件中,通过this.dragList.splice(oldIndex, 1),this.dragList.splice(newIndex, 0, item)重新调整数组顺序。页面会根据最新的dragList渲染列表。
写到这里,我们俨然已经用Vue实现了移动端的拖拽功能。但是拖拽体验并不好,接下来,我们对它进行优化。
优化点:我们希望,在元素即将可能落到的位置,提前留出一个可以放得下元素的区域,让用户更好的感知拖拽的灵活性。
方案:(方案已被验证是可行的)将li的结构做一下修改,代码如下:
<ul>
 <li class="drag-item">
<p class="leave-block"></p>
// 向上拖拽时留空
<p class="">{{item.txt}}</p>
<p class="leave-block"></p>
// 向下拖拽时留空</li>
</ul>•拖拽开始:将元素的定位方式由static设置为absolute,z-index设置为一个较大的值,防止元素二次拖拽无效;
•拖拽过程中:将元素即将落入新位置的那个li下p的item.isShow设置为true,其他li下p的item.isShow均设置为false;
•拖拽结束:将所有li下p的item.isShow 均设置为false,将元素定位方式由absolute设置为static。
贴一段伪代码:
touchStart(e){
// 获取元素距离视口顶部的初始距离
initTop = e.currentTarget.offsetTop;
// 开始拖动时,获取鼠标距离视口顶部的距离
initClientY = e.touches[0].clientY;
// 计算出接触点距离元素顶部的距离
elTop = e.touches[0].clientY - initTop;
},
touchMove(index, item, e){
// 将拖拽结束时,给元素设置的static定位方式移除,防止元素二次拖拽无效
e.target.classList.remove('static');
// 给拖拽的元素设置绝对定位方式
e.target.classList.add('ab');
// 获取元素在拖拽过程中距离视口顶部距离
currTop = e.touches[0].clientY - elTop;
// 元素在拖拽过程中距离视口顶部距离赋给元素
e.target.style.top = currTop ;
// 获取元素初始位置
oldIndex = index;
// 获取拖拽元素
currItem = item;
// 若元素已经拖至区域外
if(e.touches[0].clientY > (this.dragList.length) * elHeight){
// 将元素距离上侧的距离设置为拖动区视图的高
currTop = (this.dragList.length) * elHeight;
return;
}
// 向下拖拽
if(currTop > initTop ){
// 若拖拽到大于等于元素的一半时,即可将元素插入到最新的位置
if((currTop - initTop) % elHeight>= elHeight / 2){
// 计算出元素拖到的最新位置
newIndex = Math.round((currTop - initTop) / elHeight) + index;
// 确保新元素的索引不能大于等于列表的长度
if(newIndex < this.dragList.length){
// 将所有列表留空处隐藏
for(var i = 0;i< this.dragList.length;i++){
this.dragList[i].isShow = false;
}
// 将元素即将拖到的新位置的留空展示
this.dragList[newIndex].isShow = true;
}
else {
return;
}
}
}
// 向上拖拽,原理同上
if(currTop < initTop){ ... } }, touchEnd(e){ // 若拖动距离大于某个设定的值,则按照上述,执行相关代码 if(Math.abs(e.changedTouches[0].clientY - initClientY ) > customVal){
this.dragList.splice(oldIndex, 1);
this.dragList.splice(newIndex, 0, currItem);
for(var i = 0;i< this.dragList.length;i++){
this.dragList[i].isShow = false;
this.dragList[i].isShowUp = false;
}
}
e.target.classList.remove('ab');
e.target.classList.add('static');
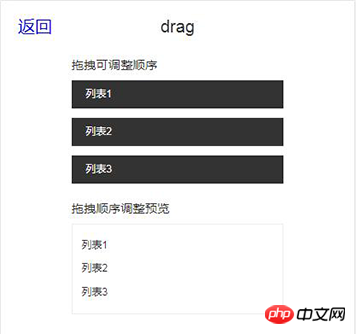
}优化后,如下图所示:

以上便是用Vue实现移动端拖拽组件的过程。我们知道,有些项目是需要在PC端用Vue实现此功能。这里简单提一下PC与移动端的区别如下:
•PC端可以使用的事件组有两种:第一种:H5新特性draggable,dragstart,drag,dragend;第二种:mousedown,mousemove,mouseup;
•PC端获取鼠标坐标是通过e.clientX,clientY,区别于移动端的e.touches[0].clientX,e.touches[0].clientY。
相信看了本文案例你已经掌握了方法,更多精彩请关注php中文网其它相关文章!
推荐阅读:
The above is the detailed content of How to develop Vue drag and drop components. For more information, please follow other related articles on the PHP Chinese website!
 Vue parent component calls the method of child component
 Introduction to laravel components
 Can windows.old be deleted?
 What is the mobile service password?
 The difference between vscode and visual studio
 How to solve access denied
 What are artificial intelligence technologies?
 How to make a round picture in ppt


