

Detailed explanation of steps to implement calculator in JS
This time I will bring you a detailed explanation of the steps to implement the calculator in JS. What are the precautions for implementing the calculator in JS. The following is a practical case, let's take a look.
I have always wanted to write a calculator during my final review. In my spare time, I was also thinking about how to implement it. I thought it shouldn't be difficult, but I just wanted to write it. Yesterday we finally got to start construction. At first I thought it would take about a week or at least two days to complete. I thought I could go home for two days after the completion. But I didn't expect that the entire implementation process was relatively smooth. It took about six hours to complete the design to implementation yesterday.
I haven’t written much code for about a month. My whole brain is not used to it, my response is slow, and some basic things are a bit blurry. It may be that I didn't understand it well in the first place, and there was no other practice, which resulted in a somewhat low efficiency.
Text
##html code:
<p class="errorHint" id="errorHint"><img src="https://github.com/crystalYY/calculator/blob/master/img/error.png?raw=true"></p> <table cellpadding="0"> <tr> <th colspan="5">计算器</th> </tr> <tr> <td colspan="5"> <input type="text" value="0" name="showResult"> </td> </tr> <tr> <td><button>7</button></td> <td><button>8</button></td> <td><button>9</button></td> <td><button class="setChange" id="backSpace">退格</button></td> <td><button class="setChange" id="clearNum">C</button></td> </tr> <tr> <td><button>4</button></td> <td><button>5</button></td> <td><button>6</button></td> <td><button>+</button></td> <td><button>-</button></td> </tr> <tr> <td><button>1</button></td> <td><button>2</button></td> <td><button>3</button></td> <td><button>*</button></td> <td><button>/</button></td> </tr> <tr> <td><button>0</button></td> <td><button>.</button></td> <td><button>%</button></td> <td colspan="2"><button class="setChange" id="gainResult">Enter</button></td> </tr> </table> <script type="text/javascript" src='index.js'> </script>
CSScode:
*{margin: 0px; padding: 0px;}
		.errorHint{position: absolute; left: 130px; top:-282px;}
		.showError{border:1px solid red;}
		table{ border: 2px solid #996c33; width: 550px; padding: 10px; margin: 150px auto; background:url(https://github.com/crystalYY/calculator/blob/master/img/bg2.jpg?raw=trueg) left center no-repeat; border-radius: 10px;}
		table td{
			text-align: center;
			width: 100px;
			height: 40px;
			padding-left: 2px;
			padding-bottom: 2px;
		}
		table th{
			font-size: 18px;
			font-family:'楷体';
			color: 	#8B0000;
		}
		table td button{
			width: 98%;
			height: 98%;
			font-size: 16px;
			font-family: 'Microsoft yahei';
			background: none;
			color: 	#8B4726;
			outline:none;
			border:1px solid #000;
			border-radius: 5px;
			cursor: pointer;
		}
		table td input{
			width: 100%;
			margin: 10px 0;
			padding: 5px;
			border:1px solid #996c33;
			box-sizing: border-box;
			text-align: right;
			font-size: 16px;
			font-family: 'Microsoft yahei';
}JS code:
var oinput=document.getElementsByTagName('input')[0];
		//获取外部样式
		function getStyle(obj, name)
		{
			if(obj.currentStyle)
			{
				return obj.currentStyle[name];
			}
			else
			{
				return getComputedStyle(obj, false)[name];
			}
		}
		//渐变动画
		function move(obj,attr,tar){
			clearInterval(obj.timer);
			obj.timer=setInterval(function(){
				var cur=parseInt(getStyle(obj,attr));
				var itarget=parseInt(tar);
				var speed=(itarget-cur)/6;
				speed=speed>0?Math.ceil(speed):Math.floor(speed);
				obj.style[attr]=parseInt(getStyle(obj,attr))+speed+'px';
				if(speed==0){
					clearInterval(obj.timer);
				}
			},30);
		}
		//事件绑定函数
		function addEvent(obj,ev,fun){
			if(obj.attachEvent){
				obj.attachEvent('on'+ev,fun);
			}else{
				obj.addEventListener(ev,fun,false);
			}
		}
		//阻止默认行为
		function stopEvent(ev){
			var e=ev||window.event;
			if(e.preventDefault){
				e.preventDefault();
			}
			else{
				e.returnValue=false;//ie
			}
		}
		//计算最终结果
		function getResult(){
			function evalResult(){
				var result=eval(oinput.value);
				return result;
			}
			//捕获异常
			try{
				var x=evalResult();
				return x;
			}
			catch (e){
				oinput.className='showError';
				var errorHint=document.getElementById('errorHint');
				move(errorHint,'top',0);
				setTimeout(function(){
					oinput.className='';
					move(errorHint,'top',-282);
				},2000);
				return oinput.value;
			}
		}
		//文本框获取焦点,错误提示消失
		//按下回车得到结果
		function enterResult(ev){
			var e=ev||window.event;
			if(e.keyCode==13){
				stopEvent(ev);//阻止enter键的默认行为
				var result=getResult();
				oinput.value=result;
			}
		}
		//绑定点击事件
		function init(){
			var otable=document.getElementsByTagName('table')[0];
			addEvent(otable,'keydown',function(ev){
				enterResult(ev);
			});
			addEvent(otable,'click',function(ev){
				stopEvent(ev);
				var e=ev||window.event;
				var itat=e.target||e.srcElement;
				var obtns=document.getElementsByTagName('button');
				if(itat.nodeName.toLowerCase()=='button'){
					for(var i=0;i<obtns.length;i++){
						obtns[i].style.borderColor='#000';
					}
					itat.style.borderColor='white';
					if(itat.className!='setChange'){
						if(oinput.value=='0'){
							oinput.value='';
							oinput.value+=itat.innerHTML;
						}
						else{
							oinput.value+=itat.innerHTML;
						}
					}else{
						if(itat.id=='backSpace'){
							oinput.value=oinput.value.toString().slice(0,-1);
						}
						else if(itat.id=='clearNum'){
							oinput.value='0';
						}else{
							var result=getResult();
							oinput.value=result;
						}
					}
				}
			});
		}
		init();
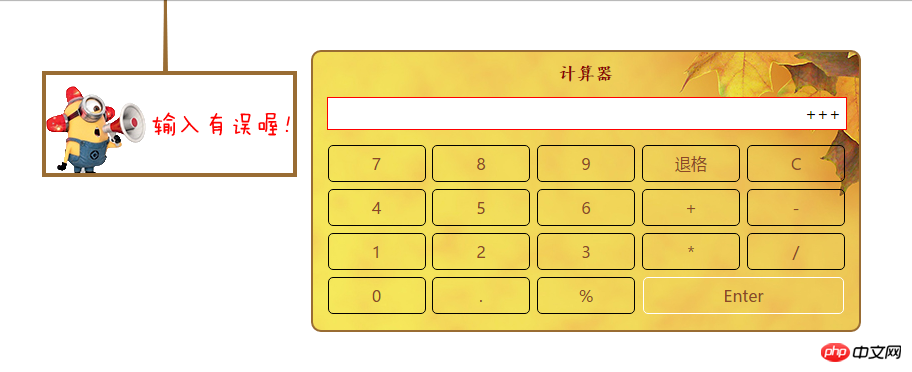
Implementation ideas
1. Use table to draw the entire interface.
I learned from the structures that other people have implemented and found that some of them did not directly write 1, 2, 3 or backspace in td, but instead nested a button. In fact, I still don't quite understand why this is done. I just feel that it has some effect during typesetting: because margin has no effect on td, padding can only be set.2. Use the eval function to calculate the final result and catch the exception
function getResult(){
   function evalResult(){
    var result=eval(oinput.value);
    return result;
   }
   //捕获异常
   try{
    var x=evalResult();
    return x;
   }
   catch (e){
    oinput.className='showError';
    var errorHint=document.getElementById('errorHint');
    move(errorHint,'top',0);
    setTimeout(function(){
     oinput.className='';
     move(errorHint,'top',-282);
    },2000);
    return oinput.value;
   }
}The eval() function evaluates a string and executes the JavaScript code in it.Getting the final result is easy with this function. My idea is to not intervene when the user enters the formula to be calculated. The final calculation obtains the value from the input input box, then passes the value as a parameter to eval, and uses try catch (exception) to capture and Handle exceptions.
3. Bind events through the event proxy
Because each button needs a click event, if you bind them one by one, the code will be very inconsistent. Simple and very inefficient. At this time, you can consider using an event proxy. Due to the principle of event bubbling, we can bind the click event to the table, and then make different reactions and call different functions by judging the specific object where the event occurred.4. Other effects
You can add other effects according to your own design ideas. I mainly added an error prompt animation: if the eval functionthrows an exception , then slowly slide down a picture from above, and set the stay time through setTimeout.
5. Pay attention to details
When setting the enter key press to obtain the result, the keydown event object should be the entire table, and the default behavior of the enter key should be preventedYou need to write a compatibility function when getting the element style, because obj.style.attr can only get the interline style. To get the external style, you need to use getComputedStyle(obj,false)[attr] or IE-compatible obj.currentStyle[attr ].
How to use routing guards in Angular routing
How to implement login in react-router routing with React Verification Control
The above is the detailed content of Detailed explanation of steps to implement calculator in JS. For more information, please follow other related articles on the PHP Chinese website!

Hot AI Tools

Undresser.AI Undress
AI-powered app for creating realistic nude photos

AI Clothes Remover
Online AI tool for removing clothes from photos.

Undress AI Tool
Undress images for free

Clothoff.io
AI clothes remover

AI Hentai Generator
Generate AI Hentai for free.

Hot Article
Hot Tools

Notepad++7.3.1
Easy-to-use and free code editor

SublimeText3 Chinese version
Chinese version, very easy to use

Zend Studio 13.0.1
Powerful PHP integrated development environment

Dreamweaver CS6
Visual web development tools

SublimeText3 Mac version
God-level code editing software (SublimeText3)
Hot Topics
 1376
1376
 52
52

 Detailed explanation of obtaining administrator rights in Win11
Mar 08, 2024 pm 03:06 PM
Detailed explanation of obtaining administrator rights in Win11
Mar 08, 2024 pm 03:06 PM
Windows operating system is one of the most popular operating systems in the world, and its new version Win11 has attracted much attention. In the Win11 system, obtaining administrator rights is an important operation. Administrator rights allow users to perform more operations and settings on the system. This article will introduce in detail how to obtain administrator permissions in Win11 system and how to effectively manage permissions. In the Win11 system, administrator rights are divided into two types: local administrator and domain administrator. A local administrator has full administrative rights to the local computer
 Detailed explanation of division operation in Oracle SQL
Mar 10, 2024 am 09:51 AM
Detailed explanation of division operation in Oracle SQL
Mar 10, 2024 am 09:51 AM
Detailed explanation of division operation in OracleSQL In OracleSQL, division operation is a common and important mathematical operation, used to calculate the result of dividing two numbers. Division is often used in database queries, so understanding the division operation and its usage in OracleSQL is one of the essential skills for database developers. This article will discuss the relevant knowledge of division operations in OracleSQL in detail and provide specific code examples for readers' reference. 1. Division operation in OracleSQL
 Detailed explanation of the role and usage of PHP modulo operator
Mar 19, 2024 pm 04:33 PM
Detailed explanation of the role and usage of PHP modulo operator
Mar 19, 2024 pm 04:33 PM
The modulo operator (%) in PHP is used to obtain the remainder of the division of two numbers. In this article, we will discuss the role and usage of the modulo operator in detail, and provide specific code examples to help readers better understand. 1. The role of the modulo operator In mathematics, when we divide an integer by another integer, we get a quotient and a remainder. For example, when we divide 10 by 3, the quotient is 3 and the remainder is 1. The modulo operator is used to obtain this remainder. 2. Usage of the modulo operator In PHP, use the % symbol to represent the modulus
 An efficient Fibonacci sequence calculator written in PHP
Mar 21, 2024 am 10:06 AM
An efficient Fibonacci sequence calculator written in PHP
Mar 21, 2024 am 10:06 AM
Efficient Fibonacci sequence calculator: PHP implementation of Fibonacci sequence is a very classic mathematical problem. The rule is that each number is equal to the sum of the previous two numbers, that is, F(n)=F(n -1)+F(n-2), where F(0)=0 and F(1)=1. When calculating the Fibonacci sequence, it can be implemented recursively, but performance problems will occur as the value increases. Therefore, this article will introduce how to write an efficient Fibonacci using PHP
 Detailed explanation of the linux system call system() function
Feb 22, 2024 pm 08:21 PM
Detailed explanation of the linux system call system() function
Feb 22, 2024 pm 08:21 PM
Detailed explanation of Linux system call system() function System call is a very important part of the Linux operating system. It provides a way to interact with the system kernel. Among them, the system() function is one of the commonly used system call functions. This article will introduce the use of the system() function in detail and provide corresponding code examples. Basic Concepts of System Calls System calls are a way for user programs to interact with the operating system kernel. User programs request the operating system by calling system call functions
 Detailed explanation of Linux curl command
Feb 21, 2024 pm 10:33 PM
Detailed explanation of Linux curl command
Feb 21, 2024 pm 10:33 PM
Detailed explanation of Linux's curl command Summary: curl is a powerful command line tool used for data communication with the server. This article will introduce the basic usage of the curl command and provide actual code examples to help readers better understand and apply the command. 1. What is curl? curl is a command line tool used to send and receive various network requests. It supports multiple protocols, such as HTTP, FTP, TELNET, etc., and provides rich functions, such as file upload, file download, data transmission, proxy
 Simple JavaScript Tutorial: How to Get HTTP Status Code
Jan 05, 2024 pm 06:08 PM
Simple JavaScript Tutorial: How to Get HTTP Status Code
Jan 05, 2024 pm 06:08 PM
JavaScript tutorial: How to get HTTP status code, specific code examples are required. Preface: In web development, data interaction with the server is often involved. When communicating with the server, we often need to obtain the returned HTTP status code to determine whether the operation is successful, and perform corresponding processing based on different status codes. This article will teach you how to use JavaScript to obtain HTTP status codes and provide some practical code examples. Using XMLHttpRequest
 Detailed analysis of C language learning route
Feb 18, 2024 am 10:38 AM
Detailed analysis of C language learning route
Feb 18, 2024 am 10:38 AM
As a programming language widely used in the field of software development, C language is the first choice for many beginner programmers. Learning C language can not only help us establish the basic knowledge of programming, but also improve our problem-solving and thinking abilities. This article will introduce in detail a C language learning roadmap to help beginners better plan their learning process. 1. Learn basic grammar Before starting to learn C language, we first need to understand the basic grammar rules of C language. This includes variables and data types, operators, control statements (such as if statements,
