

How to operate vue to export the table in v-for
This time I will show you how to operate vue to export the table in v-for , what are the precautions when operating vue to export the table in v-for, the following is the actual combat Let’s take a look at the case.
1. NeedinstallationThe following dependencies
 npm install -S file-saver xlsx
 npm install -D script-loader
2. Create a new file in the project Folder: (vendor---name as you like)
Place two files Blob.js and Export2Excel.js in it.
3. In the .vue file
Write these two methods: list is the content of the table
//export2Excel是你点击导出所绑定的方法名
    export2Excel() {
      require.ensure([], () => {
        const { export_json_to_excel } = require('../../vendor/Export2Excel');//其中自己的路径也要注意下
        const tHeader = ['序号', 'IMSI', 'MSISDN', '证件号码', '姓名'];//表格的头的名称
        const filterVal = ['ID', 'imsi', 'msisdn', 'address', 'name'];//对应的内容的名字,一定要一 一 对应
        const list = this.tableData;//tableData是你表单所绑定的数据名称,一定要对应
        const data = this.formatJson(filterVal, list);
        export_json_to_excel(tHeader, data, '列表excel');//列表excel这个是导出以后表格的名称,根据需要自行更改
      })
    },
    formatJson(filterVal, jsonData) {
      return jsonData.map(v => filterVal.map(j => v[j]))
}I believe you have mastered the method after reading the case in this article. For more exciting information, please pay attention to other related articles on the PHP Chinese website!
Recommended reading:
How to use Vue to implement tree view data
What are the methods for JS to implement DOM tree traversal?
The above is the detailed content of How to operate vue to export the table in v-for. For more information, please follow other related articles on the PHP Chinese website!

Hot AI Tools

Undresser.AI Undress
AI-powered app for creating realistic nude photos

AI Clothes Remover
Online AI tool for removing clothes from photos.

Undress AI Tool
Undress images for free

Clothoff.io
AI clothes remover

AI Hentai Generator
Generate AI Hentai for free.

Hot Article
Hot Tools

Notepad++7.3.1
Easy-to-use and free code editor

SublimeText3 Chinese version
Chinese version, very easy to use

Zend Studio 13.0.1
Powerful PHP integrated development environment

Dreamweaver CS6
Visual web development tools

SublimeText3 Mac version
God-level code editing software (SublimeText3)
Hot Topics
 1377
1377
 52
52

 Steps to adjust the format of pictures inserted in PPT tables
Mar 26, 2024 pm 04:16 PM
Steps to adjust the format of pictures inserted in PPT tables
Mar 26, 2024 pm 04:16 PM
1. Create a new PPT file and name it [PPT Tips] as an example. 2. Double-click [PPT Tips] to open the PPT file. 3. Insert a table with two rows and two columns as an example. 4. Double-click on the border of the table, and the [Design] option will appear on the upper toolbar. 5. Click the [Shading] option and click [Picture]. 6. Click [Picture] to pop up the fill options dialog box with the picture as the background. 7. Find the tray you want to insert in the directory and click OK to insert the picture. 8. Right-click on the table box to bring up the settings dialog box. 9. Click [Format Cells] and check [Tile images as shading]. 10. Set [Center], [Mirror] and other functions you need, and click OK. Note: The default is for pictures to be filled in the table
 How to make a table for sales forecast
Mar 20, 2024 pm 03:06 PM
How to make a table for sales forecast
Mar 20, 2024 pm 03:06 PM
Being able to skillfully make forms is not only a necessary skill for accounting, human resources, and finance. For many sales staff, learning to make forms is also very important. Because the data related to sales is very large and complex, and it cannot be simply recorded in a document to explain the problem. In order to enable more sales staff to be proficient in using Excel to make tables, the editor will introduce the table making issues about sales forecasting. Friends in need should not miss it! 1. Open [Sales Forecast and Target Setting], xlsm, to analyze the data stored in each table. 2. Create a new [Blank Worksheet], select [Cell], and enter [Label Information]. [Drag] downward and [Fill] the month. Enter [Other] data and click [
 How to use JavaScript to implement drag-and-drop adjustment of table column width?
Oct 21, 2023 am 08:14 AM
How to use JavaScript to implement drag-and-drop adjustment of table column width?
Oct 21, 2023 am 08:14 AM
How to use JavaScript to realize the drag-and-drop adjustment function of table column width? With the development of Web technology, more and more data are displayed on web pages in the form of tables. However, sometimes the column width of the table cannot meet our needs, and the content may overflow or the width may be insufficient. In order to solve this problem, we can use JavaScript to implement the drag-and-drop adjustment function of the column width of the table, so that users can freely adjust the column width according to their needs. To realize the drag-and-drop adjustment function of table column width, the following three main points are required:
 How to set WPS value to automatically change color according to conditions_Steps to set WPS table value to automatically change color according to condition
Mar 27, 2024 pm 07:30 PM
How to set WPS value to automatically change color according to conditions_Steps to set WPS table value to automatically change color according to condition
Mar 27, 2024 pm 07:30 PM
1. Open the worksheet and find the [Start]-[Conditional Formatting] button. 2. Click Column Selection and select the column to which conditional formatting will be added. 3. Click the [Conditional Formatting] button to bring up the option menu. 4. Select [Highlight conditional rules]-[Between]. 5. Fill in the rules: 20, 24, dark green text with dark fill color. 6. After confirmation, the data in the selected column will be colored with corresponding numbers, text, and cell boxes according to the settings. 7. Conditional rules without conflicts can be added repeatedly, but for conflicting rules WPS will replace the previously established conditional rules with the last added rule. 8. Repeatedly add the cell columns after [Between] rules 20-24 and [Less than] 20. 9. If you need to change the rules, you can just clear the rules and then reset the rules.
 How to get Douyin private message emoticons on WeChat? How to export the private message emoticon package?
Mar 21, 2024 pm 10:01 PM
How to get Douyin private message emoticons on WeChat? How to export the private message emoticon package?
Mar 21, 2024 pm 10:01 PM
With the continuous rise of social media, Douyin, as a popular short video platform, has attracted a large number of users. On Douyin, users can not only show their lives but also interact with other users. In this interaction, emoticons have gradually become an important way for users to express their emotions. 1. How to get Douyin private message emoticons on WeChat? First of all, to get private message emoticons on the Douyin platform, you need to log in to your Douyin account, then browse and select the emoticons you like. You can choose to send them to friends or collect them yourself. After receiving the emoticon package on Douyin, you can long press the emoticon package through the private message interface, and then select the "Add to Emoticon" function. In this way, you can add this emoticon package to Douyin’s emoticon library. 3. Next, we need to add the words in the Douyin emoticon library
 Exporting songs downloaded from QQ Music as mp3 on mac only requires two steps
Jan 05, 2024 pm 07:10 PM
Exporting songs downloaded from QQ Music as mp3 on mac only requires two steps
Jan 05, 2024 pm 07:10 PM
Listening to music is a very common thing, I believe many friends will do it no matter where they are. What software do you usually use to listen to music? Do you use QQ Music like me? I currently use QQ Music to listen to songs, and it can be used not only on mobile phones, but also on Mac computers. In addition to listening to songs online, we can also download our favorite songs from QQ Music to the computer. However, the songs downloaded from QQ Music for Mac are not in the format we need. What we need is music in MP3 format. So how to export the songs downloaded from QQ Music for Mac to MP3 format? How to export and convert songs downloaded from QQ Music for Mac to MP3 format? If you want to export and convert songs downloaded from QQ Music for Mac to MP
 Do you know how to sum a Word table?
Mar 21, 2024 pm 01:10 PM
Do you know how to sum a Word table?
Mar 21, 2024 pm 01:10 PM
Sometimes, we often encounter counting problems in Word tables. Generally, when encountering such problems, most students will copy the Word table to Excel for calculation; some students will silently pick up the calculator. Calculate. Is there a quick way to calculate it? Of course there is, in fact the sum can also be calculated in Word. So, do you know how to do it? Today, let’s take a look together! Without further ado, friends in need should quickly collect it! Step details: 1. First, we open the Word software on the computer and open the document that needs to be processed. (As shown in the picture) 2. Next, we position the cursor on the cell where the summed value is located (as shown in the picture); then, we click [Menu Bar
 How to export xmind files to pdf files
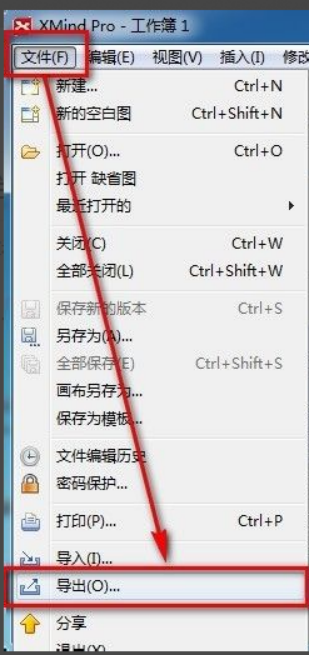
Mar 20, 2024 am 10:30 AM
How to export xmind files to pdf files
Mar 20, 2024 am 10:30 AM
xmind is a very practical mind mapping software. It is a map form made using people's thinking and inspiration. After we create the xmind file, we usually convert it into a pdf file format to facilitate everyone's dissemination and use. Then How to export xmind files to pdf files? Below are the specific steps for your reference. 1. First, let’s demonstrate how to export the mind map to a PDF document. Select the [File]-[Export] function button. 2. Select [PDF document] in the newly appeared interface and click the [Next] button. 3. Select settings in the export interface: paper size, orientation, resolution and document storage location. After completing the settings, click the [Finish] button. 4. If you click the [Finish] button
