

An in-depth explanation of the basic principles of webpack modules
This article mainly introduces the principle of webpack organization module. Now I will share it with you and give you a reference.
Nowadays, it is mainstream to use Webpack to package JS and other files on the front end. Coupled with the popularity of Node, the front-end engineering method is becoming more and more similar to the back-end. Everything is modularized and compiled together in the end. Due to the constant updates of Webpack versions and various complicated configuration options, some mysterious errors occur during use, which often makes people confused. Therefore, it is very beneficial to understand how Webpack organizes compiled modules and how the generated code is executed, otherwise it will always be a black box. Of course, I am a front-end novice, and I have just started to study the principles of Webpack recently, so I will make some notes here.
Compilation module
The word "compile" sounds like a very black technology, and the generated code is often a bunch of incomprehensible things, so it is often It’s daunting, but the core principles are actually not difficult at all. The so-called compilation of Webpack is actually just that Webpack analyzes your source code, makes certain modifications to it, and then organizes all the source code into one file. Finally, a large bundle JS file is generated, which is executed by the browser or other Javascript engine and returns the result.
Here is a simple case to illustrate the principle of Webpack packaging module. For example, we have a module mA.js
var aa = 1;

function getDate() {
 return new Date();
}

module.exports = {
 aa: aa,
 getDate: getDate
}. I casually defined a variable aa and a function getDate, and then exported them. This is written in CommonJS.
Then define an app.js as the main file, still in the CommonJS style:
var mA = require('./mA.js');

console.log('mA.aa =' + mA.aa);
mA.getDate();
Now we have two modules, packaged using Webpack, the entry file is app.js, Dependent on the module mA.js, Webpack has to do several things:
Start from the entry module app.js, analyze the dependencies of all modules, and read all used modules Come in.
The source code of each module will be organized in a function that is executed immediately.
Rewrite the syntax related to require and export in the module code, as well as their corresponding reference variables.
Establish a module management system in the finally generated bundle file, which can dynamically load the used modules at runtime.
We can take a look at the above example, the result of Webpack packaging. The final bundle file is generally a large function that is executed immediately. The organizational level is relatively complex, and the large number of names are relatively obscure, so I have made some rewrites and modifications here to make it as simple and easy to understand as possible.
First, list all the modules used, and use their file names (usually full paths) as IDs to create a table:
var modules = {
 './mA.js': generated_mA,
 './app.js': generated_app
}The key is that the generated_xxx above is What? It is a function that wraps the source code of each module in it, making it a local scope, so that internal variables are not exposed, and actually turns each module into an execution function. Its definition is generally like this:
function generated_module(module, exports, webpack_require) {
  // 模块的具体代码。
  // ...
}The specific code of the module here refers to the generated code, which Webpack calls generated code. For example, mA, after rewriting, the result is:
function generated_mA(module, exports, webpack_require) {
 var aa = 1;

 function getDate() {
  return new Date();
 }

 module.exports = {
  aa: aa,
  getDate: getDate
 }
}At first glance, it seems to be exactly the same as the source code. Indeed, mA does not require or import other modules, and export also uses the traditional CommonJS style, so there is no change in the generated code. However, it is worth noting that the last module.exports = ..., the module here is the parameter module passed in from the outside, which actually tells us that when this function is run, the source code of module mA will be executed, and finally The content that needs to be exported will be saved externally. This marks the completion of mA loading, and the external thing is actually the module management system to be discussed later.
Next, look at the generated code of app.js:
function generated_app(module, exports, webpack_require) {
 var mA_imported_module = webpack_require('./mA.js');

 console.log('mA.aa =' + mA_imported_module['aa']);
 mA_imported_module['getDate']();
}You can see that the source code of app.js has been modified regarding the imported module mA, because neither require/ Exports, or ES6-style import/export, cannot be directly executed by the JavaScript interpreter. It needs to rely on the module management system to concretize these abstract keywords. In other words, webpack_require is the specific implementation of require, which can dynamically load module mA and return the result to the app.
At this point you may have gradually built the idea of a module management system in your mind. Let’s take a look at the implementation of webpack_require:
// 加载完毕的所有模块。
var installedModules = {};

function webpack_require(moduleId) {
 // 如果模块已经加载过了,直接从Cache中读取。
 if (installedModules[moduleId]) {
  return installedModules[moduleId].exports;
 }

 // 创建新模块并添加到installedModules。
 var module = installedModules[moduleId] = {
  id: moduleId,
  exports: {}
 };

 // 加载模块,即运行模块的生成代码,
 modules[moduleId].call(
  module.exports, module, module.exports, webpack_require);

 return module.exports;
}Note that the modules in the penultimate sentence are us The generated code of all previously defined modules:
var modules = {
 './mA.js': generated_mA,
 './app.js': generated_app
}The logic of webpack_require is very clearly written. First, check whether the module has been loaded. If so, return the exports result of the module directly from the Cache. If it is a brand new module, then create the corresponding data structure module and run the generated code of this module. What this function passes in is the module object we created and its exports field. This is actually the exports and exports fields in CommonJS. The origin of module. After running this function, the module is loaded and the results that need to be exported are saved in the module object.
所以我们看到所谓的模块管理系统,原理其实非常简单,只要耐心将它们抽丝剥茧理清楚了,根本没有什么深奥的东西,就是由这三个部分组成:
// 所有模块的生成代码
var modules;
// 所有已经加载的模块,作为缓存表
var installedModules;
// 加载模块的函数
function webpack_require(moduleId);
当然以上一切代码,在整个编译后的bundle文件中,都被包在一个大的立即执行的匿名函数中,最后返回的就是这么一句话:
return webpack_require(‘./app.js');
即加载入口模块app.js,后面所有的依赖都会动态地、递归地在runtime加载。当然Webpack真正生成的代码略有不同,它在结构上大致是这样:
(function(modules) {
 var installedModules = {};

 function webpack_require(moduleId) {
   // ...
 }

 return webpack_require('./app.js');
}) ({
 './mA.js': generated_mA,
 './app.js': generated_app
});可以看到它是直接把modules作为立即执行函数的参数传进去的而不是另外定义的,当然这和上面的写法没什么本质不同,我做这样的改写是为了解释起来更清楚。
ES6的import和export
以上的例子里都是用传统的CommonJS的写法,现在更通用的ES6风格是用import和export关键词,在使用上也略有一些不同。不过对于Webpack或者其它模块管理系统而言,这些新特性应该只被视为语法糖,它们本质上还是和require/exports一样的,例如export:
export aa
// 等价于:
module.exports['aa'] = aa

export default bb
// 等价于:
module.exports['default'] = bb
而对于import:
import {aa} from './mA.js'
// 等价于
var aa = require('./mA.js')['aa']比较特殊的是这样的:
import m from './m.js'
情况会稍微复杂一点,它需要载入模块m的default export,而模块m可能并非是由ES6的export来写的,也可能根本没有export default,所以Webpack在为模块生成generated code的时候,会判断它是不是ES6风格的export,例如我们定义模块mB.js:
let x = 3;

let printX = () => {
 console.log('x = ' + x);
}

export {printX}
export default x它使用了ES6的export,那么Webpack在mB的generated code就会加上一句话:
function generated_mB(module, exports, webpack_require) {
 Object.defineProperty(module.exports, '__esModule', {value: true});
 // mB的具体代码
 // ....
}也就是说,它给mB的export标注了一个__esModule,说明它是ES6风格的export。这样在其它模块中,当一个依赖模块以类似import m from './m.js'这样的方式加载时,会首先判断得到的是不是一个ES6 export出来的模块。如果是,则返回它的default,如果不是,则返回整个export对象。例如上面的mA是传统CommonJS的,mB是ES6风格的:
// mA is CommonJS module
import mA from './mA.js'
console.log(mA);

// mB is ES6 module
import mB from './mB.js'
console.log(mB);
我们定义get_export_default函数:
function get_export_default(module) {
 return module && module.__esModule? module['default'] : module;
}这样generated code运行后在mA和mB上会得到不同的结果:
var mA_imported_module = webpack_require('./mA.js');
// 打印完整的 mA_imported_module
console.log(get_export_default(mA_imported_module));

var mB_imported_module = webpack_require('./mB.js');
// 打印 mB_imported_module['default']
console.log(get_export_default(mB_imported_module));
这就是在ES6的import上,Webpack需要做一些特殊处理的地方。不过总体而言,ES6的import/export在本质上和CommonJS没有区别,而且Webpack最后生成的generated code也还是基于CommonJS的module/exports这一套机制来实现模块的加载的。
模块管理系统
以上就是Webpack如何打包组织模块,实现runtime模块加载的解读,其实它的原理并不难,核心的思想就是建立模块的管理系统,而这样的做法也是具有普遍性的,如果你读过Node.js的Module部分的源代码,就会发现其实用的是类似的方法。这里有一篇文章可以参考。
上面是我整理给大家的,希望今后会对大家有帮助。
相关文章:
The above is the detailed content of An in-depth explanation of the basic principles of webpack modules. For more information, please follow other related articles on the PHP Chinese website!

Hot AI Tools

Undresser.AI Undress
AI-powered app for creating realistic nude photos

AI Clothes Remover
Online AI tool for removing clothes from photos.

Undress AI Tool
Undress images for free

Clothoff.io
AI clothes remover

AI Hentai Generator
Generate AI Hentai for free.

Hot Article
Hot Tools

Notepad++7.3.1
Easy-to-use and free code editor

SublimeText3 Chinese version
Chinese version, very easy to use

Zend Studio 13.0.1
Powerful PHP integrated development environment

Dreamweaver CS6
Visual web development tools

SublimeText3 Mac version
God-level code editing software (SublimeText3)
Hot Topics
 1377
1377
 52
52

 VUE3 Getting Started Tutorial: Packaging and Building with Webpack
Jun 15, 2023 pm 06:17 PM
VUE3 Getting Started Tutorial: Packaging and Building with Webpack
Jun 15, 2023 pm 06:17 PM
Vue is an excellent JavaScript framework that can help us quickly build interactive and efficient web applications. Vue3 is the latest version of Vue, which introduces many new features and functionality. Webpack is currently one of the most popular JavaScript module packagers and build tools, which can help us manage various resources in our projects. This article will introduce how to use Webpack to package and build Vue3 applications. 1. Install Webpack
 Using Jetty7 for Web server processing in Java API development
Jun 18, 2023 am 10:42 AM
Using Jetty7 for Web server processing in Java API development
Jun 18, 2023 am 10:42 AM
Using Jetty7 for Web Server Processing in JavaAPI Development With the development of the Internet, the Web server has become the core part of application development and is also the focus of many enterprises. In order to meet the growing business needs, many developers choose to use Jetty for web server development, and its flexibility and scalability are widely recognized. This article will introduce how to use Jetty7 in JavaAPI development for We
 Real-time protection against face-blocking barrages on the web (based on machine learning)
Jun 10, 2023 pm 01:03 PM
Real-time protection against face-blocking barrages on the web (based on machine learning)
Jun 10, 2023 pm 01:03 PM
Face-blocking barrage means that a large number of barrages float by without blocking the person in the video, making it look like they are floating from behind the person. Machine learning has been popular for several years, but many people don’t know that these capabilities can also be run in browsers. This article introduces the practical optimization process in video barrages. At the end of the article, it lists some applicable scenarios for this solution, hoping to open it up. Some ideas. mediapipeDemo (https://google.github.io/mediapipe/) demonstrates the mainstream implementation principle of face-blocking barrage on-demand up upload. The server background calculation extracts the portrait area in the video screen, and converts it into svg storage while the client plays the video. Download svg from the server and combine it with barrage, portrait
 How to implement form validation for web applications using Golang
Jun 24, 2023 am 09:08 AM
How to implement form validation for web applications using Golang
Jun 24, 2023 am 09:08 AM
Form validation is a very important link in web application development. It can check the validity of the data before submitting the form data to avoid security vulnerabilities and data errors in the application. Form validation for web applications can be easily implemented using Golang. This article will introduce how to use Golang to implement form validation for web applications. 1. Basic elements of form validation Before introducing how to implement form validation, we need to know what the basic elements of form validation are. Form elements: form elements are
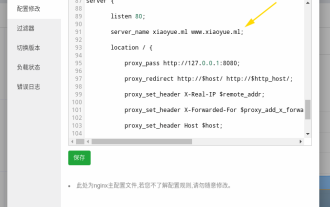 How to configure nginx to ensure that the frps server and web share port 80
Jun 03, 2023 am 08:19 AM
How to configure nginx to ensure that the frps server and web share port 80
Jun 03, 2023 am 08:19 AM
First of all, you will have a doubt, what is frp? Simply put, frp is an intranet penetration tool. After configuring the client, you can access the intranet through the server. Now my server has used nginx as the website, and there is only one port 80. So what should I do if the FRP server also wants to use port 80? After querying, this can be achieved by using nginx's reverse proxy. To add: frps is the server, frpc is the client. Step 1: Modify the nginx.conf configuration file in the server and add the following parameters to http{} in nginx.conf, server{listen80
 How to enable administrative access from the cockpit web UI
Mar 20, 2024 pm 06:56 PM
How to enable administrative access from the cockpit web UI
Mar 20, 2024 pm 06:56 PM
Cockpit is a web-based graphical interface for Linux servers. It is mainly intended to make managing Linux servers easier for new/expert users. In this article, we will discuss Cockpit access modes and how to switch administrative access to Cockpit from CockpitWebUI. Content Topics: Cockpit Entry Modes Finding the Current Cockpit Access Mode Enable Administrative Access for Cockpit from CockpitWebUI Disabling Administrative Access for Cockpit from CockpitWebUI Conclusion Cockpit Entry Modes The cockpit has two access modes: Restricted Access: This is the default for the cockpit access mode. In this access mode you cannot access the web user from the cockpit
 What are web standards?
Oct 18, 2023 pm 05:24 PM
What are web standards?
Oct 18, 2023 pm 05:24 PM
Web standards are a set of specifications and guidelines developed by W3C and other related organizations. It includes standardization of HTML, CSS, JavaScript, DOM, Web accessibility and performance optimization. By following these standards, the compatibility of pages can be improved. , accessibility, maintainability and performance. The goal of web standards is to enable web content to be displayed and interacted consistently on different platforms, browsers and devices, providing better user experience and development efficiency.
 Is PHP front-end or back-end in web development?
Mar 24, 2024 pm 02:18 PM
Is PHP front-end or back-end in web development?
Mar 24, 2024 pm 02:18 PM
PHP belongs to the backend in web development. PHP is a server-side scripting language, mainly used to process server-side logic and generate dynamic web content. Compared with front-end technology, PHP is more used for back-end operations such as interacting with databases, processing user requests, and generating page content. Next, specific code examples will be used to illustrate the application of PHP in back-end development. First, let's look at a simple PHP code example for connecting to a database and querying data:
