
 Web Front-end
JS Tutorial
Installation tutorial for using vue and element components (detailed tutorial)
Web Front-end
JS Tutorial
Installation tutorial for using vue and element components (detailed tutorial)
Installation tutorial for using vue and element components (detailed tutorial)
Below I will share with you an article on the installation of vue and the installation of element components. It has a good reference value and I hope it will be helpful to everyone.
1. Create a new vue project
1. First, you need to download nodejs. After installation, open the command window and use the npm package management tool
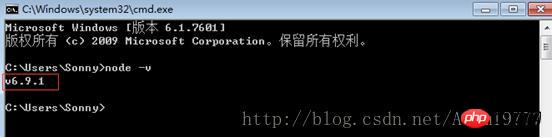
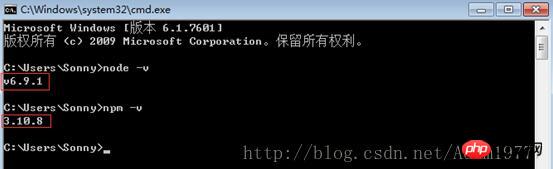
npm is integrated in node, so directly enter npm-v to view the version information of npm
2. npm has some resources Being blocked or due to foreign resources often results in failure when installing dependent packages using npm, so I also need npm's domestic mirror ---cnpm.
3. Enter npm install -g cnpm--registry=http://registry.npm.taobao.org in the command line and wait for the installation to complete. You can use cnpm to install dependency packages. Let’s talk about it here. It is best to use npm to install. Sometimes cnpm's dependencies are not fully downloaded. If npm downloads slowly, you can try cnpm to install dependency packages.
4. Install the vue-cli scaffolding building tool. Run the command npm install -g vue-cli on the command line and wait for the installation to complete.
5. Build the project with vue-cli. Select a directory to store the new project

#6. In the desktop directory, run the command vue init webpack firstVue on the command line. Explain this command. This command means to initialize a project, where webpack is the build tool, that is, the entire project is based on webpack. where firstVue is the name of the entire project folder.
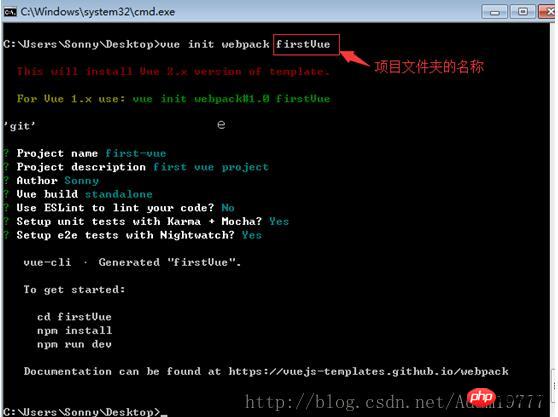
7. When running the initialization command, the user will be asked to enter several basic options, such as project name, description, author and other information. If you do not want to fill in the fields, just press Enter and default. good.
8. Open the firstVue folder. The project file is as follows.

9. Install the dependency package (remember it must be in the newly created project folder), use the npm install command
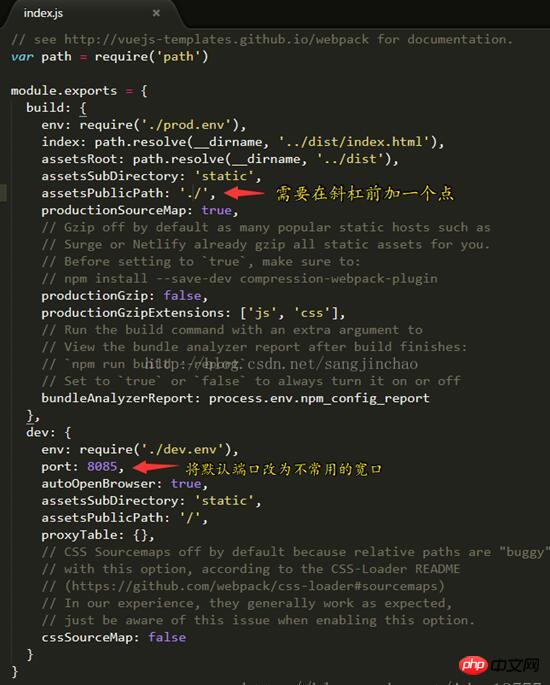
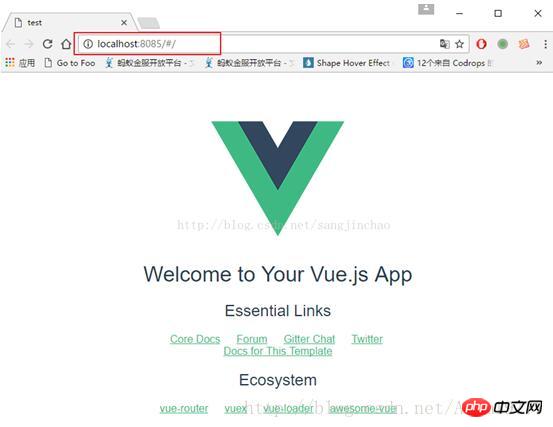
10. Install the dependency After that, run the project and implement it through npm run dev. Generally, the default is port 8080. Open the browser and enter localhost:8080

 # displays like this:
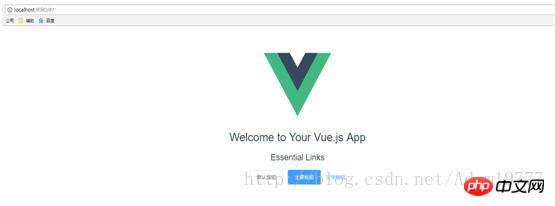
2. The following introduces Element
1. In the current directory, run: npm i element-ui -S2. Add the code (red)
// The Vue build version to load with the `import` command
// (runtime-only or standalone) has been set in webpack.base.conf with an alias.
import Vue from 'vue'
import App from './App'
import router from './router'
import ElementUI from 'element-ui' //手动变红
import '../node_modules/element-ui/lib/theme-chalk/index.css' //手动变红
//具体路径有的不同,vue运行报错请看第五点
Vue.config.productionTip = false
/* eslint-disable no-new */
Vue.use(ElementUI) //手动变红
new Vue({
el: '#app',
router,
template: '<App/>',
components: { App }
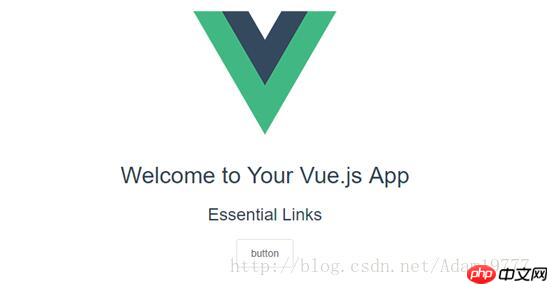
})<template>
<p class="hello">
<h1>{{ msg }}</h1>
<h2>Essential Links</h2>
<el-button>默认按钮</el-button>
<el-button type="primary">主要按钮</el-button>
<el-button type="text">文字按钮</el-button>
</p>
</template>
<script>
export default {
name: 'hello',
data () {
return {
msg: 'Welcome to Your Vue.js App'
}
}
}
</script>
<!-- Add "scoped" attribute to limit CSS to this component only -->
<style scoped>
h1, h2 {
font-weight: normal;
}
ul {
list-style-type: none;
padding: 0;
}
li {
display: inline-block;
margin: 0 10px;
}
a {
color: #42b983;
}
</style>
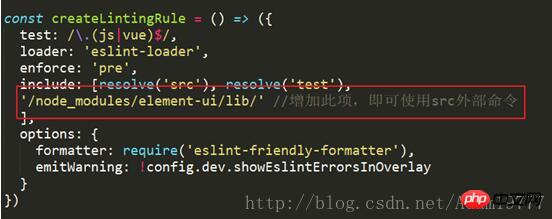
 5. The above (3) will sometimes report an error. First, check whether the index.css path of element-ui is correct. Second, because the error will show that the file cannot be found, you need to build Add a piece of code to the /webpack.base.conf.js file as follows.
 The above is what I compiled for you. I hope it will be helpful to everyone in the future.
Related articles:
Angular study notes: examples of integrating third-party UI frameworks and controlsNode.js implementation registration Example of how to activate the email functionDetailed explanation of Webpack’s babel-loader file preprocessorThe above is the detailed content of Installation tutorial for using vue and element components (detailed tutorial). For more information, please follow other related articles on the PHP Chinese website!

Hot AI Tools

Undresser.AI Undress
AI-powered app for creating realistic nude photos

AI Clothes Remover
Online AI tool for removing clothes from photos.

Undress AI Tool
Undress images for free

Clothoff.io
AI clothes remover

AI Hentai Generator
Generate AI Hentai for free.

Hot Article
Hot Tools

Notepad++7.3.1
Easy-to-use and free code editor

SublimeText3 Chinese version
Chinese version, very easy to use

Zend Studio 13.0.1
Powerful PHP integrated development environment

Dreamweaver CS6
Visual web development tools

SublimeText3 Mac version
God-level code editing software (SublimeText3)
Hot Topics
 1376
1376
 52
52

 Tutorial on how to use Dewu
Mar 21, 2024 pm 01:40 PM
Tutorial on how to use Dewu
Mar 21, 2024 pm 01:40 PM
Dewu APP is currently a very popular brand shopping software, but most users do not know how to use the functions in Dewu APP. The most detailed usage tutorial guide is compiled below. Next is the Dewuduo that the editor brings to users. A summary of function usage tutorials. Interested users can come and take a look! Tutorial on how to use Dewu [2024-03-20] How to use Dewu installment purchase [2024-03-20] How to obtain Dewu coupons [2024-03-20] How to find Dewu manual customer service [2024-03-20] How to check the pickup code of Dewu [2024-03-20] Where to find Dewu purchase [2024-03-20] How to open Dewu VIP [2024-03-20] How to apply for return or exchange of Dewu
 How to install Android apps on Linux?
Mar 19, 2024 am 11:15 AM
How to install Android apps on Linux?
Mar 19, 2024 am 11:15 AM
Installing Android applications on Linux has always been a concern for many users. Especially for Linux users who like to use Android applications, it is very important to master how to install Android applications on Linux systems. Although running Android applications directly on Linux is not as simple as on the Android platform, by using emulators or third-party tools, we can still happily enjoy Android applications on Linux. The following will introduce how to install Android applications on Linux systems.
 In summer, you must try shooting a rainbow
Jul 21, 2024 pm 05:16 PM
In summer, you must try shooting a rainbow
Jul 21, 2024 pm 05:16 PM
After rain in summer, you can often see a beautiful and magical special weather scene - rainbow. This is also a rare scene that can be encountered in photography, and it is very photogenic. There are several conditions for a rainbow to appear: first, there are enough water droplets in the air, and second, the sun shines at a low angle. Therefore, it is easiest to see a rainbow in the afternoon after the rain has cleared up. However, the formation of a rainbow is greatly affected by weather, light and other conditions, so it generally only lasts for a short period of time, and the best viewing and shooting time is even shorter. So when you encounter a rainbow, how can you properly record it and photograph it with quality? 1. Look for rainbows. In addition to the conditions mentioned above, rainbows usually appear in the direction of sunlight, that is, if the sun shines from west to east, rainbows are more likely to appear in the east.
 Tutorial on how to turn off the payment sound on WeChat
Mar 26, 2024 am 08:30 AM
Tutorial on how to turn off the payment sound on WeChat
Mar 26, 2024 am 08:30 AM
1. First open WeChat. 2. Click [+] in the upper right corner. 3. Click the QR code to collect payment. 4. Click the three small dots in the upper right corner. 5. Click to close the voice reminder for payment arrival.
 How to install Podman on Ubuntu 24.04
Mar 22, 2024 am 11:26 AM
How to install Podman on Ubuntu 24.04
Mar 22, 2024 am 11:26 AM
If you have used Docker, you must understand daemons, containers, and their functions. A daemon is a service that runs in the background when a container is already in use in any system. Podman is a free management tool for managing and creating containers without relying on any daemon such as Docker. Therefore, it has advantages in managing containers without the need for long-term backend services. Additionally, Podman does not require root-level permissions to be used. This guide discusses in detail how to install Podman on Ubuntu24. To update the system, we first need to update the system and open the Terminal shell of Ubuntu24. During both installation and upgrade processes, we need to use the command line. a simple
 How to Install and Run the Ubuntu Notes App on Ubuntu 24.04
Mar 22, 2024 pm 04:40 PM
How to Install and Run the Ubuntu Notes App on Ubuntu 24.04
Mar 22, 2024 pm 04:40 PM
While studying in high school, some students take very clear and accurate notes, taking more notes than others in the same class. For some, note-taking is a hobby, while for others, it is a necessity when they easily forget small information about anything important. Microsoft's NTFS application is particularly useful for students who wish to save important notes beyond regular lectures. In this article, we will describe the installation of Ubuntu applications on Ubuntu24. Updating the Ubuntu System Before installing the Ubuntu installer, on Ubuntu24 we need to ensure that the newly configured system has been updated. We can use the most famous "a" in Ubuntu system
 What software is photoshopcs5? -photoshopcs5 usage tutorial
Mar 19, 2024 am 09:04 AM
What software is photoshopcs5? -photoshopcs5 usage tutorial
Mar 19, 2024 am 09:04 AM
PhotoshopCS is the abbreviation of Photoshop Creative Suite. It is a software produced by Adobe and is widely used in graphic design and image processing. As a novice learning PS, let me explain to you today what software photoshopcs5 is and how to use photoshopcs5. 1. What software is photoshop cs5? Adobe Photoshop CS5 Extended is ideal for professionals in film, video and multimedia fields, graphic and web designers who use 3D and animation, and professionals in engineering and scientific fields. Render a 3D image and merge it into a 2D composite image. Edit videos easily
 Detailed steps to install Go language on Win7 computer
Mar 27, 2024 pm 02:00 PM
Detailed steps to install Go language on Win7 computer
Mar 27, 2024 pm 02:00 PM
Detailed steps to install Go language on Win7 computer Go (also known as Golang) is an open source programming language developed by Google. It is simple, efficient and has excellent concurrency performance. It is suitable for the development of cloud services, network applications and back-end systems. . Installing the Go language on a Win7 computer allows you to quickly get started with the language and start writing Go programs. The following will introduce in detail the steps to install the Go language on a Win7 computer, and attach specific code examples. Step 1: Download the Go language installation package and visit the Go official website
