
 Web Front-end
JS Tutorial
Detailed explanation of the entire process from purchasing a domain name to deploying a node.js project using pm2
Web Front-end
JS Tutorial
Detailed explanation of the entire process from purchasing a domain name to deploying a node.js project using pm2
Detailed explanation of the entire process from purchasing a domain name to deploying a node.js project using pm2
This article mainly introduces in detail the entire process from purchasing a domain name to deploying a node.js project using pm2. Now I share it with you and give it a reference.
As a front-end, I was confused about how to deploy the written project to the server, but I was still very interested in it and decided to give it a try and just do it.
1. Buy a domain name and server
To deploy a project, you must buy a domain name. This is essential. I found that Tencent Cloud has Free servers are available (only free for 7 days), so I bought a domain name from Tencent Cloud and got a free server from Tencent Cloud. Of course, you will be authenticated by your real name during this period.

Buy a domain name

Get a server
Choose CentOS server in Tencent Cloud, next Perform domain name resolution, and then set up the server (account and password, etc.)

Domain name resolution
2. Deploy Node. js environment
(1) Log in to the server and update it first (update it first when using the server for the first time)
yum update -y
(2) Install node and pm2
wget command downloads the Node.js installation package. The installation package is a compiled file. After decompression, node and npm already exist in the bin folder, so there is no need to recompile.
wget https://nodejs.org/dist/v8.9.3/node-v8.9.3-linux-x64.tar.xz
Unzip the file.
tar xvf node-v8.9.3-linux-x64.tar.xz
Create soft links to make node and npm commands globally valid. By creating soft links, you can directly use node and npm commands in any directory:
ln -s /root/node-v8.9.3-linux-x64/bin/node /usr/local/bin/node
ln -s /root/node-v8.9.3-linux-x64/bin/npm /usr/local/bin/npm
View node and npm versions.
node -v
npm -v
At this point, the Node.js environment has been installed. The software is installed in the /root/node-v8.9.3-linux-x64/ directory by default. If you need to install the software to other directories (such as: /opt/node/), please do the following:
mkdir -p /opt/node/
mv /root/node-v8.9.3-linux-x64/* /opt/node/
rm -f /usr/local/bin/node
rm -f /usr/local/bin/npm
ln -s /opt/node/bin/node /usr/local/bin/node
ln -s /opt/node/bin/npm /usr/local/bin/npm
Install pm2
npm install pm2@latest -g
Create a soft link to make the pm2 command globally valid
ln -s /root/node-v8.9.3-linux-x64/bin/pm2 /usr/local/bin/pm2
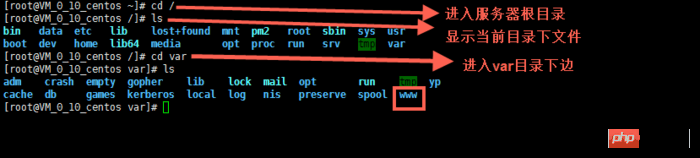
3. Deploy the project to the server using git
First enter the server root directory, display the contents of the root directory folder, and then Go to the var directory, create a www folder under the var directory, display the content under the var folder, then enter the www folder, and follow the commands
cd /
ls
cd var
ls
mkdir www
cd www
last picture
Then git clone the project in your warehouse
First install git and use the following command
yum install git
y
to enter your project

You can see in the picture above that there is a file that is not an express project. It is the configuration file of pm2. The configuration method of pm2 is http://pm2.keymetrics.io/docs/usage/ cluster-mode/
The following is the configuration in my project (newbies, if you have any questions, experts can give advice)
{
 "apps": [
  {
   "name": "app1",
   "script": "bin/www",
   "log_date_format": "YYYY-MM-DD HH:mm:SS",
   "log_file": "logs/app1.log",
   "error_file": "logs/app1-err.log",
   "out_file": "logs/app1-out.log",
   "pid_file": "pids/app1.pid",
   "instances": 1,
   "min_uptime": "200s",
   "max_restarts": 10,
   "max_memory_restart": "1M",
   "cron_restart": "1 0 * * *",
   "watch": false,
   "merge_logs": true,
   "exec_interpreter": "node",
   "exec_mode": "cluster_mode",
   "autorestart": true,
   "vizion": false
  }
 ]
}4. Start the project
pm2 start processes.json
Close the project
先查找ID
pm2 status
然后,停止相应项目的id
pm2 stop id
Start the corresponding project again
先查找ID
pm2 status
然后,开启相应项目的id
pm2 start id
Set pm2 to start automatically after booting
pm2 startup
pm2 save
The reason why you use pm2 to start the project is because you exit like this Server link, node project can still run.
The project has been deployed, but the port in the project can only be port 80. The backend master told me that nginx can be used as a proxy server. And told the installation method.
5. Install nginx and configure nginx
Install nginx
yum install nginx
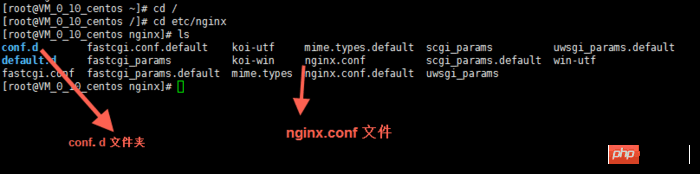
Configure nginx
Enter configuration folder directory, edit the nginx.conf file, or create a new file with the suffix .conf in the conf.d folder
cd /
cd etc/nginx
vim nginx.conf
Come with a picture
The vim editor is used here. You can search for the usage method on the Internet.
Briefly mention a few usage methods, just press the keyboard.
i  编辑
Esc 退出编辑
:q  退出vim编辑器
:wq 保存并退出vim编辑器
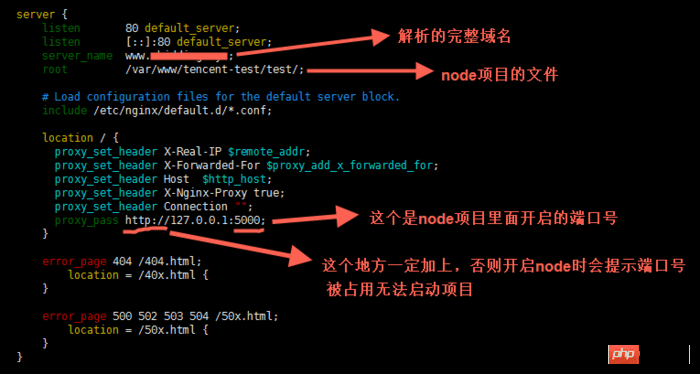
Below is my nginx configuration (newbie , if you have any questions, please let me know)
Start nginx
service nginx start
This way nginx will run.
Every time you modify the nginx configuration, you must restart it. Use the following command
service nginx reload
Set nginx to start automatically after booting
ln -s /bin/systemctl /usr/local/bin/systemcel
systemcel enable nginx
The above is what I compiled for everyone. I hope that in the future It will be helpful to everyone.
Related articles:
Detailed explanation of the four ways of event binding this in react
The above is the detailed content of Detailed explanation of the entire process from purchasing a domain name to deploying a node.js project using pm2. For more information, please follow other related articles on the PHP Chinese website!

Hot AI Tools

Undresser.AI Undress
AI-powered app for creating realistic nude photos

AI Clothes Remover
Online AI tool for removing clothes from photos.

Undress AI Tool
Undress images for free

Clothoff.io
AI clothes remover

Video Face Swap
Swap faces in any video effortlessly with our completely free AI face swap tool!

Hot Article
Hot Tools

Notepad++7.3.1
Easy-to-use and free code editor

SublimeText3 Chinese version
Chinese version, very easy to use

Zend Studio 13.0.1
Powerful PHP integrated development environment

Dreamweaver CS6
Visual web development tools

SublimeText3 Mac version
God-level code editing software (SublimeText3)
Hot Topics
 1390
1390
 52
52

 How to solve the problem of inaccessibility after Tomcat deploys war package
Jan 13, 2024 pm 12:07 PM
How to solve the problem of inaccessibility after Tomcat deploys war package
Jan 13, 2024 pm 12:07 PM
How to solve the problem that Tomcat cannot successfully access the war package after deploying it requires specific code examples. As a widely used Java Web server, Tomcat allows developers to package their own developed Web applications into war files for deployment. However, sometimes we may encounter the problem of being unable to successfully access the war package after deploying it. This may be caused by incorrect configuration or other reasons. In this article, we'll provide some concrete code examples that address this dilemma. 1. Check Tomcat service
 Yolov10: Detailed explanation, deployment and application all in one place!
Jun 07, 2024 pm 12:05 PM
Yolov10: Detailed explanation, deployment and application all in one place!
Jun 07, 2024 pm 12:05 PM
1. Introduction Over the past few years, YOLOs have become the dominant paradigm in the field of real-time object detection due to its effective balance between computational cost and detection performance. Researchers have explored YOLO's architectural design, optimization goals, data expansion strategies, etc., and have made significant progress. At the same time, relying on non-maximum suppression (NMS) for post-processing hinders end-to-end deployment of YOLO and adversely affects inference latency. In YOLOs, the design of various components lacks comprehensive and thorough inspection, resulting in significant computational redundancy and limiting the capabilities of the model. It offers suboptimal efficiency, and relatively large potential for performance improvement. In this work, the goal is to further improve the performance efficiency boundary of YOLO from both post-processing and model architecture. to this end
 Gunicorn Deployment Guide for Flask Applications
Jan 17, 2024 am 08:13 AM
Gunicorn Deployment Guide for Flask Applications
Jan 17, 2024 am 08:13 AM
How to deploy Flask application using Gunicorn? Flask is a lightweight Python Web framework that is widely used to develop various types of Web applications. Gunicorn (GreenUnicorn) is a Python-based HTTP server used to run WSGI (WebServerGatewayInterface) applications. This article will introduce how to use Gunicorn to deploy Flask applications, with
 Simple JavaScript Tutorial: How to Get HTTP Status Code
Jan 05, 2024 pm 06:08 PM
Simple JavaScript Tutorial: How to Get HTTP Status Code
Jan 05, 2024 pm 06:08 PM
JavaScript tutorial: How to get HTTP status code, specific code examples are required. Preface: In web development, data interaction with the server is often involved. When communicating with the server, we often need to obtain the returned HTTP status code to determine whether the operation is successful, and perform corresponding processing based on different status codes. This article will teach you how to use JavaScript to obtain HTTP status codes and provide some practical code examples. Using XMLHttpRequest
 Best practices and common problem solutions for deploying web projects on Tomcat
Dec 29, 2023 am 08:21 AM
Best practices and common problem solutions for deploying web projects on Tomcat
Dec 29, 2023 am 08:21 AM
Best practices for deploying Web projects with Tomcat and solutions to common problems Introduction: Tomcat, as a lightweight Java application server, has been widely used in Web application development. This article will introduce the best practices and common problem solving methods for Tomcat deployment of web projects, and provide specific code examples to help readers better understand and apply. 1. Project directory structure planning Before deploying a Web project, we need to plan the directory structure of the project. Generally speaking, we can organize it in the following way
 PHP Jenkins 101: The only way to get started with CI/CD
Mar 09, 2024 am 10:28 AM
PHP Jenkins 101: The only way to get started with CI/CD
Mar 09, 2024 am 10:28 AM
Introduction Continuous integration (CI) and continuous deployment (CD) are key practices in modern software development that help teams deliver high-quality software faster and more reliably. Jenkins is a popular open source CI/CD tool that automates the build, test and deployment process. This article explains how to set up a CI/CD pipeline with Jenkins using PHP. Set up Jenkins Install Jenkins: Download and install Jenkins from the official Jenkins website. Create project: Create a new project from the Jenkins dashboard and name it to match your php project. Configure source control: Configure your PHP project's git repository as Jenkin
 Deploy the unbeatable combination of Gunicorn and Flask
Jan 17, 2024 am 10:24 AM
Deploy the unbeatable combination of Gunicorn and Flask
Jan 17, 2024 am 10:24 AM
Gunicorn and Flask: The perfect deployment combination, specific code examples required Overview: It is very important for developers to choose the appropriate deployment method, especially for Python web applications. Among Python web frameworks, Flask is a very popular choice, and Gunicorn is a server for deploying Python applications. This article will introduce the combination of Gunicorn and Flask and provide some specific code examples to help readers
 How to solve the problem of inaccessibility after Tomcat deploys war package
Jan 13, 2024 am 11:43 AM
How to solve the problem of inaccessibility after Tomcat deploys war package
Jan 13, 2024 am 11:43 AM
The solution to the problem that Tomcat cannot be accessed after deploying the war package requires specific code examples. Introduction: In Web development, Tomcat is one of the most widely used Java Web servers. However, sometimes after we deploy the war package to Tomcat, there is an inaccessible problem. This article will introduce several situations that may lead to inaccessibility, and give corresponding solutions and code examples. 1. Ensure that the war package has been deployed correctly. The first step is to ensure that the war package has been correctly deployed to Tomcat’s webapp.
