

Making a sliding stack component by using vue (detailed tutorial)
Tantan’s stacked sliding component plays a key role. Let’s take a look at how to use vue to write a Tantan stacked component. Friends who are interested can take a look.
The effect diagram is as follows :

Preface
Hi, say Tantan must be familiar to all programmers (after all, there are many girls). Tantan’s stacked sliding components play a key role in being able to flip brands on it smoothly. Let’s take a look at how to write a Tantan using Vue. Stacking components
1. Function analysis
After simple use, you will find that the function of stacking and sliding is very simple, just use a picture The summary is:
A brief summary of the basic functional points included:
Stacking of pictures
Slide of the first picture
Slide out after the condition is successful, rebound after the condition fails
Slide out The next picture is stacked to the top
Experience Optimization
According to the different touch points, the first picture will be offset at different angles when sliding
Determine whether the offset area has successfully slid out
2. Specific implementation
With the summarized functional points, our ideas for implementing components will be clearer
1. Stacking effect
The stacking picture effect is available online A large number of examples, the implementation methods are similar, mainly by setting perspective and perspective-origin on the parent layer to achieve the perspective of the sub-layer. After setting the translate3d Z-axis value on the sub-layer, the stacking effect can be simulated. The specific code is as follows
// 图片堆叠dom
 <!--opacity: 0 隐藏我们不想看到的stack-item层级-->
 <!--z-index: -1 调整stack-item层级"-->
<ul class="stack">
 <li class="stack-item" style="transform: translate3d(0px, 0px, 0px);opacity: 1;z-index: 10;"><img src="1.png" alt="01"></li>
 <li class="stack-item" style="transform: translate3d(0px, 0px, -60px);opacity: 1;z-index: 1"><img src="2.png" alt="02"></li>
 <li class="stack-item" style="transform: translate3d(0px, 0px, -120px);opacity: 1;z-index: 1"><img src="3.png" alt="03"></li>
 <li class="stack-item" style="transform: translate3d(0px, 0px, -180px);opacity: 0;z-index: -1"><img src="4.png" alt="04"></li>
 <li class="stack-item" style="transform: translate3d(0px, 0px, -180px);opacity: 0;z-index: -1"><img src="5.png" alt="05"></li>
</ul>
<style>
.stack {
 width: 100%;
 height: 100%;
 position: relative;
 perspective: 1000px; //子元素视距
 perspective-origin: 50% 150%; //子元素透视位置
 -webkit-perspective: 1000px;
 -webkit-perspective-origin: 50% 150%;
 margin: 0;
 padding: 0;
 }
 .stack-item{
 background: #fff;
 height: 100%;
 width: 100%;
 border-radius: 4px;
 text-align: center;
 overflow: hidden;
 }
 .stack-item img {
 width: 100%;
 display: block;
 pointer-events: none;
 }
</style>The above is just a set of static code. What we hope to get is the vue component, so we need to create a component template stack.vue first. In the template we can use v -for, traverse the stack node, use :style to modify the style of each item, the code is as follows
<template>
<ul class="stack">
<li class="stack-item" v-for="(item, index) in pages" :style="[transform(index)]">
<img :src="item.src">
</li>
</ul>
</template>
<script>
export default {
props: {
// pages数据包含基础的图片数据
pages: {
type: Array,
default: []
}
},
data () {
return {
// basicdata数据包含组件基本数据
basicdata: {
currentPage: 0 // 默认首图的序列
},
// temporaryData数据包含组件临时数据
temporaryData: {
opacity: 1, // 记录opacity
zIndex: 10, // 记录zIndex
visible: 3 // 记录默认显示堆叠数visible
}
}
},
methods: {
// 遍历样式
transform (index) {
if (index >= this.basicdata.currentPage) {
let style = {}
let visible = this.temporaryData.visible
let perIndex = index - this.basicdata.currentPage
// visible可见数量前滑块的样式
if (index <= this.basicdata.currentPage + visible - 1) {
style['opacity'] = '1'
style['transform'] = 'translate3D(0,0,' + -1 * perIndex * 60 + 'px' + ')'
style['zIndex'] = visible - index + this.basicdata.currentPage
style['transitionTimingFunction'] = 'ease'
style['transitionDuration'] = 300 + 'ms'
} else {
style['zIndex'] = '-1'
style['transform'] = 'translate3D(0,0,' + -1 * visible * 60 + 'px' + ')'
}
return style
}
}
}
}
</script>##Key points
: style can bind objects as well as arrays and functions, which is very useful when traversing The most basic dom structure has been constructed, the next step is to let the first The picture "moves"
2. Picture sliding
The picture sliding effect appears in many scenes. Its principle is nothing more than monitoring the touches event and getting the displacement. , and then change the target displacement through translate3D, so the steps we want to implement are as follows- Bind the touches event to the stack
- Listen and store The numerical value of the gesture position change
- Change the x and y values of translate3D in the css attribute of the first image
Specific implementation
In the vue framework, it is not recommended to directly operate nodes, but to bind elements through the instruction v-on, so we write the bindings in v-for traversal, and use index to determine whether it is the first image. , and then use :style to modify the style of the homepage. The specific code is as follows:
<template>
<ul class="stack">
<li class="stack-item" v-for="(item, index) in pages"
:style="[transformIndex(index),transform(index)]"
@touchstart.stop.capture="touchstart"
@touchmove.stop.capture="touchmove"
@touchend.stop.capture="touchend"
@mousedown.stop.capture="touchstart"
@mouseup.stop.capture="touchend"
@mousemove.stop.capture="touchmove">
<img :src="item.src">
</li>
</ul>
</template>
<script>
export default {
props: {
// pages数据包含基础的图片数据
pages: {
type: Array,
default: []
}
},
data () {
return {
// basicdata数据包含组件基本数据
basicdata: {
start: {}, // 记录起始位置
end: {}, // 记录终点位置
currentPage: 0 // 默认首图的序列
},
// temporaryData数据包含组件临时数据
temporaryData: {
poswidth: '', // 记录位移
posheight: '', // 记录位移
tracking: false // 是否在滑动,防止多次操作,影响体验
}
}
},
methods: {
touchstart (e) {
if (this.temporaryData.tracking) {
return
}
// 是否为touch
if (e.type === 'touchstart') {
if (e.touches.length > 1) {
this.temporaryData.tracking = false
return
} else {
// 记录起始位置
this.basicdata.start.t = new Date().getTime()
this.basicdata.start.x = e.targetTouches[0].clientX
this.basicdata.start.y = e.targetTouches[0].clientY
this.basicdata.end.x = e.targetTouches[0].clientX
this.basicdata.end.y = e.targetTouches[0].clientY
}
// pc操作
} else {
this.basicdata.start.t = new Date().getTime()
this.basicdata.start.x = e.clientX
this.basicdata.start.y = e.clientY
this.basicdata.end.x = e.clientX
this.basicdata.end.y = e.clientY
}
this.temporaryData.tracking = true
},
touchmove (e) {
// 记录滑动位置
if (this.temporaryData.tracking && !this.temporaryData.animation) {
if (e.type === 'touchmove') {
this.basicdata.end.x = e.targetTouches[0].clientX
this.basicdata.end.y = e.targetTouches[0].clientY
} else {
this.basicdata.end.x = e.clientX
this.basicdata.end.y = e.clientY
}
// 计算滑动值
this.temporaryData.poswidth = this.basicdata.end.x - this.basicdata.start.x
this.temporaryData.posheight = this.basicdata.end.y - this.basicdata.start.y
}
},
touchend (e) {
this.temporaryData.tracking = false
// 滑动结束,触发判断
},
// 非首页样式切换
transform (index) {
if (index > this.basicdata.currentPage) {
let style = {}
let visible = 3
let perIndex = index - this.basicdata.currentPage
// visible可见数量前滑块的样式
if (index <= this.basicdata.currentPage + visible - 1) {
style['opacity'] = '1'
style['transform'] = 'translate3D(0,0,' + -1 * perIndex * 60 + 'px' + ')'
style['zIndex'] = visible - index + this.basicdata.currentPage
style['transitionTimingFunction'] = 'ease'
style['transitionDuration'] = 300 + 'ms'
} else {
style['zIndex'] = '-1'
style['transform'] = 'translate3D(0,0,' + -1 * visible * 60 + 'px' + ')'
}
return style
}
},
// 首页样式切换
transformIndex (index) {
// 处理3D效果
if (index === this.basicdata.currentPage) {
let style = {}
style['transform'] = 'translate3D(' + this.temporaryData.poswidth + 'px' + ',' + this.temporaryData.posheight + 'px' + ',0px)'
style['opacity'] = 1
style['zIndex'] = 10
return style
}
}
}
}
</script>3. Slide out after the condition is successful, and return after the condition fails. The triggering judgment of the bounce
condition is performed after touchend/mouseup. Here we first use simple conditions to judge, and at the same time give the first image the effect of popping up and rebounding. The code is as follows
<template>
<ul class="stack">
<li class="stack-item" v-for="(item, index) in pages"
:style="[transformIndex(index),transform(index)]"
@touchmove.stop.capture="touchmove"
@touchstart.stop.capture="touchstart"
@touchend.stop.capture="touchend"
@mousedown.stop.capture="touchstart"
@mouseup.stop.capture="touchend"
@mousemove.stop.capture="touchmove">
<img :src="item.src">
</li>
</ul>
</template>
<script>
export default {
props: {
// pages数据包含基础的图片数据
pages: {
type: Array,
default: []
}
},
data () {
return {
// basicdata数据包含组件基本数据
basicdata: {
start: {}, // 记录起始位置
end: {}, // 记录终点位置
currentPage: 0 // 默认首图的序列
},
// temporaryData数据包含组件临时数据
temporaryData: {
poswidth: '', // 记录位移
posheight: '', // 记录位移
tracking: false, // 是否在滑动,防止多次操作,影响体验
animation: false, // 首图是否启用动画效果,默认为否
opacity: 1 // 记录首图透明度
}
}
},
methods: {
touchstart (e) {
if (this.temporaryData.tracking) {
return
}
// 是否为touch
if (e.type === 'touchstart') {
if (e.touches.length > 1) {
this.temporaryData.tracking = false
return
} else {
// 记录起始位置
this.basicdata.start.t = new Date().getTime()
this.basicdata.start.x = e.targetTouches[0].clientX
this.basicdata.start.y = e.targetTouches[0].clientY
this.basicdata.end.x = e.targetTouches[0].clientX
this.basicdata.end.y = e.targetTouches[0].clientY
}
// pc操作
} else {
this.basicdata.start.t = new Date().getTime()
this.basicdata.start.x = e.clientX
this.basicdata.start.y = e.clientY
this.basicdata.end.x = e.clientX
this.basicdata.end.y = e.clientY
}
this.temporaryData.tracking = true
this.temporaryData.animation = false
},
touchmove (e) {
// 记录滑动位置
if (this.temporaryData.tracking && !this.temporaryData.animation) {
if (e.type === 'touchmove') {
this.basicdata.end.x = e.targetTouches[0].clientX
this.basicdata.end.y = e.targetTouches[0].clientY
} else {
this.basicdata.end.x = e.clientX
this.basicdata.end.y = e.clientY
}
// 计算滑动值
this.temporaryData.poswidth = this.basicdata.end.x - this.basicdata.start.x
this.temporaryData.posheight = this.basicdata.end.y - this.basicdata.start.y
}
},
touchend (e) {
this.temporaryData.tracking = false
this.temporaryData.animation = true
// 滑动结束,触发判断
// 简单判断滑动宽度超出100像素时触发滑出
if (Math.abs(this.temporaryData.poswidth) >= 100) {
// 最终位移简单设定为x轴200像素的偏移
let ratio = Math.abs(this.temporaryData.posheight / this.temporaryData.poswidth)
this.temporaryData.poswidth = this.temporaryData.poswidth >= 0 ? this.temporaryData.poswidth + 200 : this.temporaryData.poswidth - 200
this.temporaryData.posheight = this.temporaryData.posheight >= 0 ? Math.abs(this.temporaryData.poswidth * ratio) : -Math.abs(this.temporaryData.poswidth * ratio)
this.temporaryData.opacity = 0
// 不满足条件则滑入
} else {
this.temporaryData.poswidth = 0
this.temporaryData.posheight = 0
}
},
// 非首页样式切换
transform (index) {
if (index > this.basicdata.currentPage) {
let style = {}
let visible = 3
let perIndex = index - this.basicdata.currentPage
// visible可见数量前滑块的样式
if (index <= this.basicdata.currentPage + visible - 1) {
style['opacity'] = '1'
style['transform'] = 'translate3D(0,0,' + -1 * perIndex * 60 + 'px' + ')'
style['zIndex'] = visible - index + this.basicdata.currentPage
style['transitionTimingFunction'] = 'ease'
style['transitionDuration'] = 300 + 'ms'
} else {
style['zIndex'] = '-1'
style['transform'] = 'translate3D(0,0,' + -1 * visible * 60 + 'px' + ')'
}
return style
}
},
// 首页样式切换
transformIndex (index) {
// 处理3D效果
if (index === this.basicdata.currentPage) {
let style = {}
style['transform'] = 'translate3D(' + this.temporaryData.poswidth + 'px' + ',' + this.temporaryData.posheight + 'px' + ',0px)'
style['opacity'] = this.temporaryData.opacity
style['zIndex'] = 10
if (this.temporaryData.animation) {
style['transitionTimingFunction'] = 'ease'
style['transitionDuration'] = 300 + 'ms'
}
return style
}
}
}
}
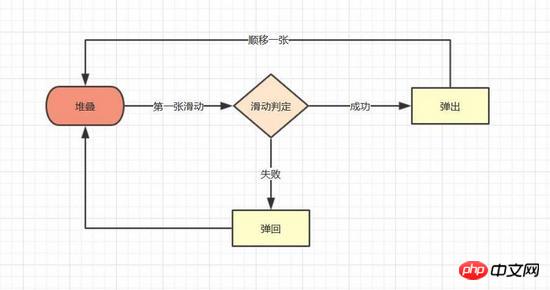
</script>4. After sliding out, the next picture is stacked to the top
Re-stacking is the last function of the component, and it is also the most important and complex functions. In our code, the sorting of stack-item depends on the transformIndex and transform function of the binding: style. The condition determined in the function is currentPage. Is it necessary to change the currentPage to 1 to complete the re-stacking?
The answer is not that simple, because our slide out is an animation effect, which will last 300ms, and the rearrangement caused by the change of currentPage will change immediately, interrupting the progress of the animation. Therefore, we need to modify the sorting conditions of the transform function first, and then change the currentPage.
# Specific implementation- Modify the transform function sorting conditions
- Let currentPage 1
-
Add the onTransitionEnd event, and after the slide-out is completed, relocate the stack list
##The code is as follows:
<template>
<ul class="stack">
<li class="stack-item" v-for="(item, index) in pages"
:style="[transformIndex(index),transform(index)]"
@touchmove.stop.capture="touchmove"
@touchstart.stop.capture="touchstart"
@touchend.stop.capture="touchend"
@mousedown.stop.capture="touchstart"
@mouseup.stop.capture="touchend"
@mousemove.stop.capture="touchmove"
@webkit-transition-end="onTransitionEnd"
@transitionend="onTransitionEnd"
>
<img :src="item.src">
</li>
</ul>
</template>
<script>
export default {
props: {
// pages数据包含基础的图片数据
pages: {
type: Array,
default: []
}
},
data () {
return {
// basicdata数据包含组件基本数据
basicdata: {
start: {}, // 记录起始位置
end: {}, // 记录终点位置
currentPage: 0 // 默认首图的序列
},
// temporaryData数据包含组件临时数据
temporaryData: {
poswidth: '', // 记录位移
posheight: '', // 记录位移
lastPosWidth: '', // 记录上次最终位移
lastPosHeight: '', // 记录上次最终位移
tracking: false, // 是否在滑动,防止多次操作,影响体验
animation: false, // 首图是否启用动画效果,默认为否
opacity: 1, // 记录首图透明度
swipe: false // onTransition判定条件
}
}
},
methods: {
touchstart (e) {
if (this.temporaryData.tracking) {
return
}
// 是否为touch
if (e.type === 'touchstart') {
if (e.touches.length > 1) {
this.temporaryData.tracking = false
return
} else {
// 记录起始位置
this.basicdata.start.t = new Date().getTime()
this.basicdata.start.x = e.targetTouches[0].clientX
this.basicdata.start.y = e.targetTouches[0].clientY
this.basicdata.end.x = e.targetTouches[0].clientX
this.basicdata.end.y = e.targetTouches[0].clientY
}
// pc操作
} else {
this.basicdata.start.t = new Date().getTime()
this.basicdata.start.x = e.clientX
this.basicdata.start.y = e.clientY
this.basicdata.end.x = e.clientX
this.basicdata.end.y = e.clientY
}
this.temporaryData.tracking = true
this.temporaryData.animation = false
},
touchmove (e) {
// 记录滑动位置
if (this.temporaryData.tracking && !this.temporaryData.animation) {
if (e.type === 'touchmove') {
this.basicdata.end.x = e.targetTouches[0].clientX
this.basicdata.end.y = e.targetTouches[0].clientY
} else {
this.basicdata.end.x = e.clientX
this.basicdata.end.y = e.clientY
}
// 计算滑动值
this.temporaryData.poswidth = this.basicdata.end.x - this.basicdata.start.x
this.temporaryData.posheight = this.basicdata.end.y - this.basicdata.start.y
}
},
touchend (e) {
this.temporaryData.tracking = false
this.temporaryData.animation = true
// 滑动结束,触发判断
// 简单判断滑动宽度超出100像素时触发滑出
if (Math.abs(this.temporaryData.poswidth) >= 100) {
// 最终位移简单设定为x轴200像素的偏移
let ratio = Math.abs(this.temporaryData.posheight / this.temporaryData.poswidth)
this.temporaryData.poswidth = this.temporaryData.poswidth >= 0 ? this.temporaryData.poswidth + 200 : this.temporaryData.poswidth - 200
this.temporaryData.posheight = this.temporaryData.posheight >= 0 ? Math.abs(this.temporaryData.poswidth * ratio) : -Math.abs(this.temporaryData.poswidth * ratio)
this.temporaryData.opacity = 0
this.temporaryData.swipe = true
// 记录最终滑动距离
this.temporaryData.lastPosWidth = this.temporaryData.poswidth
this.temporaryData.lastPosHeight = this.temporaryData.posheight
// currentPage+1 引发排序变化
this.basicdata.currentPage += 1
// currentPage切换,整体dom进行变化,把第一层滑动置零
this.$nextTick(() => {
this.temporaryData.poswidth = 0
this.temporaryData.posheight = 0
this.temporaryData.opacity = 1
})
// 不满足条件则滑入
} else {
this.temporaryData.poswidth = 0
this.temporaryData.posheight = 0
this.temporaryData.swipe = false
}
},
onTransitionEnd (index) {
// dom发生变化后,正在执行的动画滑动序列已经变为上一层
if (this.temporaryData.swipe && index === this.basicdata.currentPage - 1) {
this.temporaryData.animation = true
this.temporaryData.lastPosWidth = 0
this.temporaryData.lastPosHeight = 0
this.temporaryData.swipe = false
}
},
// 非首页样式切换
transform (index) {
if (index > this.basicdata.currentPage) {
let style = {}
let visible = 3
let perIndex = index - this.basicdata.currentPage
// visible可见数量前滑块的样式
if (index <= this.basicdata.currentPage + visible - 1) {
style['opacity'] = '1'
style['transform'] = 'translate3D(0,0,' + -1 * perIndex * 60 + 'px' + ')'
style['zIndex'] = visible - index + this.basicdata.currentPage
style['transitionTimingFunction'] = 'ease'
style['transitionDuration'] = 300 + 'ms'
} else {
style['zIndex'] = '-1'
style['transform'] = 'translate3D(0,0,' + -1 * visible * 60 + 'px' + ')'
}
return style
// 已滑动模块释放后
} else if (index === this.basicdata.currentPage - 1) {
let style = {}
// 继续执行动画
style['transform'] = 'translate3D(' + this.temporaryData.lastPosWidth + 'px' + ',' + this.temporaryData.lastPosHeight + 'px' + ',0px)'
style['opacity'] = '0'
style['zIndex'] = '-1'
style['transitionTimingFunction'] = 'ease'
style['transitionDuration'] = 300 + 'ms'
return style
}
},
// 首页样式切换
transformIndex (index) {
// 处理3D效果
if (index === this.basicdata.currentPage) {
let style = {}
style['transform'] = 'translate3D(' + this.temporaryData.poswidth + 'px' + ',' + this.temporaryData.posheight + 'px' + ',0px)'
style['opacity'] = this.temporaryData.opacity
style['zIndex'] = 10
if (this.temporaryData.animation) {
style['transitionTimingFunction'] = 'ease'
style['transitionDuration'] = 300 + 'ms'
}
return style
}
}
}
}
</script>ok~ After completing the above four steps, the basic functions of the stacking component have been implemented. Come and see the effect

Stacking sliding effect It has already been released, but Tantan has also added touch angle offset and determination of slide-out area ratio in terms of experience
The principle of angle offset is to record the user's touch position every time the user touches, calculate the maximum offset angle, and when the sliding displacement occurs, linearly increase the angle to the maximum offset angle.
The specific thing to do when using the stack is:
Calculate the required angle and direction in touchmove
touchend And set the angle to zero in onTransitionEnd
Detailed explanation of using vue-cli scaffolding to initialize the project structure under the Vue project
Change the vue request Method for a certain item value in the data
The above is the detailed content of Making a sliding stack component by using vue (detailed tutorial). For more information, please follow other related articles on the PHP Chinese website!

Hot AI Tools

Undresser.AI Undress
AI-powered app for creating realistic nude photos

AI Clothes Remover
Online AI tool for removing clothes from photos.

Undress AI Tool
Undress images for free

Clothoff.io
AI clothes remover

Video Face Swap
Swap faces in any video effortlessly with our completely free AI face swap tool!

Hot Article
Hot Tools

Notepad++7.3.1
Easy-to-use and free code editor

SublimeText3 Chinese version
Chinese version, very easy to use

Zend Studio 13.0.1
Powerful PHP integrated development environment

Dreamweaver CS6
Visual web development tools

SublimeText3 Mac version
God-level code editing software (SublimeText3)
Hot Topics
 1390
1390
 52
52

 Specific method to create film movement effect in PPT
Mar 26, 2024 pm 04:00 PM
Specific method to create film movement effect in PPT
Mar 26, 2024 pm 04:00 PM
1. Start PPT, create a new blank document, select all text boxes and delete them. 2. Execute the Insert-Shape command, drag a rectangle in the document, and fill the shape with black. 3. Drag the rectangle to elongate it, execute the Insert-Shape command, drag out the small square, and set the fill color to white. 4. Copy and paste the small squares one by one so that the top and bottom are evenly distributed on both sides of the film. After selecting them all with ctrl+a, right-click and select Group. 5. Execute the Insert-Picture command, find the picture to be inserted in the pop-up dialog box, click to open, and adjust the size and position of the picture. 6. Repeat step 5 to insert and set the remaining pictures in order to form a film picture. 7. Select the film, execute animation-add animation command
 How to make a tomato novel cover
Feb 23, 2024 pm 01:55 PM
How to make a tomato novel cover
Feb 23, 2024 pm 01:55 PM
How to make the cover of Tomato novel? You can make exclusive novel cover in Tomato novel, but most friends don’t know how to make the cover of Tomato novel. Next is the picture of how to make the cover of Tomato novel brought by the editor to the players. Tutorial, interested players come and take a look! Tomato Novel usage tutorial How to make a Tomato Novel cover 1. First open the Tomato Novel APP, enter the work management page to create a new book, and select the [Cover Template] as shown by the arrow below; 2. Then enter the cover template page and select your favorite cover Template; 3. After finally selecting the cover, click [Confirm] in the upper right corner.
 What should I do if my mobile phone screen is hard to slide and dry?
Dec 04, 2023 pm 03:51 PM
What should I do if my mobile phone screen is hard to slide and dry?
Dec 04, 2023 pm 03:51 PM
Solutions for mobile phone screens that are difficult to slide and dry: 1. Humidify the screen; 2. Clean the screen regularly; 3. Increase the sliding strength of your fingers; 4. Use mobile phone screen protectors; 5. Replace protective covers; 6. Keep hands moist; 7. , handle it cleanly when applying the film; 8. Use lubricant; 9. Use gloves; 10. Adjust the screen brightness; 11. Replace the mobile phone. Detailed introduction: 1. Humidify the screen, place a humidifier next to the screen or spray some water to increase the humidity in the air, thereby reducing the dryness of the screen; 2. Clean the screen regularly, use professional screen cleaner, etc.
 Operation guide for creating mobile Excel tables
Feb 18, 2024 pm 02:41 PM
Operation guide for creating mobile Excel tables
Feb 18, 2024 pm 02:41 PM
Mobile Excel table creation tutorial With the popularity of mobile devices and the continuous advancement of technology, mobile phones have become one of the indispensable tools in our daily life and work. Using Excel spreadsheets on your mobile phone can easily record, calculate and analyze data and improve work efficiency. This article will share with you the basic operations and techniques for creating mobile Excel tables. 1. Choose the right application. There are many mobile Excel applications on the market to choose from, such as GoogleSheets, Micro
 How to use CSS to create a countdown effect
Oct 26, 2023 am 10:36 AM
How to use CSS to create a countdown effect
Oct 26, 2023 am 10:36 AM
How to use CSS to create a countdown effect. The countdown effect is a common function in web development. It can provide users with a dynamic effect of countdown and give people a sense of urgency and expectation. This article will introduce how to use CSS to achieve the countdown effect, and give detailed implementation steps and code examples. The implementation steps are as follows: Step 1: HTML structure construction First, create a div container in HTML to wrap the countdown content. For example: <divclass="countd
 Let me teach you! How to create animation effects in PPT!
Mar 20, 2024 pm 06:40 PM
Let me teach you! How to create animation effects in PPT!
Mar 20, 2024 pm 06:40 PM
When making PPT, using some animation effects will make it more lively and cute than without using animation effects. With the addition of animation effects, people may like to watch this PPT, so we must learn how to create animation effects for PPT. Next, I will introduce in detail how to add animation effects to PPT. Please continue reading and study these steps carefully. I believe they will be helpful to you! First, open the PPT we made ourselves. You will notice that this PPT currently does not have any animation effects (as shown by the red arrow in the picture below). 2. Then, we need to add animation effects to the picture. We first select the picture, and then click the [Animation] button on the menu bar (as shown in the red circle in the figure below). 3. Next, we click inside the animation
 How to make a word cover
Mar 19, 2024 pm 06:50 PM
How to make a word cover
Mar 19, 2024 pm 06:50 PM
A graduation thesis must have a cover, a table of contents, an end, etc. Only then can the thesis be complete. In the last issue, the editor has shared with friends how to make a table of contents in Word. In this issue, I will share with you how to make a word cover. If you don’t know how to make it, hurry up! 1. First, we open the word document we want to make a cover, as shown in the figure below: 2. Then, we click the [Chapter] button on the menu bar and select the cover page. This function is equivalent to a cover library, in which you can Choose a suitable and beautiful cover by yourself, as shown in the red circle in the picture below: 3. After clicking, you can see various types of covers, such as business type, suitable for company contracts and documents; resume type, suitable for job hunting and submission of resumes Friends, wait, okay?
 How to use JavaScript to achieve the up and down sliding switching effect of images and add fade-in and fade-out animations?
Oct 20, 2023 am 11:19 AM
How to use JavaScript to achieve the up and down sliding switching effect of images and add fade-in and fade-out animations?
Oct 20, 2023 am 11:19 AM
How can JavaScript achieve the up and down sliding switching effect of images and add fade-in and fade-out animations? In web development, it is often necessary to achieve image switching effects. You can use JavaScript to achieve up and down sliding switching, and add fade-in and fade-out animation effects. Let’s take a closer look. First, we need a container that contains multiple images. We can use div tags in HTML to host images. For example, we create a div with the id "image-container" to
