

apache advanced configuration

This article mainly introduces the advanced configuration of apache, which has certain reference value. Now I share it with you. Friends in need can refer to it
1. Installation
##yum install httpd -y ##Installation
-
firewall-cmd --permanent --add-service=http ##Firewall configuration
systemctl restart firewalld ##Restart the firewall
## During the experiment, pay attention to the consistency of the security context,
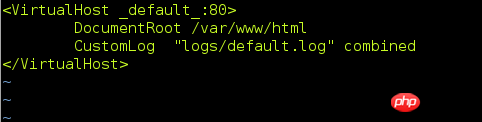
DocumentRoot "/var/www/html" ##Default publishing directory
##DirectoryIndex index.html ##Default publish fileChange the default publish directory Change the default publish file for /var/www/

# to text

##Edit the file text and write the content

##The default open file becomes the text we set
#3. Virtual host
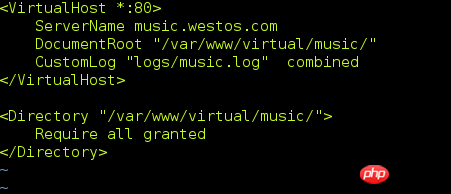
Usually there are many subdomains under a parent domain, and each subdomain has different functions. Therefore, when accessing each subdomain, you should access the files of the subdomain, so the virtual host allows you to access the files from the subdomain. An httpd server serves multiple websites at the same time. In this section, we will learn about name-based virtual hosting where multiple hostnames all point to the same IP address, but the web server serves different websites with different content based on the hostname used to reach the site
After reverting the changes from the previous step.
#Create directories, publishing directories for different subdomains.
Configuration/etc/hosts
Edit http configuration file
##default.conf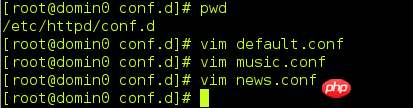
##music.conf
##news.conf
Restart the service and access different files when accessing different domain names.

-------------------------------- ------------------

----------------- --------------------------------

----------------------------- ---------------

--------------------------------------------- -----
4. Authentication
Setting 172.25.254.11 does not allow access
Read allow first, then deny. Deny will overwrite some of allow’s permissions

##Effect

------------------------------------------------ ---
2. Virtual user access control
1. In /etc/httpd/ Create a user in the directory and generate user files.
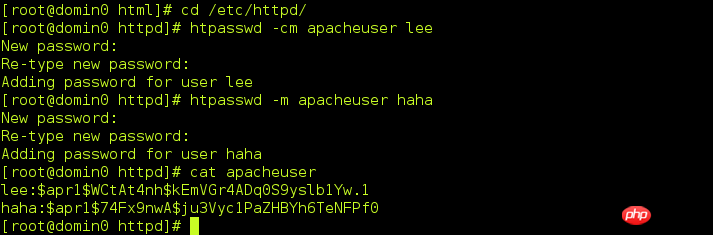
It can be seen that the file has two users.
2. Configure the httpd configuration file and associate the user file.
require user lee Only user lee is allowed to log in.

test
User lee can log in normally, but user haha cannot log in.


#-- ----------------------------------------
5. Https
- Https automatically encrypts data when accessing, for the security of network data transmission
- For HTTPS access, you need to install mod_ssl
##yum install mod_ssl
- At this time, the configuration directory automatically generates the ssl.conf configuration file

- When accessing, it says that the website certificate is not trustworthy.

-
First install the software crypto-utils.x86_64
##yum install crypto-utils. x86_64
Certificate Production
##Tell us the generated path
Then the number of secret history bits, choose the fastest 1024 bits

Then comes the generation process, which may take a while.

After finishing, this is the step. Whether to send it to CA for certification, select No. 
Whether to encrypt the private key, next. 
Fill in the information, next, and it’s ok ##Two files were generated /etc/pki/tls/certs/www.westos.com.crt/etc/pki/tls/private/www.westos.com.key Configure ssl.conf
and then log in to http://login.westos.com and it will automatically jump to https://login.westos.com page. ----------------------- -------------------------- 7. Proxy server Squid Forward proxy ##yum install squid vim /etc/squid/squid.conf ##Then other hosts can set the proxy to the squid server ip:3128 port to access the Internet through the squid server, which is generally used to circumvent the wall. Reverse proxy, (equivalent to proxy apache server) Configuration/etc /squid/squid.conf Be careful to configure the firewall to pass the http service Then the 172.25.254.111 browser accesses the Squid server address and will get the content published on 172.25.254.11 of apache.
--------------------- --------------------------------------------------
The upload folder is generated after decompression Log in to the web page 172.25.254.11/upload ## and then detect each In this software situation, when everything is passed, click Next, Configure mysql information. Installing You can access it after installation. The above is the entire content of this article, thank you for reading. Please pay attention to the PHP Chinese website for more information! Related recommendations: Detailed explanation of centos installation apache and php Detailed explanation of the relationship and role of php and apache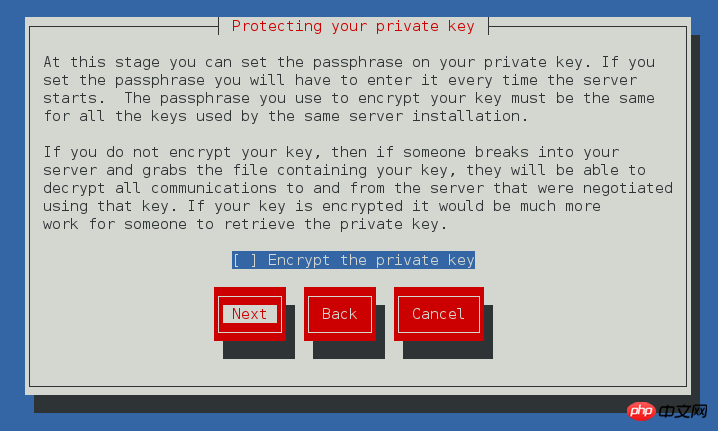


##Click get certificate, then click confirm security exception
It’s ok, the website certificate is the one we just generated. 
##6. Https address conversion1. Configuration /etc/httpd/conf.d/login.conf http configuration file

Create /var/ www/html/login Create the default publishing file/var/www/html/login/index.html
Modify /etc/hosts ## and then restart Service, give the web page login.westos.com the certificate just now,


8. Build a forum##Install php, mod_ssl, http, php-mysql , mariadb-server


The above is the detailed content of apache advanced configuration. For more information, please follow other related articles on the PHP Chinese website!

Hot AI Tools

Undresser.AI Undress
AI-powered app for creating realistic nude photos

AI Clothes Remover
Online AI tool for removing clothes from photos.

Undress AI Tool
Undress images for free

Clothoff.io
AI clothes remover

Video Face Swap
Swap faces in any video effortlessly with our completely free AI face swap tool!

Hot Article
Hot Tools

Notepad++7.3.1
Easy-to-use and free code editor

SublimeText3 Chinese version
Chinese version, very easy to use

Zend Studio 13.0.1
Powerful PHP integrated development environment

Dreamweaver CS6
Visual web development tools

SublimeText3 Mac version
God-level code editing software (SublimeText3)
Hot Topics
 1387
1387
 52
52

 How to set the cgi directory in apache
Apr 13, 2025 pm 01:18 PM
How to set the cgi directory in apache
Apr 13, 2025 pm 01:18 PM
To set up a CGI directory in Apache, you need to perform the following steps: Create a CGI directory such as "cgi-bin", and grant Apache write permissions. Add the "ScriptAlias" directive block in the Apache configuration file to map the CGI directory to the "/cgi-bin" URL. Restart Apache.
 How to start apache
Apr 13, 2025 pm 01:06 PM
How to start apache
Apr 13, 2025 pm 01:06 PM
The steps to start Apache are as follows: Install Apache (command: sudo apt-get install apache2 or download it from the official website) Start Apache (Linux: sudo systemctl start apache2; Windows: Right-click the "Apache2.4" service and select "Start") Check whether it has been started (Linux: sudo systemctl status apache2; Windows: Check the status of the "Apache2.4" service in the service manager) Enable boot automatically (optional, Linux: sudo systemctl
 How to use Debian Apache logs to improve website performance
Apr 12, 2025 pm 11:36 PM
How to use Debian Apache logs to improve website performance
Apr 12, 2025 pm 11:36 PM
This article will explain how to improve website performance by analyzing Apache logs under the Debian system. 1. Log Analysis Basics Apache log records the detailed information of all HTTP requests, including IP address, timestamp, request URL, HTTP method and response code. In Debian systems, these logs are usually located in the /var/log/apache2/access.log and /var/log/apache2/error.log directories. Understanding the log structure is the first step in effective analysis. 2. Log analysis tool You can use a variety of tools to analyze Apache logs: Command line tools: grep, awk, sed and other command line tools.
 How to delete more than server names of apache
Apr 13, 2025 pm 01:09 PM
How to delete more than server names of apache
Apr 13, 2025 pm 01:09 PM
To delete an extra ServerName directive from Apache, you can take the following steps: Identify and delete the extra ServerName directive. Restart Apache to make the changes take effect. Check the configuration file to verify changes. Test the server to make sure the problem is resolved.
 What to do if the apache80 port is occupied
Apr 13, 2025 pm 01:24 PM
What to do if the apache80 port is occupied
Apr 13, 2025 pm 01:24 PM
When the Apache 80 port is occupied, the solution is as follows: find out the process that occupies the port and close it. Check the firewall settings to make sure Apache is not blocked. If the above method does not work, please reconfigure Apache to use a different port. Restart the Apache service.
 How Debian improves Hadoop data processing speed
Apr 13, 2025 am 11:54 AM
How Debian improves Hadoop data processing speed
Apr 13, 2025 am 11:54 AM
This article discusses how to improve Hadoop data processing efficiency on Debian systems. Optimization strategies cover hardware upgrades, operating system parameter adjustments, Hadoop configuration modifications, and the use of efficient algorithms and tools. 1. Hardware resource strengthening ensures that all nodes have consistent hardware configurations, especially paying attention to CPU, memory and network equipment performance. Choosing high-performance hardware components is essential to improve overall processing speed. 2. Operating system tunes file descriptors and network connections: Modify the /etc/security/limits.conf file to increase the upper limit of file descriptors and network connections allowed to be opened at the same time by the system. JVM parameter adjustment: Adjust in hadoop-env.sh file
 How to view your apache version
Apr 13, 2025 pm 01:15 PM
How to view your apache version
Apr 13, 2025 pm 01:15 PM
There are 3 ways to view the version on the Apache server: via the command line (apachectl -v or apache2ctl -v), check the server status page (http://<server IP or domain name>/server-status), or view the Apache configuration file (ServerVersion: Apache/<version number>).
 How to check Debian OpenSSL configuration
Apr 12, 2025 pm 11:57 PM
How to check Debian OpenSSL configuration
Apr 12, 2025 pm 11:57 PM
This article introduces several methods to check the OpenSSL configuration of the Debian system to help you quickly grasp the security status of the system. 1. Confirm the OpenSSL version First, verify whether OpenSSL has been installed and version information. Enter the following command in the terminal: If opensslversion is not installed, the system will prompt an error. 2. View the configuration file. The main configuration file of OpenSSL is usually located in /etc/ssl/openssl.cnf. You can use a text editor (such as nano) to view: sudonano/etc/ssl/openssl.cnf This file contains important configuration information such as key, certificate path, and encryption algorithm. 3. Utilize OPE
