

How to operate Angular template-driven forms
This time I will show you how to operate the Angular template-driven form, and what are the precautions when operating the Angular template-driven form. The following is a practical case, let's take a look.
I won’t go into details about the importance of forms. Angular supports two-way data binding, verification, status management, etc. of forms. Let’s summarize.
Get user input
<p class="container-fluid login-page">
 <h1>Angular表单</h1>
 <form class="login-area">
  <p class="form-group">
    <input class="form-control" type="text" name="name" id="login-name" placeholder="请输入登录帐号">
  </p>
  <p class="form-group">
   <input class="form-control"type="password" name="pwd" id="login-pwd" placeholder="请输入登录密码">
  </p>
  <p class="form-group">
   <button type="submit" class="btn btn-block btn-success">登录</button>
  </p>
 </form>
</p>
If you have the above simple form, regardless of its advantages or disadvantages, what are the ways to obtain the form data? Let’s first look at two simple and crude
1) Event $event methods
When listening to an event, pass the entire event payload $event to the event Process function, which will carry various information about the trigger element. Here we listen to the submit event of the form element, pass the entire form information to the processing function, and print it out
<form class="login-area" (submit)="testInput($event)">
testInput ( _input: any) {
  console.dir(_input);
}After triggering submit, check the results. It looks very familiar. It is an event in the traditional method. Needless to say, the target is the form element, and then locate the input sub-element and obtain the value respectively.
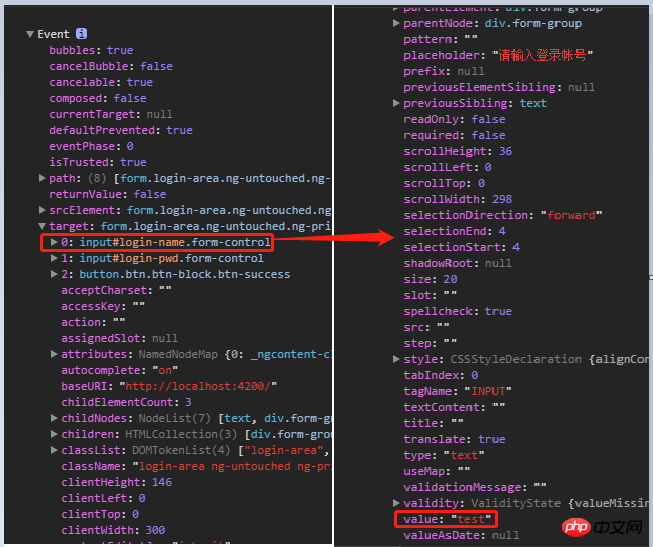
In order to obtain the Value of the input, we pass a lot of useless information. The processing function does not care about the position, attributes, etc. of the element at all, it only needs the value. So this method is not advisable
2) Template reference variables
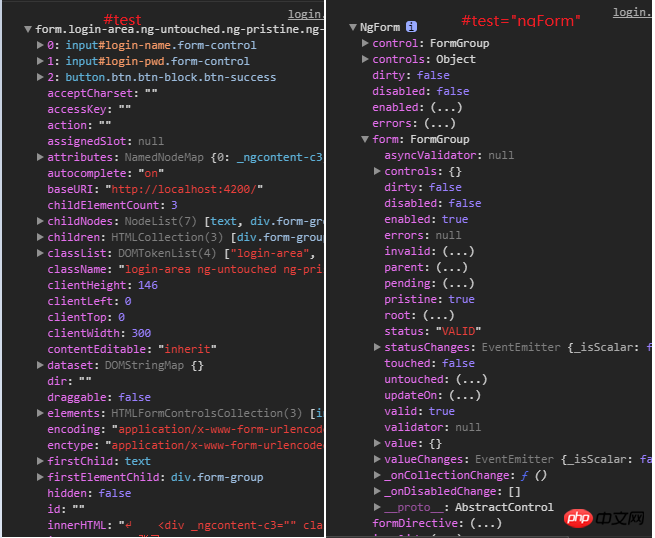
You can use template reference variables (#var) in Angular to reference DOM elements/Angular components/instructions. Usually the template reference variable represents the declared element. Of course, the pointer can also be modified to represent Angular instructions (such as the ngForm instructions and ngModel instructions used later).
// 模版引用变量代表Form元素
<form class="login-area" #test (submit)="testInput(test)">
// 模版引用变量代表ngForm指令
<form class="login-area" #test="ngForm"(submit)="testInput(test)">
You can see the difference from the picture below. The first one is the same as $event.target, which is a DOM element; the second one is the ngForm instruction, which can track the value and status of each control (have you entered it? Has the verification passed? etc.), which will be explained in detail later
#So when we directly use the template reference variable to refer to the input element, we can directly pass the input element in the template value without passing the entire element information. This method is not good either. It must be triggered by an event before it can be passed
 <form class="login-area" (submit)="testInput(test.value)">
  <p class="form-group">
    <input class="form-control" #test type="text" name="name" id="login-name" placeholder="请输入登录帐号">
  </p>
Note: Template referenceThe scope of the variable is the entire template, so in the same template, there cannot be the same name Template reference variables
These two ways of obtaining form data are just for understanding, because Angular provides two better ways to build forms---template-driven forms and model-driven forms
Template driven form
As the name suggests, it uses HTML template form professional instructions to build forms. To use template-driven forms, remember to import FormsModule in the application module first. Explain the following points:
1. Template-driven forms use [(ngModel)] syntax for two-way data binding. It is very simple to bind form data to the model. Note that when using [ngModel] in a form, you must define the name attribute, because when Angular processes the form, it will create some FormControl to track the value and status of a single form control, and the name attribute of the form control is the key value, so it must To specify the name attribute. (This should be regarded as pointing out two scientific ways to obtain form data: [ngModel] syntax binding and obtaining through formControl’s API)
2. Use the ngForm command to monitor the validity of the entire form (valid Attributes). Angular will automatically create and add the ngForm directive to the form, which you can use directly
3. Use the ngModel directive to monitor the status of a single form control, and also use specific Angular css to update the control style. We When different states can be controlled through these classes, the display of form controls

4,Form validationcan use HTML native Form validation attributes (required, pattern, max, min, etc.), when validation errors occur, the errors attribute mentioned in 3 will have corresponding error items;
还可以自定义验证器,因为模版驱动表单不直接访问FormControl实例,所以需要把自定义的验证器用指令包装。
通过以下栗子来展示模版驱动表单简单使用
<!-- 模版引用变量指向ngForm指令 -->
<form class="login-area" #testform="ngForm" (submit)="testInput()">
<p class="form-group">
<!-- ngModel绑定数据 -->
<!-- required 和 pattern 指定校验规则 -->
<!-- 模版引用变量指向ngModel指令 -->
<input class="form-control" type="text" name="name" id="login-name" placeholder="请输入登录帐号"
[(ngModel)] = "user.name"
required
pattern="[0-9A-z]+"
#nameinput = "ngModel"
>
</p>
<!-- 通过表单控件的状态控制是否展示错误说明及展示何种错误说明 -->
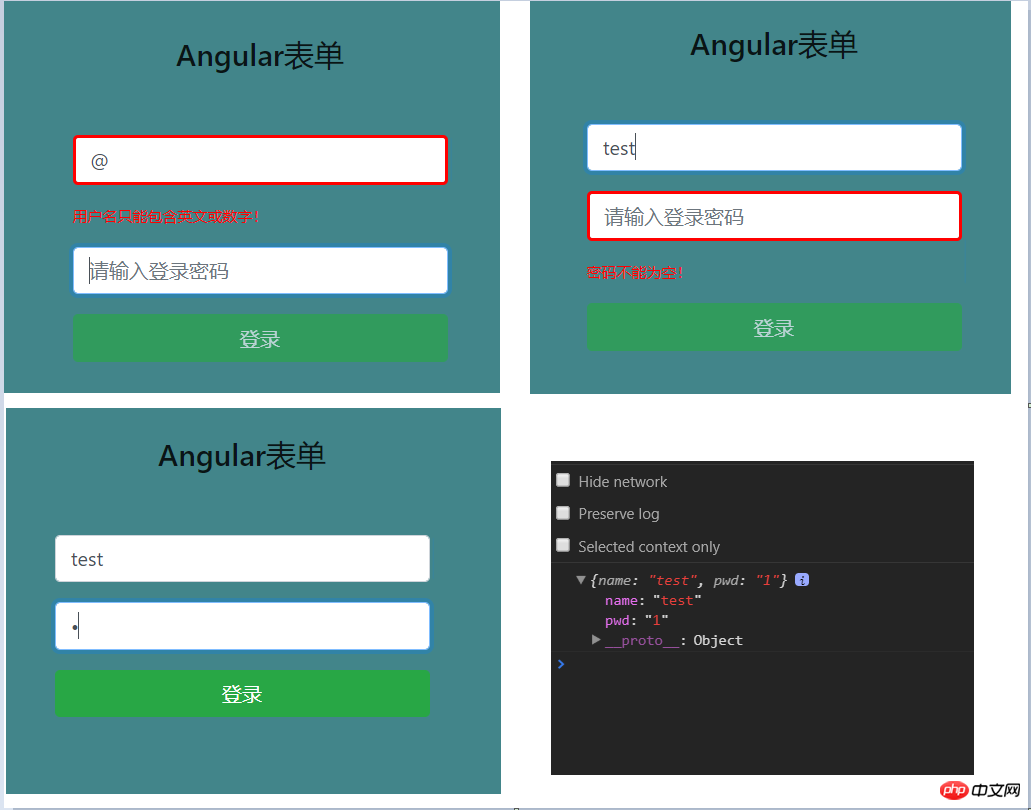
<p class="form-group" *ngIf="nameinput.touched&&nameinput.invalid">
<span class="error-info" *ngIf="nameinput.errors?.required">用户名不能为空!</span>
<span class="error-info" *ngIf="nameinput.errors?.pattern">用户名只能包含英文或数字!</span>
</p>
<p class="form-group">
<input class="form-control" type="password" name="pwd" id="login-pwd" placeholder="请输入登录密码"
[(ngModel)] = "user.pwd"
required
#pwdinput = "ngModel">
</p>
<p class="form-group" *ngIf="pwdinput.touched&&pwdinput.invalid">
<span class="error-info" *ngIf="pwdinput.errors?.required">密码不能为空!</span>
</p>
<p class="form-group">
<!-- 通过表单的状态控制按钮是否可用 -->
<button type="submit" class="btn btn-block btn-success" [disabled]="testform.invalid">登录</button>
</p>
</form>通过Angular css 自动添加的class来控制表单样式
input.ng-invalid.ng-touched{
    border: 2px solid red;
}查看下效果,表单校验、样式反馈、按钮状态管理、数据获取都很方便。
相信看了本文案例你已经掌握了方法,更多精彩请关注php中文网其它相关文章!
推荐阅读:
The above is the detailed content of How to operate Angular template-driven forms. For more information, please follow other related articles on the PHP Chinese website!

Hot AI Tools

Undresser.AI Undress
AI-powered app for creating realistic nude photos

AI Clothes Remover
Online AI tool for removing clothes from photos.

Undress AI Tool
Undress images for free

Clothoff.io
AI clothes remover

AI Hentai Generator
Generate AI Hentai for free.

Hot Article
Hot Tools

Notepad++7.3.1
Easy-to-use and free code editor

SublimeText3 Chinese version
Chinese version, very easy to use

Zend Studio 13.0.1
Powerful PHP integrated development environment

Dreamweaver CS6
Visual web development tools

SublimeText3 Mac version
God-level code editing software (SublimeText3)
Hot Topics
 1382
1382
 52
52

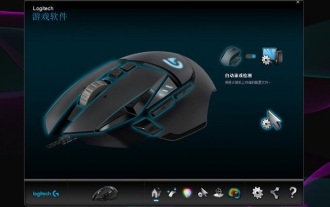
 Does Logitech ghub driver not support win7? -Why can Logitech ghub driver only be installed on the c drive?
Mar 18, 2024 pm 05:37 PM
Does Logitech ghub driver not support win7? -Why can Logitech ghub driver only be installed on the c drive?
Mar 18, 2024 pm 05:37 PM
Does Logitech ghub driver not support win7? Not compatible. Since Windows 7 has stopped updating and is no longer Microsoft's main operating system, many new software no longer supports it, such as Logitech ghub. The main interface of the Logitech driver: 1. The main software interface is on the left. The three buttons are lighting, buttons, and sensitivity settings. 2. In the settings of the lighting interface, the general special effects are relatively conventional, and the audio visual effects are the highlight. They can change color according to the sound frequency, and can be set according to the high, middle and bass bands, with different colors and effects. 3. In button settings, users can edit them here according to their special requirements. 4. In the sensitivity settings, many users will have some of their own settings. They can add the DPI speed switching point by themselves, but
 Steps to restore Logitech driver to default configuration
Feb 28, 2024 am 11:04 AM
Steps to restore Logitech driver to default configuration
Feb 28, 2024 am 11:04 AM
Facing the Logitech driver that cannot be used normally, it can only be solved by restoring the factory settings. However, many friends do not know how to restore the factory settings. The following will provide you with detailed steps to restore the factory settings. I hope it can help you. Steps to restore the Logitech driver to the default configuration: 1. First download the Logitech dedicated driver software GHub, and open it after the download is complete. 2. Then open the mouse to set up, and click the settings (gear) in the upper right corner. 3. At the bottom, click "Restore default settings" , click directly and reopen the software to restore factory settings. How to connect the Logitech driver to the device 1. Open the back cover of the mouse and take out the wireless mouse socket. 2. Select the mouse socket next to the computer. 3. Set the corresponding parameter information for the mouse. 4. Bluetooth pair the device and long press Bluetooth.
 How to download Razer mouse driver
Mar 11, 2024 pm 03:40 PM
How to download Razer mouse driver
Mar 11, 2024 pm 03:40 PM
Steps to download the Razer mouse driver: 1. Open the browser and enter the Razer official website; 2. On the official website page, find and click "Technical Support" or a similar option; 3. On the technical support page, select "Mouse" or the specific subcategory; 4. On the mouse driver download page, you can see various mouse models and their corresponding drivers; 5. Click the download link for the selected driver; 6. After the download is completed, check whether the downloaded file is complete , make sure nothing is damaged or missing.
 How to install Angular on Ubuntu 24.04
Mar 23, 2024 pm 12:20 PM
How to install Angular on Ubuntu 24.04
Mar 23, 2024 pm 12:20 PM
Angular.js is a freely accessible JavaScript platform for creating dynamic applications. It allows you to express various aspects of your application quickly and clearly by extending the syntax of HTML as a template language. Angular.js provides a range of tools to help you write, update and test your code. Additionally, it provides many features such as routing and form management. This guide will discuss how to install Angular on Ubuntu24. First, you need to install Node.js. Node.js is a JavaScript running environment based on the ChromeV8 engine that allows you to run JavaScript code on the server side. To be in Ub
 How to install win11 driver without digital signature_Tutorial on how to deal with win11 driver without digital signature
Mar 20, 2024 pm 04:46 PM
How to install win11 driver without digital signature_Tutorial on how to deal with win11 driver without digital signature
Mar 20, 2024 pm 04:46 PM
Some users have encountered some problems when installing drivers for win11 computers. The computer prompts that the digital signature of this file cannot be verified, resulting in the inability to install the driver. How to solve this problem? Please see the following introduction for details. 1. Press the [Win + [Ctrl+Shift+Enter] Open the Windows Powershell window with administrator rights; 3. User Account Control window, do you want to allow this application to make changes to your device? Click [Yes]; 4. Administrator: Windows Powers
 How to solve the problem that win11 driver does not have digital signature? Tutorial to solve the problem that win11 driver does not have digital signature
Feb 19, 2024 pm 11:20 PM
How to solve the problem that win11 driver does not have digital signature? Tutorial to solve the problem that win11 driver does not have digital signature
Feb 19, 2024 pm 11:20 PM
When we install the win11 system or run the program, we sometimes need a digital signature to use it normally. However, many users are asking how to solve the problem that the win11 driver does not have a digital signature? Users can open a Windows Powershell window with administrator rights to perform operations. Let this site carefully introduce to users the solution to the problem that the win11 driver does not have a digital signature. Solution to the problem that the win11 driver does not have a digital signature: 1. Press the [Win+X] key combination, or [right-click] click the [Windows logo] on the taskbar, and select [Run] in the menu item that opens. 2. In the run window, enter [powershel
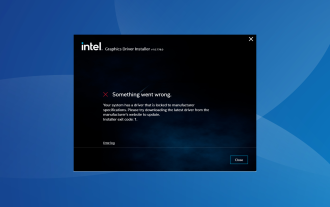 Fix: System driver locked to manufacturer specifications
Sep 23, 2023 pm 07:25 PM
Fix: System driver locked to manufacturer specifications
Sep 23, 2023 pm 07:25 PM
Graphics driver is one of the most important drivers on your PC, directly affecting performance and gaming experience. However, many people encounter the "Your system has drivers locked to manufacturer specifications" error when updating drivers through the installer. This issue occurs because the manufacturer restricts updates unless they are specifically pushed from their end. This ensures stability, but may be an issue for many people. So, let’s find out how to solve the problem now! How to fix your system with drivers locked to manufacturer specifications on Windows 11? Before we move on to slightly more complicated solutions, try these quick fixes: Make sure your computer and operating system meet the driver's system requirements. Boot your computer into safe mode, then
 Can the SteelSeries driver only be installed on the C drive?
Jan 02, 2024 am 08:07 AM
Can the SteelSeries driver only be installed on the C drive?
Jan 02, 2024 am 08:07 AM
Some SteelSeries users discovered after purchasing the driver that the default installation path was on the C drive. However, many people may not know that you can actually change the installation path. Now let's see how to make changes. Can the SteelSeries driver be installed only on the C drive? The SteelSeries driver is not limited to being installed on the C drive. SteelSeries driver files are usually installed in a specific folder under the C drive of the Windows operating system. Please note that the computer system will install its own driver on the C drive by default. Users can save downloaded third-party computer software on other disks. Users only need to change the installation path to the desired location during installation to make the replacement.
