

How to use ElementRef application in Angular4
This article mainly introduces the application of Angular4 ElementRef. Now I will share it with you and give you a reference.
Angular's slogan is - "One framework, multiple platforms. Suitable for both mobile phones and desktops (One framework.Mobile & desktop.)", that is, Angular supports the development of cross-platform applications, such as: Web applications , mobile web applications, native mobile applications and native desktop applications, etc.
In order to support cross-platform, Angular encapsulates the differences of different platforms through an abstraction layer and unifies the API interface. For example, abstract class Renderer, abstract class RootRenderer, etc. are defined. In addition, the following reference types are defined: ElementRef, TemplateRef, ViewRef, ComponentRef, ViewContainerRef, etc. Let's analyze the ElementRef class:
The role of ElementRef
Directly operating the DOM in the application layer will cause a gap between the application layer and the rendering layer Strong coupling prevents our applications from running in different environments, such as web workers, because in the web worker environment, the DOM cannot be directly manipulated. Interested readers can read the classes and methods supported in Web Workers. Through ElementRef, we can encapsulate native elements in the view layer under different platforms (in a browser environment, native elements usually refer to DOM elements). Finally, with the help of the powerful dependency injection feature provided by Angular, we can easily access native elements.
Definition of ElementRef
##
export class ElementRef {
 public nativeElement: any;
 constructor(nativeElement: any) { this.nativeElement = nativeElement; }
}import { Component, ElementRef } from '@angular/core'; @Component({
selector: 'my-app',
template: `
<h1>Welcome to Angular World</h1>
<p>Hello {{ name }}</p>
`,
}) export class AppComponent {
name: string = 'Semlinker'; constructor(private elementRef: ElementRef) { let pEle = this.elementRef.nativeElement.querySelector('p'); console.dir(pEle);
}
}
 constructor(private elementRef: ElementRef) {
 setTimeout(() => { // 此处需要使用箭头函数哈,你懂的...
   let pEle = this.elementRef.nativeElement.querySelector('p');
   console.dir(pEle);
  }, 0); }
import { Component, ElementRef, AfterViewInit } from '@angular/core'; @Component({
selector: 'my-app',
template: `
<h1>Welcome to Angular World</h1>
<p>Hello {{ name }}</p>
`,
}) export class AppComponent {
name: string = 'Semlinker'; // 在构造函数中 this.elementRef = elementRef 是可选的,编译时会自动赋值 // function AppComponent(elementRef) { this.elementRef = elementRef; } constructor(private elementRef: ElementRef) { }
ngAfterViewInit() { // 模板中的元素已创建完成 console.dir(this.elementRef.nativeElement.querySelector('p')); // let greetp: HTMLElement = this.elementRef.nativeElement.querySelector('p'); // greetp.style.backgroundColor = 'red'; }
}import { Component, ElementRef, ViewChild, AfterViewInit } from '@angular/core';
@Component({
selector: 'my-app',
template: ` <h1>Welcome to Angular World</h1>
<p #greet>Hello {{ name }}</p> `,
}) export class AppComponent { name: string = 'Semlinker';
@ViewChild('greet')
greetp: ElementRef;
ngAfterViewInit() { this.greetp.nativeElement.style.backgroundColor = 'red';
}
}import { Component, ElementRef, ViewChild, AfterViewInit, Renderer } from '@angular/core'; @Component({
selector: 'my-app',
template: `
<h1>Welcome to Angular World</h1>
<p #greet>Hello {{ name }}</p>
`,
}) export class AppComponent {
name: string = 'Semlinker'; @ViewChild('greet')
greetp: ElementRef; constructor(private elementRef: ElementRef, private renderer: Renderer) { }
ngAfterViewInit() { // this.greetp.nativeElement.style.backgroundColor = 'red'; this.renderer.setElementStyle(this.greetp.nativeElement, 'backgroundColor', 'red');
}
}export abstract class Renderer { // 创建元素 abstract createElement(parentElement: any, name: string,
debugInfo?: RenderDebugInfo): any; // 创建文本元素 abstract createText(parentElement: any, value: string,
debugInfo?: RenderDebugInfo): any; // 设置文本 abstract setText(renderNode: any, text: string): void; // 设置元素Property abstract setElementProperty(renderElement: any, propertyName: string,
propertyValue: any): void; // 设置元素Attribute abstract setElementAttribute(renderElement: any, attributeName: string,
attributeValue: string): void; // 设置元素的Class abstract setElementClass(renderElement: any, className: string,
isAdd: boolean): void; // 设置元素的样式 abstract setElementStyle(renderElement: any, styleName: string,
styleValue: string): void;
}export abstract class Renderer2 { abstract createElement(name: string, namespace?: string|null): any; abstract createComment(value: string): any; abstract createText(value: string): any; abstract setAttribute(el: any, name: string, value: string, namespace?: string|null): void; abstract removeAttribute(el: any, name: string, namespace?: string|null): void; abstract addClass(el: any, name: string): void; abstract removeClass(el: any, name: string): void; abstract setStyle(el: any, style: string, value: any,
flags?: RendererStyleFlags2): void; abstract removeStyle(el: any, style: string, flags?: RendererStyleFlags2): void; abstract setProperty(el: any, name: string, value: any): void; abstract setValue(node: any, value: string): void; abstract listen(
target: 'window'|'document'|'body'|any, eventName: string,
callback: (event: any) => boolean | void): () => void;
} About the method of closing the component by clicking outside the component in Vue (detailed tutorial)
About using How to insert variable parameters into vue.js tag attributes (detailed tutorial)
Problems with routing permission management using Vue (detailed tutorial)
The above is the detailed content of How to use ElementRef application in Angular4. For more information, please follow other related articles on the PHP Chinese website!

Hot AI Tools

Undresser.AI Undress
AI-powered app for creating realistic nude photos

AI Clothes Remover
Online AI tool for removing clothes from photos.

Undress AI Tool
Undress images for free

Clothoff.io
AI clothes remover

Video Face Swap
Swap faces in any video effortlessly with our completely free AI face swap tool!

Hot Article
Hot Tools

Notepad++7.3.1
Easy-to-use and free code editor

SublimeText3 Chinese version
Chinese version, very easy to use

Zend Studio 13.0.1
Powerful PHP integrated development environment

Dreamweaver CS6
Visual web development tools

SublimeText3 Mac version
God-level code editing software (SublimeText3)
Hot Topics
 1387
1387
 52
52

 How to Undo Delete from Home Screen in iPhone
Apr 17, 2024 pm 07:37 PM
How to Undo Delete from Home Screen in iPhone
Apr 17, 2024 pm 07:37 PM
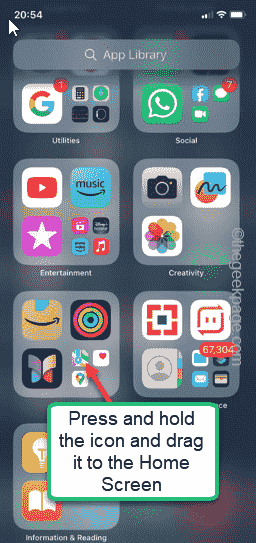
Deleted something important from your home screen and trying to get it back? You can put app icons back on the screen in a variety of ways. We have discussed all the methods you can follow and put the app icon back on the home screen. How to Undo Remove from Home Screen in iPhone As we mentioned before, there are several ways to restore this change on iPhone. Method 1 – Replace App Icon in App Library You can place an app icon on your home screen directly from the App Library. Step 1 – Swipe sideways to find all apps in the app library. Step 2 – Find the app icon you deleted earlier. Step 3 – Simply drag the app icon from the main library to the correct location on the home screen. This is the application diagram
 The role and practical application of arrow symbols in PHP
Mar 22, 2024 am 11:30 AM
The role and practical application of arrow symbols in PHP
Mar 22, 2024 am 11:30 AM
The role and practical application of arrow symbols in PHP In PHP, the arrow symbol (->) is usually used to access the properties and methods of objects. Objects are one of the basic concepts of object-oriented programming (OOP) in PHP. In actual development, arrow symbols play an important role in operating objects. This article will introduce the role and practical application of arrow symbols, and provide specific code examples to help readers better understand. 1. The role of the arrow symbol to access the properties of an object. The arrow symbol can be used to access the properties of an object. When we instantiate a pair
 From beginner to proficient: Explore various application scenarios of Linux tee command
Mar 20, 2024 am 10:00 AM
From beginner to proficient: Explore various application scenarios of Linux tee command
Mar 20, 2024 am 10:00 AM
The Linuxtee command is a very useful command line tool that can write output to a file or send output to another command without affecting existing output. In this article, we will explore in depth the various application scenarios of the Linuxtee command, from entry to proficiency. 1. Basic usage First, let’s take a look at the basic usage of the tee command. The syntax of tee command is as follows: tee[OPTION]...[FILE]...This command will read data from standard input and save the data to
 Explore the advantages and application scenarios of Go language
Mar 27, 2024 pm 03:48 PM
Explore the advantages and application scenarios of Go language
Mar 27, 2024 pm 03:48 PM
The Go language is an open source programming language developed by Google and first released in 2007. It is designed to be a simple, easy-to-learn, efficient, and highly concurrency language, and is favored by more and more developers. This article will explore the advantages of Go language, introduce some application scenarios suitable for Go language, and give specific code examples. Advantages: Strong concurrency: Go language has built-in support for lightweight threads-goroutine, which can easily implement concurrent programming. Goroutin can be started by using the go keyword
 The wide application of Linux in the field of cloud computing
Mar 20, 2024 pm 04:51 PM
The wide application of Linux in the field of cloud computing
Mar 20, 2024 pm 04:51 PM
The wide application of Linux in the field of cloud computing With the continuous development and popularization of cloud computing technology, Linux, as an open source operating system, plays an important role in the field of cloud computing. Due to its stability, security and flexibility, Linux systems are widely used in various cloud computing platforms and services, providing a solid foundation for the development of cloud computing technology. This article will introduce the wide range of applications of Linux in the field of cloud computing and give specific code examples. 1. Application virtualization technology of Linux in cloud computing platform Virtualization technology
 Understanding MySQL timestamps: functions, features and application scenarios
Mar 15, 2024 pm 04:36 PM
Understanding MySQL timestamps: functions, features and application scenarios
Mar 15, 2024 pm 04:36 PM
MySQL timestamp is a very important data type, which can store date, time or date plus time. In the actual development process, rational use of timestamps can improve the efficiency of database operations and facilitate time-related queries and calculations. This article will discuss the functions, features, and application scenarios of MySQL timestamps, and explain them with specific code examples. 1. Functions and characteristics of MySQL timestamps There are two types of timestamps in MySQL, one is TIMESTAMP
 Apple tutorial on how to close running apps
Mar 22, 2024 pm 10:00 PM
Apple tutorial on how to close running apps
Mar 22, 2024 pm 10:00 PM
1. First we click on the little white dot. 2. Click the device. 3. Click More. 4. Click Application Switcher. 5. Just close the application background.
 Discuss the concept and application of macros in Golang
Mar 05, 2024 pm 10:00 PM
Discuss the concept and application of macros in Golang
Mar 05, 2024 pm 10:00 PM
In Golang, macro (Macro) is an advanced programming technology that can help programmers simplify the code structure and improve the maintainability of the code. Macros are a source code level text replacement mechanism that replaces macro code snippets with actual code snippets during compilation. In this article, we will explore the concept and application of macros in Golang and provide specific code examples. 1. The concept of macros In Golang, macros are not a natively supported feature because the original design intention of Golang is to keep the language simple and clear.
