How to use the compile operation method in Vue
这篇文章主要介绍了Vue 中的compile操作方法,非常不错,具有参考借鉴价值,需要的朋友参考下吧
在 Vue 里,模板编译也是非常重要的一部分,里面也非常复杂,这次探究不会深入探究每一个细节,而是走一个全景概要,来吧,大家和我一起去一探究竟。
初体验
我们看了 Vue 的初始化函数就会知道,在最后一步,它进行了 vm.$mount(el) 的操作,而这个 $mount 在两个地方定义过,分别是在 entry-runtime-with-compiler.js(简称:eMount) 和 runtime/index.js(简称:rMount) 这两个文件里,那么这两个有什么区别呢?
// entry-runtime-with-compiler.js
const mount = Vue.prototype.$mount // 这个 $mount 其实就是 rMount
Vue.prototype.$mount = function (
 el?: string | Element,
 hydrating?: boolean
): Component {
 const options = this.$options
 if (!options.render) {
 ...
 if(template) {
  const { render, staticRenderFns } = compileToFunctions(template, {
  shouldDecodeNewlines,
  shouldDecodeNewlinesForHref,
  delimiters: options.delimiters,
  comments: options.comments
  }, this)
  options.render = render
  options.staticRenderFns = staticRenderFns
 }
 ...
 }
 return mount.call(this, el, hydrating)
}其实 eMount 最后还是去调用的 rMount,只不过在 eMount 做了一定的操作,如果你提供了 render 函数,那么它会直接去调用 rMount,如果没有,它就会去找你有没有提供 template,如果你没有提供 template,它就会用 el 去查询 dom 生成 template,最后通过编译返回了一个 render 函数,再去调用 eMount。
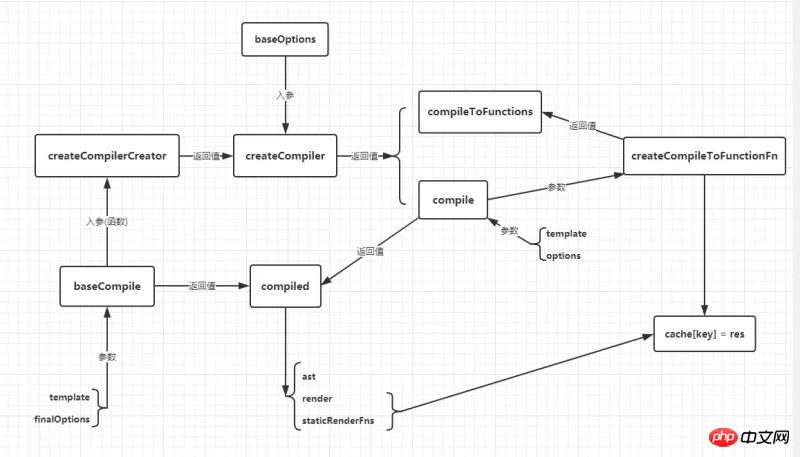
从上面可以看出,最重要的一部分就是 compileToFunctions 这个函数,它最后返回了 render 函数,关于这个函数,它有点复杂,我画了一张图来看一看它的关系,可能会有误差,希望大侠们可以指出。

编译三步走
看一下这个编译的整体过程,我们其实可以发现,最核心的部分就是在这里传进去的 baseCompile 做的工作:
parse: 第一步,我们需要将 template 转换成抽象语法树(AST)。
optimizer: 第二步,我们对这个抽象语法树进行静态节点的标记,这样就可以优化渲染过程。
generateCode: 第三步,根据 AST 生成一个 render 函数字符串。
好了,我们接下来就一个一个慢慢看。
解析器
在解析器中有一个非常重要的概念 AST,大家可以去自行了解一下。
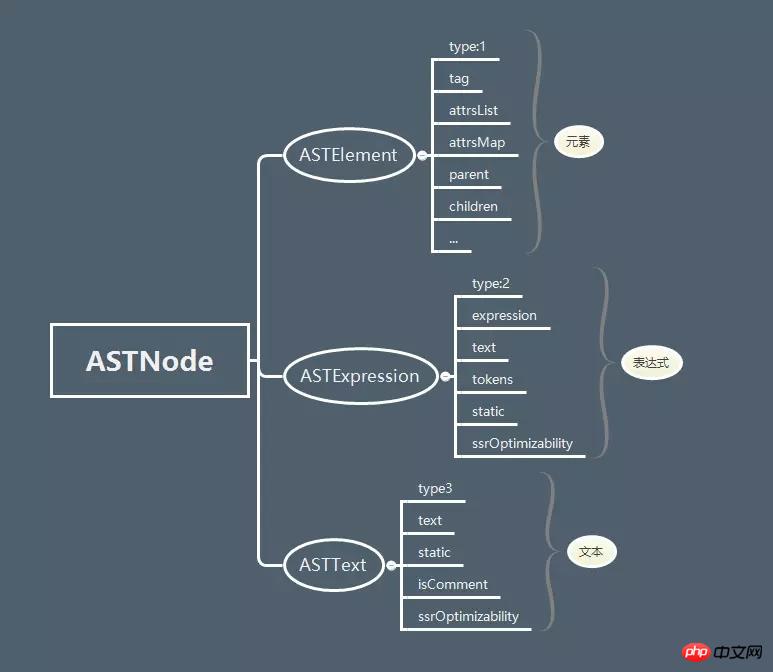
在 Vue 中,ASTNode 分几种不同类型,关于 ASTNode 的定义在 flow/compile.js 里面,请看下图:

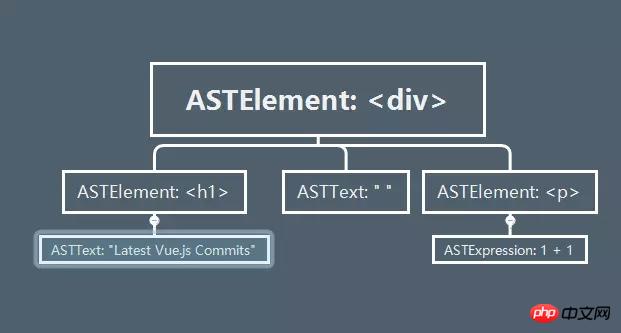
我们用一个简单的例子来说明一下:
<p id="demo">
 <h1>Latest Vue.js Commits</h1>
 <p>{{1 + 1}}</p>
</p>我们想一想这段代码会生成什么样的 AST 呢?

我们这个例子最后生成的大概就是这么一棵树,那么 Vue 是如何去做这样一些解析的呢?我们继续看。
在 parse 函数中,我们先是定义了非常多的全局属性以及函数,然后调用了 parseHTML 这么一个函数,这也是 parse 最核心的函数,这个函数会不断的解析模板,填充 root,最后把 root(AST) 返回回去。
parseHTML
在这个函数中,最重要的是 while 循环中的代码,而在解析过程中发挥重要作用的有这么几个正则表达式。
const attribute = /^\s*([^\s"'<>\/=]+)(?:\s*(=)\s*(?:"([^"]*)"+|'([^']*)'+|([^\s"'=<>`]+)))?/
const ncname = '[a-zA-Z_][\\w\\-\\.]*'
const qnameCapture = `((?:${ncname}\\:)?${ncname})`
const startTagOpen = new RegExp(`^<${qnameCapture}`)
const startTagClose = /^\s*(\/?)>/
const endTag = new RegExp(`^<\\/${qnameCapture}[^>]*>`)
const doctype = /^<!DOCTYPE [^>]+>/i
const comment = /^<!\--/
const conditionalComment = /^<!\[/Vue 通过上面几个正则表达式去匹配开始结束标签、标签名、属性等等。
关于 while 的详细注解我放在我仓库里了,有兴趣的可以去看看。
在 while 里,其实就是不断的去用 html.indexOf('<') 去匹配,然后根据返回的索引的不同去做不同的解析处理:
__等于 0:__这就代表这是注释、条件注释、doctype、开始标签、结束标签中的某一种
__大于等于 0:__这就说明是文本、表达式
__小于 0:__表示 html 标签解析完了,可能会剩下一些文本、表达式
parse 函数就是不断的重复这个工作,然后将 template 转换成 AST,在解析过程中,其实对于标签与标签之间的空格,Vue 也做了优化处理,有些元素之间的空格是没用的。
compile 其实要说要说非常多的篇幅,但是这里只能简单的理一下思路,具体代码还需要各位下去深扣。
优化器
从代码中的注释我们可以看出,优化器的目的就是去找出 AST 中纯静态的子树:
把纯静态子树提升为常量,每次重新渲染的时候就不需要创建新的节点了
在 patch 的时候就可以跳过它们
optimize 的代码量没有 parse 那么多,我们来看看:
export function optimize (root: ?ASTElement, options: CompilerOptions) {
 // 判断 root 是否存在
 if (!root) return
 // 判断是否是静态的属性
 // 'type,tag,attrsList,attrsMap,plain,parent,children,attrs'
 isStaticKey = genStaticKeysCached(options.staticKeys || '')
 // 判断是否是平台保留的标签,html 或者 svg 的
 isPlatformReservedTag = options.isReservedTag || no
 // 第一遍遍历: 给所有静态节点打上是否是静态节点的标记
 markStatic(root)
 // 第二遍遍历:标记所有静态根节点
 markStaticRoots(root, false)
}下面两段代码我都剪切了一部分,因为有点多,这里就不贴太多代码了,详情请参考我的仓库。
第一遍遍历
function markStatic (node: ASTNode) {
 node.static = isStatic(node)
 if (node.type === 1) {
 ...
 }
}其实 markStatic 就是一个递归的过程,不断地去检查 AST 上的节点,然后打上标记。
刚刚我们说过,AST 节点分三种,在 isStatic 这个函数中我们对不同类型的节点做了判断:
function isStatic (node: ASTNode): boolean {
 if (node.type === 2) { // expression
 return false
 }
 if (node.type === 3) { // text
 return true
 }
 return !!(node.pre || (
 !node.hasBindings && // no dynamic bindings
 !node.if && !node.for && // not v-if or v-for or v-else
 !isBuiltInTag(node.tag) && // not a built-in
 isPlatformReservedTag(node.tag) && // not a component
 !isDirectChildOfTemplateFor(node) &&
 Object.keys(node).every(isStaticKey)
 ))
}可以看到 Vue 对下面几种情况做了处理:
当这个节点的 type 为 2,也就是表达式节点的时候,很明显它不是一个静态节点,所以返回 false
当 type 为 3 的时候,也就是文本节点,那它就是一个静态节点,返回 true
如果你在元素节点中使用了 v-pre 或者使用了 <pre class="brush:php;toolbar:false"></code> 标签,就会在这个节点上加上 pre 为 true,那么这就是个静态节点</p><p>如果它是静态节点,那么需要它不能有动态的绑定、不能有 v-if、v-for、v-else 这些指令,不能是 slot 或者 component 标签、不是我们自定义的标签、没有父节点或者元素的父节点不能是带 v-for 的 template、 这个节点的属性都在 type,tag,attrsList,attrsMap,plain,parent,children,attrs 里面,满足这些条件,就认为它是静态的节点。</p><p>接下来,就开始对 AST 进行递归操作,标记静态的节点,至于里面做了哪些操作,可以到上面那个仓库里去看,这里就不展开了。</p><p><strong>第二遍遍历</strong></p><p>第二遍遍历的过程是标记静态根节点,那么我们对静态根节点的定义是什么,首先根节点的意思就是他不能是叶子节点,起码要有子节点,并且它是静态的。在这里 Vue 做了一个说明,如果一个静态节点它只拥有一个子节点并且这个子节点是文本节点,那么就不做静态处理,它的成本大于收益,不如直接渲染。<br/></p><p>同样的,我们在函数中不断的递归进行标记,最后在所有静态根节点上加上 staticRoot 的标记,关于这段代码也可以去上面的仓库看一看。</p><p><span style="color: #ff0000"><strong>代码生成器</strong></span></p><p>在这个函数中,我们将 AST 转换成为 render 函数字符串,代码量还是挺多的,我们可以来看一看。</p><p class="jb51code"></p><div class="code" style="position:relative; padding:0px; margin:0px;"><pre class='brush:php;toolbar:false;'>export function generate (
ast: ASTElement | void,
options: CompilerOptions
): CodegenResult {
// 这就是编译的一些参数
const state = new CodegenState(options)
// 生成 render 字符串
const code = ast ? genElement(ast, state) : &#39;_c("p")&#39;
return {
render: `with(this){return $[code]}`,
staticRenderFns: state.staticRenderFns
}
}</pre><div class="contentsignin">Copy after login</div></div><p></p><p>可以看到在最后代码生成阶段,最重要的函数就是 genElement 这个函数,针对不同的指令、属性,我们会选择不同的代码生成函数。最后我们按照 AST 生成拼接成一个字符串,如下所示:</p><p class="jb51code"></p><div class="code" style="position:relative; padding:0px; margin:0px;"><pre class='brush:php;toolbar:false;'>with(this){return _c(&#39;p&#39;,{attrs:{"id":"demo"}},[(1>0)?_c(&#39;h1&#39;,[_v("Latest Vue.js Commits")]):_e(),...}</pre><div class="contentsignin">Copy after login</div></div><p></p><p>在 render 这个函数字符串中,我们会看到一些函数,那么这些函数是在什么地方定义的呢?我们可以在 core/instance/index.js 这个文件中找到这些函数:</p><p class="jb51code"></p><div class="code" style="position:relative; padding:0px; margin:0px;"><pre class='brush:php;toolbar:false;'>// v-once
target._o = markOnce
// 转换
target._n = toNumber
target._s = toString
// v-for
target._l = renderList
// slot
target._t = renderSlot
// 是否相等
target._q = looseEqual
// 检测数组里是否有相等的值
target._i = looseIndexOf
// 渲染静态树
target._m = renderStatic
// 过滤器处理
target._f = resolveFilter
// 检查关键字
target._k = checkKeyCodes
// v-bind
target._b = bindObjectProps
// 创建文本节点
target._v = createTextVNode
// 创建空节点
target._e = createEmptyVNode
// 处理 scopeslot
target._u = resolveScopedSlots
// 处理事件绑定
target._g = bindObjectListeners
// 创建 VNode 节点
vm._c = (a, b, c, d) => createElement(vm, a, b, c, d, false)</pre><div class="contentsignin">Copy after login</div></div><p></p>
<p>在编译结束后,我们根据不同的指令、属性等等去选择需要调用哪一个处理函数,最后拼接成一个函数字符串。</p>
<p>我们可以很清楚的看到,最后生成了一个 render 渲染字符串,那么我们要如何去使用它呢?其实在后面进行渲染的时候,我们进行了 <code>new Function(render) 的操作,然后我们就能够正常的使用 render 函数了。
总结
大流程走完之后,我相信大家会对编译过程有一个比较清晰的认识,然后再去挖细节相信也会容易的多了,读源码,其实并不是一个为了读而读的过程,我们可以在源码中学到很多我们可能在日常开发中没有了解到的知识。
至于最后代码生成器中的那一大段代码,我还没有把它注释好,后面应该会将源码注释放到仓库里,不过我也相信大家也能够顺利的去读懂源码。
还有一点要提的是在 render 函数中,Vue 使用了 with 函数,我们平时肯定没见过,因为官方不推荐我们去使用 with,我抱着这样的想法去找了找原因,最后我在知乎上找到了尤大大的回答,这是链接,大家可以去了解下。
上面是我整理给大家的,希望今后会对大家有帮助。
相关文章:
浅谈angular4.0中路由传递参数、获取参数最nice的写法
The above is the detailed content of How to use the compile operation method in Vue. For more information, please follow other related articles on the PHP Chinese website!

Hot AI Tools

Undresser.AI Undress
AI-powered app for creating realistic nude photos

AI Clothes Remover
Online AI tool for removing clothes from photos.

Undress AI Tool
Undress images for free

Clothoff.io
AI clothes remover

Video Face Swap
Swap faces in any video effortlessly with our completely free AI face swap tool!

Hot Article

Hot Tools

Notepad++7.3.1
Easy-to-use and free code editor

SublimeText3 Chinese version
Chinese version, very easy to use

Zend Studio 13.0.1
Powerful PHP integrated development environment

Dreamweaver CS6
Visual web development tools

SublimeText3 Mac version
God-level code editing software (SublimeText3)

Hot Topics
 1386
1386
 52
52
 How to write a novel in the Tomato Free Novel app. Share the tutorial on how to write a novel in Tomato Novel.
Mar 28, 2024 pm 12:50 PM
Tomato Novel is a very popular novel reading software. We often have new novels and comics to read in Tomato Novel. Every novel and comic is very interesting. Many friends also want to write novels. Earn pocket money and edit the content of the novel you want to write into text. So how do we write the novel in it? My friends don’t know, so let’s go to this site together. Let’s take some time to look at an introduction to how to write a novel. Share the Tomato novel tutorial on how to write a novel. 1. First open the Tomato free novel app on your mobile phone and click on Personal Center - Writer Center. 2. Jump to the Tomato Writer Assistant page - click on Create a new book at the end of the novel.
 How to enter bios on Colorful motherboard? Teach you two methods
Mar 13, 2024 pm 06:01 PM
Colorful motherboards enjoy high popularity and market share in the Chinese domestic market, but some users of Colorful motherboards still don’t know how to enter the bios for settings? In response to this situation, the editor has specially brought you two methods to enter the colorful motherboard bios. Come and try it! Method 1: Use the U disk startup shortcut key to directly enter the U disk installation system. The shortcut key for the Colorful motherboard to start the U disk with one click is ESC or F11. First, use Black Shark Installation Master to create a Black Shark U disk boot disk, and then turn on the computer. When you see the startup screen, continuously press the ESC or F11 key on the keyboard to enter a window for sequential selection of startup items. Move the cursor to the place where "USB" is displayed, and then
 How to recover deleted contacts on WeChat (simple tutorial tells you how to recover deleted contacts)
May 01, 2024 pm 12:01 PM
Unfortunately, people often delete certain contacts accidentally for some reasons. WeChat is a widely used social software. To help users solve this problem, this article will introduce how to retrieve deleted contacts in a simple way. 1. Understand the WeChat contact deletion mechanism. This provides us with the possibility to retrieve deleted contacts. The contact deletion mechanism in WeChat removes them from the address book, but does not delete them completely. 2. Use WeChat’s built-in “Contact Book Recovery” function. WeChat provides “Contact Book Recovery” to save time and energy. Users can quickly retrieve previously deleted contacts through this function. 3. Enter the WeChat settings page and click the lower right corner, open the WeChat application "Me" and click the settings icon in the upper right corner to enter the settings page.
 How to set font size on mobile phone (easily adjust font size on mobile phone)
May 07, 2024 pm 03:34 PM
Setting font size has become an important personalization requirement as mobile phones become an important tool in people's daily lives. In order to meet the needs of different users, this article will introduce how to improve the mobile phone use experience and adjust the font size of the mobile phone through simple operations. Why do you need to adjust the font size of your mobile phone - Adjusting the font size can make the text clearer and easier to read - Suitable for the reading needs of users of different ages - Convenient for users with poor vision to use the font size setting function of the mobile phone system - How to enter the system settings interface - In Find and enter the "Display" option in the settings interface - find the "Font Size" option and adjust it. Adjust the font size with a third-party application - download and install an application that supports font size adjustment - open the application and enter the relevant settings interface - according to the individual
 The secret of hatching mobile dragon eggs is revealed (step by step to teach you how to successfully hatch mobile dragon eggs)
May 04, 2024 pm 06:01 PM
Mobile games have become an integral part of people's lives with the development of technology. It has attracted the attention of many players with its cute dragon egg image and interesting hatching process, and one of the games that has attracted much attention is the mobile version of Dragon Egg. To help players better cultivate and grow their own dragons in the game, this article will introduce to you how to hatch dragon eggs in the mobile version. 1. Choose the appropriate type of dragon egg. Players need to carefully choose the type of dragon egg that they like and suit themselves, based on the different types of dragon egg attributes and abilities provided in the game. 2. Upgrade the level of the incubation machine. Players need to improve the level of the incubation machine by completing tasks and collecting props. The level of the incubation machine determines the hatching speed and hatching success rate. 3. Collect the resources required for hatching. Players need to be in the game
 Quickly master: How to open two WeChat accounts on Huawei mobile phones revealed!
Mar 23, 2024 am 10:42 AM
In today's society, mobile phones have become an indispensable part of our lives. As an important tool for our daily communication, work, and life, WeChat is often used. However, it may be necessary to separate two WeChat accounts when handling different transactions, which requires the mobile phone to support logging in to two WeChat accounts at the same time. As a well-known domestic brand, Huawei mobile phones are used by many people. So what is the method to open two WeChat accounts on Huawei mobile phones? Let’s reveal the secret of this method. First of all, you need to use two WeChat accounts at the same time on your Huawei mobile phone. The easiest way is to
 Linux Deploy operation steps and precautions
Mar 14, 2024 pm 03:03 PM
LinuxDeploy operating steps and precautions LinuxDeploy is a powerful tool that can help users quickly deploy various Linux distributions on Android devices, allowing users to experience a complete Linux system on their mobile devices. This article will introduce the operating steps and precautions of LinuxDeploy in detail, and provide specific code examples to help readers better use this tool. Operation steps: Install LinuxDeploy: First, install
 The difference between Go language methods and functions and analysis of application scenarios
Apr 04, 2024 am 09:24 AM
The difference between Go language methods and functions lies in their association with structures: methods are associated with structures and are used to operate structure data or methods; functions are independent of types and are used to perform general operations.


