Detailed interpretation of Node timer knowledge
This article mainly introduces the relevant knowledge of Node timer. It is very good and has reference value. Friends in need can refer to it
JavaScript runs in a single thread, and asynchronous operations are particularly important.
As long as functions outside the engine are used, they need to interact with the outside, thus forming asynchronous operations. Because there are so many asynchronous operations, JavaScript has to provide a lot of asynchronous syntax. It's like, some people are always hit, and their ability to resist blows must become stronger, otherwise they will be finished.
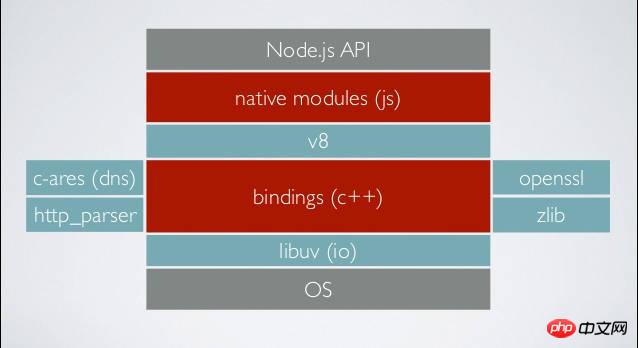
Node’s asynchronous syntax is more complicated than that of a browser, because it can talk to the kernel, and a special library libuv has to be built to do this. This library is responsible for the execution time of various callback functions. After all, asynchronous tasks must eventually return to the main thread and be queued for execution one by one.

In order to coordinate asynchronous tasks, Node actually provides four timers so that tasks can run at specified times.
setTimeout()
setInterval()
setImmediate()
process.nextTick()
The first two are language standards, and the last two are unique to Node. They are written in similar ways and have similar functions, so it is not easy to distinguish them.
Can you tell me the result of running the following code?
// test.js
setTimeout(() => console.log(1));
setImmediate(() => console.log(2));
process.nextTick(() => console.log(3));
Promise.resolve().then(() => console.log(4));
(() => console.log(5))();
The running results are as follows.
$ node test.js
If you can get it right right away, you may not need to read any more. This article explains in detail how Node handles various timers, or more broadly, how the libuv library arranges asynchronous tasks to be executed on the main thread.
1. Synchronous tasks and asynchronous tasks
First of all, synchronous tasks are always executed earlier than asynchronous tasks.
In the previous piece of code, only the last line is a synchronization task, so it is executed earliest.
(() => console.log(5))();
2. This cycle and the second cycle
Asynchronous tasks can be divided into two types.
Add asynchronous tasks in this cycle
Add asynchronous tasks in the second cycle
The so-called "loop" refers to the event loop. This is how the JavaScript engine handles asynchronous tasks, which will be explained in detail later. Just understand here that this cycle must be executed earlier than the second cycle.
Node stipulates that the callback functions of process.nextTick and Promise are appended to this cycle, that is, once the synchronization tasks are completed, they will be executed. The callback functions of setTimeout, setInterval, and setImmediate are added in the second cycle.
This means that the third and fourth lines of the code at the beginning of the article must be executed earlier than the first and second lines.
// 下面两行,次轮循环执行
setTimeout(() => console.log(1));
setImmediate(() => console.log(2));
// 下面两行,本轮循环执行
process.nextTick(() => console.log(3));
Promise.resolve().then(() => console.log(4));
3. process.nextTick()
The name process.nextTick is a bit misleading. It is executed in this cycle, and It is the fastest execution among all asynchronous tasks.

#After Node has executed all synchronization tasks, it will then execute the task queue of process.nextTick. So, the following line of code is the second output.
process.nextTick(() => console.log(3));
Basically, if you want an asynchronous task to execute as fast as possible, use process.nextTick.
4. Microtasks
According to the language specifications, the callback function of the Promise object will enter the asynchronous task "Microtask" (microtask) queue.
The microtask queue is appended behind the process.nextTick queue and also belongs to this cycle. Therefore, the following code always outputs 3 first and then 4.
process.nextTick(() => console.log(3));
Promise.resolve().then(() => console.log(4));
// 3
// 4

Note that the next queue will not be executed until the previous queue is completely emptied.
process.nextTick(() => console.log(1));
Promise.resolve().then(() => console.log(2));
process.nextTick(() => console.log(3));
Promise.resolve().then(() => console.log(4));
// 1
// 3
// 2
// 4
In the above code, all callback functions of process.nextTick will be executed earlier than Promise.
At this point, the execution sequence of this cycle is finished.
同步任务
process.nextTick()
微任务
5. The concept of event loop
The following begins to introduce the execution sequence of the second cycle, which requires understanding what an event loop is ( event loop).
Node’s official documentation introduces it like this.
“When Node.js starts, it initializes the event loop, processes the provided input script which may make async API calls, schedule timers, or call process.nextTick(), then begins processing the event loop.”
This passage is very important and needs to be read carefully. It expresses three levels of meaning.
First of all, some people think that in addition to the main thread, there is a separate event loop thread. That's not the case, there is only one main thread, and the event loop is completed on the main thread.
其次,Node 开始执行脚本时,会先进行事件循环的初始化,但是这时事件循环还没有开始,会先完成下面的事情。
同步任务
发出异步请求
规划定时器生效的时间
执行process.nextTick()等等
最后,上面这些事情都干完了,事件循环就正式开始了。
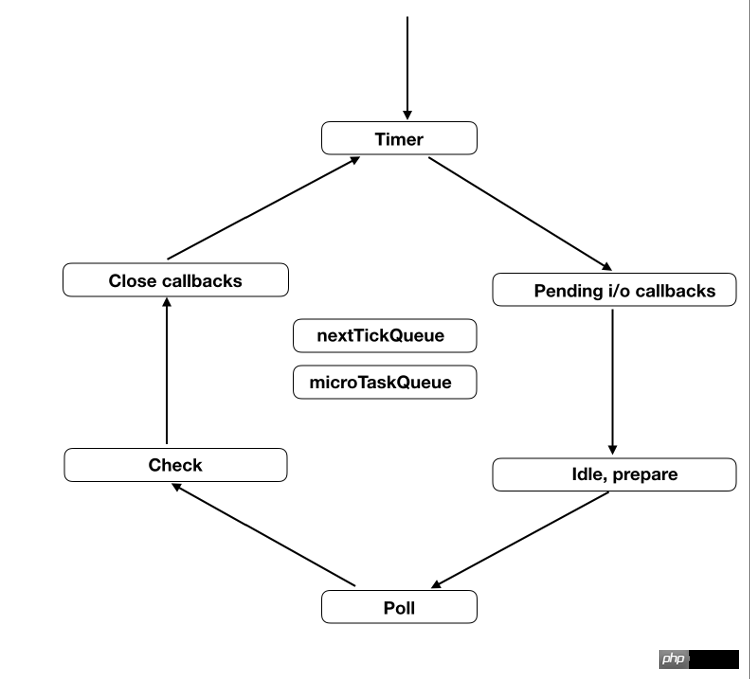
六、事件循环的六个阶段
事件循环会无限次地执行,一轮又一轮。只有异步任务的回调函数队列清空了,才会停止执行。
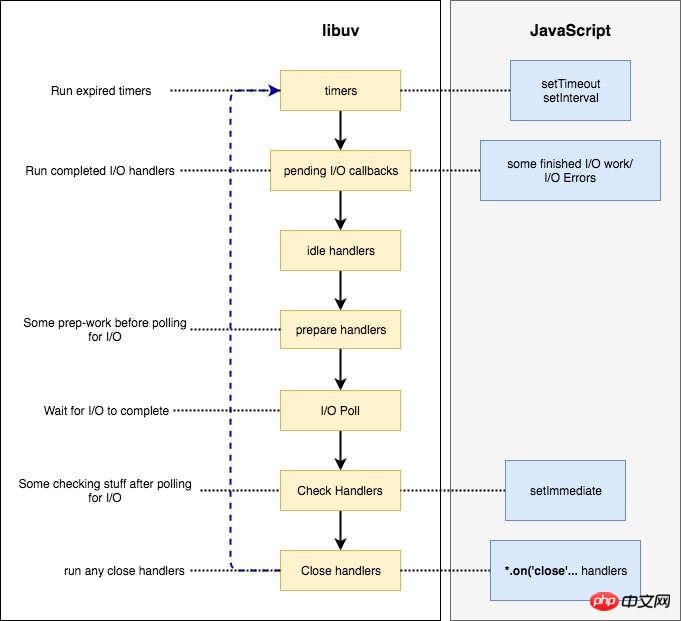
每一轮的事件循环,分成六个阶段。这些阶段会依次执行。
timers
I/O callbacks
idle, prepare
poll
check
close callbacks
每个阶段都有一个先进先出的回调函数队列。只有一个阶段的回调函数队列清空了,该执行的回调函数都执行了,事件循环才会进入下一个阶段。

下面简单介绍一下每个阶段的含义,详细介绍可以看官方文档,也可以参考 libuv 的源码解读。
(1)timers
这个是定时器阶段,处理setTimeout()和setInterval()的回调函数。进入这个阶段后,主线程会检查一下当前时间,是否满足定时器的条件。如果满足就执行回调函数,否则就离开这个阶段。
(2)I/O callbacks
除了以下操作的回调函数,其他的回调函数都在这个阶段执行。
setTimeout()和setInterval()的回调函数
setImmediate()的回调函数
用于关闭请求的回调函数,比如socket.on('close', ...)
(3)idle, prepare
该阶段只供 libuv 内部调用,这里可以忽略。
(4)Poll
这个阶段是轮询时间,用于等待还未返回的 I/O 事件,比如服务器的回应、用户移动鼠标等等。
这个阶段的时间会比较长。如果没有其他异步任务要处理(比如到期的定时器),会一直停留在这个阶段,等待 I/O 请求返回结果。
(5)check
该阶段执行setImmediate()的回调函数。
(6)close callbacks
该阶段执行关闭请求的回调函数,比如socket.on('close', ...)。
七、事件循环的示例
下面是来自官方文档的一个示例。
const fs = require('fs');
const timeoutScheduled = Date.now();
// 异步任务一:100ms 后执行的定时器
setTimeout(() => {
 const delay = Date.now() - timeoutScheduled;
 console.log(`${delay}ms`);
}, 100);
// 异步任务二:至少需要 200ms 的文件读取
fs.readFile('test.js', () => {
 const startCallback = Date.now();
 while (Date.now() - startCallback < 200) {
 // 什么也不做
 }
});上面代码有两个异步任务,一个是 100ms 后执行的定时器,一个是至少需要 200ms 的文件读取。请问运行结果是什么?

脚本进入第一轮事件循环以后,没有到期的定时器,也没有已经可以执行的 I/O 回调函数,所以会进入 Poll 阶段,等待内核返回文件读取的结果。由于读取小文件一般不会超过 100ms,所以在定时器到期之前,Poll 阶段就会得到结果,因此就会继续往下执行。
第二轮事件循环,依然没有到期的定时器,但是已经有了可以执行的 I/O 回调函数,所以会进入 I/O callbacks 阶段,执行fs.readFile的回调函数。这个回调函数需要 200ms,也就是说,在它执行到一半的时候,100ms 的定时器就会到期。但是,必须等到这个回调函数执行完,才会离开这个阶段。
第三轮事件循环,已经有了到期的定时器,所以会在 timers 阶段执行定时器。最后输出结果大概是200多毫秒。
八、setTimeout 和 setImmediate
由于setTimeout在 timers 阶段执行,而setImmediate在 check 阶段执行。所以,setTimeout会早于setImmediate完成。
setTimeout(() => console.log(1));
setImmediate(() => console.log(2));
上面代码应该先输出1,再输出2,但是实际执行的时候,结果却是不确定,有时还会先输出2,再输出1。
这是因为setTimeout的第二个参数默认为0。但是实际上,Node 做不到0毫秒,最少也需要1毫秒,根据官方文档,第二个参数的取值范围在1毫秒到2147483647毫秒之间。也就是说,setTimeout(f, 0)等同于setTimeout(f, 1)。
实际执行的时候,进入事件循环以后,有可能到了1毫秒,也可能还没到1毫秒,取决于系统当时的状况。如果没到1毫秒,那么 timers 阶段就会跳过,进入 check 阶段,先执行setImmediate的回调函数。
但是,下面的代码一定是先输出2,再输出1。
const fs = require('fs');
fs.readFile('test.js', () => {
 setTimeout(() => console.log(1));
 setImmediate(() => console.log(2));
});上面代码会先进入 I/O callbacks 阶段,然后是 check 阶段,最后才是 timers 阶段。因此,setImmediate才会早于setTimeout执行。
上面是我整理给大家的,希望今后会对大家有帮助。
相关文章:
The above is the detailed content of Detailed interpretation of Node timer knowledge. For more information, please follow other related articles on the PHP Chinese website!

Hot AI Tools

Undresser.AI Undress
AI-powered app for creating realistic nude photos

AI Clothes Remover
Online AI tool for removing clothes from photos.

Undress AI Tool
Undress images for free

Clothoff.io
AI clothes remover

Video Face Swap
Swap faces in any video effortlessly with our completely free AI face swap tool!

Hot Article

Hot Tools

Notepad++7.3.1
Easy-to-use and free code editor

SublimeText3 Chinese version
Chinese version, very easy to use

Zend Studio 13.0.1
Powerful PHP integrated development environment

Dreamweaver CS6
Visual web development tools

SublimeText3 Mac version
God-level code editing software (SublimeText3)

Hot Topics
 1392
1392
 52
52
 36
36
 110
110
 How to use express to handle file upload in node project
Mar 28, 2023 pm 07:28 PM
How to handle file upload? The following article will introduce to you how to use express to handle file uploads in the node project. I hope it will be helpful to you!
 How to delete node in nvm
Dec 29, 2022 am 10:07 AM
How to delete node with nvm: 1. Download "nvm-setup.zip" and install it on the C drive; 2. Configure environment variables and check the version number through the "nvm -v" command; 3. Use the "nvm install" command Install node; 4. Delete the installed node through the "nvm uninstall" command.
 An in-depth analysis of Node's process management tool 'pm2”
Apr 03, 2023 pm 06:02 PM
This article will share with you Node's process management tool "pm2", and talk about why pm2 is needed, how to install and use pm2, I hope it will be helpful to everyone!
 Pi Node Teaching: What is a Pi Node? How to install and set up Pi Node?
Mar 05, 2025 pm 05:57 PM
Detailed explanation and installation guide for PiNetwork nodes This article will introduce the PiNetwork ecosystem in detail - Pi nodes, a key role in the PiNetwork ecosystem, and provide complete steps for installation and configuration. After the launch of the PiNetwork blockchain test network, Pi nodes have become an important part of many pioneers actively participating in the testing, preparing for the upcoming main network release. If you don’t know PiNetwork yet, please refer to what is Picoin? What is the price for listing? Pi usage, mining and security analysis. What is PiNetwork? The PiNetwork project started in 2019 and owns its exclusive cryptocurrency Pi Coin. The project aims to create a one that everyone can participate
 How to set a timer on your iPhone camera
Apr 14, 2023 am 10:43 AM
How long can you set a timer on your iPhone camera? When you access the timer options in the iPhone's camera app, you'll be given the option to choose between two modes: 3 seconds (3s) and 10 seconds (10s). The first option lets you take a quick selfie from the front or rear camera while you're holding your iPhone. The second option is useful in scenes where you can mount your iPhone on a tripod from a distance to click group photos or selfies. How to Set a Timer on an iPhone Camera While setting a timer on an iPhone camera is a fairly simple process, exactly how to do it varies depending on the iPhone model you're using.
 What to do if npm node gyp fails
Dec 29, 2022 pm 02:42 PM
npm node gyp fails because "node-gyp.js" does not match the version of "Node.js". The solution is: 1. Clear the node cache through "npm cache clean -f"; 2. Through "npm install -g n" Install the n module; 3. Install the "node v12.21.0" version through the "n v12.21.0" command.
 Token-based authentication with Angular and Node
Sep 01, 2023 pm 02:01 PM
Authentication is one of the most important parts of any web application. This tutorial discusses token-based authentication systems and how they differ from traditional login systems. By the end of this tutorial, you will see a fully working demo written in Angular and Node.js. Traditional Authentication Systems Before moving on to token-based authentication systems, let’s take a look at traditional authentication systems. The user provides their username and password in the login form and clicks Login. After making the request, authenticate the user on the backend by querying the database. If the request is valid, a session is created using the user information obtained from the database, and the session information is returned in the response header so that the session ID is stored in the browser. Provides access to applications subject to
 What is a single sign-on system? How to implement it using nodejs?
Feb 24, 2023 pm 07:33 PM
What is a single sign-on system? How to implement it using nodejs? The following article will introduce to you how to use node to implement a single sign-on system. I hope it will be helpful to you!


