This article mainly introduces the python verification code recognition tutorial using projection method and connected domain method to segment images. It has a certain reference value. Now I share it with everyone. Friends in need can refer to it
Preface
Today’s article mainly records how to split the verification code. The main libraries used are Pillow and the image processing tool GIMP under Linux. First, assume an example with fixed position and width, no adhesion, and no interference to learn how to use Pillow to cut pictures.
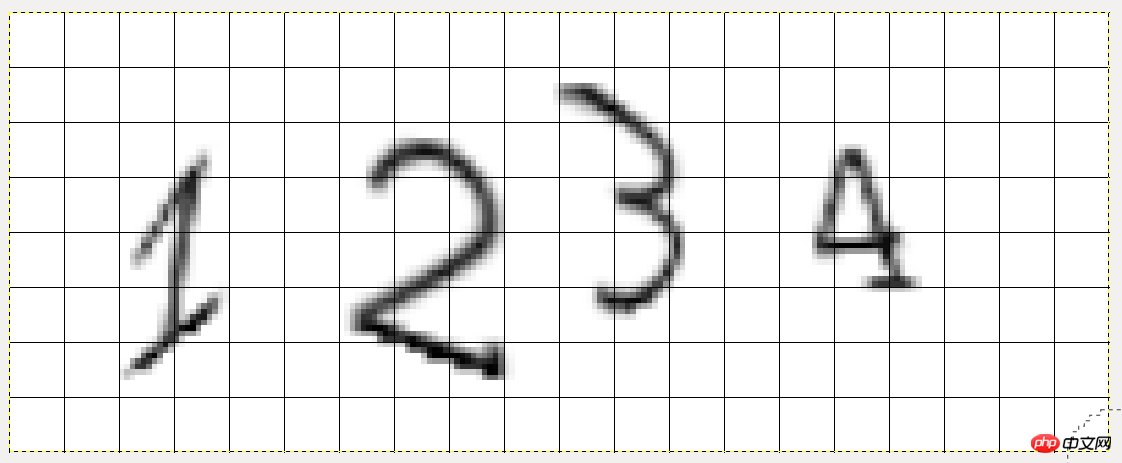
After opening the image using GIMP, press the plus sign to enlarge the image, and then click View->Show Grid to display the grid lines:

##The side length of each square is 10 pixels, so the cutting coordinates of number 1 are left 20, top 20, right 40, and bottom 70. By analogy, you can know the cutting positions of the remaining 3 numbers.
The code is as follows:
from PIL import Image
p = Image.open("1.png")
# 注意位置顺序为左、上、右、下
cuts = [(20,20,40,70),(60,20,90,70),(100,10,130,60),(140,20,170,50)]
for i,n in enumerate(cuts,1):
 temp = p.crop(n) # 调用crop函数进行切割
 temp.save("cut%s.png" % i)
Copy after login
After cutting, 4 pictures are obtained:

So, what if the character position is not fixed? Now assume a case of random position width, no adhesion, and no interfering lines.
The first method and the simplest method is called "projection method". The principle is to project the binarized image in the vertical direction, and determine the segmentation boundary based on the extreme values after projection. Here I still use the above verification code image for demonstration:
def vertical(img):
 """传入二值化后的图片进行垂直投影"""
 pixdata = img.load()
 w,h = img.size
 ver_list = []
 # 开始投影
 for x in range(w):
 black = 0
 for y in range(h):
  if pixdata[x,y] == 0:
  black += 1
 ver_list.append(black)
 # 判断边界
 l,r = 0,0
 flag = False
 cuts = []
 for i,count in enumerate(ver_list):
 # 阈值这里为0
 if flag is False and count > 0:
  l = i
  flag = True
 if flag and count == 0:
  r = i-1
  flag = False
  cuts.append((l,r))
 return cuts

p = Image.open('1.png')
b_img = binarizing(p,200)
v = vertical(b_img)
Copy after login
Through the vertical function we get a graph that contains all black pixels after projection on the X-axis The position of the left and right borders. Since the captcha does not interfere with anything, my threshold is set to 0. Regarding the binarizing function, you can refer to the previous article
The output is as follows:
[(21, 37), (62, 89), (100, 122), (146, 164)]
Copy after login
As you can see, the projection method gives the left and right boundaries It is very close to what we can get by manual inspection. For the upper and lower boundaries, if you are lazy, you can directly use 0 and the height of the picture, or you can project it in the horizontal direction. Friends who are interested here can try it by themselves.
However, when there is adhesion between characters, the projection method will cause splitting errors, such as in the previous article:

After modifying the threshold to 5, the left and right boundaries given by the projection method are:
[(5, 27), (33, 53), (59, 108)]
Copy after login
Obviously the last 6 and 9 numbers are not cut.
Modify the threshold to 7, and the result is:
[(5, 27), (33, 53), (60, 79), (83, 108)]
Copy after login
So for simple adhesion situations, adjusting the threshold can also be solved .
The second method is called the CFS connected domain segmentation method. The principle is to assume that each character is composed of a separate connected domain, in other words, there is no adhesion. Find a black pixel and start judging until all connected black pixels have been traversed and marked to determine the segmentation position of the character. The algorithm is as follows:
- #Traverse the binarized image from left to right and top to bottom. If a black pixel is encountered and this pixel has not been visited before , push this pixel onto the stack and mark it as visited.
- If the stack is not empty, continue to detect the surrounding 8 pixels and perform step 2; if the stack is empty, it means that one character block has been detected.
- The detection is over, and several characters have been determined.
The code is as follows:
import queue

def cfs(img):
 """传入二值化后的图片进行连通域分割"""
 pixdata = img.load()
 w,h = img.size
 visited = set()
 q = queue.Queue()
 offset = [(-1,-1),(0,-1),(1,-1),(-1,0),(1,0),(-1,1),(0,1),(1,1)]
 cuts = []
 for x in range(w):
  for y in range(h):
   x_axis = []
   #y_axis = []
   if pixdata[x,y] == 0 and (x,y) not in visited:
    q.put((x,y))
    visited.add((x,y))
   while not q.empty():
    x_p,y_p = q.get()
    for x_offset,y_offset in offset:
     x_c,y_c = x_p+x_offset,y_p+y_offset
     if (x_c,y_c) in visited:
      continue
     visited.add((x_c,y_c))
     try:
      if pixdata[x_c,y_c] == 0:
       q.put((x_c,y_c))
       x_axis.append(x_c)
       #y_axis.append(y_c)
     except:
      pass
   if x_axis:
    min_x,max_x = min(x_axis),max(x_axis)
    if max_x - min_x > 3:
     # 宽度小于3的认为是噪点,根据需要修改
     cuts.append((min_x,max_x))
 return cuts
Copy after login
The output result after calling is the same as using the projection method. In addition, I saw that there is a method called "Flood Fill" on the Internet, which seems to be the same as connected domains.
Related recommendations:
Python verification code recognition tutorial: grayscale processing, binarization, noise reduction and tesserocr recognition
The above is the detailed content of Python verification code recognition tutorial: segmenting images using projection method and connected domain method. For more information, please follow other related articles on the PHP Chinese website!


