This article mainly introduces an example tutorial of using the clip() method in the HTML5 Canvas API to crop an area image. Special attention needs to be paid to the use of the save() and restore() methods. Friends in need can refer to it
When using Canvas to draw an image, we often want to keep only a part of the image. We can use the image cropping function of the canvas API to achieve this idea.
The image cropping function of the Canvas API means that using a path within the canvas, only the image in the area contained in the path will be drawn, not the image outside the path. This is a bit like layer masks in Flash.
Use the clip() method without parameters of the graphics context to implement the image cropping function of Canvas. This method uses a path to set a clipping area for the Canvas. Therefore, the path must be created first. After creation is complete, call the clip() method to set the cropping area.
It should be noted that cropping is performed on the canvas. The cropped canvas cannot be restored to its original size, which means that the canvas becomes smaller as it is cut. To ensure that it can still be in the size originally defined by the canvas in the end Drawing needs to pay attention to save() and restore(). The canvas is cut first before drawing. It doesn’t have to be a picture, the path can also be put in~
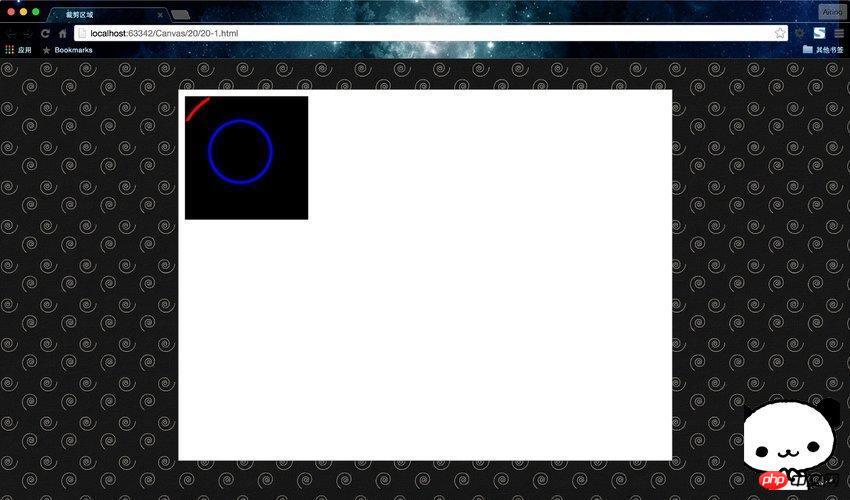
Let’s take a look at a simple Demo first.
JavaScript CodeCopy content to clipboard
<!DOCTYPE html>
<html lang="zh">
<head>
    <meta charset="UTF-8">
    <title>裁剪区域</title>
    <style>
        body { background: url("./images/bg3.jpg") repeat; }
        #canvas { border: 1px solid #aaaaaa; display: block; margin: 50px auto; }
    </style>
</head>
<body>
<p id="canvas-warp">
    <canvas id="canvas">
        你的浏览器居然不支持Canvas?!赶快换一个吧!!
    </canvas>
</p>

<script>
    window.onload = function(){
        var canvas = document.getElementById("canvas");
        canvas.width = 800;
        canvas.height = 600;
        var context = canvas.getContext("2d");
        context.fillStyle = "#FFF";
        context.fillRect(0,0,800,600);

        //在屏幕上绘制一个大方块
        context.fillStyle = "black";
        context.fillRect(10,10,200,200);
        context.save();
        context.beginPath();

        //裁剪画布从(0,0)点至(50,50)的正方形
        context.rect(0,0,50,50);
        context.clip();

        //红色圆
        context.beginPath();
        context.strokeStyle = "red";
        context.lineWidth = 5;
        context.arc(100,100,100,0,Math.PI * 2,false);
        //整圆
        context.stroke();
        context.closePath();

        context.restore();

        //再次裁切整个画布
        context.beginPath();
        context.rect(0,0,500,500);
        context.clip();

        //绘制一个没有裁切的蓝线
        context.beginPath();
        context.strokeStyle = "blue";
        context.lineWidth = 5;
        context.arc(100,100,50,0,Math.PI * 2,false);
        //整圆
        context.stroke();
        context.closePath();
    };
</script>
</body>
</html>Run result: 
Using a mixture of save() and restore() methods, we can limit the drawing area. First, we can use the rect() method to enclose an area we want to draw, and then use the clip() method to crop the area.
In this way, no matter what operations we do in the context, only the limited part will be displayed. In other words, the function of clip() is to limit the area to be displayed. When we no longer want to limit the area, we can use the restore() method to jump out and continue operating the original context.
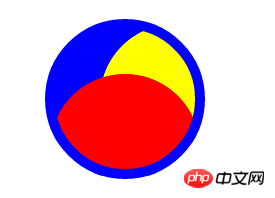
Let’s look at this cropping again: 
##JavaScript CodeCopy the content to the clipboard
function drawScreen() {
        var x = canvas.width / 2;
        var y = canvas.height / 2;
        var radius = 75;
        var offset = 50;

        //裁剪的区域为 (x, y)为中心半径为75的圆
        context.save();
        context.beginPath();
        context.arc(x, y, radius, 0, 2 * Math.PI, false);
        context.clip();

        // 先画一个蓝色的圆弧, 超过裁剪的部分不显示
        context.beginPath();
        context.arc(x - offset, y - offset, radius, 0, 2 * Math.PI, false);
        context.fillStyle = 'blue';
        context.fill();

        // 画一个黄色的圆弧, 超过裁剪的部分不显示
        context.beginPath();
        context.arc(x + offset, y, radius, 0, 2 * Math.PI, false);
        context.fillStyle = 'yellow';
        context.fill();

        // 画一个红色的圆弧, 超过裁剪的部分不显示
        context.beginPath();
        context.arc(x, y + offset, radius, 0, 2 * Math.PI, false);
        context.fillStyle = 'red';
        context.fill();

        /*
         * restore()方法会返回到context原先的状态,在这里是clip()之前的状态。
         * 大家可以移除context.beginPath()方法,试试会发生什么。
         */
        context.restore();
        context.beginPath();
        context.arc(x, y, radius, 0, 2 * Math.PI, false);
        context.lineWidth = 10;
        context.strokeStyle = 'blue';
        context.stroke();
}save(); clip(); restore();
How to specify color and transparency when drawing with HTML5 Canvas
The above is the detailed content of Crop an area image using the clip() method in the HTML5 Canvas API. For more information, please follow other related articles on the PHP Chinese website!


