 Web Front-end
 H5 Tutorial
 HTML5, implementation code for adding an icon to the right side of the Select drop-down box (to enhance user experience)
HTML5, implementation code for adding an icon to the right side of the Select drop-down box (to enhance user experience)
This article mainly introduces the implementation code of HTML5 and icons on the right side of the Select drop-down box, and deeply beautifies the page to enhance the user experience. Friends in need can refer to the following
This article will tell you about h5 and select drop-down boxes. Add an icon to the right to deeply beautify the page and enhance the user experience.
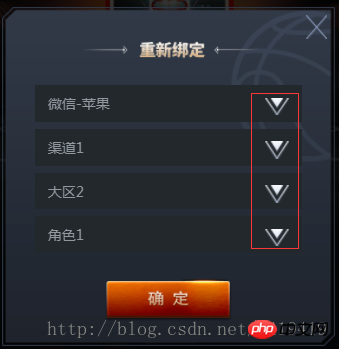
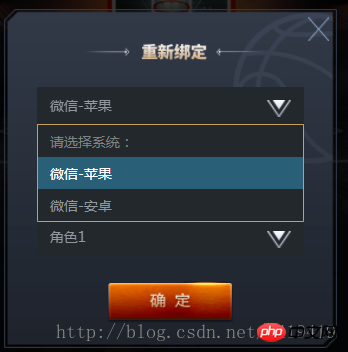
1. So let’s take a look at the effect first!


2. Let’s look at the structure of h5 again:
<p id="login-p">
                <p class="select-wrapper">
                    <select id="selector1">
                        <option value="" disabled selected>请选择系统:</option>
                        <option value="1">微信-苹果</option>
                        <option value="2">微信-安卓</option>
                    </select>
                    <img class="arrow lazy"  src="/static/imghw/default1.png"  data-src="ossweb-img/arrow.png"   alt=""  />
                </p>
                <p class="select-wrapper">
                    <select id="selector2">
                        <option value="" disabled selected>请选择渠道:</option>
                        <option value="1">渠道1</option>
                        <option value="2">渠道2</option>
                    </select>
                    <img class="arrow lazy"  src="/static/imghw/default1.png"  data-src="ossweb-img/arrow.png"   alt=""  />
                </p>
                <p class="select-wrapper">
                    <select id="selector3">
                        <option value="" disabled selected>请选择大区:</option>
                        <option value="1">大区1</option>
                        <option value="2">大区2</option>
                    </select>
                    <img class="arrow lazy"  src="/static/imghw/default1.png"  data-src="ossweb-img/arrow.png"   alt=""  />
                </p>
                <p class="select-wrapper">
                    <select id="selector4">
                        <option value="" disabled selected>请选择角色:</option>
                        <option value="1">角色1</option>
                        <option value="2">角色2</option>
                    </select>
                    <img class="arrow lazy"  src="/static/imghw/default1.png"  data-src="ossweb-img/arrow.png"   alt=""  />
                </p>
                <p id="notice">单个帐号只能领取一次奖励</p>
                <img src="/static/imghw/default1.png"  data-src="ossweb-img/comfire1.png"  class="lazy"   alt="" id="comfire1"/>
</p>3. The style part is controlled by sass. If you don’t know sass, you can also change it to css. There is no special operation that needs to be converted, so it is easy to switch to css
@function REM($n){
        @return $n/$REM*1rem;
    }
 #login-p{
        background: url(../ossweb-img/kuang1.png)0 0 no-repeat;
        background-size: 100% 100%;
        width: REM(564);
        height: REM(531);
        margin-left: REM(38);
        .select-wrapper{
            position: relative;
            display: flex;
            justify-content: center;
            align-items: center;
            height: REM(50);
            margin: REM(10) auto;
            padding-top: REM(15);
            &>select{
                width: REM(458);
                height: REM(63);
                padding-left: REM(20);
                border: 1px solid #23282d;
                background: #23282d;
                -webkit-appearance: none;
                color: #92989f;
                font-size: REM(24);
                margin-top: REM(75);
                border-radius: 0;
                z-index:10;
            }
            .arrow{
                position: absolute;
                width: REM(41);
                height: REM(30);
                top: REM(65);
                right: REM(80);
                pointer-events: none;
                z-index:11;
            }
        }
        #notice{
                font-size: REM(20);
                color: #92989f;
                text-align: center;
                margin-top: REM(75);
        }
        #comfire1{
                width: REM(220);
                height: REM(78);
                margin-top: REM(20);
                margin-left: REM(174);
        }
}4. Analysis: Mainly the .arrow element controls the position of the icon on the right . Use position: absolute; to control the position, and there will be basically no problem.
The above is the detailed content of HTML5, implementation code for adding an icon to the right side of the Select drop-down box (to enhance user experience). For more information, please follow other related articles on the PHP Chinese website!

Hot AI Tools

Undresser.AI Undress
AI-powered app for creating realistic nude photos

AI Clothes Remover
Online AI tool for removing clothes from photos.

Undress AI Tool
Undress images for free

Clothoff.io
AI clothes remover

AI Hentai Generator
Generate AI Hentai for free.

Hot Article

Hot Tools

Notepad++7.3.1
Easy-to-use and free code editor

SublimeText3 Chinese version
Chinese version, very easy to use

Zend Studio 13.0.1
Powerful PHP integrated development environment

Dreamweaver CS6
Visual web development tools

SublimeText3 Mac version
God-level code editing software (SublimeText3)

Hot Topics
 1385
1385
 52
52
 What does h5 mean?
Aug 02, 2023 pm 01:52 PM
H5 refers to HTML5, the latest version of HTML. H5 is a powerful markup language that provides developers with more choices and creative space. Its emergence promotes the development of Web technology, making the interaction and effect of web pages more Excellent, as H5 technology gradually matures and becomes popular, I believe it will play an increasingly important role in the Internet world.
 How to distinguish between H5, WEB front-end, big front-end, and WEB full stack?
Aug 03, 2022 pm 04:00 PM
This article will help you quickly distinguish between H5, WEB front-end, large front-end, and WEB full stack. I hope it will be helpful to friends in need!
 How to use position in h5
Dec 26, 2023 pm 01:39 PM
In H5, you can use the position attribute to control the positioning of elements through CSS: 1. Relative positioning, the syntax is "style="position: relative;"; 2. Absolute positioning, the syntax is "style="position: absolute;" "; 3. Fixed positioning, the syntax is "style="position: fixed;" and so on.
 How to implement h5 to slide up on the web side to load the next page
Mar 11, 2024 am 10:26 AM
Implementation steps: 1. Monitor the scroll event of the page; 2. Determine whether the page has scrolled to the bottom; 3. Load the next page of data; 4. Update the page scroll position.
 How to implement H5 form validation component in vue3
Jun 03, 2023 pm 02:09 PM
The rendering description is based on vue.js and does not rely on other plug-ins or libraries; the basic functions remain consistent with element-ui, and some adjustments have been made to the internal implementation for mobile terminal differences. The current construction platform is built using the uni-app official scaffolding. Because most mobile terminals currently have two types: h6 and WeChat mini-programs, it is very suitable for technology selection to run one set of code on multiple terminals. Implementation idea core api: use provide and inject, corresponding to and. In the component, a variable (array) is used internally to store all instances, and the data to be transferred is exposed through provide; the component uses inject internally to receive the data provided by the parent component, and finally combines its own attributes with method submission
 Summary and introduction to the new H5 promotion tag (with examples)
Aug 03, 2022 pm 05:10 PM
This article will give you an introduction to the new H5 promotion tags. I hope it will be helpful to friends in need!
 What Does H5 Refer To? Exploring the Context
Apr 12, 2025 am 12:03 AM
H5referstoHTML5,apivotaltechnologyinwebdevelopment.1)HTML5introducesnewelementsandAPIsforrich,dynamicwebapplications.2)Itsupportsmultimediawithoutplugins,enhancinguserexperienceacrossdevices.3)SemanticelementsimprovecontentstructureandSEO.4)H5'srespo
 H5 Code: Accessibility and Semantic HTML
Apr 09, 2025 am 12:05 AM
H5 improves web page accessibility and SEO effects through semantic elements and ARIA attributes. 1. Use, etc. to organize the content structure and improve SEO. 2. ARIA attributes such as aria-label enhance accessibility, and assistive technology users can use web pages smoothly.


