
 Web Front-end
JS Tutorial
How to implement Baidu index crawler using Puppeteer image recognition technology
Web Front-end
JS Tutorial
How to implement Baidu index crawler using Puppeteer image recognition technology
How to implement Baidu index crawler using Puppeteer image recognition technology
This article mainly introduces the example of Node Puppeteer image recognition to implement Baidu index crawler. The editor thinks it is quite good. Now I will share it with you and give it as a reference. Let’s follow the editor and take a look.
I have read an enlightening article before, which introduced the front-end anti-crawler techniques of various major manufacturers, but as this article said, there is no 100% anti-crawler. Crawler method, this article introduces a simple method to bypass all these front-end anti-crawler methods.
The following code takes Baidu Index as an example. The code has been packaged into a Baidu Index crawler node library: https://github.com/Coffcer/baidu-index-spider
note: Please do not abuse crawlers to cause trouble to others
Baidu Index’s anti-crawler strategy
Observe the interface of Baidu Index. The index data is a trend chart. When the mouse hovers over a certain day, two requests will be triggered and the results will be displayed in the floating box:
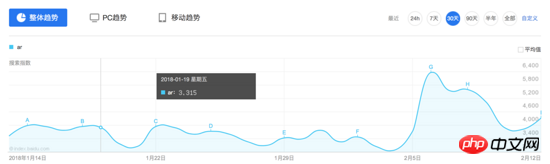
According to the general idea, let’s first look at the content of this request. :
Request 1:
Request 2:

Reptile Ideas
How to break through Baidu’s anti-reptile method is actually very simple, just don’t pay attention to how it anti-reptile. We only need to simulate user operations, screenshot the required values, and do image recognition. The steps are probably:- Simulate login
- Open the index page
- Move the mouse to the specified date
- Wait for the request to end, intercept the numerical part of the picture
- Image recognition to get the value
- Loop Steps 3 to 5, get the value corresponding to each date
puppeteer Simulate browser operation
- ##node-tesseract
tesseract Encapsulation, used for image recognition
- jimp
Image cropping
Puppeteer is a Chrome automation tool produced by the Google Chrome team, used to control Chrome execution commands. You can simulate user operations, do automated testing, crawlers, etc. Usage is very simple. There are many introductory tutorials on the Internet. You can probably know how to use it after reading this article.
API documentation: https://github.com/GoogleChrome/puppeteer/blob/master/docs/api.md
Installation:
npm install --save puppeteer
Puppeteer will Automatically download Chromium to ensure it works properly. However, domestic networks may not be able to successfully download Chromium. If the download fails, you can use cnpm to install it, or change the download address to the Taobao mirror and then install it:
npm config set PUPPETEER_DOWNLOAD_HOST=https://npm.taobao.org/mirrors
npm install --save puppeteer
You can also skip Chromium during installation. Download and run by specifying the native Chrome path through the code:
// npm
npm install --save puppeteer --ignore-scripts

// node
puppeteer.launch({ executablePath: '/path/to/Chrome' });To keep the layout tidy, only the main parts are listed below, and the code involves the selector part All used... instead. For the complete code, please see the github repository at the top of the article.
Open the Baidu Index page and simulate loginWhat we do here is to simulate user operations, click and enter step by step. There is no need to handle the login verification code. Handling the verification code is another topic. If you have logged into Baidu locally, you generally do not need a verification code.
// 启动浏览器,
// headless参数如果设置为true,Puppeteer将在后台操作你Chromium,换言之你将看不到浏览器的操作过程
// 设为false则相反,会在你电脑上打开浏览器,显示浏览器每一操作。
const browser = await puppeteer.launch({headless:false});
const page = await browser.newPage();

// 打开百度指数
await page.goto(BAIDU_INDEX_URL);

// 模拟登陆
await page.click('...');
await page.waitForSelecto('...');
// 输入百度账号密码然后登录
await page.type('...','username');
await page.type('...','password');
await page.click('...');
await page.waitForNavigation();
console.log(':white_check_mark: 登录成功');You need to scroll the page to the trend chart area, then move the mouse to a certain date and wait for the request to end. The tooltip displays the value, and then takes a screenshot to save the image.
// 获取chart第一天的坐标
const position = await page.evaluate(() => {
 const $image = document.querySelector('...');
 const $area = document.querySelector('...');
 const areaRect = $area.getBoundingClientRect();
 const imageRect = $image.getBoundingClientRect();

 // 滚动到图表可视化区域
 window.scrollBy(0, areaRect.top);

 return { x: imageRect.x, y: 200 };
});

// 移动鼠标,触发tooltip
await page.mouse.move(position.x, position.y);
await page.waitForSelector('...');

// 获取tooltip信息
const tooltipInfo = await page.evaluate(() => {
 const $tooltip = document.querySelector('...');
 const $title = $tooltip.querySelector('...');
 const $value = $tooltip.querySelector('...');
 const valueRect = $value.getBoundingClientRect();
 const padding = 5;

 return {
 title: $title.textContent.split(' ')[0],
 x: valueRect.x - padding,
 y: valueRect.y,
 width: valueRect.width + padding * 2,
 height: valueRect.height
 }
});Calculate the coordinates of the value, take a screenshot and use jimp to crop the image.
await page.screenshot({ path: imgPath });

// 对图片进行裁剪,只保留数字部分
const img = await jimp.read(imgPath);
await img.crop(tooltipInfo.x, tooltipInfo.y, tooltipInfo.width, tooltipInfo.height);
// 将图片放大一些,识别准确率会有提升
await img.scale(5);
await img.write(imgPath);Here we use Tesseract for image recognition. Tesseracts is an open source OCR tool from Google that is used to recognize text in images and can Improve accuracy through training. There is already a simple node package on github: node-tesseract. You need to install Tesseract first and set it to environment variables.
Tesseract.process(imgPath, (err, val) => {
if (err || val == null) {
 console.error(':x: 识别失败:' + imgPath);
 return;
}
console.log(val);实际上未经训练的Tesseracts识别起来会有少数几个错误,比如把9开头的数字识别成`3,这里需要通过训练去提升Tesseracts的准确率,如果识别过程出现的问题都是一样的,也可以简单通过正则去修复这些问题。
封装
实现了以上几点后,只需组合起来就可以封装成一个百度指数爬虫node库。当然还有许多优化的方法,比如批量爬取,指定天数爬取等,只要在这个基础上实现都不难了。
const recognition = require('./src/recognition');
const Spider = require('./src/spider');

module.exports = {
 async run (word, options, puppeteerOptions = { headless: true }) {
 const spider = new Spider({
 imgDir,
 ...options
 }, puppeteerOptions);

 // 抓取数据
 await spider.run(word);

 // 读取抓取到的截图,做图像识别
 const wordDir = path.resolve(imgDir, word);
 const imgNames = fs.readdirSync(wordDir);
 const result = [];

 imgNames = imgNames.filter(item => path.extname(item) === '.png');

 for (let i = 0; i < imgNames.length; i++) {
 const imgPath = path.resolve(wordDir, imgNames[i]);
 const val = await recognition.run(imgPath);
 result.push(val);
 }

 return result;
 }
}反爬虫
最后,如何抵挡这种爬虫呢,个人认为通过判断鼠标移动轨迹可能是一种方法。当然前端没有100%的反爬虫手段,我们能做的只是给爬虫增加一点难度。
上面是我整理给大家的,希望今后会对大家有帮助。
相关文章:
在Node.js中使用cheerio制作简单的网页爬虫(详细教程)
在React中使用Native如何实现自定义下拉刷新上拉加载的列表
The above is the detailed content of How to implement Baidu index crawler using Puppeteer image recognition technology. For more information, please follow other related articles on the PHP Chinese website!

Hot AI Tools

Undresser.AI Undress
AI-powered app for creating realistic nude photos

AI Clothes Remover
Online AI tool for removing clothes from photos.

Undress AI Tool
Undress images for free

Clothoff.io
AI clothes remover

AI Hentai Generator
Generate AI Hentai for free.

Hot Article
Hot Tools

Notepad++7.3.1
Easy-to-use and free code editor

SublimeText3 Chinese version
Chinese version, very easy to use

Zend Studio 13.0.1
Powerful PHP integrated development environment

Dreamweaver CS6
Visual web development tools

SublimeText3 Mac version
God-level code editing software (SublimeText3)
Hot Topics
 1378
1378
 52
52

 How to use express to handle file upload in node project
Mar 28, 2023 pm 07:28 PM
How to use express to handle file upload in node project
Mar 28, 2023 pm 07:28 PM
How to handle file upload? The following article will introduce to you how to use express to handle file uploads in the node project. I hope it will be helpful to you!
 Java development: how to implement image recognition and processing
Sep 21, 2023 am 08:39 AM
Java development: how to implement image recognition and processing
Sep 21, 2023 am 08:39 AM
Java Development: A Practical Guide to Image Recognition and Processing Abstract: With the rapid development of computer vision and artificial intelligence, image recognition and processing play an important role in various fields. This article will introduce how to use Java language to implement image recognition and processing, and provide specific code examples. 1. Basic principles of image recognition Image recognition refers to the use of computer technology to analyze and understand images to identify objects, features or content in the image. Before performing image recognition, we need to understand some basic image processing techniques, as shown in the figure
 An in-depth analysis of Node's process management tool 'pm2”
Apr 03, 2023 pm 06:02 PM
An in-depth analysis of Node's process management tool 'pm2”
Apr 03, 2023 pm 06:02 PM
This article will share with you Node's process management tool "pm2", and talk about why pm2 is needed, how to install and use pm2, I hope it will be helpful to everyone!
 Pi Node Teaching: What is a Pi Node? How to install and set up Pi Node?
Mar 05, 2025 pm 05:57 PM
Pi Node Teaching: What is a Pi Node? How to install and set up Pi Node?
Mar 05, 2025 pm 05:57 PM
Detailed explanation and installation guide for PiNetwork nodes This article will introduce the PiNetwork ecosystem in detail - Pi nodes, a key role in the PiNetwork ecosystem, and provide complete steps for installation and configuration. After the launch of the PiNetwork blockchain test network, Pi nodes have become an important part of many pioneers actively participating in the testing, preparing for the upcoming main network release. If you don’t know PiNetwork yet, please refer to what is Picoin? What is the price for listing? Pi usage, mining and security analysis. What is PiNetwork? The PiNetwork project started in 2019 and owns its exclusive cryptocurrency Pi Coin. The project aims to create a one that everyone can participate
 Teach you how to use Python programming to realize the docking of Baidu image recognition interface and realize the image recognition function.
Aug 25, 2023 pm 03:10 PM
Teach you how to use Python programming to realize the docking of Baidu image recognition interface and realize the image recognition function.
Aug 25, 2023 pm 03:10 PM
Teach you to use Python programming to implement the docking of Baidu's image recognition interface and realize the image recognition function. In the field of computer vision, image recognition technology is a very important technology. Baidu provides a powerful image recognition interface through which we can easily implement image classification, labeling, face recognition and other functions. This article will teach you how to use the Python programming language to realize the image recognition function by connecting to the Baidu image recognition interface. First, we need to create an application on Baidu Developer Platform and obtain
 How to do image processing and recognition in Python
Oct 20, 2023 pm 12:10 PM
How to do image processing and recognition in Python
Oct 20, 2023 pm 12:10 PM
How to do image processing and recognition in Python Summary: Modern technology has made image processing and recognition an important tool in many fields. Python is an easy-to-learn and use programming language with rich image processing and recognition libraries. This article will introduce how to use Python for image processing and recognition, and provide specific code examples. Image processing: Image processing is the process of performing various operations and transformations on images to improve image quality, extract information from images, etc. PIL library in Python (Pi
 How to use Python regular expressions for image recognition
Jun 23, 2023 am 10:36 AM
How to use Python regular expressions for image recognition
Jun 23, 2023 am 10:36 AM
In computer science, image recognition has always been an important field. Using image recognition, we can let the computer recognize and analyze the content in the image and process it. Python is a very popular programming language that can be used in many fields, including image recognition. This article will introduce how to use Python regular expressions for image recognition. Regular expressions are a text pattern matching tool used to find text that matches a specific pattern. Python has a built-in "re" module for regular expressions
 Implementing a highly concurrent image recognition system using Go and Goroutines
Jul 22, 2023 am 10:58 AM
Implementing a highly concurrent image recognition system using Go and Goroutines
Jul 22, 2023 am 10:58 AM
Using Go and Goroutines to implement a highly concurrent image recognition system Introduction: In today's digital world, image recognition has become an important technology. Through image recognition, we can convert information such as objects, faces, scenes, etc. in images into digital data. However, for recognition of large-scale image data, speed often becomes a challenge. In order to solve this problem, this article will introduce how to use Go language and Goroutines to implement a high-concurrency image recognition system. Background: Go language
