Vue-cropper crops images
This time I will bring you Vue-cropper to crop pictures. What are the precautions for cropping pictures with Vue-cropper? The following is a practical case, let's take a look.
1: Ideas for cropping:
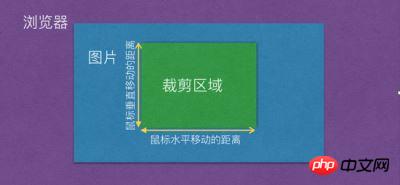
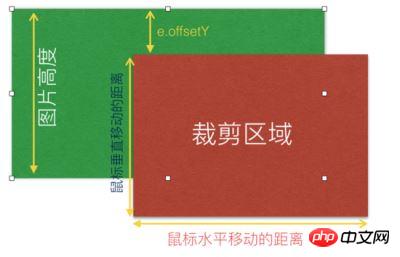
1-1. Cropping area: If you need to crop, you first need to form a cropping area and the size of the cropping area. It is related to the distance our mouse moves. How far the mouse moves, the size of the cropping area will be. As shown below:
1-2 Calculation of the width and height of the cropping area:
As shown above, the horizontal and vertical movement distance of the mouse are formed Specifies the width and height of the cropping area. Then the calculation of the width and height of the cropping area is: when we click the mouse, we can obtain the mouse click position through the event event
object, e.clientX and e.clientY; when the mouse moves, The position of the mouse can also be obtained through event. By changing the mouse position twice, the
mouse movement distance can be obtained. That is: the initial x-axis position is initX = e.clientX, initY = e.clientY;
The position moved to a certain point is: endX = e.clientX, endY = e.clientY;
So the width of the cropping area Tx = endX - initX;
The height of the cropping area is Ty = endY - initY;
1-3 Formation of the shadow area
The parts of the image we crop, except for the cropped area, are all shaded parts. As shown in the figure below:
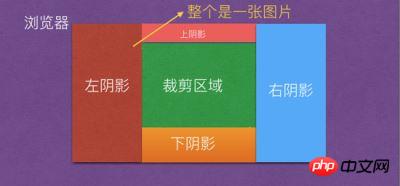
#So how to calculate the shadow area? For example, the width of the left shadow = the left offset value of the cropping area - the left offset value of the image itself; then the upper shadow height = the upper offset value of the cropping area - the upper offset value of the image, as shown in the following figure:
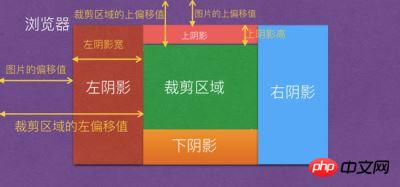
Then the height of the lower shadow = the height of the picture itself - the height of the upper shadow - the height of the cropping area; then the width of the right shadow = the width of the picture - the width of the left shadow - cropping The width of the area.
1-4 Understand that the cropping area is out of bounds
There will be out-of-bounds situations during the process of cropping pictures, so the out-of-bounds situations need to be divided into two situations. The first one is: out-of-bounds situations during the cropping process. , the second is to move the cropping area out of bounds.
1-4-1 Cross-border during cropping
What is cross-border during cropping? That is, when we use the mouse to drag the area to crop beyond the width and height of the picture, an out of bounds is formed; as shown in the following figure:
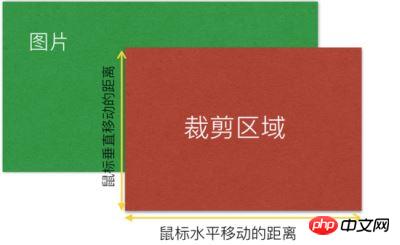
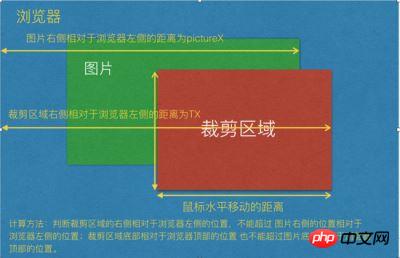
For this kind of out of bounds, it is necessary to judge whether to be cropped The position of the right side of the area relative to the left side of the browser cannot exceed the position of the right side of the image relative to the left side of the browser;
and the bottom of the cropped area cannot exceed the position relative to the top of the browser The position of the bottom of the image relative to the top of the browser is as shown below:
2. How to compress images?
When the width of the image is greater than the width of the container, compression needs to be performed; therefore var scale = width of the container/width of the image; If the height of the image * scaling ratio> The height of the container, then the scaling ratio scale = the height of the container/the height of the image; otherwise, no compression will be performed. 2-1: Calculation method for the X-axis and Y-axis movement positions in translate3d after compression: x = width of the container/compression ratio y = container Height/compression ratioThat is: transform: translate3d(x, y, z) -> translate3d(width of container/compression ratio 'px', height of container/compression ratio 'px', 0)So the page layout becomes as follows:<!DOCTYPE html> <html> <head> <title>图片裁剪</title> <meta charset="utf-8"> <meta name="viewport" content="width=device-width,initial-scale=1.0,maximum-scale=1.0,user-scalable=0"> <link rel="stylesheet" type="text/css" href="./index.css"> </head> <body> <p id="app" style="height:500px;margin: 0 auto;"> <p class="vue-cropper"> <p class="cropper-box"> <p class="cropper-box-canvas" style="width:644px;height:642px;transform: scale(0.778816, 0.778816) translate3d(453.252px, -87.312px, 0px) rotateZ(0deg)"> <img src="https://images2018.cnblogs.com/blog/561794/201804/561794-20180416230443389-1451524334.jp" /> </p> </p> <p class="cropper-drag-box cropper-crop"></p> </p> </p> </body> </html>
当我们点下鼠标时,就能够通过event事件对象获取鼠标点击位置,e.clientX 和 e.clientY; 当鼠标进行移动的时候,也能通过event获取鼠标的位置,
通过两次鼠标位置的改变,就能够获得鼠标移动的距离。即:
初始的x轴和Y轴位置分别为 cropX = e.clientX, cropY = e.clientY;
移动后现在的X轴和Y轴的位置分别为:nowX = e.clientX, nowY = e.clientY;
因此裁剪区域的临时值 var fw = ~~(nowX - cropX);
裁剪区域的临时值是 fh = ~~(nowY - cropY);
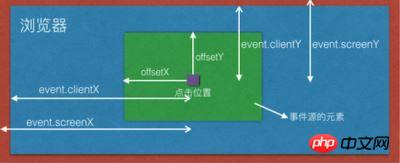
裁剪图片的时候,有可能往右拖动(值会越来越大),也有可能往相反的方向(向左)拖动(值会越来越小),同理,向上或向下拖动也是同一个道理。因此需要判断 fw 和 fh是否大于0的判断;在鼠标按键下去的时候,先获取鼠标相对于事件源元素的X和Y轴坐标,e.offsetX 和 e.offsetY;
因此 cropChangeX = e.offsetX; cropChangeY = e.offsetY;
对于offsetX 和 offsetY 的理解如下;
if (fw > 0) {
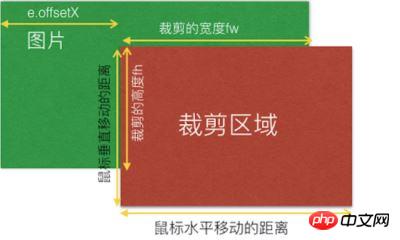
var cropW(裁剪区域的实际宽度) = cropChangeX + fw > w(图片的实际宽度) ? w - cropChangeX : fw;
cropOffsertX = cropChangeX;
}cropOffsertX 就是保存事件源相对于元素的距离。
如果fw 小于0,说明是往左裁剪,那么裁剪的距离 fw = (事件结束的clientX - 事件的开始clientX);
如果 (图片的实际宽度 - e.offsetX) + Math.abs(fw) > 图片的实际宽度 ? this.cropChangeX : Math.abs(fw);
即:
if (fw < 0) {
var cropW(裁剪区域的实际宽度) = (w - cropChangeX) + Math.abs(fw) > w ? cropChangeX : Math.abs(fw);
cropOffsertX = cropChangeX + fw > 0 ? cropChangeX + fw : 0;
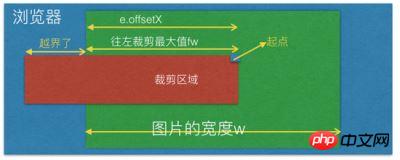
}说明往左裁剪的最大宽度只能是 e.offsetX; 不能超过该值,否则的话,就会越界。
此时cropOffsertX偏移值改变了; cropOffsertX = cropChangeX + fw > 0 ? cropChangeX + fw : 0; 如图下所示:
上面分析的是 宽和高不固定比例的裁剪,下面我们来看下 宽和高固定比例的裁剪。
5. 宽和高固定比例裁剪计算;
比如宽和高比是 3:4 这样的截图;fixedNumber = [3, 4]
因此 固定比例高度的计算
fixedHeight 裁剪区域的实际宽度
------------- = ---------------
fixedNumber[1] fixedNumber[0]
因此:
var fixedHeight = ~~(裁剪区域的实际宽度 / fixedNumber[0] * fixedNumber[1]);
如果固定比例的移动的高度 + Y轴上相对于图片的偏移值 > 大于图片的高度的话,那么裁剪区域的高度(cropH) = 图片的高度(h) - Y轴上相对于图片的偏移值(cropOffsertY); 如下图所示:
获取到了 裁剪区域的高度的话,就可以获取到裁剪区域的宽度了;计算方式是:
cropW(裁剪区域的宽度) = ~~(cropH / fixedNumber[1] * fixedNumber[0]);
同时也要判断fw 是否大于0,来计算 cropOffsertX 的值;
if (fw > 0) {
var cropOffsertX = cropChangeX
} else {
var cropOffsertX = cropChangeX - cropW
}fw > 0 说明是往右移动,因此 cropOffsertX = cropChangeX;
fw < 0 说明是往左移动,cropOffsertX = 初始的 e.offsetX - 裁剪区域的宽度
即:
if (fw > 0) {
var cropOffsertX = cropChangeX
} else {
var cropOffsertX = cropChangeX - cropW
}
fw > 0 说明是往右移动,因此 cropOffsertX = cropChangeX;
fw < 0 说明是往左移动,cropOffsertX = 初始的 e.offsetX - 裁剪区域的宽度
即:
if (fixedHeight + cropOffsertY > h) {
 cropH(裁剪区域的高度) = h - cropOffsertY;
 cropW(裁剪区域的宽度) = ~~(cropH / fixedNumber[1] * fixedNumber[0]);
 if (fw > 0) {
 var cropOffsertX = cropChangeX
 } else {
 var cropOffsertX = cropChangeX - cropW
 }
} else {
 // 否则
 cropH = fixedHeight;
}</p>
<p style="text-align: left;"><strong>6. 理解裁剪区域拉伸原理</strong></p>
<p style="text-align: left;">控制裁剪区域拉伸的点,共有12种可以拉伸的点,分别有裁剪区域的四根线可以拉伸,有四根线上的八个点可以拉伸;如下图所示:</p>
<p style="text-align: left;"><img src="/static/imghw/default1.png" data-src="https://img.php.cn/upload/article/000/000/002/bb0d95fdc559be8871b0db805adc370b-9.jpg" class="lazy" alt=""></p>
<p style="text-align: left;">当鼠标点击拉伸的时候,会触发mousedown事件;因此需要区分下到底是那根线或那个点向什么方向拉伸。因此定义 canChangeX 和 canChangeY 两个变量,</p>
<p style="text-align: left;">判断是否能改变X轴和Y轴;默认是false;同时定义两个变量为 changeCropTypeX 和 changeCropTypeY,含义是能否改变x轴或Y轴的基准点。默认为1;可以改变。</p>
<p style="text-align: left;">1. 裁剪区域的最上面的线; 可以上下拉伸, 不能左右拉伸;</p>
<p style="text-align: left;">因此可以约定: canChangeX = false, canChangeY = true; changeCropTypeX = 0; changeCropTypeY = 1;</p>
<p style="text-align: left;">2. 裁剪区域左边的线;可以左右拉伸,不能上下拉伸;</p>
<p style="text-align: left;">因此可以约定:canChangeX = true, canChangeY = false; changeCropTypeX = 1; changeCropTypeY = 0;</p>
<p style="text-align: left;">3. 裁剪区域底部线; 可以上下拉伸,不能左右拉伸;</p>
<p style="text-align: left;">因此可以约定:canChangeX = false; canChangeY = true; changeCropTypeX = 0; changeCropTypeY = 2;(为了区分上面的线,因此等于2);</p>
<p style="text-align: left;">4. 裁剪区域右边线;可以左右拉伸,不能上下拉伸;</p>
<p style="text-align: left;">因此可以约定:canChangeX = true; canChangeY = false; changeCropTypeX = 2;(为了区分左边的线) changeCropTypeY = 0;</p>
<p style="text-align: left;">5. 左上角的点;可以向上或向左移动;</p>
<p style="text-align: left;">因此 canChangeX = true, canChangeY = true; changeCropTypeX = 1; changeCropTypeY = 1;</p>
<p style="text-align: left;">6. 上面中间的点,只能上下拉伸,不能左右拉伸;</p>
<p style="text-align: left;">因此 canChangeX = false, canChangeY = true; changeCropTypeX = 0; changeCropTypeY = 1;</p>
<p style="text-align: left;">7. 右上角的点,可以左右拉伸和上下拉伸;</p>
<p style="text-align: left;">因此 canChangeX = true, canChangeY = true; changeCropTypeX = 2; changeCropTypeY = 1;</p>
<p style="text-align: left;">8. 左中角的点,只能左右拉伸,不能上下拉伸;</p>
<p style="text-align: left;">因此 canChangeX = true, canChangeY = false; changeCropTypeX = 1; changeCropTypeY = 0;</p>
<p style="text-align: left;">9. 右中角的点,只能左右拉伸,不能上下拉伸;</p>
<p style="text-align: left;">因此 canChangeX = true, canChangeY = false; changeCropTypeX = 2; changeCropTypeY = 0;</p>
<p style="text-align: left;">10. 左下角的点,可以向上或向左移动;</p>
<p style="text-align: left;">因此 canChangeX = true, canChangeY = true; changeCropTypeX = 1; changeCropTypeY = 2;</p>
<p style="text-align: left;">11. 下线中间的店,可以上下拉伸,不能左右拉伸;</p>
<p style="text-align: left;">因此 canChangeX = false, canChangeY = true; changeCropTypeX = 0; changeCropTypeY = 2;</p>
<p style="text-align: left;">12. 下右角点,可以上下拉伸,左右拉伸;</p>
<p style="text-align: left;">因此 canChangeX = true, canChangeY = true; changeCropTypeX = 2; changeCropTypeY = 2;</p>
<p style="text-align: left;">下面来看看移动操作;</p>
<pre class="brush:php;toolbar:false">var fw = ~~(移动结束的clientX - 初始的clientX);
var fh = ~~(移动结束的clientY - 初始的clientY);6-1 向左或向右拉伸的基本原理:
if (canChangeX) {
 // 如果x轴能改变的话,说明是 裁剪区域中左右两根线或是左右两个线上的点了。
 if (changeCropTypeX === 1) {
 // 如果x轴的基点能改变的话,并且等于1,说明是裁剪区域左边的线或左边线上的点了。
 // 那就有四种可能值,1. 左边的线,2. 左上角的点,3. 左中角的点。 4. 左下角的点。
 } else if (changeCropTypeX === 2) {
 // 同理,说明是裁剪区域右边的线或右边线上的点了。
 // 那也有四种可能值,1. 右边的线,2. 右上角的点,3. 右中角的点。4. 右下角的点。
 }
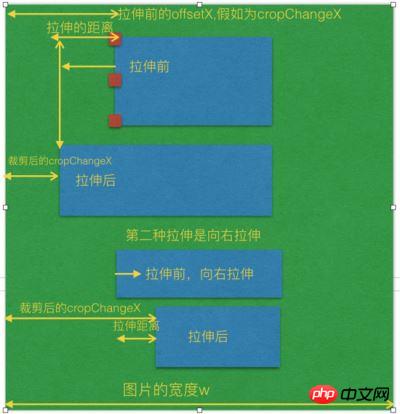
}changeCropTypeX === 1 的情况;继续如下判断:
假设裁剪区域的原始宽度为 cropOldW,裁剪区域的原始高度为 cropOldY, cropChangeX 保存原始的裁剪区域相对于图片的e.offsetX;
if (cropOldW - fw > 0) {
 如果裁剪区域的原始宽度 大于 移动的距离的话,那么说明两点,第一是向左拉伸的话,fw为负数,第二是向右拉伸,但是拉伸的距离小于裁剪区域的原始宽度
 裁剪区域后的宽度 = 图片的宽度 - 拉伸前的offsetX - 拉伸的距离 <= 图片的宽度的话 ? 拉伸前的offsetX(cropChangeX) - 拉伸的距离
 : 裁剪区原始宽度 + 拉伸前的offsetX.
 裁剪后的 cropOffsertX = 图片的宽度 - 拉伸前的offsetX(cropChangeX) - 拉伸的距离 <= 图片的宽度的话 ?
 裁剪区域前的offsertX(cropChangeX) + 拉伸的距离 : 0;
}不管向左拉还是向右拉,裁剪区后的宽度 都等于 = 拉伸前的offsetX(cropChangeX) - 拉伸的距离;
裁剪后的 cropOffsertX = 裁剪区域前的offsertX(cropChangeX) + 拉伸的距离; 如下图所示:
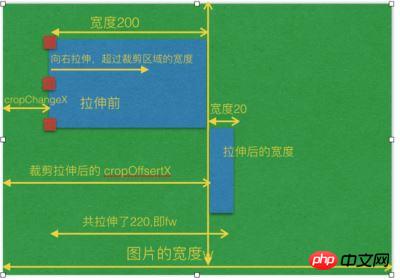
if (cropOldW - fw <= 0) {
 裁剪拉伸后的宽度 = 拉伸后的距离fw + cropChangeX <= 图片的宽度 ? 拉伸后的距离fw - 拉伸前的裁剪区域的宽度 :
 图片的宽度 - 拉伸前的裁剪区域的宽度 - cropChangeX;
 裁剪拉伸后的 cropOffsertX = 拉伸前的裁剪区域的offsetX(cropChangeX) + 裁剪区域之前的宽度;
}如下图所示:
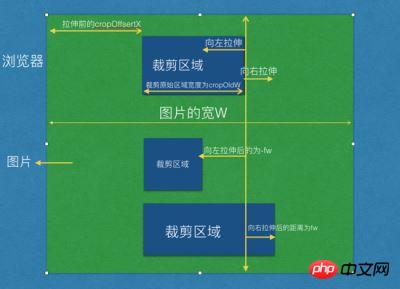
changeCropTypeX === 2 的情况;
说明是裁剪区域右边的线或右边线上的点拉伸了。那也有四种可能值,1. 右边的线,2. 右上角的点,3. 右中角的点。4. 右下角的点。
同理;右边的线拉伸也有向左拉伸和向右拉伸,如果向左拉伸的话,那么fw肯定为负数,如果向右拉伸的话,那么fw就为正数。
if (cropOldW + fw > 0) {
// 如果原始的裁剪区域的宽度 + 拉伸的距离大于0,说明是向右拉伸或者向左拉伸,但是向左拉伸的距离小于原始裁剪区域
if (裁剪区域的原始宽度 + 移动距离fw + cropOffsertX <= 图片的宽度的话) {
}这里的 裁剪区域的原始宽度 + 移动距离fw + cropOffsertX <= 图片的宽度的话 也有两种情况,第一种是向左拉伸,第二种是向右拉伸,但是没有拉伸到底,
也就是说拉伸的距离没有到图片的最右边;
现在的图片裁剪区域宽度(cropW) = 图片的原始区域的宽度 + fw(拉伸的距离,向左拉伸或向右拉伸);
否则的话,也就是说拉伸到最右边了,那么 图片裁剪区域宽度(cropW) = 图片的宽度 - 裁剪区域拉伸前的cropOffsertX;
因此此时 cropOffsertX = 拉伸前的裁剪区域的offsetX(cropChangeX);
}
如下图所示:
if (cropOldW + fw <=0) {
 // 如果原始裁剪区域的宽度 + 拉伸的距离小于或等于0的话,说明是向左拉伸,并且拉伸的距离正好大于或等于裁剪区域原始的宽度;
}这边向左拉伸的距离又可以分为2种情况,第一种是 向左拉伸的距离 小于 (原始裁剪区域 + 拉伸前的offsetX); 第二种就是向左拉伸的时候越界了,
那么让拉伸后的宽度还控制在 offsetX的宽度即可,即不越界;因此如下逻辑判断:
现在图片裁剪区域的宽度(cropW) = (图片的宽度w - 拉伸前的offsetX + Math.abs(拉伸的总距离 + 裁剪前的原始距离)) <= 图片的宽度w ? Math.abs(拉伸的总距离 + 裁剪前的原始距离) : 拉伸前的offsetX; 此时的 cropOffsertX = (图片的宽度w - 拉伸前的offsetX + Math.abs(拉伸的总距离 + 裁剪前的原始距离)) <= 图片的宽度w ?拉伸前的offsetX - Math.abs(拉伸的总距离 + 裁剪前的原始距离) : 0; 如下图所示:
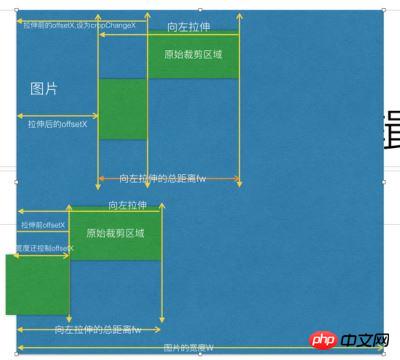
6-2 向上或向下拉伸的基本原理
if (canChangeY) {
 // 如果Y轴能改变的话,说明是 裁剪区域中上下两根线或是上下两个线上的点了。
 if (this.changeCropTypeY === 1) {
 // 如果Y轴的基点能改变的话,并且等于1,说明是裁剪区域上边的线或上边线上的点了。
 // 那就有四种可能值,1. 上边的线,2. 上左角的点,3. 上中角的点。 4. 上右角的点。
 } else if(this.changeCropTypeY === 2) {
 // 等于2,说明是裁剪区域下边的线或下边线上的点了。
 // 同理也就有四种可能值,1. 下边的线,2. 下左角的点,3. 下中角的点。 4. 下右角的点。
 }
}changeCropTypeY === 1 的情况;
假设裁剪区域的原始宽度为 cropOldH,裁剪区域的原始高度为 cropOldY, cropChangeY 保存原始的裁剪区域相对于图片的e.offsetY,
向上或向下拉伸的距离为fh.
如果是向下拉伸的话,又分为2种情况,第一种是向下拉伸它的距离不超过原始裁剪区域的高度 cropOldH, 第二种是已经超过它的原始裁剪区域的高度了。
if (原始裁剪区域的高度cropOldH - 拉伸的距离fh > 0) {
// 说明是向上拉伸(fw肯定为负数)或向下拉伸(fw肯定为正数),但是向下拉伸的距离不超过原裁剪区域的高度
裁剪区域后的高度cropH 计算又分为2种情况,第一种是向上拉伸的距离fh小于或等于拉伸前的 e.offsetY, 第二种拉伸距离是大于e.offsetY,也就是向上
拉伸的时候越界了, 如果越界了,那么拉伸后的高度 = 裁剪之前的原始高度 + e.offsetY(裁剪区域之前的offsetY);因此:
裁剪区域后的高度cropH = 图片的高度 - e.offsetY(裁剪区域之前的offsetY) - fh <= 图片的高度 ? 图片的原始高度cropOldH - 拉伸的距离fh :
裁剪之前的原始高度 + e.offsetY(裁剪区域之前的offsetY);
拉伸区域之后的cropOffsertY = 图片的高度 - e.offsetY(裁剪区域之前的offsetY) - fh <= 图片的高度 ? e.offsetY(裁剪区域之前的offsetY) + fh : 0
}如下图所示:
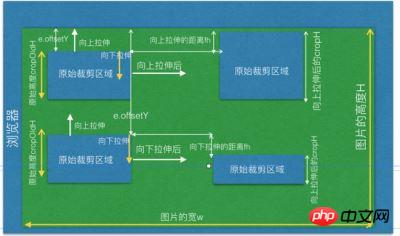
if (原始裁剪区域的高度cropOldH - 拉伸的距离fh <= 0) {
// 说明是向下拉伸,且拉伸的距离fh大于或等于原始裁剪区域的高度cropOldH
同时一样也要判断两种情况,第一种是向下拉伸后,没有超过图片的最低端,第二种是超过了图片的最低端,也就是越界的情况。
拉伸后裁剪区域的高度 = 拉伸后的总距离fh + 拉伸前的offsetY <= 图片的高度h ? 拉伸后的总距离fh - 裁剪区域原始的高度cropOldH : 图片的高度H -
拉伸前的offsetY - 裁剪区域原始的高度 cropOldH;
拉伸区域之后的cropOffsetY = 拉伸前的offsetY + 裁剪区域原始的高度cropOldH;
}如下图所示:
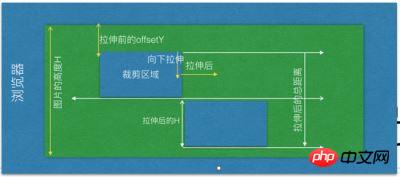
changeCropTypeY === 2 的情况
等于2,说明是裁剪区域下边的线或下边线上的点了。
if (原裁剪区域的高度 + 被拉伸的距离fh > 0) {
// 说明了有可能是向下拉伸,或向上拉伸,但是向上拉伸的距离小于原裁剪区域的高度
裁剪区域后的高度 = 原裁剪区域的高度 + 被拉伸的距离fh + 原始裁剪区域的offsetY <= 图片的高度 ? 原裁剪区域的高度 + 被拉伸的距离fh : 图片的高度 -
原始裁剪的offsetY
裁剪后的cropOffsertY = 原始裁剪的offsetY;
}如下图所示:
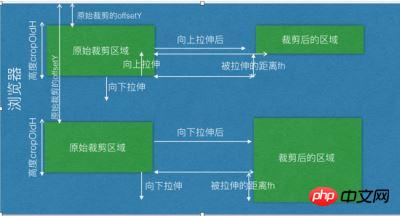
if (原裁剪区域的高度 + 被拉伸的距离fh <= 0) {
// 说明是向上拉伸,且向上拉伸的距离大于或等于原始裁剪区域的高度
裁剪区域后的高度 = 图片的高度 - 原裁剪区域的offsetY + Math.abs(fh + 原裁剪区域的高度) <= 图片的高度 ? 原裁剪区域的高度 + 被拉伸的总距离fh :
原裁剪区域的offsetY;
裁剪后的offsetY = 图片的高度 - 原裁剪区域的offsetY + Math.abs(fh + 原裁剪区域的高度) <= 图片的高度 ? 原裁剪区域的offsetY - Math.abs(被拉伸的总距 离fh + 原裁剪区域的高度) : 0;
}如下图所示:
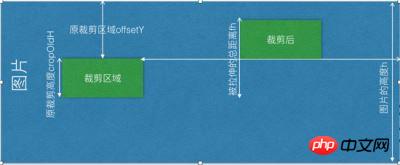
6-3: 向左或向右拉伸且是固定比例拉伸,假设固定比例 3:4, 即 fixedNumber = [3, 4];
向左或向右拉伸,高度会随着变化。如下图所示:
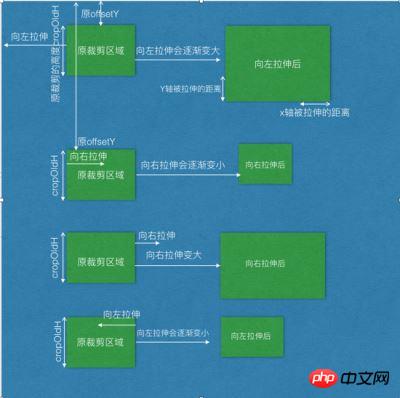
if (canChangeX && fixed) {
比如宽和高比是 3:4 这样的比例;fixedNumber = [3, 4]
因此 固定比例高度的计算
裁剪区域的高度 fixedNumber[1]
------------- = ---------------
裁剪区域的宽度 fixedNumber[0]
因此:
var 裁剪区域的高度(fixedHeight) = ~~(裁剪区域的宽度 / fixedNumber[0] * fixedNumber[1]);
if (裁剪区域的高度 + 原裁剪区域的offsetY > 图片的高度) {
// 说明向左拉伸或向右拉伸,导致纵向区域越界了,
拉伸后的高度 = 图片的高度 - 原裁剪区域的offsetY;
拉伸后的宽度 3
---------- = ----
拉伸后的高度 4
拉伸后的宽度 = 拉伸后的高度 / fixedNumber[1] * fixedNumber[0];
} else {
拉伸后的高度 = fixedHeight;
}
}同样的道理,如果Y轴上的上下线拉伸的话,宽度会跟着变化,也是一样的计算方式:
if (this.canChangeY && this.fixed) {
比如宽和高比是 3:4 这样的比例;fixedNumber = [3, 4];
因此 固定比例宽度的计算
裁剪区域的高度 fixedNumber[1]
------------- = ---------------
裁剪区域的宽度 fixedNumber[0]
裁剪区域的宽度(fixedWidth) = ~~(裁剪区域的高度 / fixedNumber[1] * fixedNumber[0]);
if (裁剪区域的宽度 + 原裁剪区域的offsetX > 图片的宽度) {
// 说明向上或向下拉伸,横向区域越界了
拉伸后的宽度 = 图片的宽度 - 原裁剪区的offsetX;
拉伸后的宽度 3
---------- = ----
拉伸后的高度 4
拉伸后的高度 = 拉伸后的宽度 / fixedNumber[0] * fixedNumber[1];
} else {
拉伸后的宽度 = fixedWidth;
}
}7. 截图移动操作
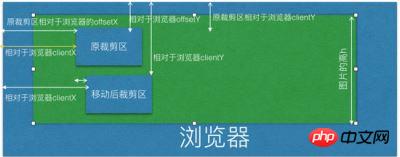
首先可以先获取原裁剪区域的offsetx,和 offsetY, 该offsetX和offsetY是相对于浏览器的,因此原坐标的x轴和Y轴的 e.clientx 和 e.clientY;
当鼠标移动裁剪区到一个新坐标的时候,会有一个新的 e.clientX 和 e.clientY; 把终点的x轴和Y轴离客户端的距离 - 起点的x轴和Y轴的距离,
就等于移动了多少的距离了,再加上原裁剪区相对于浏览器的 offsetX 或 offsetY后,就是最终相对于浏览器的坐标了;因此;
fw = 终点的x轴坐标(e.clientX) - 起点的x轴坐标(e.clientX) + 原裁剪区相对于浏览器的x轴坐标(offsetX);
fh = 终点的y轴坐标(e.clientY) - 起点的y轴坐标(e.clientY) + 原裁剪区相对于浏览器的y轴坐标(offsetY);
如下图所示:
if (移动后的距离fw小于或等于1的话) {
移动后的cropOffsertX = 1;
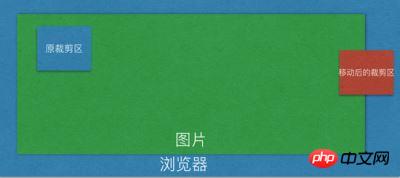
} else if ((移动后的距离 + 裁剪区域的宽度) > 图片的宽度的话) {
// 说明移动的裁剪区域越界了,那么就让裁剪区处于中间的位置
移动后的cropOffsertX = 图片的宽度 - 裁剪区的宽度 - 1;
}如下图所示:
else {
移动后的cropOffsertX = fw;
}
同理 if (移动后的距离fh小于或等于1的话) {
移动后的cropOffsertY = 1;
} else if ((移动后的距离 + 裁剪区域的高度) > 图片的高度的话) {
// 说明移动的裁剪区域越界了,那么就让裁剪区处于中间的位置
移动后的cropOffsertY = 图片的高度 - 裁剪区的高度 - 1;
} else {
移动后的cropOffsertY = fh;
}8. 自动截图操作
代码的基本原理是:看组件是否传递了 autoCropWidth 和 autoCropHeight, 如果传递了该参数的宽度和高度的话,那么使用该参数的值,
如果没有传递的话,或者说该宽度和高度的值都为0的话,那么截取的宽度和高度就是图片的宽度和高度的80%;如果传递的宽度w和高度h大于图片的
本身的宽度或高度的话,那么宽度或高度的值就是图片的本身的宽度和高度的值。
如果传递了固定比例的话,那么高度的计算是根据宽度的比例来计算出来的。计算方式还是之前一样的:如下:
  w    fixedNumber[0]
 ------------- = ---------------
  h    fixedNumber[1]
因此 h = w / this.fixedNumber[0] * this.fixedNumber[1]
如果高度大于图片的高度的话,那么高度就是等于图片的高度,然后根据现在的高度重新计算宽度;
代码如下:
// 如果比例之后 高度大于h
if (h > this.h) {
h = this.h
w = h / this.fixedNumber[1] * this.fixedNumber[0]
}自动截图的主要代码如下:
var w = this.autoCropWidth
var h = this.autoCropHeight
if (w === 0 || h === 0) {
 w = this.w * 0.8
 h = this.h * 0.8
}
w = w > this.w ? this.w : w
h = h > this.h ? this.h : h
if (this.fixed) {
 h = w / this.fixedNumber[0] * this.fixedNumber[1]
}
// 如果比例之后 高度大于h
if (h > this.h) {
 h = this.h
 w = h / this.fixedNumber[1] * this.fixedNumber[0]
}相信看了本文案例你已经掌握了方法,更多精彩请关注php中文网其它相关文章!
推荐阅读:
The above is the detailed content of Vue-cropper crops images. For more information, please follow other related articles on the PHP Chinese website!

Hot AI Tools

Undresser.AI Undress
AI-powered app for creating realistic nude photos

AI Clothes Remover
Online AI tool for removing clothes from photos.

Undress AI Tool
Undress images for free

Clothoff.io
AI clothes remover

AI Hentai Generator
Generate AI Hentai for free.

Hot Article

Hot Tools

Notepad++7.3.1
Easy-to-use and free code editor

SublimeText3 Chinese version
Chinese version, very easy to use

Zend Studio 13.0.1
Powerful PHP integrated development environment

Dreamweaver CS6
Visual web development tools

SublimeText3 Mac version
God-level code editing software (SublimeText3)

Hot Topics
 1378
1378
 52
52
 How to add functions to buttons for vue
Apr 08, 2025 am 08:51 AM
You can add a function to the Vue button by binding the button in the HTML template to a method. Define the method and write function logic in the Vue instance.
 How to use bootstrap in vue
Apr 07, 2025 pm 11:33 PM
Using Bootstrap in Vue.js is divided into five steps: Install Bootstrap. Import Bootstrap in main.js. Use the Bootstrap component directly in the template. Optional: Custom style. Optional: Use plug-ins.
 How to reference js file with vue.js
Apr 07, 2025 pm 11:27 PM
There are three ways to refer to JS files in Vue.js: directly specify the path using the <script> tag;; dynamic import using the mounted() lifecycle hook; and importing through the Vuex state management library.
 How to use watch in vue
Apr 07, 2025 pm 11:36 PM
The watch option in Vue.js allows developers to listen for changes in specific data. When the data changes, watch triggers a callback function to perform update views or other tasks. Its configuration options include immediate, which specifies whether to execute a callback immediately, and deep, which specifies whether to recursively listen to changes to objects or arrays.
 How to return to previous page by vue
Apr 07, 2025 pm 11:30 PM
Vue.js has four methods to return to the previous page: $router.go(-1)$router.back() uses <router-link to="/" component window.history.back(), and the method selection depends on the scene.
 Vue realizes marquee/text scrolling effect
Apr 07, 2025 pm 10:51 PM
Implement marquee/text scrolling effects in Vue, using CSS animations or third-party libraries. This article introduces how to use CSS animation: create scroll text and wrap text with <div>. Define CSS animations and set overflow: hidden, width, and animation. Define keyframes, set transform: translateX() at the beginning and end of the animation. Adjust animation properties such as duration, scroll speed, and direction.
 How to use vue pagination
Apr 08, 2025 am 06:45 AM
Pagination is a technology that splits large data sets into small pages to improve performance and user experience. In Vue, you can use the following built-in method to paging: Calculate the total number of pages: totalPages() traversal page number: v-for directive to set the current page: currentPage Get the current page data: currentPageData()
 How to query the version of vue
Apr 07, 2025 pm 11:24 PM
You can query the Vue version by using Vue Devtools to view the Vue tab in the browser's console. Use npm to run the "npm list -g vue" command. Find the Vue item in the "dependencies" object of the package.json file. For Vue CLI projects, run the "vue --version" command. Check the version information in the <script> tag in the HTML file that refers to the Vue file.


