

How to use the picture annotation component in jquery.picsign
This article mainly introduces the first open source component encapsulated by jquery.picsign. Friends in need can refer to it
After several days of trying and learning, I encapsulated my first js component , there are many shortcomings, please enlighten me.
Due to some business needs, I need to add some annotations to the pictures. I found some on the Internet but they couldn't meet the needs, and there were some bugs and too many pitfalls.
So I had the idea to package one myself. , learned the implementation ideas of other similar components, and the development ideas of js components, and developed the jquery.picsign component
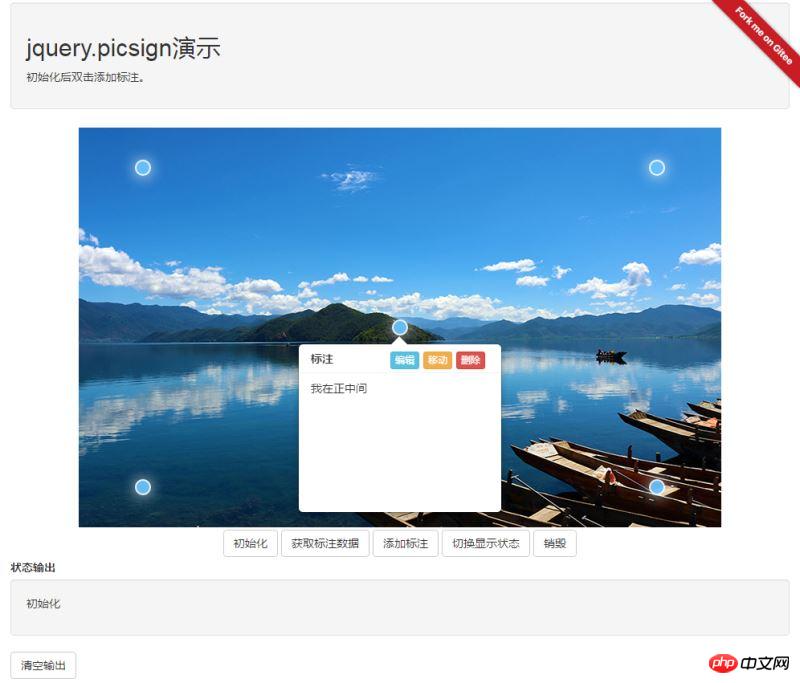
jQuery picture annotation component (jquery .picsign)
Online demo: http://artlessbruin.gitee.io/picsign/
gitee: https://gitee.com/ArtlessBruin/PicSign
1. Component dependencies
jquery
<script src="https://cdn.bootcss.com/jquery/3.3.1/jquery.min.js"></script>
bootstrap
<link href="https://cdn.bootcss.com/bootstrap/3.3.7/css/bootstrap.min.css" rel="stylesheet">
<script src="https://cdn.bootcss.com/bootstrap/3.3.7/js/bootstrap.min.js"></script>
layer
<link href="https://cdn.bootcss.com/layer/3.1.0/theme/default/layer.css" rel="stylesheet">
<script src="https://cdn.bootcss.com/layer/3.1.0/layer.js"></script>
webui-popover
<link href="https://cdn.bootcss.com/webui-popover/2.1.15/jquery.webui-popover.min.css" rel="stylesheet">
<script src="https://cdn.bootcss.com/webui-popover/2.1.15/jquery.webui-popover.min.js"></script>
2. Reference component files
<link href="css/jquery.picsign.css" rel="external nofollow" rel="stylesheet" />
<script src="js/jquery.picsign.js"></script>
3. Use
to add a p
<p id="picsign"></p>
Initialization component
$("#picsign").picsign(option);
//option为组件参数,详细说明见option参数说明option parameter description
var option={
 picurl: null,//图片地址
 signdata: [],//初始数据,详细说明参见基本数据格式
 editable: {//是否可编辑(默认可编辑 设置为false则禁用所有编辑)
 add: true,//是否可添加
 update: true,//是否可修改
 del: true,//是否可删除
 move: true//是否可移动
 },
 signclass: 'signdot',//标注点样式
 popwidth: 400,//标注内容显示窗口宽
 popheight: 247,//标注内容显示窗口高
 inputwidth: 400,//标注内容编辑窗口宽
 inputheight: 247,//标注内容编辑窗口高
 beforeadd: function (data) {//在添加保存前执行的方法,返回false阻断添加
 },
 onadd: function (data) {//添加完成执行的方法
 },
 beforeupdate: function (data) {//在修改保存前执行的方法,返回false阻断修改
 },
 onupdate: function (data) {//修改完成执行的方法
 },
 beforedel: function (data) {//在删除保存前执行的方法,返回false阻断删除
 },
 ondel: function (data) {//删除完成执行的方法
 }
};Basic data format
[{
 left:'50%',
 top:'50%',
 msg:'这是标注信息',
 signid:'这是标注唯一标识符,用户无需赋值,与组件逻辑相关,请不要使用此关键字'
}]The data added by the user must contain left and top , msg attribute
Users can extend other attributes by themselves
Special instructions: Please do not add and use the signid keyword
Method call
$("#picsign").picsign('functionName',parameter);
//functionName为方法名称,parameter为方法参数,详细说明参见方法说明Method description
Get annotation data
Method name: getData
Parameters: None
$("#picsign").picsign('getData');Add annotation data
Method name: addSign
Parameters: Basic data Json, whether to trigger the event (default is true)
$("#p_picsign").picsign("addSign",
 [{ left: '50%', top: '10%', msg: "123"},
 { left: '80%', top: '10%', msg: "456"}],
 true
)Switch label display status
Method name: toggle
Parameters: None
$("#p_picsign").picsign("toggle")Component destruction
Method name :destroy
Parameters: None
$("#p_picsign").picsign("destroy")The above is what I compiled for everyone. I hope it will be helpful to everyone in the future.
Related articles:
Concept and usage of command mode in JS (detailed tutorial)
Use selenium to capture Taobao data information
How to implement map grid using Baidu Map
The above is the detailed content of How to use the picture annotation component in jquery.picsign. For more information, please follow other related articles on the PHP Chinese website!

Hot AI Tools

Undresser.AI Undress
AI-powered app for creating realistic nude photos

AI Clothes Remover
Online AI tool for removing clothes from photos.

Undress AI Tool
Undress images for free

Clothoff.io
AI clothes remover

AI Hentai Generator
Generate AI Hentai for free.

Hot Article
Hot Tools

Notepad++7.3.1
Easy-to-use and free code editor

SublimeText3 Chinese version
Chinese version, very easy to use

Zend Studio 13.0.1
Powerful PHP integrated development environment

Dreamweaver CS6
Visual web development tools

SublimeText3 Mac version
God-level code editing software (SublimeText3)
Hot Topics
 1377
1377
 52
52

 Detailed explanation of jQuery reference methods: Quick start guide
Feb 27, 2024 pm 06:45 PM
Detailed explanation of jQuery reference methods: Quick start guide
Feb 27, 2024 pm 06:45 PM
Detailed explanation of jQuery reference method: Quick start guide jQuery is a popular JavaScript library that is widely used in website development. It simplifies JavaScript programming and provides developers with rich functions and features. This article will introduce jQuery's reference method in detail and provide specific code examples to help readers get started quickly. Introducing jQuery First, we need to introduce the jQuery library into the HTML file. It can be introduced through a CDN link or downloaded
 Angular components and their display properties: understanding non-block default values
Mar 15, 2024 pm 04:51 PM
Angular components and their display properties: understanding non-block default values
Mar 15, 2024 pm 04:51 PM
The default display behavior for components in the Angular framework is not for block-level elements. This design choice promotes encapsulation of component styles and encourages developers to consciously define how each component is displayed. By explicitly setting the CSS property display, the display of Angular components can be fully controlled to achieve the desired layout and responsiveness.
 How to use PUT request method in jQuery?
Feb 28, 2024 pm 03:12 PM
How to use PUT request method in jQuery?
Feb 28, 2024 pm 03:12 PM
How to use PUT request method in jQuery? In jQuery, the method of sending a PUT request is similar to sending other types of requests, but you need to pay attention to some details and parameter settings. PUT requests are typically used to update resources, such as updating data in a database or updating files on the server. The following is a specific code example using the PUT request method in jQuery. First, make sure you include the jQuery library file, then you can send a PUT request via: $.ajax({u
 How to remove the height attribute of an element with jQuery?
Feb 28, 2024 am 08:39 AM
How to remove the height attribute of an element with jQuery?
Feb 28, 2024 am 08:39 AM
How to remove the height attribute of an element with jQuery? In front-end development, we often encounter the need to manipulate the height attributes of elements. Sometimes, we may need to dynamically change the height of an element, and sometimes we need to remove the height attribute of an element. This article will introduce how to use jQuery to remove the height attribute of an element and provide specific code examples. Before using jQuery to operate the height attribute, we first need to understand the height attribute in CSS. The height attribute is used to set the height of an element
 jQuery Tips: Quickly modify the text of all a tags on the page
Feb 28, 2024 pm 09:06 PM
jQuery Tips: Quickly modify the text of all a tags on the page
Feb 28, 2024 pm 09:06 PM
Title: jQuery Tips: Quickly modify the text of all a tags on the page In web development, we often need to modify and operate elements on the page. When using jQuery, sometimes you need to modify the text content of all a tags in the page at once, which can save time and energy. The following will introduce how to use jQuery to quickly modify the text of all a tags on the page, and give specific code examples. First, we need to introduce the jQuery library file and ensure that the following code is introduced into the page: <
 Use jQuery to modify the text content of all a tags
Feb 28, 2024 pm 05:42 PM
Use jQuery to modify the text content of all a tags
Feb 28, 2024 pm 05:42 PM
Title: Use jQuery to modify the text content of all a tags. jQuery is a popular JavaScript library that is widely used to handle DOM operations. In web development, we often encounter the need to modify the text content of the link tag (a tag) on the page. This article will explain how to use jQuery to achieve this goal, and provide specific code examples. First, we need to introduce the jQuery library into the page. Add the following code in the HTML file:
 How to tell if a jQuery element has a specific attribute?
Feb 29, 2024 am 09:03 AM
How to tell if a jQuery element has a specific attribute?
Feb 29, 2024 am 09:03 AM
How to tell if a jQuery element has a specific attribute? When using jQuery to operate DOM elements, you often encounter situations where you need to determine whether an element has a specific attribute. In this case, we can easily implement this function with the help of the methods provided by jQuery. The following will introduce two commonly used methods to determine whether a jQuery element has specific attributes, and attach specific code examples. Method 1: Use the attr() method and typeof operator // to determine whether the element has a specific attribute
 Understand the role and application scenarios of eq in jQuery
Feb 28, 2024 pm 01:15 PM
Understand the role and application scenarios of eq in jQuery
Feb 28, 2024 pm 01:15 PM
jQuery is a popular JavaScript library that is widely used to handle DOM manipulation and event handling in web pages. In jQuery, the eq() method is used to select elements at a specified index position. The specific usage and application scenarios are as follows. In jQuery, the eq() method selects the element at a specified index position. Index positions start counting from 0, i.e. the index of the first element is 0, the index of the second element is 1, and so on. The syntax of the eq() method is as follows: $("s
