Using Qiniu Cloud Storage in ThinkPHP
This article mainly introduces the use of Qiniu cloud storage in ThinkPHP. It has certain reference value. Now I share it with you. Friends in need can refer to it

ThinkPHP development --Use Qiniu Cloud Storage
Qiniu Cloud Storage is one of the thinkphp storage type options. How to use it? Okay, let’s not get too far. The following is a detailed introduction to how to use it
The first thing is to register a Qiniu Cloud Storage. Niu Account

ThinkPHP Development--Use Qiniu Cloud Storage
and then log in

ThinkPHP Development--Use Qiniu Cloud Storage
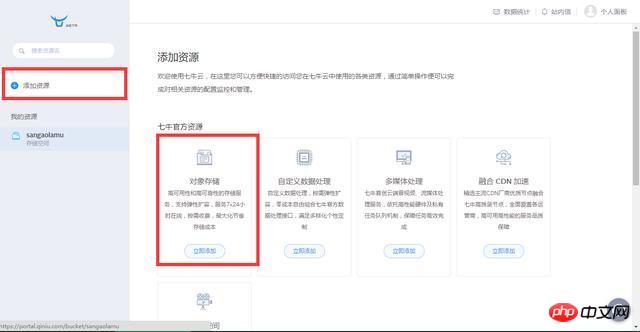
Then select add resources and select object storage

ThinkPHP Development--Use Qiniu Cloud Storage

ThinkPHP development--using Qiniu Cloud Storage
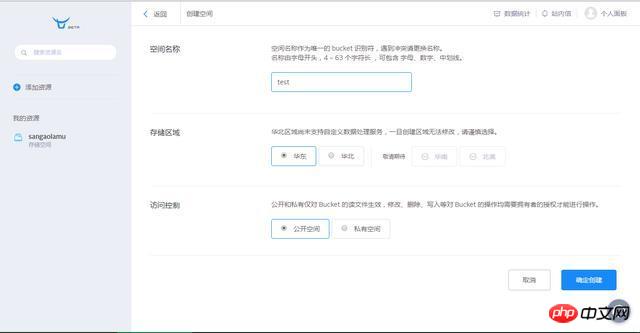
Then fill in the space name (i.e. bucket, this name will be used later), access control For public access (select public access for ease of operation, of course you can also select private, but authorization is required when requesting resources), confirm creation.
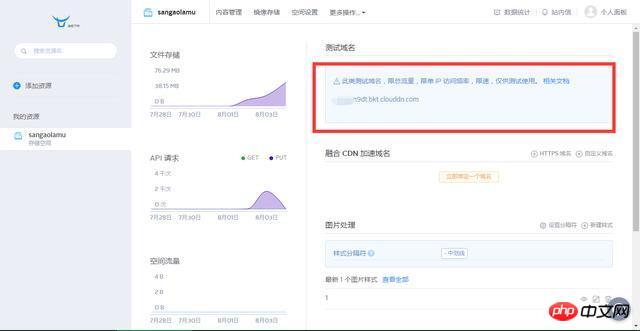
Enter the resource you just created and record the domain name

ThinkPHP development--use Qiniu Cloud Storage
Select in the personal panel Key Management Here you can get your AccessKey and SecretKey. The preparations are done, the following is the specific configuration and code implementation.
Make the following configuration in the configuration file config.php
'config_qiniu' => array( 'accessKey' => '', //这里填七牛AK 'secretKey' => '', //这里填七牛SK 'domain' => '',//这里是域名 'bucket' => 'sangaolamu'//这里是七牛中的“空间” ), 'config' => array( 'maxSize' => 5*1024*1024, 'rootPath' => './Uploads/', 'savePath' => '', 'saveName' => array('uniqid',''), 'exts' => array('jpg', 'gif', 'png', 'jpeg'), 'autoSub' => true, 'subName' => array('date','Ymd'), ), //然后在需要调用上传的地方将原来上传到本地代码片段修改为以下代码 $config = C('config'); $config_qiniu = C('config_qiniu'); $upload = new ThinkUpload($config,'Qiniu',$config_qiniu); $info = $upload->upload();
$info is the information returned after uploading, where url is the address of the file, in the form of [url] => ; http://ob9pbn9dt.bkt.clouddn.com/20160802_57a05d764e1f4.jpg, save this field, and access this address when accessing later. At this point, the file has been uploaded to Qiniu Cloud for storage. I will give examples of how to delete and other operations later.
The above is the entire content of this article. I hope it will be helpful to everyone's study. For more related content, please pay attention to the PHP Chinese website!
Related recommendations:
Qiniu integrates PHP to upload files,
##
The above is the detailed content of Using Qiniu Cloud Storage in ThinkPHP. For more information, please follow other related articles on the PHP Chinese website!

Hot AI Tools

Undresser.AI Undress
AI-powered app for creating realistic nude photos

AI Clothes Remover
Online AI tool for removing clothes from photos.

Undress AI Tool
Undress images for free

Clothoff.io
AI clothes remover

Video Face Swap
Swap faces in any video effortlessly with our completely free AI face swap tool!

Hot Article

Hot Tools

Notepad++7.3.1
Easy-to-use and free code editor

SublimeText3 Chinese version
Chinese version, very easy to use

Zend Studio 13.0.1
Powerful PHP integrated development environment

Dreamweaver CS6
Visual web development tools

SublimeText3 Mac version
God-level code editing software (SublimeText3)

Hot Topics
 1387
1387
 52
52
 How to run thinkphp project
Apr 09, 2024 pm 05:33 PM
To run the ThinkPHP project, you need to: install Composer; use Composer to create the project; enter the project directory and execute php bin/console serve; visit http://localhost:8000 to view the welcome page.
 There are several versions of thinkphp
Apr 09, 2024 pm 06:09 PM
ThinkPHP has multiple versions designed for different PHP versions. Major versions include 3.2, 5.0, 5.1, and 6.0, while minor versions are used to fix bugs and provide new features. The latest stable version is ThinkPHP 6.0.16. When choosing a version, consider the PHP version, feature requirements, and community support. It is recommended to use the latest stable version for best performance and support.
 How to run thinkphp
Apr 09, 2024 pm 05:39 PM
Steps to run ThinkPHP Framework locally: Download and unzip ThinkPHP Framework to a local directory. Create a virtual host (optional) pointing to the ThinkPHP root directory. Configure database connection parameters. Start the web server. Initialize the ThinkPHP application. Access the ThinkPHP application URL and run it.
 Which one is better, laravel or thinkphp?
Apr 09, 2024 pm 03:18 PM
Performance comparison of Laravel and ThinkPHP frameworks: ThinkPHP generally performs better than Laravel, focusing on optimization and caching. Laravel performs well, but for complex applications, ThinkPHP may be a better fit.
 Development suggestions: How to use the ThinkPHP framework to implement asynchronous tasks
Nov 22, 2023 pm 12:01 PM
"Development Suggestions: How to Use the ThinkPHP Framework to Implement Asynchronous Tasks" With the rapid development of Internet technology, Web applications have increasingly higher requirements for handling a large number of concurrent requests and complex business logic. In order to improve system performance and user experience, developers often consider using asynchronous tasks to perform some time-consuming operations, such as sending emails, processing file uploads, generating reports, etc. In the field of PHP, the ThinkPHP framework, as a popular development framework, provides some convenient ways to implement asynchronous tasks.
 How to install thinkphp
Apr 09, 2024 pm 05:42 PM
ThinkPHP installation steps: Prepare PHP, Composer, and MySQL environments. Create projects using Composer. Install the ThinkPHP framework and dependencies. Configure database connection. Generate application code. Launch the application and visit http://localhost:8000.
 How is the performance of thinkphp?
Apr 09, 2024 pm 05:24 PM
ThinkPHP is a high-performance PHP framework with advantages such as caching mechanism, code optimization, parallel processing and database optimization. Official performance tests show that it can handle more than 10,000 requests per second and is widely used in large-scale websites and enterprise systems such as JD.com and Ctrip in actual applications.
 Development suggestions: How to use the ThinkPHP framework for API development
Nov 22, 2023 pm 05:18 PM
Development suggestions: How to use the ThinkPHP framework for API development. With the continuous development of the Internet, the importance of API (Application Programming Interface) has become increasingly prominent. API is a bridge for communication between different applications. It can realize data sharing, function calling and other operations, and provides developers with a relatively simple and fast development method. As an excellent PHP development framework, the ThinkPHP framework is efficient, scalable and easy to use.


