This article mainly introduces the email prompt completion effect implemented by JS, involving techniques related to javascript regular matching, event response and dynamic operation of page elements. Friends in need can refer to the following
The examples of this article describe JS Implemented email prompt completion effect. Share it with everyone for your reference, the details are as follows:
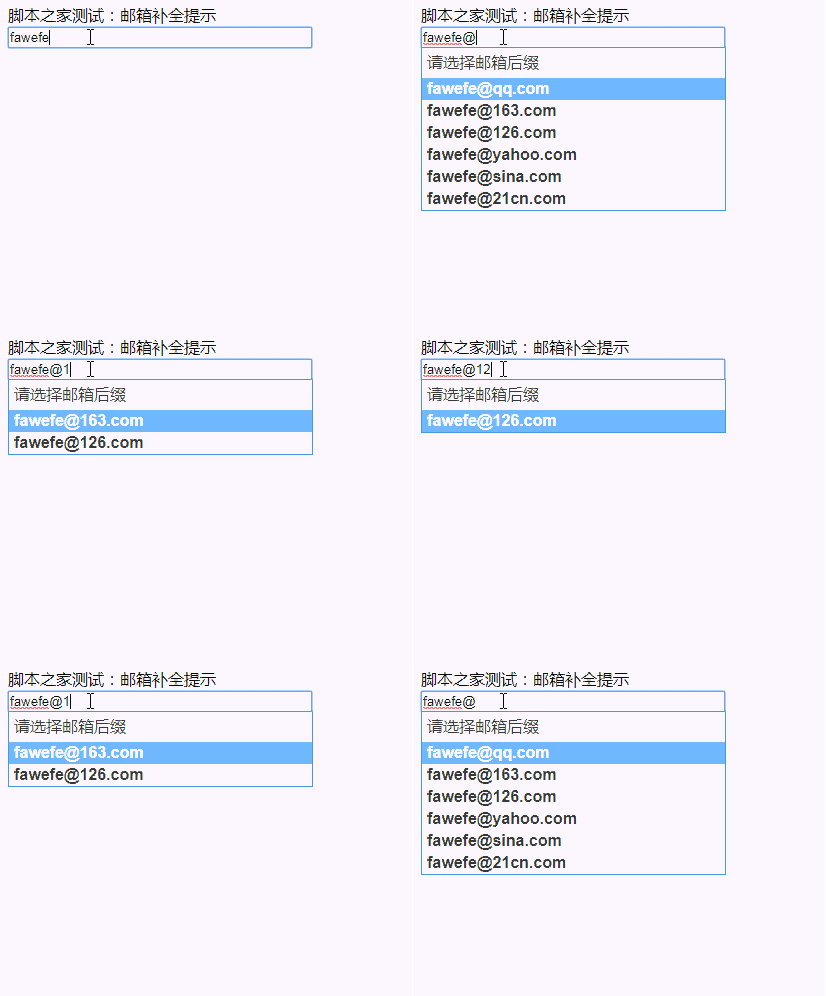
What I want to achieve now is an effect similar to the email prompt box when logging in to NetEase, but I plan to change it slightly here, that is, the email prompt will appear when entering @ List
The principle of implementing prompts is to use regular rules for matching
The effect diagram is as follows:

The code is as follows:
<!doctype html>
<html>
<head>
<meta charset="utf-8" />
<title>邮箱补全提示</title>
<style>
ul{padding:0px;margin:0px;}
.login_autoComplete{width:256px;border:1px solid #4190db;position:absolute;background-color:#ffffff;z-index:99;top:109px;left:40px;display:none}
.login_auto_ul em{font-style:normal}
.login_auto_ul li.login_auto_title{font-weight:normal;line-height:30px;}
.login_auto_ul li{line-height:22px;text-indent:5px;font-family:"Arial";cursor:pointer;font-weight:bold;color:#333}
.login_auto_ul li.hover,.login_auto_ul li.curr{color:#ffffff;background-color:#6eb6fe}
</style>
<script src="http://libs.baidu.com/jquery/2.0.0/jquery.min.js"></script>
<script>
window.email_auto = function(selector){
var elt = $(selector);
var strHtml = '<p class="login_autoComplete" id="login_autoComplete">'+
' <ul class="login_auto_ul">'+
' <li class="login_auto_title">请选择邮箱后缀</li>'+
' <li class="hover" hz="@qq.com"></li>'+
' <li hz="@163.com"></li>'+
' <li hz="@126.com"></li>'+
' <li hz="@yahoo.com"></li>'+
' <li hz="@sina.com"></li>'+
' <li hz="@21cn.com"></li>'+
' </ul>'+
' </p>';
var lc = "#login_autoComplete";
var autoComplete,autoLi;
if($(lc).length==0){
$("body").append(strHtml);
$(lc).data("elt",elt);
autoComplete = $("#login_autoComplete");
autoLi = autoComplete.find("li:not(.login_auto_title)");
autoLi.mouseover(function(){
$(this).siblings().filter(".hover").removeClass("hover");
$(this).addClass("hover");
}).mouseout(function(){
$(this).removeClass("hover");
}).mousedown(function(){
$(lc).data("elt").val($(this).text()).change();
$(this).parent().parent().hide();
});
}else{
$(lc).data("elt",elt);
autoComplete = $("#login_autoComplete");
autoLi = autoComplete.find("li:not(.login_auto_title)");
}
$(lc).css("width",elt.outerWidth()-1);
//用户名补全+翻动
elt.keyup(function(e){
if(/13|38|40|116/.test(e.keyCode) || this.value==''){
return false;
}
var username = this.value;
if(username.indexOf("@")==-1){
autoComplete.hide();
return false;
}
autoLi.each(function(){
this.innerHTML = username.replace(/\@+.*/,"")+$(this).attr("hz");
if(this.innerHTML.indexOf(username)>=0){
$(this).show();
}else{
$(this).hide();
}
}).filter(".hover").removeClass("hover");
autoComplete.show().css({
left : $(this).offset().left,
top : $(this).offset().top + $(this).outerHeight(true) - 1
});
if(autoLi.filter(":visible").length==0){
autoComplete.hide();
}else{
autoLi.filter(":visible").eq(0).addClass("hover");
}
}).change(function(){
$("#login_autoComplete").hide();
}).keydown(function(e){
if(e.keyCode==38){ //上
autoLi.filter(".hover").prev().not(".login_auto_title").addClass("hover").next().removeClass("hover");
}else if(e.keyCode==40){ //下
autoLi.filter(".hover").next().addClass("hover").prev().removeClass("hover");
}else if(e.keyCode==13){ //Enter
autoLi.filter(".hover").mousedown();
}
}).focus(function(){
$("#login_autoComplete").data("elt",$(this));
});
}
$(function(){
email_auto("#xxx");
});
</script>
</head>
<body>
脚本之家测试:邮箱补全提示<br/>
<input type="text" id="xxx" style="width:300px"/>
</body>
</html>The above is what I compiled for everyone. I hope it will be helpful to everyone in the future.
Related articles:
How to solve the problem of invalid static resource images after vue packaging
How to use vue less to implement simple skin change function
The above is the detailed content of How to implement email prompt completion function in JS. For more information, please follow other related articles on the PHP Chinese website!


