How to use vue+props to pass data in the project
This time I will show you how to use vue props to transfer data in the project, and what are the precautions for using vue props to transfer data. The following is a practical case, let's take a look.
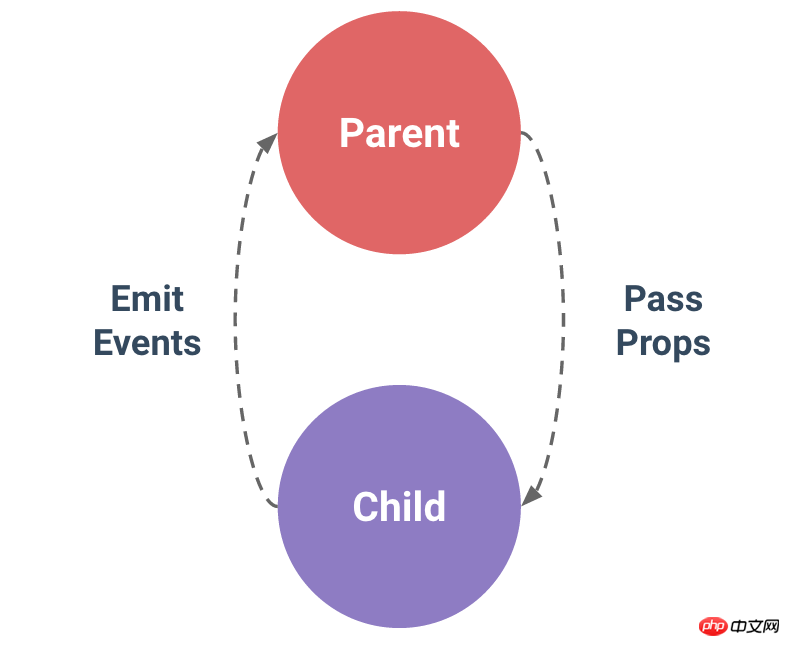
In Vue, the relationship between parent and child components can be summarized as props are passed downwards and events are passed upwards. The parent component sends data to the child component through props, and the child component sends messages to the parent component through events. See how they work.

1. Basic Usage
Components are not just about reusing the content of the template. What's more important is communication between components.
In the component, use the option props to declare the data that needs to be received from the parent. The value of props can be two types, one is a string array, and the other is an object.
1.1 String array:
  <p id="app4">
   <my-component4 message="数据来自父组件"></my-component4>
  </p>
Vue.component('my-component4',{
 props: ['message'],
 template: '<p>{{message}}</p>'
});
var app4 = new Vue({
 el: '#app4'
});The result after rendering is: The data declared in
<p id= ” app4”>
  <p >来自父组件的数据</ p>
</p>
props and the data returned by the component data function are mainly The difference is that the props come from the parent, while the data in the data is the component's own data, and the scope is the component itself. Both types of data can be used in the template, computed properties, and methods.
The data message in the above example is passed from the parent through props. Write the name of the props directly on the custom label of the component. If you want to pass multiple data, just add items in the props array. .
Sometimes, the data passed is not directly hard-coded, but dynamic data from the parent. In this case, you can use the command v -bind to dynamically bind the value of props. When the data of the parent component changes , will also be passed to child components.
  <p id="app5">
   <input type="text" v-model="text">
   <my-component5 :my-text="text"></my-component5>
  </p>
Vue.component('my-component5',{
 props: ['myText'],
 template: '<p>{{myText}}</p>'
});
var app5 = new Vue({
 el: '#app5',
 data: {
  text: '动态传递父组件数据'
 }
});A few points to note:
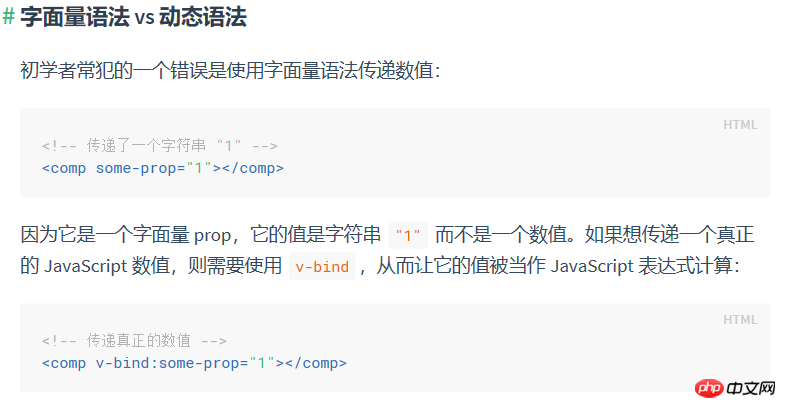
1. If you want to directly pass numbers, Boolean values, arrays, and objects, and do not use v-bind, only strings will be passed.

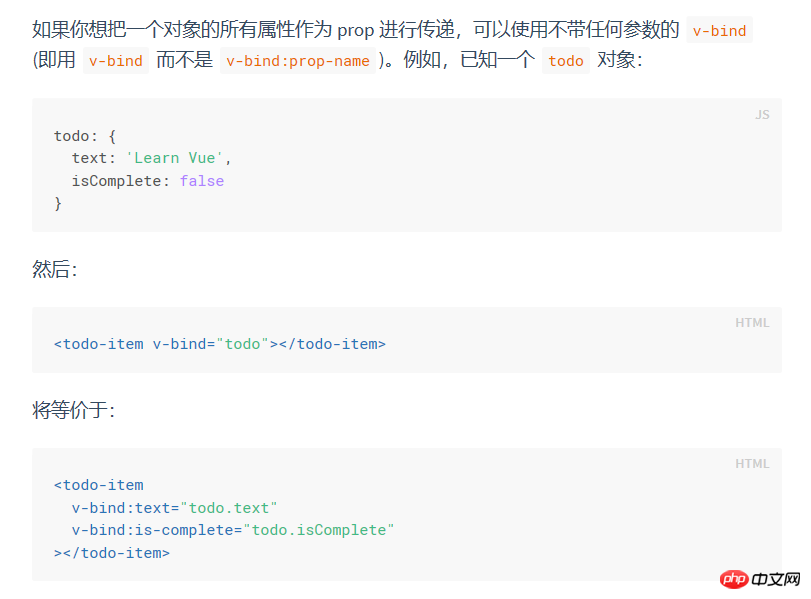
2. If you want to pass all the properties of an object as props, you can use v-bind without any parameters (that is, use v-bind instead of v -bind:prop-name). For example, a known todo object:

1.2 Object:
When prop needs to be verified, object writing is required.
Generally when your component needs to be provided to others, it is recommended to perform data verification. For example, a certain data must be of numeric type. If a string is passed in, a warning will pop up on the console.
 <p id="app6">
   <input type="text" v-model="number">
   <my-component6 :my-text="number"></my-component6>
  </p>
Vue.component('my-component6',{
 props: {
  'myText':{
   type: Number, //必须是数字类型的
   required: true, //必须传值
   default: 1 //如果未定义,默认值就是1
  }
 },
 template: '<p>{{myText}}</p>'
});
var app6 = new Vue({
 el: '#app6',
 data: {
  number: 1
 }
});The verified type type can be:
• String
• Number
• Boolean
• Object
• Array
• Function
type can also be a custom constructor, detected using instanceof.
When prop verification fails, a warning will be thrown in the console under the development version.
2. One-way data flow
The biggest change between Vue 2.x and Vue l.x is that Vue2.x is passed through props The data is one-way, that is, when the data of the parent component changes, it will be passed to the child component, but not the other way around.
In business, we often encounter two situations where prop needs to be changed.
2.1 One is that the parent component passes in the initial value, and the subcomponent saves it as the initial value. It can be used and modified at will within the scope. (After Prop is passed in as the initial value, the subcomponent wants to use it as local data;)
In this case, you can declare another data in the component data and reference the prop of the parent component. The sample code is as follows :
 <p id="app7">
   <my-component7 :init-count="1"></my-component7>
  </p>
Vue.component('my-component7',{
 props: ['initCount'],
 template: '<p>{{count}}</p>',
 data: function(){
  return {
   count: this.initCount
  }
 }
});
var app7 = new Vue({
 el: '#app7'
});The data count is declared in the component. It will obtain the initCount from the parent component when the component is initialized. After that, it has nothing to do with it. It only maintains the count, so that you can avoid directly operating the initCount.
2.2 Prop is passed in as the original value that needs to be transformed. (Prop is passed in as raw data and is processed into other data output by the subcomponent.)
In this case, calculated properties are enough. The sample code is as follows:
  <p id="app8">
   <my-component8 :width="100"></my-component8>
  </p>
Vue.component('my-component8',{
 props: ['width'],
 template: '<p :style="style">组件内容</p>',
 computed: {
  style: function(){
   return {
    width: this.width+'px'
   }
  }
 }
});
var app8 = new Vue({
 el: '#app8'
});Note that objects and Arrays are reference types, pointing to the same memory space. If prop is an object or array, changing it inside the child component will affect the state of the parent component.
I believe you have mastered the method after reading the case in this article. For more exciting information, please pay attention to other related articles on the php Chinese website!
Recommended reading:
What are the packaging optimization methods for Vue
Resolve the conflict between double-click and click events
The above is the detailed content of How to use vue+props to pass data in the project. For more information, please follow other related articles on the PHP Chinese website!

Hot AI Tools

Undresser.AI Undress
AI-powered app for creating realistic nude photos

AI Clothes Remover
Online AI tool for removing clothes from photos.

Undress AI Tool
Undress images for free

Clothoff.io
AI clothes remover

AI Hentai Generator
Generate AI Hentai for free.

Hot Article

Hot Tools

Notepad++7.3.1
Easy-to-use and free code editor

SublimeText3 Chinese version
Chinese version, very easy to use

Zend Studio 13.0.1
Powerful PHP integrated development environment

Dreamweaver CS6
Visual web development tools

SublimeText3 Mac version
God-level code editing software (SublimeText3)

Hot Topics
 1386
1386
 52
52
 How to add functions to buttons for vue
Apr 08, 2025 am 08:51 AM
You can add a function to the Vue button by binding the button in the HTML template to a method. Define the method and write function logic in the Vue instance.
 How to use bootstrap in vue
Apr 07, 2025 pm 11:33 PM
Using Bootstrap in Vue.js is divided into five steps: Install Bootstrap. Import Bootstrap in main.js. Use the Bootstrap component directly in the template. Optional: Custom style. Optional: Use plug-ins.
 How to use watch in vue
Apr 07, 2025 pm 11:36 PM
The watch option in Vue.js allows developers to listen for changes in specific data. When the data changes, watch triggers a callback function to perform update views or other tasks. Its configuration options include immediate, which specifies whether to execute a callback immediately, and deep, which specifies whether to recursively listen to changes to objects or arrays.
 How to reference js file with vue.js
Apr 07, 2025 pm 11:27 PM
There are three ways to refer to JS files in Vue.js: directly specify the path using the <script> tag;; dynamic import using the mounted() lifecycle hook; and importing through the Vuex state management library.
 What does vue multi-page development mean?
Apr 07, 2025 pm 11:57 PM
Vue multi-page development is a way to build applications using the Vue.js framework, where the application is divided into separate pages: Code Maintenance: Splitting the application into multiple pages can make the code easier to manage and maintain. Modularity: Each page can be used as a separate module for easy reuse and replacement. Simple routing: Navigation between pages can be managed through simple routing configuration. SEO Optimization: Each page has its own URL, which helps SEO.
 How to return to previous page by vue
Apr 07, 2025 pm 11:30 PM
Vue.js has four methods to return to the previous page: $router.go(-1)$router.back() uses <router-link to="/" component window.history.back(), and the method selection depends on the scene.
 How to query the version of vue
Apr 07, 2025 pm 11:24 PM
You can query the Vue version by using Vue Devtools to view the Vue tab in the browser's console. Use npm to run the "npm list -g vue" command. Find the Vue item in the "dependencies" object of the package.json file. For Vue CLI projects, run the "vue --version" command. Check the version information in the <script> tag in the HTML file that refers to the Vue file.
 How to use function intercept vue
Apr 08, 2025 am 06:51 AM
Function interception in Vue is a technique used to limit the number of times a function is called within a specified time period and prevent performance problems. The implementation method is: import the lodash library: import { debounce } from 'lodash'; Use the debounce function to create an intercept function: const debouncedFunction = debounce(() => { / Logical / }, 500); Call the intercept function, and the control function is called at most once in 500 milliseconds.


