How to write a PC-side carousel using jquery (detailed tutorial)
This article mainly tells you how to use jquery to write an example of a PC-side carousel effect. Friends who are interested can refer to it.
I haven’t been very busy with other projects recently. I was assigned to make a new page for the company’s official website project (I have never been exposed to the company’s official website project before). There is a place where carousel images are used. At first, I wanted to use it directly. It would be nice to implement the swiper.js plug-in, but I found that swiper.js had not been introduced in the official website project before. After thinking about it, I decided not to introduce it to avoid having to add another network request. Since jQuery has been used in the project , then simply use jQuery to write a carousel image.
Now take out the code for the carousel picture you wrote separately, make a small demo and write it here to record it (the picture of the carousel picture in the demo was randomly found online)
Achieved effects:
1. Automatic carousel (carousel time interval is customized in js code)
2. Click the left and right buttons to achieve manual switching
3. The small dot at the bottom displays the active state according to the position of the switched image.
4. The mouse passes through the carousel area, stops the carousel, and leaves the carousel area to start the carousel.
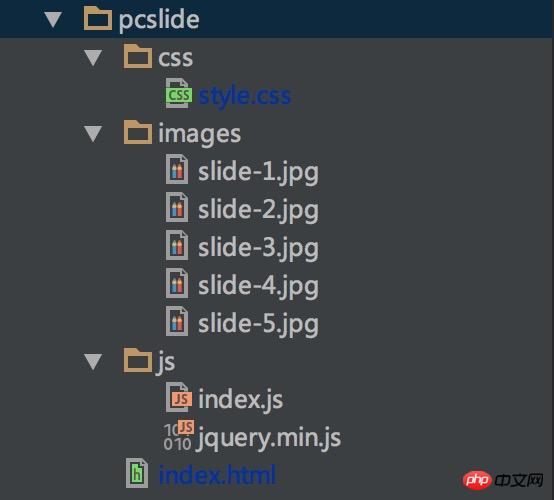
The code directory results are as follows:

##1. index.html
Note: Here are 5 pictures as an example. The actual carousel on the page shows users 5 different pictures. However, for the sake of the continuity of the carousel effect, a fifth picture is added in front of the first picture and after the fifth picture. The first picture, so there are 7 pictures in the demo structure, and the size of each picture must be the same (the width and height here are 720*350px).<!DOCTYPE html>
<html lang="en">
<head>
<meta charset="UTF-8">
<title>PC-jquery版轮播图</title>
<link rel="stylesheet" href="css/style.css" rel="external nofollow" >
</head>
<body>
<p class="layout">
<h2 style="text-align: center;">PC-jquery版轮播图</h2>
<p class="slide" id="slide">
<p id="outer" class="outer">
<ul id="inner" class="inner">
<li><a href="http://www.baidu.com" rel="external nofollow" rel="external nofollow" rel="external nofollow" rel="external nofollow" rel="external nofollow" rel="external nofollow" rel="external nofollow" ><p>图片-5</p><img src="images/slide-5.jpg"></a></li>
<li><a href="http://www.baidu.com" rel="external nofollow" rel="external nofollow" rel="external nofollow" rel="external nofollow" rel="external nofollow" rel="external nofollow" rel="external nofollow" ><p>图片-1</p><img src="images/slide-1.jpg"></a></li>
<li><a href="http://www.baidu.com" rel="external nofollow" rel="external nofollow" rel="external nofollow" rel="external nofollow" rel="external nofollow" rel="external nofollow" rel="external nofollow" ><p>图片-2</p><img src="images/slide-2.jpg"></a></li>
<li><a href="http://www.baidu.com" rel="external nofollow" rel="external nofollow" rel="external nofollow" rel="external nofollow" rel="external nofollow" rel="external nofollow" rel="external nofollow" ><p>图片-3</p><img src="images/slide-3.jpg"></a></li>
<li><a href="http://www.baidu.com" rel="external nofollow" rel="external nofollow" rel="external nofollow" rel="external nofollow" rel="external nofollow" rel="external nofollow" rel="external nofollow" ><p>图片-4</p><img src="images/slide-4.jpg"></a></li>
<li><a href="http://www.baidu.com" rel="external nofollow" rel="external nofollow" rel="external nofollow" rel="external nofollow" rel="external nofollow" rel="external nofollow" rel="external nofollow" ><p>图片-5</p><img src="images/slide-5.jpg"></a></li>
<li><a href="http://www.baidu.com" rel="external nofollow" rel="external nofollow" rel="external nofollow" rel="external nofollow" rel="external nofollow" rel="external nofollow" rel="external nofollow" ><p>图片-1</p><img src="images/slide-1.jpg"></a></li>
</ul> <!--底部小圆点-->
<ol class="dot" id="dot">
<li class="active"></li>
<li></li>
<li></li>
<li></li>
<li></li>
</ol>
</p>
<!--左右两侧的点击切换按钮-->
<p class="arrow-box">
<p class="arrow arrow-l" id="arrow_l">‹</p>
<p class="arrow arrow-r" id="arrow_r">›</p>
</p>
</p>
</p>
<script src="js/jquery.min.js"></script>
<script src="js/index.js"></script>
</body>
</html>2. style.css
* {
 margin: 0;
 padding: 0;
 box-sizing: border-box;
}
.layout {
 width: 1000px;
 margin: 30px auto;
}
ul,ol,li {
 list-style: none;
}
.slide {
 position: relative;
 width: 900px;
 margin:auto;
}
.slide .outer {
 position: relative;
 margin: 30px auto;
 width: 720px;
 height: 400px;
 overflow: hidden;
}
.slide .outer .inner {
 width: 5040px;
 height: 350px;
 position: absolute;
 left: -720px;
 top: 0;
}
.slide .outer .inner li {
 float: left;
 height: 350px;
}
.slide .outer .inner li a {
 display: block;
 position: relative;
 width: 100%;
 height: 100%;
}
.slide .outer .inner li a p {
 position: absolute;
 left: 0;
 bottom: 0;
 color: #fff;
 font-size: 18px;
 width: 720px;
 height: 80px;
 line-height: 80px;
 padding-left: 50px;
 background: linear-gradient(180deg,rgba(0,0,0,0), rgba(0,0,0,0.5));
}
.slide .outer .dot {
 margin-top: 365px;
 text-align: center;
}
.slide .outer .dot li {
 height: 6px;
 width: 6px;
 border-radius: 3px;
 background-color: #d2cbcb;
 display: inline-block;
 margin: 0 3px;
}
.slide .outer .dot li.active {
 background-color: #6e5ca5;
}
.slide .arrow-box {
 position: absolute;
 width: 900px;
 height: 60px;
 top: 150px;
 left: 0;
}
.slide .arrow-box .arrow {
 width: 60px;
 height: 60px;
 line-height: 60px;
 text-align: center;
 border-radius: 30px;
 background-color: #dde2e6;
 font-size: 60px;
 color: #999;
 cursor: pointer;
}
.slide .arrow-box .arrow.arrow-l {
 float: left;
}
.slide .arrow-box .arrow.arrow-r {
 float: right;
}3. index.js
Note: In the js code, each Variables are annotated. In order to prevent the animation from stopping due to rapid multiple clicks, stop(false,true) is called here every time the image is switched. But please note that when scrolling to the left, after scrolling to the last picture, do not use stop(false,true) when switching again, but instantly locate the first picture (actually the third picture in the dom structure). (two pictures), similarly, when scrolling to the right, after scrolling to the first picture, there is no need to stop (false, true) when switching again, but to instantly locate the last picture (actually a dom structure the second to last picture in ).var interval = 3000; //轮播间隔时间
var arrowL = $('#arrow_l'); //左侧箭头
var arrowR = $('#arrow_r'); //右侧箭头
var slideBox = $('#slide'); //轮播图区域
var innerBox = $('#inner'); //内层大盒子
var img = innerBox.children('li'); //每个图片
var dot = $('#dot'); //小圆点盒子
var imgW = $(img[0]).outerWidth(); //每个li标签的宽度
var imgCount = 5; //总图片个数(不同图片的个数)(实际dom上是有7张)
var i = 0; //初始化为第0张图片
timer = null; //定时器
//自动轮播
timer = setInterval(function () {
i++;
innerBox.stop(false, true).animate({'left':-i*imgW+'px'},300)
dot.find('li').removeClass('active').eq(i-1).addClass('active')
if(i > imgCount){
innerBox.animate({'left':-1*imgW+'px'},0);
dot.find('li').removeClass('active').eq(0).addClass('active')
i = 1;
}
},interval)
//点击右侧箭头,播放下一张
arrowR.click(function () {
i++;
innerBox.stop(false, true).animate({'left':-i*imgW+'px'},300)
dot.find('li').removeClass('active').eq(i-1).addClass('active')
if(i > imgCount){
innerBox.animate({'left':-1*imgW+'px'},0);
dot.find('li').removeClass('active').eq(0).addClass('active')
i = 1;
}
})
//点击左侧箭头,播放上一张
arrowL.click(function () {
i--;
innerBox.stop(false, true).animate({'left':-i*imgW+'px'},300)
dot.find('li').removeClass('active').eq(i-1).addClass('active')
if(i < 1){
innerBox.animate({'left':-imgCount*imgW+'px'},0);
dot.find('li').removeClass('active').eq(imgCount-1).addClass('active')
i = imgCount;
}
})
//鼠标经过轮播图区域时,清除定时器,停止自动轮播
slideBox.mouseenter(function () {
clearInterval(timer);
})
//鼠标离开轮播图区域时,重新启动自动轮播
slideBox.mouseleave(function () {
timer = setInterval(function () {
i++;
innerBox.stop(false, true).animate({'left':-i*imgW+'px'},300)
dot.find('li').removeClass('active').eq(i-1).addClass('active')
if(i > imgCount){
innerBox.animate({'left':-1*imgW+'px'},0);
dot.find('li').removeClass('active').eq(0).addClass('active')
i = 1;
}
},interval)
})4. Rendering display

 ##The above is what I compiled for you. I hope it will be helpful to everyone in the future.
Related articles:
New features of webpack 4.0.0-beta.0 version (detailed tutorial)In vue2.0 component How to implement value transfer and communicationUse SpringMVC to solve vue cross-domain requestsThe above is the detailed content of How to write a PC-side carousel using jquery (detailed tutorial). For more information, please follow other related articles on the PHP Chinese website!

Hot AI Tools

Undresser.AI Undress
AI-powered app for creating realistic nude photos

AI Clothes Remover
Online AI tool for removing clothes from photos.

Undress AI Tool
Undress images for free

Clothoff.io
AI clothes remover

AI Hentai Generator
Generate AI Hentai for free.

Hot Article

Hot Tools

Notepad++7.3.1
Easy-to-use and free code editor

SublimeText3 Chinese version
Chinese version, very easy to use

Zend Studio 13.0.1
Powerful PHP integrated development environment

Dreamweaver CS6
Visual web development tools

SublimeText3 Mac version
God-level code editing software (SublimeText3)

Hot Topics
 1376
1376
 52
52
 Detailed explanation of jQuery reference methods: Quick start guide
Feb 27, 2024 pm 06:45 PM
Detailed explanation of jQuery reference method: Quick start guide jQuery is a popular JavaScript library that is widely used in website development. It simplifies JavaScript programming and provides developers with rich functions and features. This article will introduce jQuery's reference method in detail and provide specific code examples to help readers get started quickly. Introducing jQuery First, we need to introduce the jQuery library into the HTML file. It can be introduced through a CDN link or downloaded
 How to remove the height attribute of an element with jQuery?
Feb 28, 2024 am 08:39 AM
How to remove the height attribute of an element with jQuery? In front-end development, we often encounter the need to manipulate the height attributes of elements. Sometimes, we may need to dynamically change the height of an element, and sometimes we need to remove the height attribute of an element. This article will introduce how to use jQuery to remove the height attribute of an element and provide specific code examples. Before using jQuery to operate the height attribute, we first need to understand the height attribute in CSS. The height attribute is used to set the height of an element
 How to use PUT request method in jQuery?
Feb 28, 2024 pm 03:12 PM
How to use PUT request method in jQuery? In jQuery, the method of sending a PUT request is similar to sending other types of requests, but you need to pay attention to some details and parameter settings. PUT requests are typically used to update resources, such as updating data in a database or updating files on the server. The following is a specific code example using the PUT request method in jQuery. First, make sure you include the jQuery library file, then you can send a PUT request via: $.ajax({u
 In-depth analysis: jQuery's advantages and disadvantages
Feb 27, 2024 pm 05:18 PM
jQuery is a fast, small, feature-rich JavaScript library widely used in front-end development. Since its release in 2006, jQuery has become one of the tools of choice for many developers, but in practical applications, it also has some advantages and disadvantages. This article will deeply analyze the advantages and disadvantages of jQuery and illustrate it with specific code examples. Advantages: 1. Concise syntax jQuery's syntax design is concise and clear, which can greatly improve the readability and writing efficiency of the code. for example,
 jQuery Tips: Quickly modify the text of all a tags on the page
Feb 28, 2024 pm 09:06 PM
Title: jQuery Tips: Quickly modify the text of all a tags on the page In web development, we often need to modify and operate elements on the page. When using jQuery, sometimes you need to modify the text content of all a tags in the page at once, which can save time and energy. The following will introduce how to use jQuery to quickly modify the text of all a tags on the page, and give specific code examples. First, we need to introduce the jQuery library file and ensure that the following code is introduced into the page: <
 Use jQuery to modify the text content of all a tags
Feb 28, 2024 pm 05:42 PM
Title: Use jQuery to modify the text content of all a tags. jQuery is a popular JavaScript library that is widely used to handle DOM operations. In web development, we often encounter the need to modify the text content of the link tag (a tag) on the page. This article will explain how to use jQuery to achieve this goal, and provide specific code examples. First, we need to introduce the jQuery library into the page. Add the following code in the HTML file:
 How to tell if a jQuery element has a specific attribute?
Feb 29, 2024 am 09:03 AM
How to tell if a jQuery element has a specific attribute? When using jQuery to operate DOM elements, you often encounter situations where you need to determine whether an element has a specific attribute. In this case, we can easily implement this function with the help of the methods provided by jQuery. The following will introduce two commonly used methods to determine whether a jQuery element has specific attributes, and attach specific code examples. Method 1: Use the attr() method and typeof operator // to determine whether the element has a specific attribute
 Understand the role and application scenarios of eq in jQuery
Feb 28, 2024 pm 01:15 PM
jQuery is a popular JavaScript library that is widely used to handle DOM manipulation and event handling in web pages. In jQuery, the eq() method is used to select elements at a specified index position. The specific usage and application scenarios are as follows. In jQuery, the eq() method selects the element at a specified index position. Index positions start counting from 0, i.e. the index of the first element is 0, the index of the second element is 1, and so on. The syntax of the eq() method is as follows: $("s


