

How to write todolist component using vue?
This article mainly introduces the example explanation of the todolist component written in the vue component. This article introduces it to you in very detail. Friends who need it can refer to it.
We insert a todolist sub-component on the topNav page.
I don’t know what’s going on, the markdown code here is always serial. . So the code is uncomfortable to read, so forgive me, I will finally put the source code address of github.
1. Register the subcomponent in the parent component topNav and introduce the subcomponent
<template>
 <p>
  <p>下面这一行就是定义的组件名称</p>
  <todo-list></todo-list>
  <router-view></router-view>
 </p>
</template>
<script>
/*
1. Introduce our subcomponent drawerLayout through import
2. Introduce the subcomponent and Rename it todoList, and then register it in the components group
3. Use the component in the form of html tags in our template, todoList is
Note:
(1) The name of the subcomponent does not matter, but the first letter of the second word of the subcomponent name todoList we introduced must be capitalized (otherwise you will Trap)
(2) When using tags, todoList is todo-list, which is written in camel case nomenclature (in layman’s terms, it means changing the uppercase first letter of the second word to lowercase, and then adding A "-")
*/
import todoList from '../components/todoList.vue'
 export default {
  components: {
   todoList
  },
  data() {
   return {
   };
  }
 }
</script>2. Let’s take a look at the function of the component first
First of all, let’s take a general look at what the component looks like, and then I will figure out how to write it
The first thing we see is an input input box, which displays edit... by default. When we do not add data, "No content yet" is displayed below

Then, We enter the data "first example" and hit Enter, a list will appear
list including a radio button, text, and a delete button
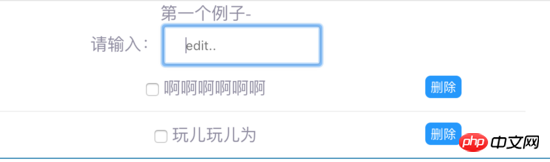
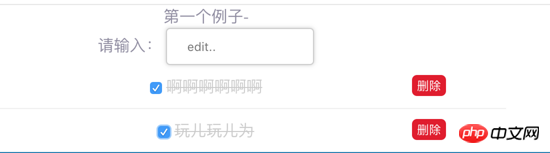
How to delete it? Since we are going to do it, we must do a little more functions and use some internal commands. The deletion rule we set is
First select the list, then click delete, and then the record will be gone. If After deleting this data, there will be no list, and "no content yet" will be displayed
3. Start writing our todo sub-component
I put the styles in the code at the end, so you can ignore some classes at this moment
Let’s set up the general framework of this todolist first, and then add functions to it
<template>
<p class="ex1">
<p class="input-text">
<label for="inputNum">请输入:</label>
<input type="text"
id="inputNum"
name="inputNum"
placeholder="edit..">
<!--列表内容-->
<ul>
<li>
<input type="checkbox" >
<span>dd</span>
<button>删除</button>
</li>
</ul>
<p class="empty" v-if="!inputList.length">暂无内容</p>
</p>
</p>
</template>
<script>
export default {
data () {
return {
inputList: [],
inputItem: {
content: '',
finished: false,
deleted: false
}
}
},
methods: {
//将输入框的数据添加到list中
addItem: function() {}
//改变选中状态
changeState: function(index) {},
//删除列表元素
deleteItem: function(index) {}
}
}
</script>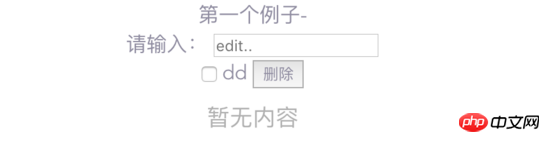
Next, I won’t update the code for each small step, because the space is too large, I will write a more functional block (I will be very detailed)
First of all, let’s clarify the following ideas
Enter data in the input box, and press Enter to display a list list below (including a radio button, the entered data, blue Operation button)
Bidirectionally bind the value of the input box to inputItem.content
Bind the enter event (@keydown.13) to the input box to the addItem method, each time you enter Press Enter to add the data in the input box to the list list (inputList array)
Use the v-for command to traverse the values in the inputList and display them
Select the radio button, list The content becomes a delete effect (a horizontal line is drawn through the middle), and the blue operation button turns into a red delete button. Clicking the button will delete the column list
Bind the checked of the radio button to the finished of the inputItem After binding, you can use this finished to do other things
The button of the list just added to the list content is a blue operation button. If we want to check whether the radio button is selected or not, There are two states to add and remove a class to the content sub-section (the deletion effect mentioned above), and to turn the button into a red delete button. Then you can bind the changeState method to operate
that delete functions? First, we need to select the list row and then click Delete to delete the row of data, right. So we bind the button to a deleteItem method. What the method does is to first detect whether the finished row is true. If it is true, then we delete the row data
We first complete the adding function: after input Enter data into the box and press Enter. A list of lines will be displayed below (including radio button boxes, entered data, and delete buttons)
<template>
<p class="ex1">
<p class="input-text">
<label for="inputNum">请输入:</label>
<!--@keydow.13表示回车的事件-->
<!--v-model是为了让输入的数据和inputItem.content同步-->
<input type="text" id="inputNum" name="inputNum" placeholder="edit.."
@keydown.13="addItem" v-model="inputItem.content" class="edit"
>
<!--列表内容-->
<ul class="task">
<li v-for="(key, item) in inputList">
<input type="checkbox" :checked="item.finished">
<span>{{key.content}}</span>
<button class="del">删除</button>
</li>
</ul>
<p class="empty" v-if="!inputList.length">暂无内容</p>
</p>
</p>
</template>
<script>
export default {
data () {...省略 },
methods: {
addItem: function() {
this.inputList.push(this.inputItem);
/*
为什么我们要对inputItem再次初始化?
解答:因为每次在输入框中输入数据,都会同时改变inputItem的content属性,
然后我们点击回车,该inputItem的整个对象都添加进inputList中,
按正常逻辑来说,inputList内的内容和inputItem是没有联系了。
如果我们此时不对inputItem进行再次初始化,那么就会发现你再次在输入框中输入数据的时候,
会同时改变下面的list的值,简易你们把初始化的代码去掉,运行下试试看!
*/
this.inputItem = {
content: '',
finished: false,
deleted: false
};
},
//改变选中状态
changeState: function(index) {},
//删除列表元素
deleteItem: function(index) {}
}
}
</script>Let’s first look at the code for the list content
<!--列表内容-->
<ul class="task">
<li v-for="(item, index) in inputList">
<!--单选框绑定了item.finished,还添加了点击事件-->
<input type="checkbox"
:checked="item.finished"
@click="changeState(index)"
>
<!--通过item.finished值来动态绑定class-->
<span :class="{'finish':item.finished}">{{item.content}}</span>
<!--按钮的颜色通过动态添加class来实现,然后按钮的文本通过改变isDel来实现,isDel的改变也是通过changeState方法来操作的-->
<button @click="deleteItem(index)"
class="del"
:class="{'native':item.finished === true}"
>{{isDel}}</button>
</li>
</ul>
<p class="empty" v-if="!inputList.length">暂无内容</p>Then we Explain the changeState method
//改变选中状态
   changeState: function (index) {
    // this.inputList[index].finished = true 错误:这样如果点击第二次,无法回到false,就会一直true状态
    this.inputList[index].finished = !this.inputList[index].finished;
    // 根据finished的值来对应的修改isDel的值,isDel的值就是按钮的文本
    if (this.inputList[index].finished) {
   this.isDel = '删除'
    }else {
     this.isDel = '操作'
 }
   },
//删除列表元素
   deleteItem: function (index) {
   if (this.inputList[index].finished) {
    his.inputList.splice(index,1);
   }
}The above is what I compiled for everyone. I hope it will be helpful to everyone in the future.
Related articles:
How to use AngularJS to implement the function of downloading excel files
How to configure config in vue (detailed tutorial)
How to implement multi-object movement in JS (detailed tutorial)
The above is the detailed content of How to write todolist component using vue?. For more information, please follow other related articles on the PHP Chinese website!

Hot AI Tools

Undresser.AI Undress
AI-powered app for creating realistic nude photos

AI Clothes Remover
Online AI tool for removing clothes from photos.

Undress AI Tool
Undress images for free

Clothoff.io
AI clothes remover

Video Face Swap
Swap faces in any video effortlessly with our completely free AI face swap tool!

Hot Article
Hot Tools

Notepad++7.3.1
Easy-to-use and free code editor

SublimeText3 Chinese version
Chinese version, very easy to use

Zend Studio 13.0.1
Powerful PHP integrated development environment

Dreamweaver CS6
Visual web development tools

SublimeText3 Mac version
God-level code editing software (SublimeText3)
Hot Topics


 How to use bootstrap in vue
Apr 07, 2025 pm 11:33 PM
How to use bootstrap in vue
Apr 07, 2025 pm 11:33 PM
Using Bootstrap in Vue.js is divided into five steps: Install Bootstrap. Import Bootstrap in main.js. Use the Bootstrap component directly in the template. Optional: Custom style. Optional: Use plug-ins.
 How to add functions to buttons for vue
Apr 08, 2025 am 08:51 AM
How to add functions to buttons for vue
Apr 08, 2025 am 08:51 AM
You can add a function to the Vue button by binding the button in the HTML template to a method. Define the method and write function logic in the Vue instance.
 How to use watch in vue
Apr 07, 2025 pm 11:36 PM
How to use watch in vue
Apr 07, 2025 pm 11:36 PM
The watch option in Vue.js allows developers to listen for changes in specific data. When the data changes, watch triggers a callback function to perform update views or other tasks. Its configuration options include immediate, which specifies whether to execute a callback immediately, and deep, which specifies whether to recursively listen to changes to objects or arrays.
 What does vue multi-page development mean?
Apr 07, 2025 pm 11:57 PM
What does vue multi-page development mean?
Apr 07, 2025 pm 11:57 PM
Vue multi-page development is a way to build applications using the Vue.js framework, where the application is divided into separate pages: Code Maintenance: Splitting the application into multiple pages can make the code easier to manage and maintain. Modularity: Each page can be used as a separate module for easy reuse and replacement. Simple routing: Navigation between pages can be managed through simple routing configuration. SEO Optimization: Each page has its own URL, which helps SEO.
 How to reference js file with vue.js
Apr 07, 2025 pm 11:27 PM
How to reference js file with vue.js
Apr 07, 2025 pm 11:27 PM
There are three ways to refer to JS files in Vue.js: directly specify the path using the <script> tag;; dynamic import using the mounted() lifecycle hook; and importing through the Vuex state management library.
 How to return to previous page by vue
Apr 07, 2025 pm 11:30 PM
How to return to previous page by vue
Apr 07, 2025 pm 11:30 PM
Vue.js has four methods to return to the previous page: $router.go(-1)$router.back() uses <router-link to="/" component window.history.back(), and the method selection depends on the scene.
 How to use vue traversal
Apr 07, 2025 pm 11:48 PM
How to use vue traversal
Apr 07, 2025 pm 11:48 PM
There are three common methods for Vue.js to traverse arrays and objects: the v-for directive is used to traverse each element and render templates; the v-bind directive can be used with v-for to dynamically set attribute values for each element; and the .map method can convert array elements into new arrays.
 How to jump to the div of vue
Apr 08, 2025 am 09:18 AM
How to jump to the div of vue
Apr 08, 2025 am 09:18 AM
There are two ways to jump div elements in Vue: use Vue Router and add router-link component. Add the @click event listener and call this.$router.push() method to jump.
