

Apply third-party verification code in Vue project
This time I will bring you what are the precautions for applying third-party verification codes in Vue projects. The following is a practical case, let’s take a look.
What is Tencent verification code? It looks like this...:point_down:
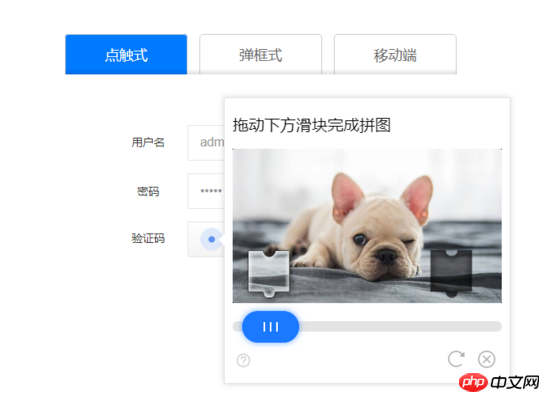
Recent company projects require the introduction of Tencent Cloud verification. The requirements are as follows: In order to prevent others from maliciously swiping SMS verification codes, when users short When you get the verification code multiple times within a certain period of time, you need to call Tencent Verification Code. After the verification is successful, the verification code will continue to be sent automatically. At first, I was confused. There were not many related articles in the online search. However, now I am connected. La, discovery is a very simple thing (perhaps because it is too simple, so no one writes 2333...)
Not much BB, let’s get started!
Let’s first look at the interface calling process of the document:

(Document address: cloud.tencent.com/document/pr… )
It is divided into several small steps:
The background goes to Tencent Cloud to obtain a JS address;
-
The background passes it to the front end through the interface;
The front end loads the verification code based on the JS address;
After successful verification, you will get a ticket (which is a bunch of strings), and then pass it Verify the ticket to the background;
. If passed, you will receive a SMS (or email) verification code.
If we don’t care about the backend, what do we need to do on the front end?
First add a label: point_down: in the .vue component that needs to introduce Tencent verification code:
Then when you frequently call the interface for sending text messages until the Tencent verification code is triggered (this judgment is told to you by the background, for example, the interface in our project passes There is an isShow variable in the JSON parameter. If it is equal to 1, Tencent Cloud verification will be triggered. The default state is 0, which means Tencent verification is not required. Ask your backend for specific conditions, manual work is funny)
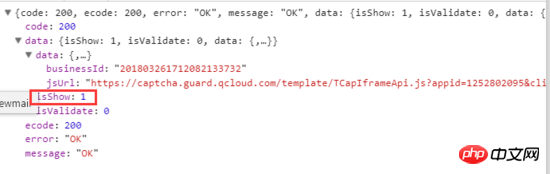
The picture above is the actual interface callback in our project. You can see that there is a Js address and businessId in the callback;
This Js address is how you get cloud verification. You need to write a method to dynamically add this Js to the body tag: point_down::
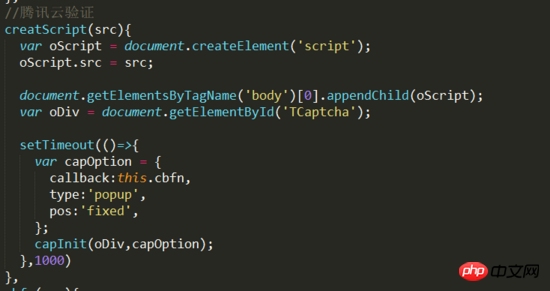
The parameter src is to pass the Js address when calling the verification code interface to return data. come over.
The capInit function is only available when you introduce Js, otherwise an error will be reported, so set a delay (the code is relatively simple, you can use promise).
Then this callback function is called after user verification, passing in json format verification parameters. :point_down:
//回调函数:验证码页面关闭时回调
cbfn(res) {
 if (res.ret == 0) {
  // 用户验证成功,获取到ticket,然后你需要将这个ticket和之前的businessId一起传给后台
  // 若后台验证成功,用户就可以收到验证码了,无需你再做其他操作
  alert(res.ticket);
  capDestroy()
 }
 else {
  //用户关闭验证码页面,没有验证
  capDestroy() //销毁之前创建的script标签
 }
}Repeat: The user verification is successful and the ticket is obtained. Then you need to pass this ticket and the previous businessId to the backend. If the background verification is successful, the user can receive the verification code without you needing to do other operations
Finally (copy)capInit(iframe_p, options) This function, options is a Json object, multiple parameters can be set. :point_down:
1. iframe_p (required): element that embeds the verification code iframe.
2. options: {callback:xxx,showheader:xxx, themeColor:xxxxxx,type:"embed"}, json format object
callback: Verification code page closing callback function . After the user is authenticated, this function will be called and the json format verification parameters will be passed in.
{ret:xxx,ticket:"xxx"}
ret=0 means the user verification is completed and the business can verify the ticket;
ret=1 means the user has not been verified Verification code, there is no ticket parameter at this time.
Parameter ticket needs to be submitted to the business backend. For specific fields to fill in, please refer to the backend server development section later.
themeColor: Set the theme color of the page, the value is a hexadecimal color, such as ff572d. After setting, the buttons and icons on the page will change to the set color
showHeader
: Display the header of the verification code page (return and help, only valid for mobile pages)false: Do not display
type: Optional option on the PC side to configure the style of the verification code. For specific style performance, please check the official website of the verification code
"point": Triggered (default)
"embed": Embedded
"popup": Pop-up style
pos: Set the position attribute of the pop-up verification code. This parameter is only valid for PC pop-up verification code.
absolute: Absolute positioning
fixed: Absolute relative to the browser window Positioning
static: Static positioning
relative: Relative positioning
keepOpen: Set the page attribute that passes the verification
false: Refresh the verification pass (default)
lang: Set the verification code language type
Simplified Chinese: 2052 (default)
Traditional Chinese: 1028
English: 1033
To Remember to call capDestroy() in time to destroy the script tag you created, otherwise there will be many script tags...
The document says to call capDestroy() before calling capInit(), but I tried it, but it didn't work, so I finally put it in the callback. Regardless of whether the verification is successful or the user has not verified, and the verification pop-up window is closed, capDestroy() is called.
I believe you have mastered the method after reading the case in this article. For more exciting information, please pay attention to other related articles on the php Chinese website!
Recommended reading:
What steps are needed for vue cli webapck4
The above is the detailed content of Apply third-party verification code in Vue project. For more information, please follow other related articles on the PHP Chinese website!

Hot AI Tools

Undresser.AI Undress
AI-powered app for creating realistic nude photos

AI Clothes Remover
Online AI tool for removing clothes from photos.

Undress AI Tool
Undress images for free

Clothoff.io
AI clothes remover

AI Hentai Generator
Generate AI Hentai for free.

Hot Article
Hot Tools

Notepad++7.3.1
Easy-to-use and free code editor

SublimeText3 Chinese version
Chinese version, very easy to use

Zend Studio 13.0.1
Powerful PHP integrated development environment

Dreamweaver CS6
Visual web development tools

SublimeText3 Mac version
God-level code editing software (SublimeText3)
Hot Topics
 1378
1378
 52
52

 How to add functions to buttons for vue
Apr 08, 2025 am 08:51 AM
How to add functions to buttons for vue
Apr 08, 2025 am 08:51 AM
You can add a function to the Vue button by binding the button in the HTML template to a method. Define the method and write function logic in the Vue instance.
 How to reference js file with vue.js
Apr 07, 2025 pm 11:27 PM
How to reference js file with vue.js
Apr 07, 2025 pm 11:27 PM
There are three ways to refer to JS files in Vue.js: directly specify the path using the <script> tag;; dynamic import using the mounted() lifecycle hook; and importing through the Vuex state management library.
 How to use watch in vue
Apr 07, 2025 pm 11:36 PM
How to use watch in vue
Apr 07, 2025 pm 11:36 PM
The watch option in Vue.js allows developers to listen for changes in specific data. When the data changes, watch triggers a callback function to perform update views or other tasks. Its configuration options include immediate, which specifies whether to execute a callback immediately, and deep, which specifies whether to recursively listen to changes to objects or arrays.
 How to use bootstrap in vue
Apr 07, 2025 pm 11:33 PM
How to use bootstrap in vue
Apr 07, 2025 pm 11:33 PM
Using Bootstrap in Vue.js is divided into five steps: Install Bootstrap. Import Bootstrap in main.js. Use the Bootstrap component directly in the template. Optional: Custom style. Optional: Use plug-ins.
 How to return to previous page by vue
Apr 07, 2025 pm 11:30 PM
How to return to previous page by vue
Apr 07, 2025 pm 11:30 PM
Vue.js has four methods to return to the previous page: $router.go(-1)$router.back() uses <router-link to="/" component window.history.back(), and the method selection depends on the scene.
 Vue realizes marquee/text scrolling effect
Apr 07, 2025 pm 10:51 PM
Vue realizes marquee/text scrolling effect
Apr 07, 2025 pm 10:51 PM
Implement marquee/text scrolling effects in Vue, using CSS animations or third-party libraries. This article introduces how to use CSS animation: create scroll text and wrap text with <div>. Define CSS animations and set overflow: hidden, width, and animation. Define keyframes, set transform: translateX() at the beginning and end of the animation. Adjust animation properties such as duration, scroll speed, and direction.
 How to query the version of vue
Apr 07, 2025 pm 11:24 PM
How to query the version of vue
Apr 07, 2025 pm 11:24 PM
You can query the Vue version by using Vue Devtools to view the Vue tab in the browser's console. Use npm to run the "npm list -g vue" command. Find the Vue item in the "dependencies" object of the package.json file. For Vue CLI projects, run the "vue --version" command. Check the version information in the <script> tag in the HTML file that refers to the Vue file.
 How to use function intercept vue
Apr 08, 2025 am 06:51 AM
How to use function intercept vue
Apr 08, 2025 am 06:51 AM
Function interception in Vue is a technique used to limit the number of times a function is called within a specified time period and prevent performance problems. The implementation method is: import the lodash library: import { debounce } from 'lodash'; Use the debounce function to create an intercept function: const debouncedFunction = debounce(() => { / Logical / }, 500); Call the intercept function, and the control function is called at most once in 500 milliseconds.
